DROPS Super Sale · 5 miękkich wełnianych włóczek 30% TANIEJ

Jak odczytywać schematy w robótce na szydełku

Szydełkowy schemat składa się z symboli. 1 symbol = 1 oczko (lub grupa oczek) – legenda do symbolu wyjaśnia o jakie oczko chodzi/jak je przerobić. Schemat pokazuje wszystkie oczka, widok na prawej stronie robótki (o ile nie określono inaczej).

Typowy schemat na szydełku wygląda następująco:
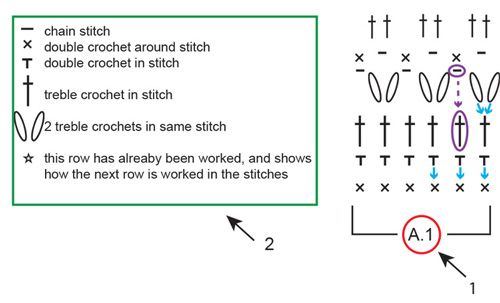
1: 1. A.1 to nazwa schematu i odnosi się do całego schematu – w nawiasach. Wszystko w nawiasach stanowi 1 powtórzenie schematu.
2: 2. To legenda do schematu, co oznacza jak przerabiać każdy symbol.
Niebieskie strzałki: Ten symbol jest przerabiany w lub wokół oczka, które znajduje się bezpośrednio pod nim w schemacie. Czasami kilka oczek jest przerabianych w/wokół tego samego oczka.
Fioletowe owalne oznaczenia i strzałki: Nie przerabiamy we wszystkie oczka, na przykład czasami wykonujemy oczko łańcuszka i omijamy oczko, które znajduje się poniżej.

Schemat jest odczytywany, odwrotnie do czytania np. książki: od prawej do lewej strony, od dołu do góry. Inaczej mówiąc, zaczynamy od symbolu w prawym dolnym rogu i dalej w lewą stronę i do góry (patrz CZERWONE oznaczenia na schemacie poniżej).

Jeżeli należy powtórzyć kilka razy ten sam schemat (tzn. przerabiać ten sam schemat kilka razy na szerokość w rzędzie/okrążeniu), będziemy go przerabiać do końca rzędu i zaczynać kolejny motyw ponownie od pierwszego oczka.
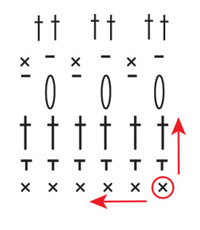
W tę i z powrotem:

Gdy przerabiamy w tę i z powrotem, co drugi rząd będzie przerabiany na prawej stronie robótki i co drugi rząd będzie przerabiany na lewej stronie robótki. Gdy przerabiany na lewej stronie robótki, schemat będzie czytany w odwrotnym kierunku: czyli od lewej do prawej (patrz czerwona strzałka na prawej stronie robótki i niebieska na lewej stronie).

Rząd zaczyna się od pewnej konkretnej liczby oczek łańcuszka – zależy ona od wysokości następnego przerabianego oczka i umożliwia rozpoczęcie robótki na tej samej wysokości (patrz zielone owalne symbole poniżej). Jeżeli oczka łańcuszka są dodane w schemacie (jak w naszym przykładzie), wszystkie oczka są przerabiane dokładnie zgodnie ze schematem. Czasami jednak na początku opisu pojawia się WSKAZÓWKA, która mówi ile oczek łańcuszka będzie trzeba wykonać na początku każdego rzędu, oraz czy te oczka łańcuszka zastępują (czy nie) pierwsze oczko w rzędzie. Jeżeli oczka łańcuszka NIE są włączone do schematu, postępuj zgodnie ze WSKAZÓWKĄ.

Na okrągło:

Gdy przerabiamy na okrągło, wszystkie okrążenia są wykonywane na prawej stronie robótki: od prawej do lewej strony (patrz czerwone strzałki poniżej). Początek i koniec okrążeń jest często wyjaśniony w schemacie (patrz schemat A.2 poniżej – zielona ramka). Tak jak gdy przerabiamy w tę i z powrotem, tak i tutaj okrążenia zaczynają się od pewnej liczby oczek łańcuszka, odpowiadającej wysokości następnego oczka. Okrążenie zazwyczaj kończymy przerabiając jedno oczko zamykające w ostatnie z oczek łańcuszka na początku okrążenia (patrz niebieska ramka poniżej). Inaczej mówiąc: oczka łańcuszka schematu A.2 = początek okrążenia, a oczka zamykające schematu A.2 = koniec okrążenia.

Jeżeli mamy przerobić kilka razy schemat (A.1) (tzn. powtórzyć go kilka razy na szerokość), przerabiamy do ostatniego oczka, a następnie zaczynamy ponownie od pierwszego oczka memu tym samym rzędzie schematu A.1. UWAGA: w tym przykładzie powtarzamy TYLKO schemat A.1, schemat A.2 pokazuje początek i koniec okrążenia.

Kilka schematów przerabianych kolejno po sobie w rzędzie/okrążeniu:

Jeżeli mamy przerabiać kilka schematów, jeden po drugim memu tym samym rzędzie/okrążeniu, robimy to następująco: przerabiamy 1-szy rząd schematu 1, następnie przerabiamy 1-szy rząd schematu 2, dalej 1-szy rząd schematu 3, itd. UWAGA: gdy przerabiamy w tę i z powrotem, na lewej stronie robótki trzeba czytać schematy w przeciwnym kierunku, tj. zaczynamy od schematu 3, dalej schemat 2 i kończymy przerabiając schemat 1. Schematy są również odczytywane w przeciwnym kierunku (= czyli od lewej do prawej strony), jak zwykle.

Schematy kołowe:

Gdy wykonujemy koło, zaczynamy pracę od środka robótki i dalej przerabiamy na boki, jest to przedstawione na schemacie kołowym. Schemat może pokazywać całe koło – w takim przypadku każdy symbol jest przedstawiany osobno, dokładnie jak ma być przerabiany. Schemat może również stanowić wycinek koła, który będzie przerabiany określoną liczbę razy, tak aby ostatecznie uzyskać pełne koło.

Pełne koło:

Gdy schemat przedstawia całe koło, zaczynamy od symbolu na środku schematu: zazwyczaj kółeczka przedstawiającego konkretną liczbę oczek łańcuszka zamkniętych na okrągło przez 1 oczko zamykające (tzw. pierścień podstawy, patrz poniżej). Tak jak przy przerabianiu na okrągło, okrążenia zaczynają się od pewnej określonej liczby oczek łańcuszka (odpowiadającej wysokości następnego symbolu) i kończą oczkiem zamykającym w ostatnie z tych oczek łańcuszka – odpowiednik schematu A.2 w poprzednim przykładzie (patrz niebieska ramka) – UWAGA: gdy ta początkowa liczba oczek łańcuszka występuje na schemacie, te oczka łańcuszka NIE zastępują innych symboli, a każdy z nich jest przerabiany oddzielnie, tak jak widzimy na schemacie. Jeżeli te oczka łańcuszka ZASTĘPUJĄ oczko, będzie to oczko odjęte ze schematu.

Przerabiamy w kierunku przeciwnym do ruchu wskazówek zegara: od prawej do lewej, 1 symbol za drugim (patrz czerwona strzałka poniżej). Oczka pierwszego okrążenia są generalnie przerabiane WOKÓŁ pierścienia podstawy, tzn. wkładamy szydełko W ŚRODEK pierścienia podstawy, łapiemy nitkę i przeciągamy ją przez pierścień podstawy (et przerabiamy oczko jak zwykle) – nie przerabiamy oczka W jedno z oczek łańcuszka, ale WOKÓŁ pierścienia podstawy. Na końcu okrążenia, łączymy się z jego początkiem przerabiając oczko zamykające, następnie rozpoczynamy drugie okrążenie schematu: drugie okrążenie jest kolejnym okrążeniem, jest najbliższe środka (patrz zielona strzałka).

Wycinek koła:

Jeżeli schemat przedstawia tylko wycinek (fragment) koła, to fragment ten będzie powtarzany określoną liczbę razy na szerokość (przez całe okrążenie), aby powstało całe koło. Zaczynamy od symbolu na dole (patrz czerwony okrąg) i przerabiamy jak w przypadku CAŁEGO KOŁA, ale będziemy powtarzać schemat A.2 określoną liczbę razy w okrążeniu. Tak jak przy przerabianiu na okrągło, jest zwykle oddzielny schemat jak zacząć i zakończyć okrążenie (patrz schemat A.1, w niebieskiej ramce poniżej). Zaczynamy od rzędu schematu najbliższego od pierścienia podstawy, na dole, przerabiamy oczko/a łańcuszka schematu A.1, dalej symbol/e schematu A.2 (w tym przykładzie jest tylko jeden symbol w 1-szym okrążeniu) i powtarzamy symbol/e schematu A.2 tyle razy ile jest w opisie.

Na końcu okrążenia kończymy przerabiając oczko zamykające schematu A.1. Gdy 1-sze okrążenie jest zakończone, przerabiamy 2-gie okrążenie: najbliższe pierścienia podstawy (patrz zielona strzałka poniżej).

Schematy żakardu/kolorów:

Niektóre szydełkowe schematy są schematami kwadratowymi, gdzie 1 kwadracik/pole = 1 oczko. Jakie oczko ma być przerabiane znajdziemy w opisie, a celem tego schematu jest pokazanie w jakim kolorze mają być przerabiane oczka (patrz czerwony okrąg poniżej = opis symboli).

Przerabiamy jak w opisie poniżej, W TĘ I Z POWROTEM, NA OKRĄGŁO lub PO OKRĘGU.

Komentarze (161)

Country flag Maria Randerly Cunha Feitosa napisała:

Excelente. Muito obrigado

06.01.2021 - 00:51

Country flag Maj-Britt Poulsen napisała:

Hej Jeg er helt vild med modellen JANIS - bluse med rude i Paris. Og vil gerne hækle den. Jeg kan ikke finde ud af at tyde diagrammer og vil spørge om ikke jeg kan finde opskriften på video. Håber du kan hjælpe mig. Godt nytår ☺

01.01.2021 - 15:57

Odpowiedź DROPS Design

Hei Maj-Britt. Ja, dette er virkelig en flott modell. Til denne modellen er det laget 2 hjelpevideoer, Hjelp til Halsfellingen og Hvordan hekle A.3. Å lage en video til hele genseren er dessverre ikke mulig, men håper hjelpevideoene og andre generelle videoer du finner under modellen kan hjelpe deg. God Fornøyelse!

11.01.2021 - 09:08

Country flag Hilde - Igjen napisała:

Jeg skal begynne på 2. omg og der står det "= omg med fm/lm" - skal det da kun hekles fm og lm på denne omgangen - før jeg går videre?

29.12.2020 - 12:34

Odpowiedź DROPS Design

Hei Hilde. I 2. omgang skal det kun hekles fastmasker og luftmasker. Om du ser på diagram A.1 (og A.2) hekles det en omgang med bare fastmasker og luftmasker, mens neste omgang hekles det kun staver (her økes det også i A.2). Altså alle omganger med partall, der hekles det kun fastmasker og luftmasker, mens omganger med oddetall hekles det kun staver. God Fornøyelse!

11.01.2021 - 08:56

Country flag Hilde napisała:

Gjelder Misty Mountain bærestykke:Når jeg skal hekle 2. omg og det står "hekle A1 over de første 10 stavene", så betyr ved det at jeg skal hekle 1. raden på A1over det de første stavene? Etter 2. omg: "repeter A1 i høyden og øk som vist i A2 samtidig økes det jevnt fordelt slik:" Blir dette starten på 3. omg? Har heklet mye - men dette mønsteret er ikke lett å forstå!

18.12.2020 - 16:34

Odpowiedź DROPS Design

Hei Hilde. 1. omgang i diagram A.1 og A.2 er forklart i oppskriftsteksten, den har også en stjerne markert i diagrammet (*). Når du har heklet 1. omgang har du 84 staver (str. S) og du starter nå på 2. omgang på diagram A.1 og A.2 (fastmasker og luftmasker). På 3. omgang hekler du kun staver og da økes det også når du hekler A.2. På 4. omgang hekles det fastmasker og luftmasker igjen, mens på 5. omgang hekles det kun staver og her økes det igjen (i A.2). Når du har heklet A.1 1 gang i høyden repeteres A.1 i høyden. God Fornøyelse!

11.01.2021 - 08:07

Country flag L H napisała:

Do you have your heart pattern written out. I can follow a written pattern but have a hard time with a diagram better. Thank you

09.12.2020 - 16:34

Odpowiedź DROPS Design

Dear LH, could you please ask your question on the pattern you would like to work? If there is only a diagram under the pattern page without any written explanation, this means there is only a diagram, but there might be a video showing how to crochet this pattern. Happy crocheting!

10.12.2020 - 09:30

Country flag Leanne napisała:

I need 183 stitches but am not sure where to add the extra stitches across the 155 that form the pattern, eg where do I add the extra 18 stitches to make 108 across the 90 that make up A.3a (3 repeats)? I presume 6 in each repeat but am not sure whether to add all 6 to the start of the A.3a row, the end or whatever. There are 2 chain stitches amongst the trebles in this row and I'm not sure where they should be positioned in relation to the extra stitches that I need to include. Thank you.

26.10.2020 - 00:47

Odpowiedź DROPS Design

Dear Leanne, could you please ask your question under the pattern you are working on? It will be then much easier for us to get the correct reference to help you. Thanks for your comprehension. Happy crocheting!

26.10.2020 - 13:37

Country flag Ursula Pereyra napisała:

Gracias por las explicaciones!!!, son de gran ayuda recien me inicié en este maravilloso mundo y gracias a sus patrones y explicaciones estoy tejiendo, Gracias!!! Estoy maravillada y sorprendida de mis logros!!!

17.10.2020 - 15:05

Country flag Patricia Bailey napisała:

A4,5,9 how many times then the next bit how many times ... totally confusing pattern, I ripped it out

03.10.2020 - 11:24

Odpowiedź DROPS Design

Dear Mrs Bailey, could you please ask your question in the question section of the pattern you are working on? This would help us to be able to assist you - remember to add the size worked as well as the part of the pattern you are stuck. Thanks for your comprehension!

05.10.2020 - 13:25

Country flag Nikki napisała:

Hi I have a crochet pattern here which I believe is one of your older ones as couldn’t find it on your site, but I need help following the diagram. I have horizontal lines in different lengths with no meaning, apart from the small one meaning a chain stitch. I say its your pattern as Drops Alpaca and Drops cotton viscose is used from the garn studios. I need help with this please. I can’t see a way of using photos to show you.. Thank you Nikki

16.08.2020 - 10:13

Odpowiedź DROPS Design

Dear Nikki, could you please ask your question in the "question" section of this pattern? It would be much easier for us to help you when we also can see the diagram and the diagram key. Thanks for your comprehension. Happy crocheting!

17.08.2020 - 10:25

Country flag Angela Jane Charles napisała:

You have a diagram of crochet stitches at the top, but in the pattern I am doing, I have 1) a stitch that appears in the diagram for the Fraction of a circle above: an upright line with a solid circle near the top. 2) two stitches that appear in the Full circle diagram: a solid oval and an outline oval with two solid dots in it. I can't find any step-by-step instruction on how to make these stitches, and the description in my pattern is not clear enough. Could you help me please?

02.08.2020 - 16:32

Odpowiedź DROPS Design

Dear Mrs Charles, could you please post your question under the pattern you are working on? It would be much easier for us to explain you. Thanks for your comprehension. Happy knitting!

03.08.2020 - 09:03

Country flag Mary napisała:

Thank you for the comprehensive explanations of different types of diagrams.

28.07.2020 - 01:42

Country flag Samantha napisała:

I brought this pattern because it states it has a tutorial video. Cant find it. Not very happy

26.06.2020 - 07:41

Odpowiedź DROPS Design

Dear Samantha, all our patterns are free - you are not supposed to buy them. There are videos for every patterns showing the different techniques used - but not all patterns do have their single videos - this page explains how to read a diagram. Feel free to ask your question in the pattern page or contact directly the store where you bought the yarn for any individual assistance. Happy crocheting!

26.06.2020 - 07:58

Country flag Kloe napisała:

Hi! Is it me or the pattern is weirdly written? At the end of a row, I'm used to do a slip stitch followed by a single crochet stitch, turn my work and start the next row. Now, you just turn and turn in the anticlockwise all the time? Is it because of the pattern at the beginning? Thanks in advance!

21.06.2020 - 23:50

Odpowiedź DROPS Design

Dear Kloe, this is the method how to work diagrams - there might be some difference from a pattern to another, these would then be explained in the pattern - feel free to ask your question on the pattern you are working on to be sure. Happy crocheting!

22.06.2020 - 09:19

Country flag Claire Menyuk napisała:

This is the first Drops pattern I am trying, and I feel completely confused by your diagrams. I am making 177-24. You say to work A.1b, then A.3 over the next 45 treble crochets, but they both not only go across, but up as well. Does this mean, I repeat the pattern for 6 rows up? You offer no videos of how to work these patterns. I'm so frustrated, I'm ready to give up before even starting.

12.06.2020 - 20:55

Odpowiedź DROPS Design

Dear Mrs Menyuk, A.1b shows how to start the rows, then you repeat 5 times the 9 sts in diagram A.3 in width (9 sts x 5 = over the next 45 sts). Happy crocheting!

15.06.2020 - 10:44

Country flag Connie napisała:

It would be nice if your video's had sound, explaining as she/he went along

06.06.2020 - 21:45

Odpowiedź DROPS Design

Dear Connie, Our videos do not have sound because we are a worldwide company and our videos are watched by people around the world, speaking different languages, many of whom do not understand English. We have therefore written instructions to accompany our videos, Happy crocheting!

08.06.2020 - 09:45

Country flag Cynthia napisała:

I bought DROPS pattern 190-21 (CA Dream top), and I’m really struggling with the diagrams. Do you offer them written out in English anywhere, or have some helpful resources I can use? I watched the linked video, and still have a lot of questions.

03.06.2020 - 07:25

Odpowiedź DROPS Design

Dear Cynthia, there is only diagrams to this pattern, with the help of this lesson you should be able to understand how to follow the diagrams, please feel free to ask your question in the pattern or request individual assistance from the store where you bought the yarn and remember our patterns are free, you were not supposed to buy it. Happy crocheting!

03.06.2020 - 07:42

Country flag Guadalupe napisała:

Por favor, me encantaría hacer este poncho serena, pero me cuesta entender el paso a paso. Tendrán otra forma de poder estudiarlo?? Muchas gracias. Espero su respuesta

26.05.2020 - 00:09

Country flag Maria De Rose napisała:

I am working a crochet pattern from a UK magazine. The written instruction tells me to continue the pattern using the chart for rows 3-61, however the chart rows shown begin at row 56. (The first 2 rows are completed using treble crochets). I consider myself an experienced crocheter but these instructions have somewhat stumped me. I also checked other pages and the back of the magazine but there are no other instructions.

25.05.2020 - 17:46

Odpowiedź DROPS Design

Dear Mrs De Rose, exept if this pattern is a DROPS pattern published on our website, I'm afraid we will not be able to help you there since we might not know the pattern. You are welcome to contact your yarn store for any individual asssitance, they will be able to assist you with the pattern. Happy crocheting!

26.05.2020 - 09:19

Country flag Patrizia napisała:

Buongiorno posso chiedere perche il lavoro mi si sposta e sembra inclinato verso destra cioe le righe non sono perfettamente dritte in verticale ?graie per l'aiuto

13.05.2020 - 09:32

Odpowiedź DROPS Design

Buongiorno Patrizia, all'inizio del giro lavora le catenelle indicate per girare? Buon lavoro!

04.06.2020 - 10:32

Country flag Leyla napisała:

Jag ska nu virka filten \\\"Sleepy times\\\" Drops baby 29-15 och tittar på diagrammet den är i A1, A2, A3 och A4 men mellan varje sektion så finns det en tjock linje som skiljevägg. Är det för att man ska veta när A1 slutar och A2 börjar? I vilket fall: är det så att i denna beskrivning så är rad 1-3 endast stolpar varvet ut i 3 varv? Det som förvirrar mig är att stolparna i A1 och A4 sitter täta däremot stolparna i A3 sitter isär. Betyder detta något?

08.05.2020 - 08:02

Odpowiedź DROPS Design

Hej Leyla, ja det er for at vise hvor du starter med de forskellige diagrammer. Det kan være en god ide at sætte en markør i hver overgang, til du er inde i mønsteret. God fornøjelse!

08.05.2020 - 13:43

Napisz komentarz lub pytanie do tej lekcji

Twój adres email nie będzie opublikowany. Pola obowiązkowe są oznaczone *.