DROPS Children 49 · Lots of new kid designs!

How to read knitting diagrams

A knitting diagram consists of squares. 1 square = 1 stitch - the symbol definition provide information on how the stitch is worked. The diagram shows all stitches seen from the right side (unless otherwise specified).

A diagram looks like this:
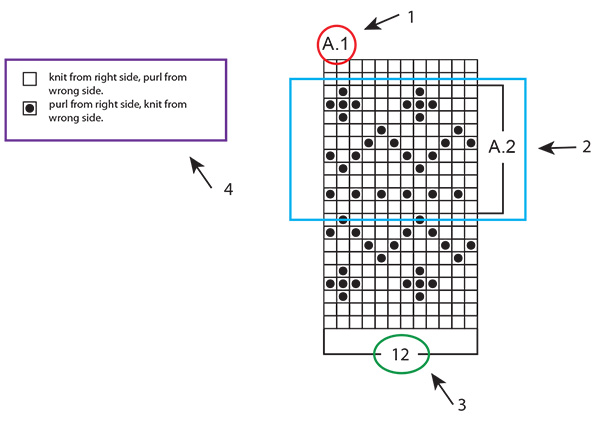
  1. A.1 is the name of the diagram, and refer to the entire diagram.
  2. A.2 is only the part of the diagram within the square brackets.
  3. This number refers to the number of stitches on the 1st row of the diagram.
  4. This is the symbol definition: it explains how each stitch is worked, or in what colour (in multicoloured patterns).

You read a knitting diagram completely opposite to how you would normally read: from right to left, from bottom to top. In other words: you start with the symbol in the bottom right corner, and work your way leftwards and upwards (see RED in diagram below). If you are supposed to start at a different point/with a different stitch, will this be specified - for example: the different sizes can start at different places in the same diagram (see BLUE box below).

If you are supposed to work several repeats of a diagram (ie: work the same diagram several times in width) you’ll work until the end of the diagram row, and start again with the first stitch for the next repeat.

Back and forth:

When working back and forth, every other row will be worked from the right side and every other row will be worked from the wrong side. Since the diagram shows all stitches seen from the right side, you’ll have to work it in opposite way when working from the wrong side (see BLUE arrows in diagram below): you read the row from left to right, knit stitches are purled, and purl stitches are knit etc (this will often be specified in symbol definition: “knit from right side, purl from wrong side”).

In the round:

When working in the round all rounds are worked from the right side, and the diagram is read solely from right to left. When starting a new round, simply start working the first symbol on the next row in diagram.

Several different diagrams worked consecutively on the row/round:

If you’re working several different diagrams after each other on the same row/round, work as follows: Work 1st row in diagram 1, continue with 1st row in diagram 2, then 1st row in diagram 3 etc. REMEMBER: if you’re working back and forth, the diagram will have to be worked in the opposite order from the wrong side - ie: start with diagram 3, then diagram 2 and lastly diagram 1. They are also worked in opposite way as usual.

In the pattern this can be written as follows: “work A.1, A.2, A.3 a total of 1-1-2-3-4 times”. This means that you first work A.1, then A.2 and finally you repeat A.3 a total of 1-1-2-3-4 times (depending on your size). It is ONLY A.3 that is repeated, A.1 and A.2 are worked 1 time each.

When stitch count doesn’t match whole repeats of diagram:

Sometimes the stitch count is not divisible with full/whole repeats of the diagram in width. For example: A.1 covers 12 stitches and is to be repeated over 40 stitches. In this case you will work 3 full repeats of A.1 (=36 stitches), and then work the first 4 stitches in the diagram over the remaining stitches (see RED line below). This is usually the case where the diagram is a repetitive pattern, so that regardless of working full repeats, the pattern will still be consistent.

Comments (678)

Country flag Mélodie wrote:

Bonjour, Je fais le modèle U-625. J'ai un décalage dans le motif M2 entre le début et la fin des rangs du pull. En effet ma dernière maille du rang 8 se retrouve à côté de la première maille du rang 9. Dois-je anticiper la démarcation et faire la dernière maille du rang 8 à la place de la dernière maille du rang 7 pour éviter le décalage dans le motif ? Merci d'avance pour votre réponse. Cordialement

18.12.2019 - 21:46

DROPS Design answered:

Bonjour Mélodie, en fonction des jacquards, la technique des rayures en rond peut aider, mais parfois, un léger décalage est inévitable. Bon tricot!

19.12.2019 - 08:46

Country flag Rachel wrote:

On the pattern for socks DROPS 100-19 at the bottom of the diagram M.2 what does "36 m str 40/42" mean in English? And on the side 16 p/v? Please email me a response. Thanks for your help!

18.12.2019 - 03:33

DROPS Design answered:

Dear Rachel, this means you are working M.2 over 36 stitches in size 40/42. Happy knitting!

18.12.2019 - 08:13

Country flag Jenny Timgren wrote:

Har ni några tips på enkla diagram att börja med? Har aldrig stickat efter diagram förut och skulle vilja göra en tunn sjal 🙂

17.12.2019 - 09:12

DROPS Design answered:

Hei Jenny. Anbefaler deg å bruke vår søkmotor. Skriv: Sjal under "Vad letar du efter?" Hak av for "Stickat", velg Dam under Alla Kategorier, velg "Hålmönster (mönster/teknikk) og velg A under "All Yarn Groups". Da har du mange fine sjal du kan velge med diagramme, f.eks DROPS 201-20 og 158-5 (med små diagram). God Fornøyelse!

27.01.2020 - 07:33

Country flag Nasreen Syed wrote:

Sorry what do you mean or k1 row purl1 row because after the 2nd pattern my garter row is not starting from the right side i have to purl from the right side si the whole cycle is disturbing

15.12.2019 - 17:07

DROPS Design answered:

Dear Mrs Syed, for any individual assistance please feel free to contact the store where you bought the yarn, even per mail or telephone, they will help you to read diagrams. Happy knitting!

16.12.2019 - 09:59

Country flag Nasreen Syed wrote:

In the pattern after the garter rows the 2 rows which is kfrom right snd purl from back shown in the diagram are 2 of them means that you k 1 row p 1 row then k 1 row and purl 1 row or just k 1 row and p1 row

13.12.2019 - 15:18

DROPS Design answered:

Dear Mrs Syed, on first row inA.1 you have to knit all stitches = 1st symbol: knit from RS. on 2nd row in A.1 you will knit all stitches = 2nd symbol: knit from wrong side. Happy knitting!

16.12.2019 - 09:58

Country flag Nasreen Syed wrote:

Hi i am still working on odeta and having trouble to follow the pattern specially on the yarn over the 8 st are 2 knit 2 knit tog yarnover knit1 yarn over knit 1 slip 1 knit 1 slip.the slip st over the knit st Row 2 of the pattern 1 knit 2 ktog yarnover k1 k1 yarnover k1 slip1 k1 slip the slip st over the k st The ladt row of the pattern k2 yarnover k1 slip 1 k2 tog slip the slip st over the k st is that how it goes

05.12.2019 - 14:47

DROPS Design answered:

Dear Mrs Syed, remember that diagram should be read from bottom up, ie row 2 in pattern-1 = A.1 = knit from WS. When you have K2 tog, YO all the row (= ex. A.3), just work K2 tog, YO over the stitches worked following that diagram. Should you need any further assistance reading diagrams, you are welcome to contact the store where you bought the yarn, even per mail or telephone. Happy knitting!

09.12.2019 - 10:30

Country flag Duquenoy Francine wrote:

Bonjour Merci pour ces explications claires et précises

03.12.2019 - 11:02

Country flag Nasreen Syed wrote:

I am trying to knit Odeta and i am not a new knitter but this pattern is confusing me when i am reading the pattern its directly starting with the diagram their is no ridge but the picture has ridge and the pattern says 3st then the diagram A1 8st and then it sayswork on 104st and then 13st and so how how does the diagram goes 8 1 8 please explain Regards

24.11.2019 - 16:44

DROPS Design answered:

Dear Mrs Syed, when working A.1 on this pattern, the diagram includes the first 3 ridges (see the first 6 rows in diagram). You then work: 3 sts in garter st (= K every row), then repeat A.1 (= 8 sts) a total of 13 times over the next 104 sts, then work A.2 (= 1 stitch - so that pattern is symetrical on both sides) and finish with 3 sts in garter st. From WS work: 3 sts in garter st, A.2, repat A.1 reading diagram from the left towards the right, 3 sts in garter st. Happy knitting!

25.11.2019 - 13:07

Country flag Brenda wrote:

I just want to say how awesome all of the tutorial and lesson videos are, and I am SO grateful for this explanation on how to read a chart. Everything is so thorough and meticulous, I have no problem following along. This is one of my most favorite websites! Thank you so much for sharing!

24.11.2019 - 01:43

Country flag Ire'ne Tillberg wrote:

Jag stickar children 23-36 Storl 3/4 år. Kommit till benen, ska börja m flätan på sidan. Förstår inte diagrammet eller diagram förklaringen. Tack på förhand

15.11.2019 - 20:14

DROPS Design answered:

Hei Ire`ne. Litt usikker på hva du ikke forstår. Du skal allerede ha strikket flettene før du begynner på bena. Fletten på bena fortsetter du med som før. Legg gjerne igjen et spørsmål under selve oppskriften og hva du har problemer med, så hjelper vi deg så fort vi kan. mvh DROPS design

18.11.2019 - 10:01

Country flag Madeleine wrote:

Vill bara säga att dessa instruktioner var mycket bra och hjälper mig mycket, stort tack!

15.11.2019 - 10:19

Country flag Karolyn Fredette wrote:

Why don't you just give us the directions, instead of these foolish confusing diagrams?

11.11.2019 - 21:19

DROPS Design answered:

Dear Mrs Fredette, The DROPS patterns are knitted and crocheted by thousands and thousands of people  around the world. We understand however that in certain countries, with different knitting/crochet traditions than Scandinavia, our patterns might be written in a way that differs from what some are used to. But of course we want everyone to understand our patterns, so that’s why we have created an extensive library of tutorial videos as well as step by step lessons that explain how to follow the techniques we use and how to read the diagrams in our patterns. Give them a try!

12.11.2019 - 08:40

Country flag Romy Hutchinson wrote:

All three diagrams have a different number of lines I.e. M.3 has 18, M.2 has 8 & M.1 has 22.....I’m at line 8 which uses all 8 lines, but how do I work using different diagrams when the diagrams have different benumbed if lines? I hope that makes sense 😂

04.11.2019 - 21:59

DROPS Design answered:

Dear Mrs Hutchinson, sometimes the repeats are not worked in height in the same number of rows, you have then to repeat the part of the repeat over the number of rows shown in the diagram - please ask your question on the pattern you are working on to get a more detailed answer. Happy knitting!

05.11.2019 - 10:56

Country flag Deborah Donnelly wrote:

I am doing drops design no ai-088. Don't understand the symbols in A.1 on row 41 and 43.Please help

30.10.2019 - 01:01

DROPS Design answered:

Hi, please write your question under comments in the pattern, then we can answer asap. Thank you!

13.02.2020 - 12:31

Country flag Barbara Ross wrote:

HI I purchased pattern ME-042- Snuggly Bunny. Am i right in thinking the pattern is repeated along the whole row in graph pattern 1st Edge stitch in garter stitch . Also do i repeat the cables every 4 and 6 rows. Thank you . Barbara

29.10.2019 - 20:17

DROPS Design answered:

Hello Barbara Ross! Yes you are right. Just follow the free Snuggly Bunny pattern here: https://www.garnstudio.com/pattern.php?id=4562&cid=19 Happy knitting!

05.04.2020 - 17:36

Country flag Britt Iréne Gotlin Blom wrote:

Jag har svårt att tyda diagrammet för modell 71-13 när det gäller början på ärmarna. Tacksam för hjälp med förklaring.

24.10.2019 - 23:20

DROPS Design answered:

Hej. Om du lägger in det som en fråga på mönstret så ska vi försöka hjälpa dig. Mvh DROPS Design

25.10.2019 - 10:29

Country flag Rousset Fabienne wrote:

Bonjour Pouvez vous m'expliquer comment faire un décalage sur un diagramme. On me dit sur le modèle 188-3 de drops de décaler le début du tour de 2 mailles à gauche pour que le motif tombe juste. Merci d'avance

15.09.2019 - 16:16

DROPS Design answered:

Bonjour Mme Rousset, vous trouverez la réponse ci-dessous pour la flèche 1 - pour la flèche 2, procédez de la même façon, mais glissez seulement 1 maille au début du tour; les 2 dernières mailles de chaque A.1 vont se tricoter avec la 1ère m du A.1 suivant. Bon tricot!

16.09.2019 - 13:26

Country flag Rousset Fabienne wrote:

Bonjour Sur le modèle de la robe 188-3 de drops on me dit" au tour avec la flèche 1 dans A1 , " décaler le début du tour de 2 mailles à gauche pour que le motif tombe juste" pouvez vous m'expliquer comment faire se décalage. Merci d'avance

15.09.2019 - 16:12

DROPS Design answered:

Bonjour Mme Rousset, sur ce rang, glissez les 2 premières mailles du 1er A.1 du tour sur l'aiguille droite sans les tricoter, tricotez le 1er A.1 (= vous tricotez ensemble les 2 dernières mailles du 1er A.1 et les 2 premières mailles du A.1 suivant = glissez l'avant-dernière m de A.1, tricotez la dernière m de A.1 + les 2 premières m du A.1 suivant ensemble à l'endroit et passez la m glissée par-dessus les 3 mailles tricotées ensemble) ; le A.1 suivant commence après les 2 premières mailles, comme le 1er, continuez ainsi jusqu'à la fin du tour; le tour commence maintenant après la diminution du dernier A.1 du tour. Bon tricot!

16.09.2019 - 13:25

Country flag Deborah wrote:

Hi I am really new to knitting, I am unsure of what "knit from right side, purl from wrong side" means and vise versa. Does that mean I just knit stitch a whole row and then for "purl from right side, knit from wrong side" means that I then do purl stitches for a whole row? I am really confused help would be great!!

05.09.2019 - 14:48

DROPS Design answered:

Dear Deborah, in the first diagram at the top of the lesson, you would have to work from RS as follows: the white squares will be worked K from RS and P from WS (= stocking stitch) and the black dots will be worked P from RS and K from WS . Each square in a diagram is matching a stitch. In 1st example at the top of lesson, work 1st row: K from RS (all stitches), P all sts on row 2, then on row 3 (= RS); work: K4, P1, K5, P1, K1 and on row 4 (=WS): K3, P4, K3, P3. and so on. Happy knitting!

06.09.2019 - 08:36

Country flag Marion wrote:

Bonjour, il est écrit "On lit un diagramme tricot dans le sens opposé de la lecture classique: de droite à gauche et de haut en bas." mais la flèche sur le schéma en dessous indique une lecture de bas en haut. Qu'est ce qui est correct?

05.09.2019 - 09:36

DROPS Design answered:

Bonjour Marion, c'était une erreur, il faut effectivement lire les diagrammes de bas en haut et non de haut en bas (sauf mention contraire explicite dans le modèle), la correction a été faite, merci pour votre retour. Bon tricot!

05.09.2019 - 09:43

Leave a comment or question to this lesson

Your email address will not be published. Required fields are marked *.