How to read knitting diagrams
A knitting diagram consists of squares. 1 square = 1 stitch - the symbol definition provide information on how the stitch is worked. The diagram shows all stitches seen from the right side (unless otherwise specified).
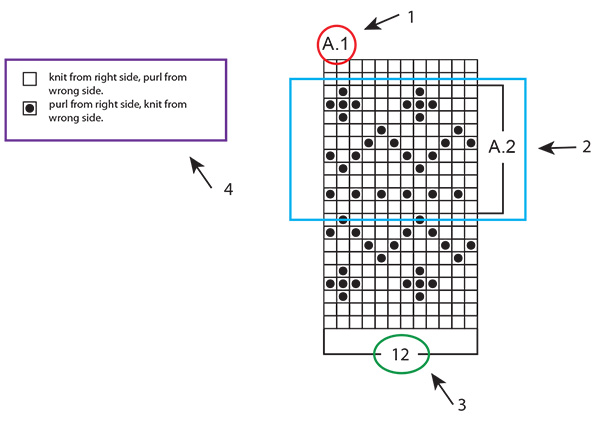
A diagram looks like this:

- A.1 is the name of the diagram, and refer to the entire diagram.
- A.2 is only the part of the diagram within the square brackets.
- This number refers to the number of stitches on the 1st row of the diagram.
- This is the symbol definition: it explains how each stitch is worked, or in what colour (in multicoloured patterns).
You read a knitting diagram completely opposite to how you would normally read: from right to left, from bottom to top. In other words: you start with the symbol in the bottom right corner, and work your way leftwards and upwards (see RED in diagram below). If you are supposed to start at a different point/with a different stitch, will this be specified - for example: the different sizes can start at different places in the same diagram (see BLUE box below).

If you are supposed to work several repeats of a diagram (ie: work the same diagram several times in width) you’ll work until the end of the diagram row, and start again with the first stitch for the next repeat.
Back and forth:
When working back and forth, every other row will be worked from the right side and every other row will be worked from the wrong side. Since the diagram shows all stitches seen from the right side, you’ll have to work it in opposite way when working from the wrong side (see BLUE arrows in diagram below): you read the row from left to right, knit stitches are purled, and purl stitches are knit etc (this will often be specified in symbol definition: “knit from right side, purl from wrong side”).

In the round:
When working in the round all rounds are worked from the right side, and the diagram is read solely from right to left. When starting a new round, simply start working the first symbol on the next row in diagram.

Several different diagrams worked consecutively on the row/round:
If you’re working several different diagrams after each other on the same row/round, work as follows: Work 1st row in diagram 1, continue with 1st row in diagram 2, then 1st row in diagram 3 etc. REMEMBER: if you’re working back and forth, the diagram will have to be worked in the opposite order from the wrong side - ie: start with diagram 3, then diagram 2 and lastly diagram 1. They are also worked in opposite way as usual.

In the pattern this can be written as follows: “work A.1, A.2, A.3 a total of 1-1-2-3-4 times”. This means that you first work A.1, then A.2 and finally you repeat A.3 a total of 1-1-2-3-4 times (depending on your size). It is ONLY A.3 that is repeated, A.1 and A.2 are worked 1 time each.
When stitch count doesn’t match whole repeats of diagram:
Sometimes the stitch count is not divisible with full/whole repeats of the diagram in width. For example: A.1 covers 12 stitches and is to be repeated over 40 stitches. In this case you will work 3 full repeats of A.1 (=36 stitches), and then work the first 4 stitches in the diagram over the remaining stitches (see RED line below). This is usually the case where the diagram is a repetitive pattern, so that regardless of working full repeats, the pattern will still be consistent.
