


Komentáře / Otázky (10)
![]() Justyna napsala:
Justyna napsala:
Chciałabym zrobić ten zestaw z bardziej miękkiej i cieńszej włóczki. Testowałam Merino Extra Fine - wzór wychodzi dość sztywny. Co będzie lepszą alternatywą: Flora, Baby Merino, Air?
10.05.2022 - 22:28Odpověď DROPS Design :
Witaj Justyno, polecam albo Air (1 nitka), albo 2 nitki Flory. Przy czym ta druga jest lekko gryząca (w składzie ma alpakę), ale jest bardzo miękka i miła w pracy. Spróbuj jeszcze wyprać próbki. Włóczka po praniu zyskuje zwykle na miękkości. Pozdrawiamy!
11.05.2022 - 09:25
![]() Marie-Claude napsala:
Marie-Claude napsala:
J’ai aussi fait ce modèle en taille moyenne mais j’ai modifié la taille du motif A1 à 88 mailles au lieu de 80. Le bonnet fini est très joli mais la taille finale est de 55cm donc S/M.
04.01.2021 - 16:16
![]() Amelie napsala:
Amelie napsala:
Tres jolie .. malheureusement jai eu la mauvaise surprise de me rendre compte (apres l’avoir fini) que le bonnet est bien trop petit a cause du motif A1. Il faudra revoir les tailles, car j’ai suivi a la lettre les instructions, et la tension etait bonne. Un peu decevant du coup
29.11.2019 - 15:09
![]() Marisa napsala:
Marisa napsala:
Hay en error en la última línea de la explicación del diagrama. En lugar de "trabajar 2 puntos juntos de revés, estirar el hilo" debería poner: "trabajar 3 puntos juntos de revés". Un saludo
22.11.2019 - 17:01
![]() Aude Lajudie napsala:
Aude Lajudie napsala:
Bonjour, J'ai du mal à comprendre comment se font les diminutions au niveau du point mousse sur le bonnet : Faut il diminuer de 8 mailles tous les 4 tours 5 fois? Cela fait trop peu de diminutions!!! Merci
30.09.2018 - 11:57Odpověď DROPS Design :
Bonjour Mme Lajudie, vous diminuez 8 mailles, tricotez 3 tours sans diminuer et répétez ces 4 tours 5 fois au total = vous diminuez 5 fois 8 mailles soit 40 mailles au total, il reste 32-40 m (cf taille). Tricotez ensuite 2 tours en même temps, tricotez toutes les mailles ensemble 2 par 2 à l'end = il reste d'abord 16-20 m après le 1er tour puis 8-10 m après les 2ème tour. Bon tricot!
01.10.2018 - 09:58
![]() Veronica napsala:
Veronica napsala:
Buongiorno nelle spiegazioni dello scaldacollo , raggiunti i 28 cm dite di lavorare 1 costa ed intrecciare, poi dite di cambiare i ferri lavorare 2 coste ed intrecciate, ma se intreccio dopo la prima costa non ho più maglie da lavorare, come si fa?
17.03.2018 - 17:21Odpověď DROPS Design :
Buonasera Veronica. Abbiamo corretto il testo. Buon lavoro!
17.03.2018 - 17:54
![]() Ylva Lundin napsala:
Ylva Lundin napsala:
Hej Det står inte hur stor del av den 14 cm långa resårstickade delen som skall vikas upp. Vad rekommenderar ni?
25.11.2017 - 18:05Odpověď DROPS Design :
Du kan pröva att vika resåren dubbel, så att du får en tjock uppvikt kant.
27.11.2017 - 17:34
![]() Jessica Goux napsala:
Jessica Goux napsala:
Bonjour, Je viens de recevoir la laine pour tricoter cet ensemble. Il est indiqué de commencer en moutarde, mais sur la photo la couleur moutarde apparaît au milieu entre les cotes et le point fantaisie. Du coup je ne comprends pas. Y-a-t-il une technique pour "coudre" (plier en deux les cotes) de manière à ce que le point moutarde vienne s'intercaler entre les cotes et le point d'astrakan? Merci de m'éclairer.
23.11.2017 - 21:31Odpověď DROPS Design :
Bonjour Mme Goux, on monte bien les mailles en moutarde et on continue en gris clair. Quand le bonnet est terminé, on replie la bordure en côtes sur l'endroit, ainsi la rayure moutarde va apparaître à la jonction des côtes et du point d'astrakan. Bon tricot!
24.11.2017 - 08:46
![]() Laillet Lalita napsala:
Laillet Lalita napsala:
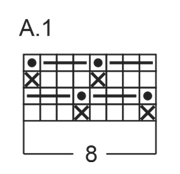
Bonjour, Je tricote depuis peu et je n'ai jamais suivi un diagramme pour tricoter. Comment se lit t-il ? de bas en haut ? de haut en bas ? par ligne ?? Je suis perdue :) Merci de votre aide
17.09.2017 - 19:42Odpověď DROPS Design :
Bonjour Mme Laillet, vous trouverez plus d'explications sur les diagrammes ici, dans le cas présent, commencez en bas à droite du diagramme et lisez tous les rangs du diagramme de droite à gauche, car on tricote ici en rond. Bon tricot!
18.09.2017 - 09:17
![]() Irena napsala:
Irena napsala:
Chcę zrobić tę czapkę z włóczki Air. Czy powinnam robić podwójną nitką?
13.09.2017 - 15:45Odpověď DROPS Design :
Witaj Ireno, włóczka Air jest z tej samej grupy co Alaska, więc może być użyta w tym wzorze pojedynczo. Włóczki mają jednak różną długość w motku. Ja na wszelki wypadek wykonałabym próbkę zarówno w wersji pojedynczej jak i podwójnie. Powodzenia!
13.09.2017 - 17:51
|
|||||||||||||
Welcome Winter#welcomewinterset |
|||||||||||||
 |
 |
||||||||||||
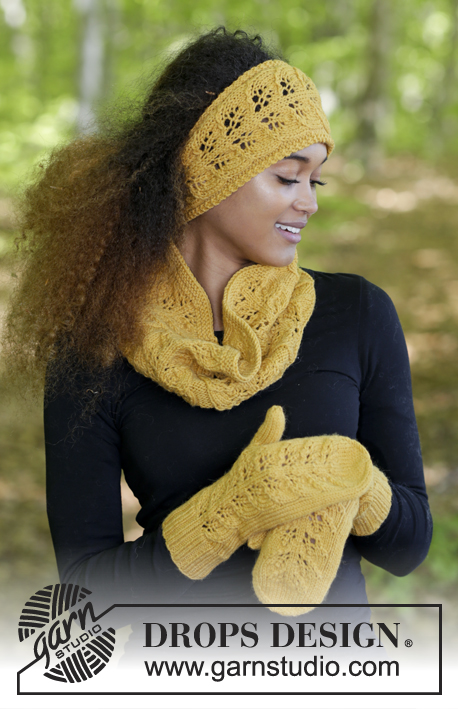
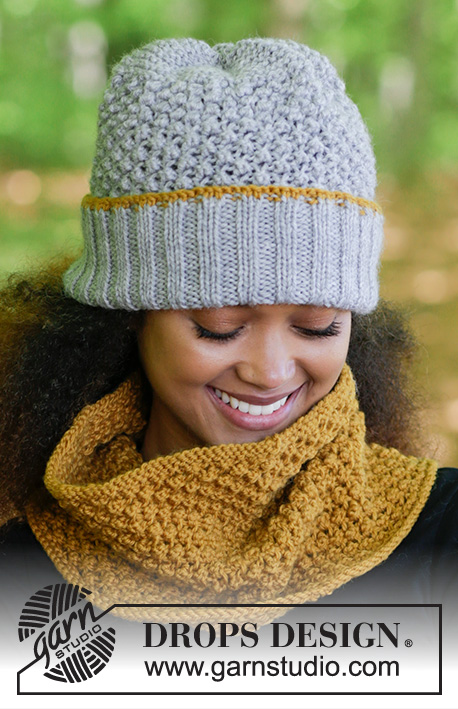
Souprava: čepice a nákrčník s růžičkovým vzorem pletené z příze DROPS Alaska.
DROPS 180-13 |
|||||||||||||
|
VROUBKOVÝ VZOR: 1 vroubek = 2 kruhové řady. Pleteme střídavě 1 kruhovou řadu hladce, 1 obrace. VZOR: Viz schéma A.1. Pleteme-li tento vzor v kruhových řadách, bude lícová strana uvnitř dílu. Tj. čepici/nákrčník pleteme rubovou stranou ven a po dokončení je převrátíme na líc. ---------------------------------------------------------- ČEPICE: Čepici pleteme v kruhových řadách na krátké kruhové jehlici. Podle potřeby převedeme pleteninu na ponožkové jehlice. Na kruhovou jehlici č.4,5 nahodíme hořčicovou přízí 92-100-108 ok a upleteme 1 kruhovou řadu pružným vzorem 2/2 (tj. střídáme 2 oka hladce, 2 obrace). Pak přízi změníme na světlou šedou. Pokračujeme pružným vzorem až do výše 14 cm. Nyní upleteme 1 kruhovou řadu obrace a SOUČASNĚ ujmeme rovnoměrně 20 ok (ujímáme tedy každé zhruba 5. oko) = 72-80-88 ok. Upleteme 1 kruhovou řadu hladce. Pleteninu pak převedeme na kruhovou jehlici č.5. Teď pleteme nad všemi oky růžičkový vzor – viz schéma A.1. Ve výši 25-26-27 cm začneme plést nad všemi oky VROUBKOVÝM VZOREM – viz výše a SOUČASNĚ v 1. kruhové řadě ujmeme rovnoměrně 8 ok. Toto ujímání opakujeme v každé 4. kruhové řadě, celkem 5-5-6x = 32-40-40 ok. V každé z následujících 2 kruhových řad spleteme každá 2 oka hladce = 8-10-10 ok. Přízi odstřihneme, protáhneme zbylými oky, stáhneme a zapošijeme. Čepice je vysoká asi 31-32-34 cm. POZOR! Pamatujte na to, že čepici musíme nakonec převrátit naruby, aby se vzor dostal na lícovou stranu – teprve pak můžeme zapošít konce přízí. ---------------------------------------------------------- NÁKRČNÍK: Pleteme v kruhových řadách na kruhové jehlici. Na kruhovou jehlici č.5 nahodíme přízí Alaska 120-136-152 ok a upleteme 1 vroubek VROUBKOVÝM VZOREM – viz výše. Pak pleteme vzorem A.1 nad všemi oky. Ve výši 25-28-30 cm upleteme 1 vroubek, pak všechna oka uzavřeme. POZOR! Pamatujte na to, že nákrčník musíme nakonec převrátit naruby, aby se vzor dostal na lícovou stranu – teprve pak můžeme zapošít konce přízí. |
|||||||||||||
Vysvětlivky ke schématu |
|||||||||||||
|
|||||||||||||
|
|||||||||||||
Dokončili jste tento model?Pak označte své fotky tagem #dropspattern #welcomewinterset nebo je pošlete do galerie #dropsfan. Potřebujete s tímto návodem poradit?Otevřete-li si návod na stránce garnstudio.com, najdete tam 14 výukových video-ukázek, Komentáře/Dotazy a další užitečné informace. © 1982-2025 DROPS Design A/S. Vyhrazujeme si veškerá práva. Tento dokument, včetně všech jeho dílčích částí, podléhá autorským právům. Podrobnější komentář k možnostem užití našich návodů najdete dole pod každým návodem na našich stránkách. |
|||||||||||||


V oblasti pletené a háčkované módy působí DROPS Design více než 40 let. Díky tomu vám můžeme nabídnout jednu z nejrozsáhlejších kolekcí modelů s bezplatnými návody dostupnými na internetu - navíc v 17 jazycích. K dnešnímu dni máme na 314 katalogů a 11821 návodů celkem - z nich je už 7047 dostupných v [češtině].
Přidejte komentář k návodu DROPS 180-13
Rádi bychom věděli, co si o tomto modelu myslíte!
Pokud se chcete na něco zeptat, dbejte prosím na to, abyste ve formuláři níže vybrali správnou kategorii - díky tomu se dříve dozvíte, co potřebujete vědět. Povinná pole jsou označena *.