DROPS Merino Extra Fine
100% Wool
from 4.55 $ /50g
Get the yarn to make this pattern from 63.70$.

The yarn cost is calculated from the pattern’s smallest size and the yarn’s cheapest product type. Looking for an even better price? You might find it on the DROPS Deals!

DROPS Super Sale

Yesterday

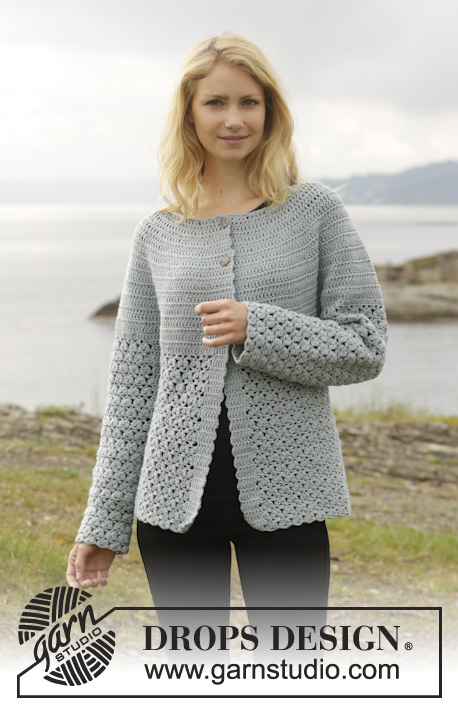
Crochet DROPS jumper with lace pattern, round yoke and detachable collar, worked top down in ”Merino Extra Fine”. Size: S - XXXL.

DROPS 156-18
DROPS design: Pattern no me-071
Yarn group B
-----------------------------------------------------------
Size: S - M - L - XL - XXL - XXXL
Finished measurements:
Bust: 80-90-98-104-114-132 cm / 31½"-35½"-38½"-41"-45"-52"
Full length: 56-58-60-62-64-66 cm / 22"-22¾"-23⅝"-24⅜"-25¼"-26"

Materials:
DROPS MERINO EXTRA FINE from Garnstudio
700-800-850-950-1000-1100 g (includes detachable collar) color no 15, light grayish green
(Detachable collar weighs approx. 100 g)

DROPS HOOK SIZE 4.5 mm/US 7 - or size needed to get 16 dc x 9 rows = 4" x 4" (10 x 10 cm), or A.2 = width 2.5 cm / ⅞".

-------------------------------------------------------

Alternative Yarn – See how to change yarns here
Yarn Groups A to F – Use the same pattern and change the yarn here
Yarn usage using an alternative yarn – Use our yarn converter here

-------------------------------------------------------

DROPS Merino Extra Fine
100% Wool
from 4.55 $ /50g
Get the yarn to make this pattern from 63.70$.

The yarn cost is calculated from the pattern’s smallest size and the yarn’s cheapest product type. Looking for an even better price? You might find it on the DROPS Deals!

Pattern instructions

NOTE: This pattern is written in American English. All measurements in charts are in cm. For conversion from inches to cm - click here. There are different terms for crocheting in American and British English. If this pattern includes crochet, click for "crochet terms" here. For this pattern in British English, please click here.
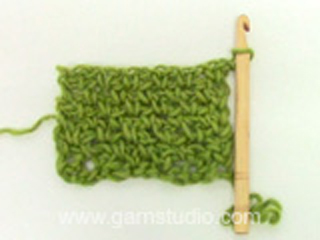
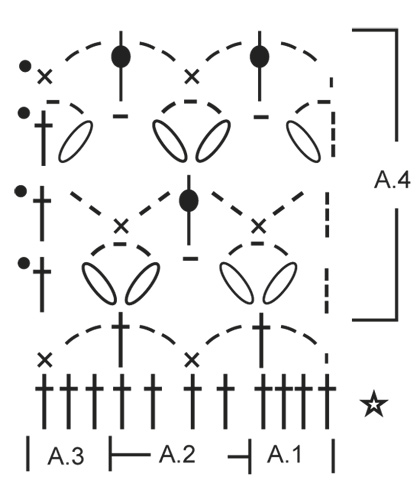
PATTERN:
See diagrams A.1-A.4.

CROCHET INFO:
Replace first dc on every round with 3 ch. Finish every dc round with 1 sl st in 3rd ch from beg of round.
Replace first sc on every round with 1 ch.
Finish every sc round with 1 sl st in 1st ch on round.

INCREASE TIP:
Inc 1 st by working 2 dc in 1 dc, first on one side of all markers on round, next time on the other side of all markers on round, continue inc like this.

DECREASE TIP:
Work 1 dc but wait with last pull through (= 2 sts on hook), then work next dc but on last pull through, pull yarn through all sts on hook = 1 dc dec.
----------------------------------------------------------

BODY:
The piece is worked top down. Worked in the round from mid back. Work 93-98-103-113-118-128 ch on hook size 4.5 mm/US 7 with Merino Extra Fine and form a ring with 1 sl st in first ch. Work next round as follows: ch 1, 1 sc in first ch, 1 sc in each of the next ch 2, * skip ch 1, 1 sc in each of the next 4 ch *, repeat from *-* = 76-80-84-92-96-104 sc – READ CROCHET INFO.
Then work an elevation in the back of neck as follows:
ROUND 1 (= RS): Beg mid back, work ch 1, 1 sc in 1st sc, * ch 1, skip 1 sc, 1 sc in next sc *, repeat from *-* around the neck AT THE SAME TIME insert 1 marker after 38-40-42-46-48-52 sts (= mid front), turn piece.
ROW 2 (= WS): Work 1 sc in every ch and 1 ch over every sc around the neck until 28-30-32-36-38-42 sts remain until marker, turn piece.
ROW 3: Work 1 sc in every ch and 1 ch over every sc until 28-30-32-36-38-42 sts remain until marker, turn piece.
ROW 4: Work 1 sc in every ch and 1 ch over every sc around the neck until 22-24-26-30-32-36 sts remain until marker, turn piece.
ROW 5: Work 1 sc in every ch and 1 ch over every sc around the neck until 22-24-26-30-32-36 sts remain until marker, turn piece.
ROW 6: Work 1 sc in every ch and 1 ch over every sc around the neck until 16-18-20-24-26-30 sts remain until marker, turn piece.
ROW 7: Work 1 sc in every ch and 1 ch over every sc until 16-18-20-24-26-30 sts remain until marker, turn and work back to mid back.

Then work in the round with dc AT THE SAME TIME on 1st round insert 19-20-21-23-24-26 markers in piece as follows: Insert 1st marker at beg of round (= mid back), then insert 18-19-20-22-23-25 markers 4 dc apart, after last marker there are 4 dc. Work in the round with dc AT THE SAME TIME inc 1 dc at all markers as follows: Inc every other round 5-6-6-5-5-6 times, and every 4th round 2-2-2-3-3-3 times - READ INCREASE TIP = 209-240-252-276-288-338 dc. Work a round while at the same time inc 14-7-7-7-19-5 dc evenly = 223-247-259-283-307-343 dc. REMEMBER THE CROCHET GAUGE! On next round work as follows from mid back: 30-34-37-41-45-52 dc, 8 ch (under sleeve), skip 52-56-56-60-64-68 dc from previous round (to be used for sleeve later), 60-68-74-82-90-104 dc (front piece), 8 ch (under sleeve), skip 52-56-56-60-64-68 dc from previous round (to be used for sleeve later) and 29-33-36-40-44-51 dc = 135-151-163-179-195-223 dc/ch. Insert a marker, now measure piece from here! Work 1 dc in every dc/ch AT THE SAME TIME dec 8-8-8-12-12-12 sts evenly – READ DECREASE TIP = 127-143-155-167-183-211 dc.

Continue to work as follows: Work A.1, A.2 30-34-37-40-44-51 repetitions in total in width, finish with A.3. Continue pattern like this. When A.1-A.3 have been worked 1 time vertically, repeat A.4 vertically until finished measurements.

When piece measures 14-14-14-15-15-15 cm / 5½"-5½"-5½"-6"-6"-6" from marker, adjust so that next round is last round in A.4, inc 1 repetition of A.2 in 8th-9th-9th-10th-11th-13th repetition in ch-space as follows: Work ch 2, 1 sc in ch-space, ch 2, 1 dc in same ch-space, ch 2, 1 sc in same ch-space. Work 14-16-19-20-22-25 repetitions of A.2, in next repetition of A.2 inc the same way. Then continue as before = 32-36-39-42-46-53 repetitions of A.2 in width. Fasten off when piece measures 34-34-36-35-37-37 cm / 13½"-13½"-14¼"-13¾"-14½"-14½" from marker, adjust to finish with next to last round in A.4, piece measures 56-58-60-62-64-66 cm / 22"-22¾"-23⅝"-24⅜"-25¼"-26" in total.

SLEEVE:
Sleeve is worked in the round, top down. Insert a marker, now measure piece from here! Beg by working mid under sleeve as follows: Work 1 sc in 5th ch of the 8 ch work in armhole on body, 3 ch (= 1 dc), work 1 dc in each of the next ch 3, 1 dc in every dc over sleeve, then work 1 dc in each of the remaining 4 ch under sleeve = 60-64-64-68-72-76 dc. Insert 1 marker mid under sleeve.
Continue to work as follows: 1 dc in each of the first 11-11-11-13-13-15 dc AT THE SAME TIME dec 1 dc (= 10-10-10-12-12-14 dc), A.1, A.2 8-9-9-9-10-10 times in width, A.3, work 1 dc in each of the last 10-10-10-12-12-14 dc. Continue with 1 dc in each of the 20-20-20-24-24-28 dc mid under sleeve and A.1-A.3 over sleeve. When A.1-A.3 have been worked 1 time vertically, repeat A.4 vertically until finished measurements. Continue this pattern AT THE SAME TIME when piece measures 4 cm / 1½", dec 1 dc on each side of marker - Remember DECREASE TIP. Repeat dec every 3½-3½-3½-2½-2½-2 cm / 1¼"-1¼"-1¼"-⅞"-⅞"-¾" 9-9-9-11-11-13 more times. Now work only A.1-A.3 over sleeve. Fasten off when sleeve measures 43½-42½-42½-39½-40-38 cm / 17"-16¾"-16¾"-15½"-15¾"-15", adjust to finish with next to last round in A.4 – NOTE – shorter measurements in the larger sizes because of wider neck and shoulders.
Work the other the same way.

DETACHABLE COLLAR:
Worked in the round. Work 99 ch on hook size 4.5 mm/US 7 with Merino Extra Fine and form a ring with 1 sl st in 1st ch. Work 3rd row in A.1, 3rd row in A.2 23 times and 3rd row in A.3. Repeat A.4 vertically until finished measurements. When piece measures 8 cm / 3⅛", adjust so that next round is last round in A.4, inc 1 repetition of A.2 in each side of piece as follows: Work A.1, then work first A.2 as follows: Work ch 2, 1 sc in ch-space, ch 2, 1 dc in same ch-space, ch 2, 1 sc in same ch-space. Work as before until 1 repetition of A.2 remains before A.3, in next repetition of A.2 inc the same way. Then work as before (= 25 repetitions of A.2 in width) until piece measures approx. 20 cm / 8", adjust to finish with next to last row in A.4. Fasten off.

Diagram

All measurements in charts are in cm.

symbols = chain stitch (ch) – NOTE: if chain stitch is worked at the end of hook it will become too tight. 1 chain should be the same length as the width of a singlecrochet.
symbols = single crochet (sc)
symbols = double crochet (dc) in stitch
symbols = 1 slip stitch (sl st) in 3rd/1st chain at beginning of round
symbols = double crochet around stitch
symbols = work 3 double crochets into 1 double crochet in same stitch as follows: Work 1 double crochet but wait with last pull through (= 2 strands on hook), work 1 double crochet the same way, then work next double crochet but on last pull through, pull yarn through all stitches on hook
symbols = 1st round is explained in pattern
diagram
diagram
Do you have a question? See a list of frequently asked questions (FAQ)

Knitting tension is what determines the final measurements of your work, and is usually measured per 10 x 10 cm. It is provided like so: number of stitches in width x number of rows in height - eg: 19 stitches x 26 rows = 10 x 10 cm.

The knitting tension is very individual; some people knit/crochet loosely while others work tightly. You adjust the knitting tension with the needle size, which is why the suggested needle size only serve as a guide! You need to adjust this (up or down) to ensure that YOUR knitting tension matches the knitting tension provided in the pattern. If you work with a different knitting tension than provided you will have a different yarn consumption, and your work will have different measurements than what the pattern suggests.

The knitting tension also determines which yarns can replace each other. As long as you achieve the same knitting tension you can replace one yarn with another.

See DROPS lesson: How to measure your tension/gauge

See DROPS video: How to make a gauge tension swatch

The required amount of yarn is provided in grams, eg: 450 g. To calculate how many balls you’ll need you first need to know how many grams are in 1 ball (25g, 50g or 100g). This information is available if you click on the individual yarn quality on our pages. Divide the amount required with the amount of each ball. For example, if each ball is 50g (the most common amount), the calculation will be as follows: 450 / 50 = 9 balls.

The important thing when changing from one yarn to another is that the knitting/crochet tension remains the same. This is so that the measurements of the finished piece will be the same as on the sketch provided. It is easier to achieve the same knitting tension using yarns from the same yarn group. It is also possible to work with multiple strands of a thinner yarn to achieve the knitting tension of a thicker one. Please try our yarn converter. We recommend you to always work a test swatch.

Please NOTE: when changing yarn the garment might have a different look and feel to the garment in the photo, due to individual properties and qualities of each yarn.

See DROPS lesson: Can I use a different yarn than the one mentioned in the pattern?

All our yarns are categorised into yarn groups (from A to F) according to thickness and knitting tension – group A contains the thinnest yarns and group F the thickest. This makes it easier for you to find alternative yarns to our patterns, should you wish to switch yarn. All yarns within the same group have a similar knitting tension and can easily replace each other. However, different yarn qualities have different structures and properties which will give the finished work a unique look and feel.

Click here for an overview of the yarns in each yarn group

At the top of all our patterns you’ll find a link to our yarn converter, which is a helpful tool should you wish to use a different yarn than suggested. By filling in the yarn quality you wish to replace, the amount (in your size) and number of strands, the converter will present good alternative yarns with the same knitting tension. Additionally it will tell you how much you’ll require in the new qualities and whether you’ll need to work with multiple strands. Most skeins are 50g (some are 25g or 100g).

If the pattern is worked with multiple colours, every colour will have to be converted separately. Similarly, if the pattern is worked with several strands of different yarns (for example 1 strand Alpaca and 1 strand Kid-Silk) you will have to find alternatives for each, individually.

Click here to see our yarn converter

Since different yarns have different qualities and textures we have chosen to keep the original yarn in our patterns. However, you can easily find options among our available qualities by using our yarn converter, or simply pick a yarn from the same yarn group.

It is possible that some retailers still have discontinued yarns in stock, or that someone has a few skeins at home that they would like to find patterns for.

The yarn converter will provide both alternative yarn as well as required amount in the new quality.

If you think it's hard to decide what size to make, it can be a good idea to measure a garment you own already and like the size of. Then you can pick the size by comparing those measures with the ones available in the pattern's size chart.

You'll find the size chart at the bottom of the pattern.

See DROPS lesson: How to read size chart

The needle size provided in the pattern serves only as a guide, the important thing is to follow the knitting tension. And since knitting tension is very individual, you will have to adjust the needle size to ensure that YOUR tension is the same as in the pattern – maybe you’ll have to adjust 1, or even 2 needle sizes, up or down to achieve the correct tension. For this, we recommend that you work test swatches.

Should you work with a different knitting tension than the one provided, the measurements of the finished garment might deviate from the measurement sketch.

See DROPS lesson: How to measure your tension/gauge

See DROPS video: How to make a gauge tension swatch

Working a garment top-down provides more flexibility and room for personal adjustment. For example it is easier to try the garment on while working, as well as making adjustments to length of yoke and shoulder caps.

The instructions are carefully explaining every step, in the correct order. Diagrams are adjusted to the knitting direction and are worked as usual.

The diagram depicts all rows/rounds, and every stitch seen from the right side. It is read from bottom to top, from right to left. 1 square = 1 stitch.

When working back and forth, every other row is worked from the right side and every other row is worked from the wrong side. When working from the wrong side, the diagram will have to be worked reversed: from left to right, knit stitches are purled, purl stitches are knit etc.

When working in the round every round is worked from the right side and the diagram are worked from right to left on all rounds.

See DROPS lesson: How to read knitting diagrams

The diagram depicts all rows/rounds, and every stitch seen from the right side. It is worked from bottom to top, from right to left.

When working back and forth every other row is worked from the right side: from right to left and every other row is worked from the wrong side: from left to right.

When working in the round, every row in the diagram are worked from the right side, from right to left.

When working a circular diagram you start in the middle and work your way outwards, counter clockwise, row by row.

The rows usually start with a given number of chain stitches (equivalent to the height of the following stitch), this will either be depicted in the diagram or explained in the pattern.

See DROPS lesson: How to read crochet diagrams

Instructions for working several diagrams after each other on the same row/round, will often be written like so: “work A.1, A.2, A.3 a total of 0-0-2-3-4 times". This means you work A.1 once, then A.2 is worked once, and A.3 is repeated (in width) the number of times provided for your size – in this case like so: S = 0 times, M = 0 times, L=2 times, XL= 3 times and XXL = 4 times.

The diagrams are worked as usual: begin with the first row in A.1, then work the first row in A.2 etc.

See DROPS lesson: How to read knitting diagrams

See DROPS lesson: How to read crochet diagrams

The total width of the garment (from wrist-to-wrist) will be larger in the larger sizes, despite the actual sleeves being shorter. The larger sizes have longer sleeve caps and wider shoulders, so there will be a good fit in all sizes.

The measurement sketch/schematic drawing provides information regarding the full length of the garment. If it’s a jumper or a jacket the length is measured from the highest point on the shoulder (usually closest to the neckline), and straight down to the bottom of the garment. It is NOT measured from the tip of shoulder. Similarly, the length of yoke is measured from the highest point on the shoulder and down to where yoke is split into body and sleeves.

See DROPS lesson: How to read a schematic drawing

Diagrams are often repeated on the round or in height. 1 repeat is the diagram the way it appears in the pattern. If it says to work 5 repeats of A.1 in the round, then you work A.1 a total of 5 times after/next to each other in the round. If it says to work 2 repeats of A.1 vertically/in height you work the entire diagram once, then begin again at the start and work the entire diagram one more time.

Chain stitches are slightly narrower than other stitches and to avoid working the cast-on edge too tight, we simply chain more stitches to begin with. The stitch count will be adjusted on the following row to fit the pattern and measurement sketch.

The rib edge is more elastic and will contract slightly compared to, for example, stocking stitch. By increasing before the rib edge, you avoid a visible difference in width between the rib edge and the rest of the body.

It’s very easy to cast off too tightly, and by making yarn overs while casting off (and simultaneously casting these off) you avoid a too tight cast off edge.

See DROPS video: How to bind off with yarn overs (yo)

To achieve an even increase (or decrease) you can increase on, for example: every 3rd and 4th row alternately, like so: work 2 rows and increase on the 3rd row, work 3 rows and increase on the 4th. Repeat this until the increase is complete.

See DROPS lesson: Increase or decrease 1 st on every 3rd and 4th row alternately

Should you prefer to work in the round instead of back and forth, you may of course adjust the pattern. You’ll need to add steeks mid-front (usually 5 stitches), and follow the instructions. When you would normally turn and work from the wrong side, simply work across the steek and continue in the round. At the end you’ll cut the piece open, pick up stitches to work bands, and cover the cut edges.

See DROPS video: How to knit steeks and cut open

Should you prefer to work back and forth instead of in the round, you may of course adjust the pattern so you work the pieces separately and then assemble them at the end. Divide the stitches for the body in 2, add 1 edge stitch in each side (for sewing) and work the front and back pieces separately.

See DROPS lesson: Can I adapt a pattern for circular needles into straight needles?

Pattern repeats can vary slightly in the different sizes, in order to get the correct proportions. If you’re not working the exact same size as the garment in the photo, yours might deviate slightly. This has been carefully developed and adjusted so that the complete impression of the garment is the same in all sizes.

Make sure to follow instructions and diagrams for your size!

If you have found a pattern you like which is available in women’s size it’s not very difficult to convert it to men’s size. The biggest difference will be the length of sleeves and body. Start working on the women size that you think would fit across the chest. The additional length will be worked right before you cast off for the armhole/sleeve cap. If the pattern is worked top-down you can add the length right after the armhole or before the first decrease on sleeve.

Regarding additional yarn amount, this will depend on how much length you add, but it is better with a skein too many than too few.

All yarns will have excess fibres (from production) that might come off as lint or shedding. Brushed yarns (ie hairier yarns) have more of these loose, excess fibres, causing more shedding.

Shedding also depends on what is worn under or over the garment, and whether this pulls at the yarn fibres. It’s therefore not possible to guarantee that there will be no shedding

Below are some tips on how to get the best result when working with hairier yarns:

1. When the garment is finished (before you wash it) shake it vigorously so the looser hairs come off. NOTE: do NOT use a lint roller, brush or any method that pulls at the yarn.

2. Place the garment in a plastic bag and put it in your freezer - the temperature will cause the fibres to become less attached to each other, and excess fibres will come off easier.

3. Leave in the freezer for a few hours before taking it out and shaking it again.

4. Wash the garment according to the instructions on the yarn label.

Pilling is a natural process that happens to even the most exclusive of fibers. It's a natural sign of wear and tear that is hard to avoid, and that is most visible in high friction areas of your garment like a sweater's arms and cuffs.

You can make your garment look as new by removing the pilling, using a fabric comb or a pill/lint remover.

Still can't find the answer you need? Then scroll down and leave your question so one of our experts can try to help you. This will be done normally within 5 to 10 working days.
In the meantime, you can read the questions and answers that others have left to this pattern or join the DROPS Workshop on Facebook to get help from fellow knitters/crocheters!

You might also like...

Post a comment to pattern DROPS 156-18

We would love to hear what you have to say about this pattern!

If you want to leave a question, please make sure you select the correct category in the form below, to speed up the answering process. Required fields are marked *.

Comments / Questions (68)

Lyn wrote:

Oops, didn't mean to repost same question! Yes I have checked and double checked the number of rounds and my tension is pretty spot on, maybe slightly tighter but not enough to make that much difference. I am making medium size

23.06.2015 - 23:34

Lyn wrote:

I am crocheting Pattern 156-18 but it's not looking like the picture. I have completed the treble bodice and into the lace pattern. Even though my measurements seem to be correct for pattern size my bodice appears much shorter than the in the picture where it comes well below the bust line closer to waist. Mine sits high across my bust. Can you offer any explanation? If I lengthen the treble bodice will it mess up the sleeves?

23.06.2015 - 15:26

DROPS Design answered:

Dear Lyn, do you also get the corret tension in height, ie 9 rows tr = 10 cm ? You can also check that you have the correct number of rounds for yoke. Happy crocheting!

23.06.2015 - 19:29

country flag Jing Wang wrote:

It is still very confusion. Please can you just confirm how many sts I should work for ROW 2, and how many sts I should work for ROW if for 2nd size? Thx Jing

19.06.2015 - 14:25

DROPS Design answered:

Dear Mrs Wang, as you said, on row 2 in 2nd size, you work 10 sts (= leave 30 sts unworked before marker mid front), turn and work these 10 sts back (to marker mid back) + 10 sts past marker mid back (= 30 sts are unworked before marker mid front). Count the sts you leave unworked before starting your next row will help you to make the short rows. Happy crocheting!

19.06.2015 - 18:22

country flag Jing Wang wrote:

Just for your information, I started Body pattern with ch 98. So I inserted 1 marker after 40 sts(mid front) for ROUND 1.

19.06.2015 - 01:44

DROPS Design answered:

Dear Mrs Wang, then in 2nd size, work row 2 from WS until 30 sts remain before marker mid front, turn and work row 3 froms RS until 30 sts remain before marker mid front on the other side, turn and work row 4 from WS until 24 sts remain before marker mid front, turn and work row 5 from RS until 24 sts remain before marker mid front on the other side .. Happy crocheting!

19.06.2015 - 09:59

country flag Jing Wang wrote:

Thank you for your answers. If I "work row 2 from WS until 28-42 sts remain before marker mid front, do not work these sts (leave them unworked), turn", does that mean I will only work 10sts for Row 2, after turning, I will only work 20sts for Row 3 ? thx

19.06.2015 - 01:40

DROPS Design answered:

Dear Mrs Wang, that's correct for row 2 and 3, then you continue leaving less sts unworked each side as stated for your size. Happy crocheting!

19.06.2015 - 09:50

country flag Jing Wang wrote:

Ok, question 1 is clear now with thx. But I am still confused on question 2. If I "work row 2 from WS until 28-42 sts (see size) remain before marker on mid front, ... Do you mean Not to work all the way cross the maker, but before the maker 28-42 sts? Jing

15.06.2015 - 21:07

DROPS Design answered:

Dear Mrs Wang, that's right you will work row 2 from WS until 28-42 sts remain before marker mid front, do not work these sts (leave them unworked), turn, work next row from RS until 28-42 sts remain on the other side of mid front, do not work these sts, turn and work next row, leaving more sts unworked before marker mid front and so on = you will work more rows over some sts this will create an elevation on mid back. Happy crocheting!

16.06.2015 - 08:33

Jing Wang wrote:

I have got a few questions for Body pattern: 1. With regard to Round 1, I understand it that I need to work all the way round, not half way, but insert a maker after 38-40-42-46-48-52; Is it right? 2. at Row 2, if I work it as it says and until 28-30-32-36-38-42sts remain until maker, (then turn pieie for Row 3) how can I still do the same (I mean work the same until 28-30-32-36-38-42sts remain until maker) at Row 3 ? ? ? Jing

14.06.2015 - 19:25

DROPS Design answered:

Dear Mrs Wang, 1. is correct, then 2. on row 2 you start working short rows for the elevation in the back of the neck: work row 2 from WS until 28-42 sts (see size) remain before marker on mid front, turn and work row 3 from RS until 28-42 sts remain before marker on mid front on the other side. Repeat these 2 rows leaving some more sts unworked at the end of each row on both sides of marker mid front. Happy crocheting!

15.06.2015 - 10:37

country flag Carine Van Maestricht wrote:

Beste, dank u voor de gekregen uitleg. Maar ik heb nog een vraagje. Ik was ondertussen al willen beginnen aan die kraag van patroon 156-18. Het is toch een losse hangende kraag, maar ik weet niet hoe ik die meerderen moet uitvoeren. Wil je mij eens duidelijk uitleggen hoe ik dit moet doen aub. Dank u en groetjes. Carine

12.02.2015 - 08:58

DROPS Design answered:

Hoi Carine. Je moet haken zoals staat in het patroon: haak A.1, haak dan de eerste A.2 als volgt: haak 2 l, 1 v in de l-lus, 2 l, 1 stk in dezelfde l-lus, 2 l, 1 v in dezelfde l-lus. (dit is de meerdering). aak als hiervoor tot er 1 herhaling van A.2 overblijft voor A.3 en meerder in de volgende herhaling van A.2 op dezelfde manier. Dwz, herhaal hier "2 l, 1 v in de l-lus, 2 l, 1 stk in dezelfde l-lus, 2 l, 1 v in dezelfde l-lus"

12.02.2015 - 17:16

country flag Van Maestricht Carine wrote:

Ik versta 'het haken van een ronding op het achterpand van de hals niet. Vanaf toer 1 tot en met toer 7 versta ik niet. ik wil dolgraag deze pull haken, maar hoe begin ik eraan ? Dank U groetjes

11.02.2015 - 08:42

DROPS Design answered:

Hoi Carine. In toer 1 heb je 1 markeerder na 38-40-42-46-48-52 st geplaatst (afhankelijk van je gekozen maat). De markeerder = middenvoor, begin van de toer = middenachter. Je haakt nu heen en weer. Dus toer 2 haak je v/l tot 28-30-32-36-38-42 st voor de markeerder. Keer het werk en haak terug tot 28-30-32-36-38-42 st voor de markeerder aan de andere kant, keer enzovoort. Op deze manier haak je een verhoging op de achterkant.

11.02.2015 - 15:53

country flag Mary wrote:

Hi, I have some questions about the sleeves of this pattern. It seems that after the first round I have to dc 13, then decrease one and then start on the detail on the sleeve? But in the pictures the sleeves don't start with the detail until halfway. The sleeve pattern is very confusing..

06.02.2015 - 18:06

DROPS Design answered:

Dear Mary, the jumper is worked top down, ie you first work yoke in the round, leave sts unworked on each side for sleeves and continue body in the round. Sleeves are then worked top down over the skipped sts on yoke. Happy crocheting!

07.02.2015 - 09:53