DROPS Kid-Silk
DROPS Kid-Silk
75% Mohair, 25% Silk
from 6.75 $ /25g
Get the yarn to make this pattern from 81.00$.

The yarn cost is calculated from the pattern’s smallest size and the yarn’s cheapest product type. Looking for an even better price? You might find it on the DROPS Deals!

DROPS SS24

Everything After

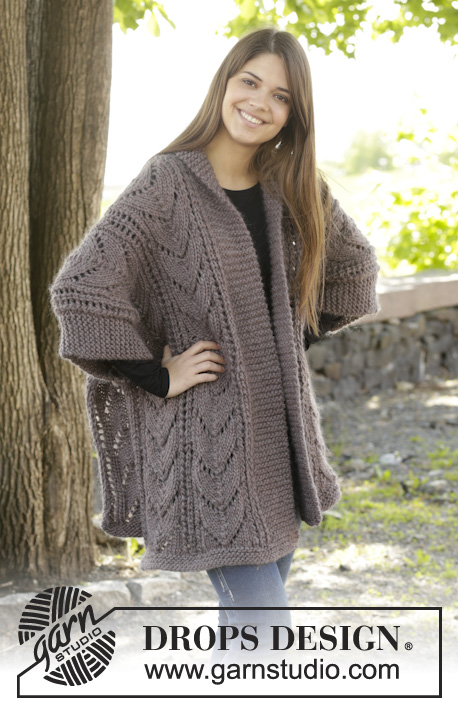
Knitted DROPS jacket with stripes in 2 strands ”Kid-Silk”. Size: S - XXXL.

DROPS 157-45
DROPS design: Pattern no ks-095
Yarn group A + A or C
-----------------------------------------------------------
Size: S - M - L - XL - XXL - XXXL
Finished measurements:
Bust: 88-96-104-116-128-136 cm / 34½''-37 3/4''-41''-45 3/4''-50½''
Full length: 70-72-74-76-78-80 cm / 27½''-28 3/8''-29 1/8''-30''-30¾''-31½

Materials:
DROPS KID-SILK from Garnstudio
150-150-175-200-200-225 g color no 22, ash gray
50-75-75-75-75-100 g color no 09, pearl gray
50-50-75-75-75-100 g color no 06, light grayish green
50-50-75-75-75-75 g color no 07, light steel blue

DROPS CIRCULAR NEEDLE (60 or 80 cm / 24'' or 32'') SIZE 5 mm/ US 8 - or size needed to get 17 sts x 22 rows in stockinette st = 4'' x 4'' (10 x 10 cm) with 2 strands.
DROPS CIRCULAR NEEDLE (60 or 80 cm / / 24'' or 32'') SIZE 4.5 mm / US 7 - for garter st.

-------------------------------------------------------

Alternative Yarn – See how to change yarns here
Yarn Groups A to F – Use the same pattern and change the yarn here
Yarn usage using an alternative yarn – Use our yarn converter here

-------------------------------------------------------

DROPS Kid-Silk
DROPS Kid-Silk
75% Mohair, 25% Silk
from 6.75 $ /25g
Get the yarn to make this pattern from 81.00$.

The yarn cost is calculated from the pattern’s smallest size and the yarn’s cheapest product type. Looking for an even better price? You might find it on the DROPS Deals!

Pattern instructions

NOTE: This pattern is written in American English. All measurements in charts are in cm. For conversion from inches to cm - click here. There are different terms for crocheting in American and British English. If this pattern includes crochet, click for "crochet terms" here. For this pattern in British English, please click here.
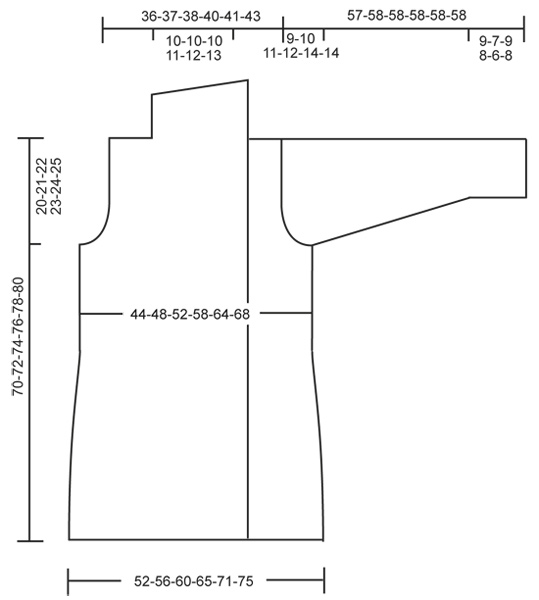
GARTER ST (back and forth on needle):
K all rows. 1 ridge = K2 rows.

STRIPE COLORS (applies to front and back piece):
Work 1 strand ash gray tog with color in stripes.
Stripe 1: Light gray blue until piece measures: 24-24-25-25-26-27 cm / 9½"-9½"-9 3/4"-9 3/4"-10 1/4"-10½"
Stripe 2: Light grayish green until piece measures: 47-48-49-51-52-53 cm / 18½"-19"-19 1/4"-20"-20½"-21"
Stripe 3: Pearl gray until piece is finished.

STRIPES COLORS (applies to sleeves):
Work 1 strand ash gray tog with color in stripes.
Stripe 1: Light gray blue until piece measures 19 cm / 7½''.
Stripe 2: Light grayish green until piece measures 38 cm / 15''.
Stripe 3: Pearl gray until piece is finished.

BAND STS:
From RS: * P 2, K 2, P 26, K 2, P 2 *
From WS: * K 2, P 2, K 26, P 2, K 2 *

INCREASE TIP:
Inc 1 st by making 1 YO, on next round P YO twisted (i.e. work in back loop of st instead front) to avoid holes.
----------------------------------------------------------

JACKET:
Worked in several pieces back and forth on circular needle.

BACK PIECE:
Cast on 107-119-125-137-149-155 sts (includes 1 edge st in each side) on circular needle size 4.5 mm / US 7 with 1 strand ash gray + 1 strand STRIPE COLOR - see explanation above (= 2 strands). Work 3 ridges in GARTER ST - see explanation above. Switch to circular needle size 5 mm / US 8 and K 1 row from RS AT THE SAME TIME dec 17-21-21-25-27-25 sts evenly = 90-98-104-112-122-130 sts. Then work in stockinette st with 1 edge st in garter st in each side. REMEMBER THE GAUGE! When piece measures 9 cm / 3½'', dec 1 st in each side, repeat dec in each side every 4-4-4-4½-4½-4½ cm / 1½"-1½"-1½"-1 3/4"-1 3/4"-1 3/4" 7-7-7-6-6-6 times in total = 76-84-90-100-110-118 sts. When piece measures 40 cm / 15 3/4'', inc 11-12-12-14-16-17 sts evenly - READ INCREASE TIP = 87-96-102-114-126-135 sts. When piece measures 50-51-52-53-54-55 cm / 19¾''-20''-20½''-21''-21¼''-21 5/8'', bind off for armholes at the beg of every row in each side as follows: 3 sts 1-1-1-2-3-3 times, 2 sts 1-3-4-4-5-6 times and 1 st 3-3-3-4-4-5 times = 71-72-74-78-80-83 sts. When piece measures 68-70-72-74-76-78 cm / 26¾''-27½''-28 3/8''-29 1/8''-30''-30¾'', bind off the middle 17-18-18-20-22-23 sts for neck and finish each shoulder separately. Continue to dec 1 st on next row from neck = 26-26-27-28-28-29 sts remain on the shoulder. Bind off when piece measures 70-72-74-76-78-80 cm / 27½''-28 3/8''-29 1/8''-30''-30¾''-31½.

RIGHT FRONT PIECE:
Worked back and forth on circular needle.
Cast on 75-81-87-93-99-105 sts (includes 1 edge st in the side and 34 band sts towards mid front) on circular needle size 4.5 mm / US 7 with 1 strand ash gray + 1 strand STRIPE COLOR - see explanation above (= 2 strands). Work 3 ridges in GARTER ST - see explanation above. Switch to circular needle size 5 mm / US 8 and K 1 row from RS AT THE SAME TIME dec 4-6-9-11-12-14 sts evenly = 71-75-78-82-87-91 sts. Then work in stockinette st with 34 BAND STS - see explanation above - towards mid front and 1 edge st in garter st. When piece measures 9 cm / 3½'', beg dec in the side as on back piece = 64-68-71-76-81-85 sts. When piece measures 40 cm / 15 3/4'', inc 6-5-5-6-7-9 sts evenly = 70-73-76-82-88-94 sts. When piece measures 50-51-52-53-54-55 cm / 19¾''-20''-20½''-21''-21¼''-21 5/8'', bind off for armhole at beg of every row from WS as on back piece = 62-61-62-64-65-68 sts. When piece measures 70-72-74-76-78-80 cm / 27½''-28 3/8''-29 1/8''-30''-30¾''-31½, bind off the first 26-26-27-28-28-29 sts from WS = 36-35-35-36-37-39 sts remain on needle. Work rest of row. Then work collar in garter st as follows (1st row = RS): * Work back and forth over all sts, work back and forth only over the first 18-18-18-18-18-18 sts *, repeat from *-* until collar measures approx, 11-11-11-12-12-13 cm / 4½"-4½"-4½"-4 3/4"-4 3/4"-5" from shoulder (measures in the shorter side). Bind off.

LEFT FRONT PIECE:
Work as right but reversed.

SLEEVE:
Worked back and forth on needle. Cast on 50-50-50-56-56-56 sts (includes 1 edge st in each side) on circular needle size 4.5 mm / US 7 with 1 strand ash gray + 1 strand STRIPE COLOR - see explanation above (= 2 strands). Work 3 ridges in GARTER ST - see explanation above. Switch to circular needle size 5 mm / US 8 and K 1 row from RS AT THE SAME TIME dec 8-8-6-12-10-10 sts evenly = 42-42-44-44-46-46 sts. Then work in stockinette st with 1 edge st in garter st in each side. When piece measures 9-7-9-8-6-8 cm / 3½"-2 3/4"-3½"-3"-2 3/8"-3 1/8', inc 1 st in each side. Repeat inc every 3½-3-2½-2-2-1½ cm / 1 1/4"-1 1/8"-7/8"-3/4"-3/4"-½" 11-14-15-18-19-22 times in total = 64-70-74-80-84-90 sts on needle. When piece measures 48-48-47-46-44-44 cm / 19"-19"-18½"-18"-17 1/4"-17 1/4" - NOTE! Shorter measurements in the larger sizes because of longer sleeve cap and wider shoulders, bind off for sleeve cap at beg of every row in each side as follows: 4 sts 1 time, then bind off 2 sts 7-8-9-10-11-12 times, 1 st 2 times, then bind off all sts. Piece now measures approx. 57-58-58-58-58-58 cm / 22½"-22 3/4"-22 3/4"-22 3/4"-22 3/4"-22 3/4".

ASSEMBLY:
Sew the shoulder seams. Sew in sleeves. Sew sleeve and side seams in one inside 1 edge st. Sew collar tog mid back in outer loops of edge sts to avoid a chunky seam. Sew collar to neck line in the back of neck with neat little stitches.

POCKETS:
Cast on 31-31-34-34-38-38 sts on circular needle size 4.5 mm / US 7 with 1 strand ash gray + 1 strand light gray blue (= 2 strands) and work in stockinette st back and forth on needle until piece measures approx. 16-16-18-18-20-20 cm / 6 1/4"-6 1/4"-7"-7"-8"-8". Work 2 ridges, loosely bind off.
Knit another pocket. Place one pocket on each front piece approx. in the middle between side and band with bottom edge of pocket approx. 7 cm / 2¾'' over edge in garter st (try the jacket on for placement). Sew the pockets on with neat stitches.

Diagram

All measurements in charts are in cm.

diagram measurements
Do you have a question? See a list of frequently asked questions (FAQ)

Knitting tension is what determines the final measurements of your work, and is usually measured per 10 x 10 cm. It is provided like so: number of stitches in width x number of rows in height - eg: 19 stitches x 26 rows = 10 x 10 cm.

The knitting tension is very individual; some people knit/crochet loosely while others work tightly. You adjust the knitting tension with the needle size, which is why the suggested needle size only serve as a guide! You need to adjust this (up or down) to ensure that YOUR knitting tension matches the knitting tension provided in the pattern. If you work with a different knitting tension than provided you will have a different yarn consumption, and your work will have different measurements than what the pattern suggests.

The knitting tension also determines which yarns can replace each other. As long as you achieve the same knitting tension you can replace one yarn with another.

See DROPS lesson: How to measure your tension/gauge

See DROPS video: How to make a gauge tension swatch

The required amount of yarn is provided in grams, eg: 450 g. To calculate how many balls you’ll need you first need to know how many grams are in 1 ball (25g, 50g or 100g). This information is available if you click on the individual yarn quality on our pages. Divide the amount required with the amount of each ball. For example, if each ball is 50g (the most common amount), the calculation will be as follows: 450 / 50 = 9 balls.

The important thing when changing from one yarn to another is that the knitting/crochet tension remains the same. This is so that the measurements of the finished piece will be the same as on the sketch provided. It is easier to achieve the same knitting tension using yarns from the same yarn group. It is also possible to work with multiple strands of a thinner yarn to achieve the knitting tension of a thicker one. Please try our yarn converter. We recommend you to always work a test swatch.

Please NOTE: when changing yarn the garment might have a different look and feel to the garment in the photo, due to individual properties and qualities of each yarn.

See DROPS lesson: Can I use a different yarn than the one mentioned in the pattern?

All our yarns are categorised into yarn groups (from A to F) according to thickness and knitting tension – group A contains the thinnest yarns and group F the thickest. This makes it easier for you to find alternative yarns to our patterns, should you wish to switch yarn. All yarns within the same group have a similar knitting tension and can easily replace each other. However, different yarn qualities have different structures and properties which will give the finished work a unique look and feel.

Click here for an overview of the yarns in each yarn group

At the top of all our patterns you’ll find a link to our yarn converter, which is a helpful tool should you wish to use a different yarn than suggested. By filling in the yarn quality you wish to replace, the amount (in your size) and number of strands, the converter will present good alternative yarns with the same knitting tension. Additionally it will tell you how much you’ll require in the new qualities and whether you’ll need to work with multiple strands. Most skeins are 50g (some are 25g or 100g).

If the pattern is worked with multiple colours, every colour will have to be converted separately. Similarly, if the pattern is worked with several strands of different yarns (for example 1 strand Alpaca and 1 strand Kid-Silk) you will have to find alternatives for each, individually.

Click here to see our yarn converter

Since different yarns have different qualities and textures we have chosen to keep the original yarn in our patterns. However, you can easily find options among our available qualities by using our yarn converter, or simply pick a yarn from the same yarn group.

It is possible that some retailers still have discontinued yarns in stock, or that someone has a few skeins at home that they would like to find patterns for.

The yarn converter will provide both alternative yarn as well as required amount in the new quality.

If you think it's hard to decide what size to make, it can be a good idea to measure a garment you own already and like the size of. Then you can pick the size by comparing those measures with the ones available in the pattern's size chart.

You'll find the size chart at the bottom of the pattern.

See DROPS lesson: How to read size chart

The needle size provided in the pattern serves only as a guide, the important thing is to follow the knitting tension. And since knitting tension is very individual, you will have to adjust the needle size to ensure that YOUR tension is the same as in the pattern – maybe you’ll have to adjust 1, or even 2 needle sizes, up or down to achieve the correct tension. For this, we recommend that you work test swatches.

Should you work with a different knitting tension than the one provided, the measurements of the finished garment might deviate from the measurement sketch.

See DROPS lesson: How to measure your tension/gauge

See DROPS video: How to make a gauge tension swatch

Working a garment top-down provides more flexibility and room for personal adjustment. For example it is easier to try the garment on while working, as well as making adjustments to length of yoke and shoulder caps.

The instructions are carefully explaining every step, in the correct order. Diagrams are adjusted to the knitting direction and are worked as usual.

The diagram depicts all rows/rounds, and every stitch seen from the right side. It is read from bottom to top, from right to left. 1 square = 1 stitch.

When working back and forth, every other row is worked from the right side and every other row is worked from the wrong side. When working from the wrong side, the diagram will have to be worked reversed: from left to right, knit stitches are purled, purl stitches are knit etc.

When working in the round every round is worked from the right side and the diagram are worked from right to left on all rounds.

See DROPS lesson: How to read knitting diagrams

The diagram depicts all rows/rounds, and every stitch seen from the right side. It is worked from bottom to top, from right to left.

When working back and forth every other row is worked from the right side: from right to left and every other row is worked from the wrong side: from left to right.

When working in the round, every row in the diagram are worked from the right side, from right to left.

When working a circular diagram you start in the middle and work your way outwards, counter clockwise, row by row.

The rows usually start with a given number of chain stitches (equivalent to the height of the following stitch), this will either be depicted in the diagram or explained in the pattern.

See DROPS lesson: How to read crochet diagrams

Instructions for working several diagrams after each other on the same row/round, will often be written like so: “work A.1, A.2, A.3 a total of 0-0-2-3-4 times". This means you work A.1 once, then A.2 is worked once, and A.3 is repeated (in width) the number of times provided for your size – in this case like so: S = 0 times, M = 0 times, L=2 times, XL= 3 times and XXL = 4 times.

The diagrams are worked as usual: begin with the first row in A.1, then work the first row in A.2 etc.

See DROPS lesson: How to read knitting diagrams

See DROPS lesson: How to read crochet diagrams

The total width of the garment (from wrist-to-wrist) will be larger in the larger sizes, despite the actual sleeves being shorter. The larger sizes have longer sleeve caps and wider shoulders, so there will be a good fit in all sizes.

The measurement sketch/schematic drawing provides information regarding the full length of the garment. If it’s a jumper or a jacket the length is measured from the highest point on the shoulder (usually closest to the neckline), and straight down to the bottom of the garment. It is NOT measured from the tip of shoulder. Similarly, the length of yoke is measured from the highest point on the shoulder and down to where yoke is split into body and sleeves.

See DROPS lesson: How to read a schematic drawing

Diagrams are often repeated on the round or in height. 1 repeat is the diagram the way it appears in the pattern. If it says to work 5 repeats of A.1 in the round, then you work A.1 a total of 5 times after/next to each other in the round. If it says to work 2 repeats of A.1 vertically/in height you work the entire diagram once, then begin again at the start and work the entire diagram one more time.

Chain stitches are slightly narrower than other stitches and to avoid working the cast-on edge too tight, we simply chain more stitches to begin with. The stitch count will be adjusted on the following row to fit the pattern and measurement sketch.

The rib edge is more elastic and will contract slightly compared to, for example, stocking stitch. By increasing before the rib edge, you avoid a visible difference in width between the rib edge and the rest of the body.

It’s very easy to cast off too tightly, and by making yarn overs while casting off (and simultaneously casting these off) you avoid a too tight cast off edge.

See DROPS video: How to bind off with yarn overs (yo)

To achieve an even increase (or decrease) you can increase on, for example: every 3rd and 4th row alternately, like so: work 2 rows and increase on the 3rd row, work 3 rows and increase on the 4th. Repeat this until the increase is complete.

See DROPS lesson: Increase or decrease 1 st on every 3rd and 4th row alternately

Should you prefer to work in the round instead of back and forth, you may of course adjust the pattern. You’ll need to add steeks mid-front (usually 5 stitches), and follow the instructions. When you would normally turn and work from the wrong side, simply work across the steek and continue in the round. At the end you’ll cut the piece open, pick up stitches to work bands, and cover the cut edges.

See DROPS video: How to knit steeks and cut open

Should you prefer to work back and forth instead of in the round, you may of course adjust the pattern so you work the pieces separately and then assemble them at the end. Divide the stitches for the body in 2, add 1 edge stitch in each side (for sewing) and work the front and back pieces separately.

See DROPS lesson: Can I adapt a pattern for circular needles into straight needles?

Pattern repeats can vary slightly in the different sizes, in order to get the correct proportions. If you’re not working the exact same size as the garment in the photo, yours might deviate slightly. This has been carefully developed and adjusted so that the complete impression of the garment is the same in all sizes.

Make sure to follow instructions and diagrams for your size!

If you have found a pattern you like which is available in women’s size it’s not very difficult to convert it to men’s size. The biggest difference will be the length of sleeves and body. Start working on the women size that you think would fit across the chest. The additional length will be worked right before you cast off for the armhole/sleeve cap. If the pattern is worked top-down you can add the length right after the armhole or before the first decrease on sleeve.

Regarding additional yarn amount, this will depend on how much length you add, but it is better with a skein too many than too few.

All yarns will have excess fibres (from production) that might come off as lint or shedding. Brushed yarns (ie hairier yarns) have more of these loose, excess fibres, causing more shedding.

Shedding also depends on what is worn under or over the garment, and whether this pulls at the yarn fibres. It’s therefore not possible to guarantee that there will be no shedding

Below are some tips on how to get the best result when working with hairier yarns:

1. When the garment is finished (before you wash it) shake it vigorously so the looser hairs come off. NOTE: do NOT use a lint roller, brush or any method that pulls at the yarn.

2. Place the garment in a plastic bag and put it in your freezer - the temperature will cause the fibres to become less attached to each other, and excess fibres will come off easier.

3. Leave in the freezer for a few hours before taking it out and shaking it again.

4. Wash the garment according to the instructions on the yarn label.

Pilling is a natural process that happens to even the most exclusive of fibers. It's a natural sign of wear and tear that is hard to avoid, and that is most visible in high friction areas of your garment like a sweater's arms and cuffs.

You can make your garment look as new by removing the pilling, using a fabric comb or a pill/lint remover.

Still can't find the answer you need? Then scroll down and leave your question so one of our experts can try to help you. This will be done normally within 5 to 10 working days.
In the meantime, you can read the questions and answers that others have left to this pattern or join the DROPS Workshop on Facebook to get help from fellow knitters/crocheters!

You might also like...

Post a comment to pattern DROPS 157-45

We would love to hear what you have to say about this pattern!

If you want to leave a question, please make sure you select the correct category in the form below, to speed up the answering process. Required fields are marked *.

Comments / Questions (83)

Tineke wrote:

Bedankt! Ga ik proberen! Groetjes, Tineke

10.01.2015 - 10:47

Tineke wrote:

Kun je dit vest ook met rechte naalden breien? Zo ja, wat verandert er dan? Alvast bedankt! Tineke

09.01.2015 - 10:49

DROPS Design answered:

Hoi Tineke. Het vest wordt heen en weer gebreid op de rondbreinaalden, maar je zou ook rechte naalden kunnen gebruiken. Er verandert niets in het patroon.

09.01.2015 - 16:00

country flag Susanne Moeser wrote:

Nun, ich habe 27 Maschen abgekettet und die Reihe bis zum Ende fertig gestrickt. 35 M übrig plus die Blende (es wird keine Wort über die Blende verloren). Nun wende ich. WAS dann?

04.01.2015 - 20:52

DROPS Design answered:

Die Blende ist in den 35 M enthalten: Nach den Abn. für den Armausschnitt am Vorderteil sind noch 62 M übrig. Wenn Sie 27 M in der Rück-R abketten (d.h. ab der Seite der Jacke), bleiben 35 M als Kragen-M übrig, 34 davon sind die Blenden-M. Die 35 M stricken Sie nun ab dem vorderen Rand, d.h. ab der Hin-R, wie folgt: 1 Hin-R über alle 35 M, 1 Rück-R über alle 35 M, 1 Hin-R über die ersten 18 M, wenden, 1 Rück-R über diese 18 M usw. Zu verkürzten R finden Sie Videos, unter "Videos" oben im Kopf neben dem Foto.

06.01.2015 - 22:43

country flag Aukje Trotsenburg wrote:

Bij het rechtervoorpand heb ik de schouder al afgekant. Nu begrijp ik niet wat ik verder doen moet.Het gaat om de passage:*brei heen en weer over alle steken, brei heen en weer alleen over de eerste 18 steken* waar moet ik heen met die 18 steken? Bij voorbaat dank, Aukje Trotsenburg

20.12.2014 - 17:55

DROPS Design answered:

Hoi Aukje. Deze jas heeft een sjaalkraag. Je kant dus niet alle st af, maar alleen de eerste 26-26-27-28-28-29 st af aan de verkeerde kant (dus vanaf de schouder richting de hals. Je hebt nu 36-35-35-36-37-39 st over op de nld. Vervolgens brei je de verkorte toeren over de kraag zoals beschreven en dit stukje zal later samen met de kraag van het linker voorpand worden genaaid en aan de hals van het achterpand worden genaaid. Fijne feestdagen.

23.12.2014 - 16:32

country flag Van Elsen Karin wrote:

Bonsoir, j'ai fais le calcule par rapport à l'échantillon 17m/22rgs si le bas du gilet mesure 56cm 17m x 5.6cm=95.2mailles je ne suis pas sûre mais je le trouve encore large par rapport à la photo avec 95 mailles.... merci de votre aide, bonne soirée.

18.12.2014 - 20:35

country flag Van Elsen Karin wrote:

Bonjour, j'ai fais l'échantillon aig N°5 17m/22rgs c'est parfait, (taille:M) J'ai montée 119m sur aig 4,5 et tricotée 2 rgs point mousse et là je mesure et j'ai 66cm au lieu de 56 cm? Pourquoi, car je tricotes de la même façon que pour l'échantillon à part que c'est aig N°4.5....Pouvez-vous m'aider,SVP, merci. Bonne soirée.

18.12.2014 - 17:28

DROPS Design answered:

Bonjour Mme Van Elsen, en taille M, on monte 119 m, mais au 1er rang end après la côte mousse (= 1er rang jersey), on répartit 21 diminutions, il reste 98 m (= env. 56 cm). Bon tricot!

19.12.2014 - 08:45

country flag Van Elsen Karin wrote:

Bonjour, les augmentations avec le jeté, peut on le remplacer par une augmentation normale? merci , bonne journée

18.12.2014 - 13:20

DROPS Design answered:

Bonjour Mme Van Elsen, vous pouvez tout à fait ajuster votre façon d'augmenter - voir ici différentes techniques en vidéo. Bon tricot!

18.12.2014 - 16:02

country flag Vanessa G wrote:

Bonjour, êtes-vous sûr que pour la grandeur xxxl il suffit de cette quantité de laine ? ça semble pas beaucoup Merci

07.12.2014 - 00:44

DROPS Design answered:

Bonjour Vanessa G, en taille XXXL, il faut un total de 500 g Kid-Silk, soit 20 pelotes de 25 g x env. 200 m de fil chacune (toutes couleurs confondues) - pensez à bien vérifier votre échantillon en largeur et en hauteur (soit 17 m x 22 rangs jersey = 10 x 10 cm). Bon tricot!

07.12.2014 - 13:01

country flag Leila wrote:

Jos tekee mallin c-ryhmän langasta Esim. Brushed Alpaca Silk -langasta, kuinka lasken langanmenekin?

12.11.2014 - 09:52

DROPS Design answered:

Tässä esimerkki siitä, miten lasket lankavaihtoehdon metrimäärän: Malliin tarvitaan 300g langasta X. Langan X juoksevuus on 170m per 50g, eli tarvitset 6 kerää (lankaa X) x 170 m = 1020 m. Haluat käyttää lankaa Y. Tämän langan juoksevuus on 150m per 50g. 1020m / 150m = 6.8 = tarvitset 7 kerää langasta Y, jotta metrimäärä olisi sama kuin langassa X.

18.11.2014 - 16:33

country flag Marie wrote:

Faut impérativement utiliser l'aiguille circulaire? Jamais utilisé ça .....

05.11.2014 - 21:32

DROPS Design answered:

Bonjour Marie, on tricote ici en allers et retours sur aig. circulaire pour avoir suffisamment de place pour toutes les mailles. Vous pouvez utiliser des aig. droites mais veillez bien à conserver la même tension que pour votre échantillon (mailles plus serrées) ou voici comment faire en vidéo. Bon tricot!

06.11.2014 - 08:23