
Oblíbené kategorie
Hledáte přízi?


|
|
Always Beautiful |
|
 |
 |
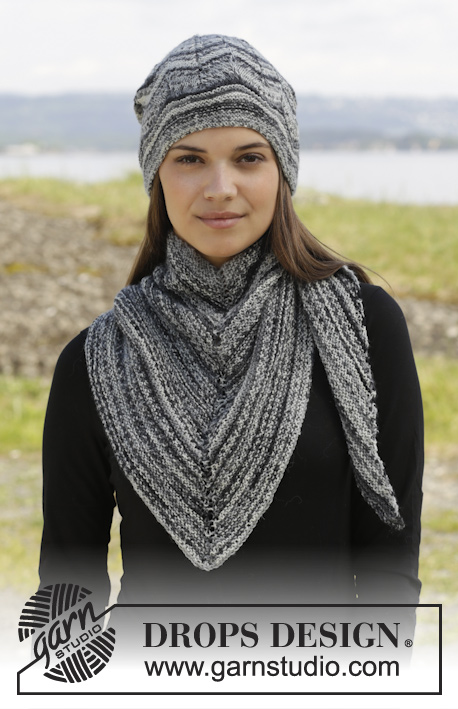
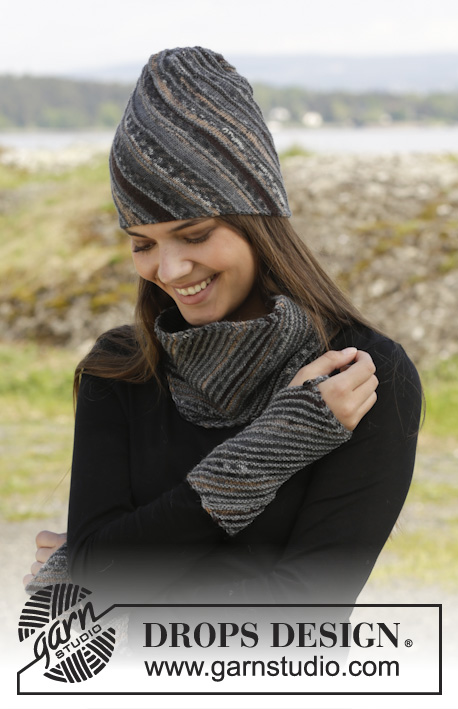
DROPS nákrčník, čepice a rukavice – palčáky pletené vroubkovým vzorem z dvojité příze "Alpaca".
DROPS 157-43 |
|
|
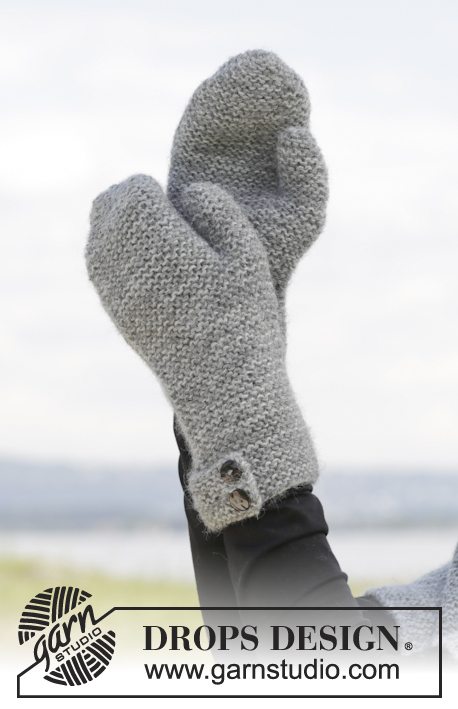
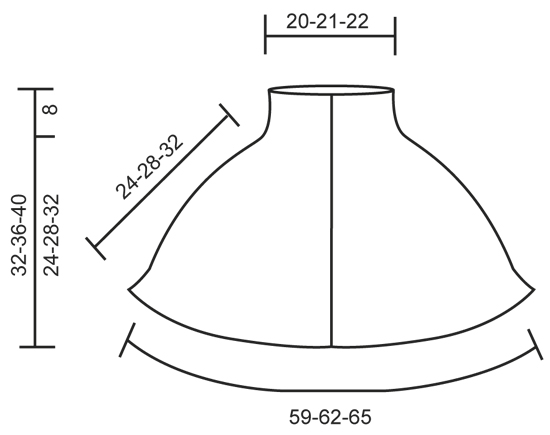
VROUBKOVÝ VZOR: V řadách: pleteme stále hladce, lícové i rubové řady. 1 vroubek = 2 řady hladce. V kruhových řadách: pleteme střídavě 1 kruhovou řadu hladce, 1 obrace. 1 vroubek = 2 kruhové řady. TIP: Pokaždé, když otáčíme práci uprostřed řady, sejmeme první oko hladce, přízi pořádně utáhneme a teprve pak pleteme dál – díky tomuto postupu nebudou v místech přechodů jednotlivých zkrácených řad vznikat velké dírky. TIP - PŘIDÁVÁNÍ: Přidáváme nahozením; v následující řadě pleteme nahození hladce za zadní nit, aby v pletenině nevznikaly dírky. ------------------------------------------------------- NÁKRČNÍK: Pleteme kolmo od předního okraje jedné légy k okraji druhé. Na jehlice č.3,5 nahodíme 1 vláknem šedé + 1 vláknem světle šedé (= dvojitá příze) příze Alpaca 64-72-80 ok a pleteme vroubkovým vzorem – viz výše – do výše 4 cm (= léga). Pak pokračujeme vroubkovým vzorem a SOUČASNĚ plete,e zkrácené řady, takto – začínáme lícovou řadou: *upleteme 8 ok, práci otočíme – viz TIP - PŘIDÁVÁNÍ – a pleteme zpáteční řadu, upleteme 38-46-56 ok, práci otočíme a pleteme zpáteční řadu, upleteme 48-56-64 ok, práci otočíme a pleteme zpáteční řadu, upleteme 2 řady nad všemi oky*, *-* opakujeme. Ve výši asi 43-45-47 cm – měřeno podél okraje průkrčníku, tj. podél kratší strany (máme dokončenu celou sekvenci zkrácených řad) – upleteme 4 cm výšky vroubkovým vzorem nad všemi oky (= léga). Ve výši asi 47-49-51 cm u horního okraje a asi 125-131-137 cm - měřeno podél dolního okraje mezi légami (= zvlněný okraj) – všechna oka uzavřeme. DOKONČENÍ: Pravou légu položíme přes levou a přišijeme 5 ozdobných knoflíků – knoflíky nebudeme zapínat, přišijeme je napevno skrz obě vrstvy pleteniny: začneme 2 cm od okraje průkrčníku a každý další přišíváme po asi 6,5-7,5-8,5 cm výšky pleteniny. ---------------------------------------------------------- ČEPICE: Pleteme v řadách na kruhové jehlici. Na kruhovou jehlici č.4 nahodíme 1 vláknem šedé + 1 vláknem světle šedé (= dvojitá příze) příze Alpaca 104-106-110 ok a upleteme 1 rubovou řadu obrace a 1 lícovou řadu hladce. Pokračujeme vroubkovým vzorem – viz výše. Ve výši 4 cm uzavřeme na začátku lícové řady 10 ok (= ozdobný pásek) = 94-96-100 ok. Upleteme 63-64-67 ok, přízi odstřihneme a práci otočíme. Řada nyní začíná zde (= střed zadní strany). Pleteme vroubkovým vzorem v řadách nad všemi oky (tj. pleteme přes místo, kde začínala řada dříve) = 94-96-100 ok. Ve výši 12 cm ujmeme rovnoměrně 8 ok = 86-88-92 ok. Toto ujímání zopakujeme ještě ve výši 16 cm = 78-80-84 ok. Ve výši 18 cm ujmeme rovnoměrně 10 ok a toto ujímání opakujeme vždy po 2 cm výšky pleteniny, celkem 4x = 38-40-44 ok. Ve výši 25 cm splétáme každá 2 hladce = 19-20-22 ok. V následující řadě opět spleteme každá 2 oka hladce = v řadě zbývá 10-10-11 ok. Přízi odstřihneme, protáhneme zbylými oky, stáhneme a zapošijeme. DOKONČENÍ: Čepici uprostřed zadní strany sešijeme. Ozdobný pásek přeložíme přes čepici a přišijeme na něj 2 ozdobné knoflíky – knoflíky nebudeme zapínat, přišijeme je napevno skrz obě vrstvy pleteniny. ---------------------------------------------------------- RUKAVICE: PRAVÁ RUKAVICE: Pleteme v řadách. Na jehlice č.4 nahodíme 1 vláknem šedé + 1 vláknem světle šedé (= dvojitá příze) příze Alpaca 45-47-49 ok a pleteme vroubkovým vzorem – viz výše. Ve výši 4 cm uzavřeme na začátku rubové řady 10 ok (= ozdobný pásek) = 35-37-39 ok. Ve výši 8,5-9,5-10 cm – končíme rubovou řadou – si označíme 18.-19.-20. oko. Nyní tvarujeme klínek palce - přidáme 1 oko na každé straně označeného oka - viz TIP - PŘIDÁVÁNÍ. Toto přidávání opakujeme na každé straně přidaných ok (tj. před a za vznikajícím klínem) v každé 4. řadě, celkem 5-6-7x = 45-49-53 ok. Ve výši 15,5-16,5-18 cm odložíme 11-13-15 ok palce na pomocnou jehlici. V následující řadě nahodíme za odloženými oky palce 1 oko nové = na jehlici zbývá 35-37-39 ok. Pleteme do výše 23-24-26 cm. V následující lícové řadě ujmeme rovnoměrně 3 oka = 32-34-36 ok. Upleteme 3 řady hladce. V následující řadě ujmeme rovnoměrně 4 oka = 28-30-32 ok. Toto ujímání opakujeme v každé 2. řadě ještě 4x = 12-14-16 ok. Upleteme 1 řadu hladce. V následující řadě splétáme každá 2 oka hladce = 6-7-8 ok. Přízi odstřihneme, protáhneme zbylými oky a zapošijeme. PALEC: Odložených 11-13-15 ok palce vrátíme zpět na ponožkové jehlice č.4 a z okraje za oky palce nabereme ještě 2 oka nová = 13-15-17 ok. Pleteme vroubkovým vzorem v kruhových řadách na ponožkových jehlicích – viz výše. Když je palec vysoký 5-5,5-6 cm, spleteme každá 2 oka hladce = 7-8-9 ok. V následující kruhové řadě opět spleteme každá 2 oka hladce = 4-4-5 ok. Přízi odstřihneme, protáhneme zbylými oky a zapošijeme. DOKONČENÍ: Rukavici po straně sešijeme – šev vedeme vnější částí krajových ok, aby byl co nejjemnější. Na okraj pásku přišijeme na ozdobu 2 knoflíky – přišíváme skrz obě vrstvy pleteniny. LEVÁ RUKAVICE: Pleteme stejně jako pravou rukavici, jen zrcadlově převrácenou; tj. 10 ok pro ozdobný pásek uzavřeme na začátku lícové řady. |
|
|
|
|
Vyrobili jste si tento nebo nějaký jiný z našich modelů? Přidejte ke svým fotkám na sociálních sítích tag #dropsdesign - díky tomu je uvidíme i my! Potřebujete s tímto návodem poradit?Otevřete-li si návod na stránce garnstudio.com, najdete tam výukových video-ukázek, Komentáře/Dotazy a další užitečné informace. © 1982-2024 DROPS Design A/S. Vyhrazujeme si veškerá práva. Tento dokument, včetně všech jeho dílčích částí, podléhá autorským právům. Podrobnější komentář k možnostem užití našich návodů najdete dole pod každým návodem na našich stránkách. |
|


V oblasti pletené a háčkované módy působí DROPS Design více než 40 let. Díky tomu vám můžeme nabídnout jednu z nejrozsáhlejších kolekcí modelů s bezplatnými návody dostupnými na internetu - navíc v 17 jazycích. K dnešnímu dni máme na 304 katalogů a 11422 návodů celkem - z nich je už 6303 dostupných v češtině.
Komentáře / Otázky (19)
You’ve got to be kidding right - your capelet pattern is incomprehensible. I will be sticking to English patterns from now on. Too bad it is a nice pattern.
27.01.2023 - 23:35Do I work the 64 st and if where yarn cut is back the front has to be sewn up and how to you get the back?????? This is the most confusing pattern I've ever seen and asked 2 knitters of 30 ( Exactly this passage: Work 63-64-67 sts, cut the yarn and turn piece. This is now beg of row (= mid back). Then work in garter st back and forth over all sts from here, ie work over previous beg of row = 94-96-100 sts. How do I do this? I cut the thread and turn cap but then I got a hole in the middle!
26.10.2021 - 20:35DROPS Design answered:
Dear Mrs Carlson, this part of the pattern has been edited, thanks for the info. You will have to cut the yarn after the first 10 sts have been cast off, insert a marker to mark the new beg of the rows and now work back and forth from the marker. See correction text. Happy knitting!
09.11.2021 - 11:19Har stickat 47 cm som angivet på halsvärmare. Rätstickning fram och tillbaka. Hur fortsätter jag? Är den i flera delar? Hur många?
23.09.2019 - 14:41DROPS Design answered:
Hej. Den stickas bara i en del och formas med hjälp av de förkortade varven, du får alltså olika mått på de olika sidorna. När du stickat klart syr du dit knapparna. Lycka till!
24.09.2019 - 11:52How many grams of yarn if working with group c?
30.05.2019 - 02:36DROPS Design answered:
Dear Missy, you can try our yarn converter - or read more about alternatives here. Happy knitting!
31.05.2019 - 10:14Wieviel Wolle benötige ich für den Kragenschal in Größe L/XL?
22.01.2019 - 18:16DROPS Design answered:
Liebe Frau Mädler, die Garnangaben finden Sie unter dem Kopfsprung, dh 200 g DROPS Alpaca /50 g das Knaüel Alpaca = 4 Knäuel in jede Farbe (= 8 Knäuel insgesamt). Viel Spaß beim stricken!
23.01.2019 - 08:53Liebes Dropsteam, natürlich, das verstehe ich und habe auch für die Mütze noch vorhandenes Garn von Ihnen genutzt:-) Ich werde Ihnen weiterhin treu bleiben! Viele Grüße ins Neue Jahr!
03.01.2019 - 09:10Hallo, kann man die Mütze auch in glatt rechts stricken wie bei einer Beanie? Mit Baby Alpaca 100%? Danke im Voraus!
01.01.2019 - 19:59DROPS Design answered:
Liebe Petra, nach dem Rand mit Krausrippe können Sie glatt rechts stricken, die Abnahmen entstehen in cm von der gesamte Höhe und werden so einfach zu folgen. Wir bitten um Verständnis, dass wir nicht Produkte unserer Konkurrenz empfehlen können und dass der Kauf des Materials uns hilft, weiterhin kostenlose Anleitungen zur Verfügung stellen zu können. Wir können Ihnen dann nur empfehlen, DROPS Alpaca oder eine Alternative (siehe unser Garnumrechner) zu benutzen. Viel Spaß beim stricken!
02.01.2019 - 11:44Bonjour, je ne comprends pas les explications pour la fin du tricot du tour du coup: "A environ 47 cm de hauteur total en haut et environ 125 cm le long du bas du bord ... ?"les explications s'arrêtent là, je ne sais pas quoi faire à partir de la, le tricot est petit pour ressembler à la photo et au dessin patron. Merci de m'apporter votre aide :))) Belle journée. Cécile Rose
26.11.2017 - 19:37DROPS Design answered:
Bonjour Mme Hubert, cette phrase a été réécrite, il fallait lire: "L'ouvrage mesure environ 47-49-51 cm de hauteur totale en haut (petit côté) et environ 125-131-137 cm le long du bas (long côté), en mesurant à 4 cm du bord (bord ondulé)." Correction faite, merci. Bon tricot!
27.11.2017 - 10:40När jag vänder efter 64 m mitt bak, så är ju halva mössan rätstickad och halva avigstickad.
02.09.2016 - 21:49DROPS Design answered:
Hej Monika. Nej, du strikker jo riller ikke glat
05.09.2016 - 12:36Beautiful pattern but I do not understand cap .. :( Exactly this passage: Work 63-64-67 sts, cut the yarn and turn piece. This is now beg of row (= mid back). Then work in garter st back and forth over all sts from here, ie work over previous beg of row = 94-96-100 sts. How do I do this? I cut the thread and turn cap but then I got a hole in the middle! Can I after closing those 10 stitches make cap in the round on circular needle? As it is in the pattern 'Bliss'
04.12.2014 - 10:40