
Oblíbené kategorie
Hledáte přízi?


|
|
Raspberry Smoothie |
|
 |
 |
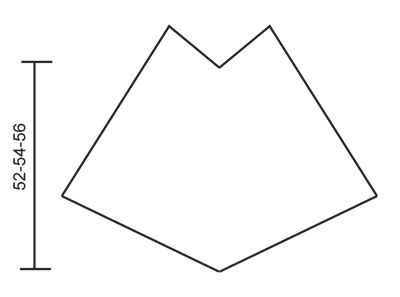
DROPS háčkované pončo z příze „Verdi“. Velikost S – XXXL
DROPS 137-25 |
|
|
PONČO: Háčkujeme v řadách dokola jako jeden díl od průkrčníku směrem dolů. Háčkem č. 6 uháčkujeme přízí Verid 130-150-170 řo a spojíme pevným okem do kruhu. 1. kruhová řada: 3 řo, do dalších dvou řo háčkujeme 1 DS, * řo, vynecháme 2 řo a do dalších tří řo háčkujeme vždy jeden DS*, mezi *-* opakujeme, až zbývají 2 řo, ta vynecháme a řadu končíme pevným okem do třetího řo ze začátku řady, do prvních dvou DS ze začátku řady háčkujeme pevná oka = 78-90-102 DS /26-30-34 skupin DS. 2. kr. ř.: 3 řo (= 1 DS), do první smyčky háčkujeme 2 DS, řo, * 3 DS a řo do další smyčky*, mezi *-* opakujeme 5-6-7krát, 3 DS do další smyčky, řo, 3 DS do stejné smyčky (= přidávání ve středu předního dílu), řo, *3 DS a řo do další smyčky*, mezi *-* opakujeme celkem 12-14-16krát, do další symčky 3 DS, řo, 3 DS do stejné smyčky (= přidávání ve středu zadního dílu), řo, * 3 DS a řo do další smyčky*, mezi *-* opakujeme celkem 6-7-8krát a řadu končíme pevným okem do třetího řo ze začátku řady, a do prvních dvou DS ze začátku řady háčkujeme pevná oka = 28-32-36 skupin z DS. Od 3. kruhové řady až do konečné délky: háčkujeme stejně jak je popsáno výše, SOUČASNĚ ve středu předního a zadního dílu háčkujeme 3 DS + řo+ 3DS do jedné smyčky (tj. v každé kruhové řadě přidáme ve vrcholu jednu skupinu DS = 2 skupiny DS v každé kruhové řadě). Háčkujeme až do výšky asi 52-54-56 cm, měřeno od průkrčníku středem předního dílu. Přizi ustřihneme a zapošijeme. HÁČKOVANÝ LEM: Kolem průkrčníku háčkujeme háčkem č. 6: do první smyčky KS, *3 řo, vynechat 3 DS, do další smyčky háčkujeme KS*, mezi *-* opakujeme a řadu končíme pevným okme do prvního KS. Přízi ustřihneme a zapošijeme. |
|
|
|
|
Vyrobili jste si tento nebo nějaký jiný z našich modelů? Přidejte ke svým fotkám na sociálních sítích tag #dropsdesign - díky tomu je uvidíme i my! Potřebujete s tímto návodem poradit?Otevřete-li si návod na stránce garnstudio.com, najdete tam výukových video-ukázek, Komentáře/Dotazy a další užitečné informace. © 1982-2024 DROPS Design A/S. Vyhrazujeme si veškerá práva. Tento dokument, včetně všech jeho dílčích částí, podléhá autorským právům. Podrobnější komentář k možnostem užití našich návodů najdete dole pod každým návodem na našich stránkách. |
|


V oblasti pletené a háčkované módy působí DROPS Design více než 40 let. Díky tomu vám můžeme nabídnout jednu z nejrozsáhlejších kolekcí modelů s bezplatnými návody dostupnými na internetu - navíc v 17 jazycích. K dnešnímu dni máme na 304 katalogů a 11422 návodů celkem - z nich je už 6304 dostupných v češtině.
Komentáře / Otázky (46)
If I want to make the neck are smaller,, how many chains do I start with?
06.05.2022 - 00:31DROPS Design answered:
Dear MammaO, we are unfortunately not able to adjust every pattern to every single requet, for any further assistance, please contact the store where you bought the yarn or any crochet forum. Thanks for your comprehension. Happy crocheting!
06.05.2022 - 07:48I am making the 137-25 poncho. My pints in both sides are not going straight down but vering to the side. I’m not sure what I have done wrong
17.02.2022 - 04:16DROPS Design answered:
Dear Mrs Gomez, it's a bit difficult to find the solution without seing your work - make sure the increases at both tips are always make upwards in the middle ch-space on mid back and mid front (insert a marker there can help). Bring your work to your store, or show them a picture per mail, so that they can help you - even per mail or telephone. Happy crocheting!
17.02.2022 - 10:31How can I make a border at the neckline and add tassels to the bottom in this design
02.12.2021 - 12:09DROPS Design answered:
Dear Meera, for the neckline you work 1 treble crochet in each stitch, around the whole neck. If you work more than 1 row, you need to decrease in mid front and mid back. As for the tassels, here you have a video about how to add them: https://www.garnstudio.com/lesson.php?id=17&cid=19 Happy crochetting!
05.12.2021 - 22:45I like this poncho. Can you show a video how to do the biggest size?
28.02.2021 - 04:17DROPS Design answered:
Dear Lois Seb, Unfortunatel we do not have a video showing the full making of this pattern, however, you can find our videor relevant to this piece below the pattern. Happy Crafting.
28.02.2021 - 20:23I'm new to this pattern. If you do 170, has anyone figured out how many " chains" ( 3 dc) you have before you have to do the increase? I want to do the biggest size, but do not understand when to do the increases? I'm not wanting to start only to have to rip it out because the increases are in the wrong space? Or is this post too late to get a response? Thank you
22.02.2021 - 02:09DROPS Design answered:
Dear Judy, you cast on 170 chains and on first row you have 102 dc, ie 34 dc groups, on first round; this means on 2nd round, you will have 32 dc groups between each increase + 2 dc-groups on mid front + 2 dc-groups on mid back = 36 dc-groups. Happy crocheting!
22.02.2021 - 09:42Bonjour, j'ai choisi ce modèle puisque le Beach Paradise à 2 fils est plus difficile. Est-ce possible que le Raspberry a été modifier dernièrement? C'est possible d'ajouter des franges au poncho?, merci.
15.09.2020 - 20:25DROPS Design answered:
Bonjour Marie, à priori ce modèle n'a pas été modifié ni corrigé récemment - qu'est ce qui pourrait vous y faire penser? Nous pourrions vérifier si vous constatez quelque chose. Vous pouvez tout à fait ajouter des franges, pensez juste à augmenter la quantité nécessaire - votre magasin DROPS saura vous conseiller si besoin - même par mail ou téléphone. Bon crochet!
16.09.2020 - 08:40OK, I am going to try an experiment, here- (probably another grand disaster in the making, hehe)- I am going to try doing the initial chain and Round 1 flat (not in the round)- and THEN try joining them AFTER Round 1 and from that point doing it in the round. Um, Erm, wish me luck !!!! (nervous laughter)
29.01.2020 - 09:57My beginning chain got twisted (without my knowing it, of course)- so I carefully counted every stitch, (170 carefully crocheted groups of 3 DC, chain 1 (skip two)... only to find out I had to rip the whole thing out. I wish there was some way of doing this whole project without having to use a beginning chain like that. *sigh*
28.01.2020 - 21:15DROPS Design answered:
Dear Mrs Kieding, this video below could help you. Happy crocheting!
29.01.2020 - 08:58Is there any way you could make a video for the xxl/xxxl size? This would be easier for me as a beginner and I also learn visually, not so much with written instructions. I want to make this poncho for my sister's birthday coming up soon.
02.08.2019 - 04:06DROPS Design answered:
Dear Shannyn, we have added your request to our todolist, to help you to show how to start the poncho. In the meantime, just cast on the requested number of chains, work first row as explained (you should get something like this, but in the round and not in rows) then from 2nd round you will increase for mid front and mid back as shown a href="https://www.garnstudio.com/video.php?id=635&lang=en">in this square, ie only increase on 2 places as explained in the pattern and not on 4 as shown in the square. Happy crocheting!
07.08.2019 - 10:34Hi I love this patten. But as many other have come to a problem. I am doing 150 chain so how many blockes before increase?? Also how many between??
23.07.2019 - 20:24DROPS Design answered:
Dear Zoe, with 150 chains, you should have after first round a total of 90 sts = 30 "blocks", on 2nd round (rounds start at the shoulder), work first 7 "blocks", then increase, work 14 "blocks", increase, work 7 "blocks". Happy crocheting!
06.08.2019 - 09:56