DROPS Kid-Silk uni colour 75% Mohair, 25% Silk |
6.75 $ /25g |
Order |
Clicking the ORDER button will redirect you to Wool Warehouse Direct Ltd website
The yarn cost is calculated from the pattern’s smallest size and the yarn’s cheapest product type. Looking for an even better price? You might find it on the DROPS Deals!
-------------------------------------------------------
Alternative Yarn – See how to change yarns here
Yarn Groups A to F – Use the same pattern and change the yarn here
Yarn usage using an alternative yarn – Use our yarn converter here
-------------------------------------------------------
DROPS Kid-Silk uni colour 75% Mohair, 25% Silk 6.75 $ /25g Order |
Clicking the ORDER button will redirect you to Wool Warehouse Direct Ltd website
The yarn cost is calculated from the pattern’s smallest size and the yarn’s cheapest product type. Looking for an even better price? You might find it on the DROPS Deals!
All measurements in charts are in cm.
= K from RS, P from WS | |
= P from RS, K from WS |
Each of our patterns has specific tutorial videos to help you.
These step-by-step tutorials might also help you:
Why is the knitting/crochet tension so important?
Knitting tension is what determines the final measurements of your work, and is usually measured per 10 x 10 cm. It is provided like so: number of stitches in width x number of rows in height - eg: 19 stitches x 26 rows = 10 x 10 cm.
The knitting tension is very individual; some people knit/crochet loosely while others work tightly. You adjust the knitting tension with the needle size, which is why the suggested needle size only serve as a guide! You need to adjust this (up or down) to ensure that YOUR knitting tension matches the knitting tension provided in the pattern. If you work with a different knitting tension than provided you will have a different yarn consumption, and your work will have different measurements than what the pattern suggests.
The knitting tension also determines which yarns can replace each other. As long as you achieve the same knitting tension you can replace one yarn with another.
See DROPS lesson: How to measure your tension/gauge
See DROPS video: How to make a gauge tension swatch
How do I know how many balls of yarn I need?
The required amount of yarn is provided in grams, eg: 450 g. To calculate how many balls you’ll need you first need to know how many grams are in 1 ball (25g, 50g or 100g). This information is available if you click on the individual yarn quality on our pages. Divide the amount required with the amount of each ball. For example, if each ball is 50g (the most common amount), the calculation will be as follows: 450 / 50 = 9 balls.
Can I use a different yarn than what the pattern suggests?
The important thing when changing from one yarn to another is that the knitting/crochet tension remains the same. This is so that the measurements of the finished piece will be the same as on the sketch provided. It is easier to achieve the same knitting tension using yarns from the same yarn group. It is also possible to work with multiple strands of a thinner yarn to achieve the knitting tension of a thicker one. Please try our yarn converter. We recommend you to always work a test swatch.
Please NOTE: when changing yarn the garment might have a different look and feel to the garment in the photo, due to individual properties and qualities of each yarn.
See DROPS lesson: Can I use a different yarn than the one mentioned in the pattern?
What are the yarn groups?
All our yarns are categorised into yarn groups (from A to F) according to thickness and knitting tension – group A contains the thinnest yarns and group F the thickest. This makes it easier for you to find alternative yarns to our patterns, should you wish to switch yarn. All yarns within the same group have a similar knitting tension and can easily replace each other. However, different yarn qualities have different structures and properties which will give the finished work a unique look and feel.
How do I use the yarn converter?
At the top of all our patterns you’ll find a link to our yarn converter, which is a helpful tool should you wish to use a different yarn than suggested. By filling in the yarn quality you wish to replace, the amount (in your size) and number of strands, the converter will present good alternative yarns with the same knitting tension. Additionally it will tell you how much you’ll require in the new qualities and whether you’ll need to work with multiple strands. Most skeins are 50g (some are 25g or 100g).
If the pattern is worked with multiple colours, every colour will have to be converted separately. Similarly, if the pattern is worked with several strands of different yarns (for example 1 strand Alpaca and 1 strand Kid-Silk) you will have to find alternatives for each, individually.
Why do you show discontinued yarns in the patterns?
Since different yarns have different qualities and textures we have chosen to keep the original yarn in our patterns. However, you can easily find options among our available qualities by using our yarn converter, or simply pick a yarn from the same yarn group.
It is possible that some retailers still have discontinued yarns in stock, or that someone has a few skeins at home that they would like to find patterns for.
The yarn converter will provide both alternative yarn as well as required amount in the new quality.
What size should I knit?
If you think it's hard to decide what size to make, it can be a good idea to measure a garment you own already and like the size of. Then you can pick the size by comparing those measures with the ones available in the pattern's size chart.
You'll find the size chart at the bottom of the pattern.
See DROPS lesson: How to read size chart
Why do I get the wrong knitting tension with the suggested needle size?
The needle size provided in the pattern serves only as a guide, the important thing is to follow the knitting tension. And since knitting tension is very individual, you will have to adjust the needle size to ensure that YOUR tension is the same as in the pattern – maybe you’ll have to adjust 1, or even 2 needle sizes, up or down to achieve the correct tension. For this, we recommend that you work test swatches.
Should you work with a different knitting tension than the one provided, the measurements of the finished garment might deviate from the measurement sketch.
See DROPS lesson: How to measure your tension/gauge
See DROPS video: How to make a gauge tension swatch
Why is the pattern worked top-down?
Working a garment top-down provides more flexibility and room for personal adjustment. For example it is easier to try the garment on while working, as well as making adjustments to length of yoke and shoulder caps.
The instructions are carefully explaining every step, in the correct order. Diagrams are adjusted to the knitting direction and are worked as usual.
How do I work according to a knitting diagram?
The diagram depicts all rows/rounds, and every stitch seen from the right side. It is read from bottom to top, from right to left. 1 square = 1 stitch.
When working back and forth, every other row is worked from the right side and every other row is worked from the wrong side. When working from the wrong side, the diagram will have to be worked reversed: from left to right, knit stitches are purled, purl stitches are knit etc.
When working in the round every round is worked from the right side and the diagram are worked from right to left on all rounds.
See DROPS lesson: How to read knitting diagrams
How do I work according to a crochet diagram?
The diagram depicts all rows/rounds, and every stitch seen from the right side. It is worked from bottom to top, from right to left.
When working back and forth every other row is worked from the right side: from right to left and every other row is worked from the wrong side: from left to right.
When working in the round, every row in the diagram are worked from the right side, from right to left.
When working a circular diagram you start in the middle and work your way outwards, counter clockwise, row by row.
The rows usually start with a given number of chain stitches (equivalent to the height of the following stitch), this will either be depicted in the diagram or explained in the pattern.
See DROPS lesson: How to read crochet diagrams
How do I work several diagrams simultaneously on the same row/round?
Instructions for working several diagrams after each other on the same row/round, will often be written like so: “work A.1, A.2, A.3 a total of 0-0-2-3-4 times". This means you work A.1 once, then A.2 is worked once, and A.3 is repeated (in width) the number of times provided for your size – in this case like so: S = 0 times, M = 0 times, L=2 times, XL= 3 times and XXL = 4 times.
The diagrams are worked as usual: begin with the first row in A.1, then work the first row in A.2 etc.
See DROPS lesson: How to read knitting diagrams
See DROPS lesson: How to read crochet diagrams
Why are the sleeves shorter in larger sizes?
The total width of the garment (from wrist-to-wrist) will be larger in the larger sizes, despite the actual sleeves being shorter. The larger sizes have longer sleeve caps and wider shoulders, so there will be a good fit in all sizes.
Where on the garment is the length measured?
The measurement sketch/schematic drawing provides information regarding the full length of the garment. If it’s a jumper or a jacket the length is measured from the highest point on the shoulder (usually closest to the neckline), and straight down to the bottom of the garment. It is NOT measured from the tip of shoulder. Similarly, the length of yoke is measured from the highest point on the shoulder and down to where yoke is split into body and sleeves.
See DROPS lesson: How to read a schematic drawing
What is a repeat?
Diagrams are often repeated on the round or in height. 1 repeat is the diagram the way it appears in the pattern. If it says to work 5 repeats of A.1 in the round, then you work A.1 a total of 5 times after/next to each other in the round. If it says to work 2 repeats of A.1 vertically/in height you work the entire diagram once, then begin again at the start and work the entire diagram one more time.
Why does the piece start with more chain stitches than it’s worked with?
Chain stitches are slightly narrower than other stitches and to avoid working the cast-on edge too tight, we simply chain more stitches to begin with. The stitch count will be adjusted on the following row to fit the pattern and measurement sketch.
Why increase before the rib edge when the piece is worked top-down?
The rib edge is more elastic and will contract slightly compared to, for example, stocking stitch. By increasing before the rib edge, you avoid a visible difference in width between the rib edge and the rest of the body.
Why increase in the cast-off edge?
It’s very easy to cast off too tightly, and by making yarn overs while casting off (and simultaneously casting these off) you avoid a too tight cast off edge.
See DROPS video: How to bind off with yarn overs (yo)
How do I increase/decrease on every 3rd and 4th row/round alternately?
To achieve an even increase (or decrease) you can increase on, for example: every 3rd and 4th row alternately, like so: work 2 rows and increase on the 3rd row, work 3 rows and increase on the 4th. Repeat this until the increase is complete.
See DROPS lesson: Increase or decrease 1 st on every 3rd and 4th row alternately
How can I work a jacket in the round instead of back and forth?
Should you prefer to work in the round instead of back and forth, you may of course adjust the pattern. You’ll need to add steeks mid-front (usually 5 stitches), and follow the instructions. When you would normally turn and work from the wrong side, simply work across the steek and continue in the round. At the end you’ll cut the piece open, pick up stitches to work bands, and cover the cut edges.
See DROPS video: How to knit steeks and cut open
Can I work a jumper back and forth instead of in the round?
Should you prefer to work back and forth instead of in the round, you may of course adjust the pattern so you work the pieces separately and then assemble them at the end. Divide the stitches for the body in 2, add 1 edge stitch in each side (for sewing) and work the front and back pieces separately.
See DROPS lesson: Can I adapt a pattern for circular needles into straight needles?
Why is the pattern slightly different than what I see in the photo?
Pattern repeats can vary slightly in the different sizes, in order to get the correct proportions. If you’re not working the exact same size as the garment in the photo, yours might deviate slightly. This has been carefully developed and adjusted so that the complete impression of the garment is the same in all sizes.
Make sure to follow instructions and diagrams for your size!
How do I make a women’s size garment into a men’s size one?
If you have found a pattern you like which is available in women’s size it’s not very difficult to convert it to men’s size. The biggest difference will be the length of sleeves and body. Start working on the women size that you think would fit across the chest. The additional length will be worked right before you cast off for the armhole/sleeve cap. If the pattern is worked top-down you can add the length right after the armhole or before the first decrease on sleeve.
Regarding additional yarn amount, this will depend on how much length you add, but it is better with a skein too many than too few.
How do I prevent a hairy garment from shedding?
All yarns will have excess fibres (from production) that might come off as lint or shedding. Brushed yarns (ie hairier yarns) have more of these loose, excess fibres, causing more shedding.
Shedding also depends on what is worn under or over the garment, and whether this pulls at the yarn fibres. It’s therefore not possible to guarantee that there will be no shedding
Below are some tips on how to get the best result when working with hairier yarns:
1. When the garment is finished (before you wash it) shake it vigorously so the looser hairs come off. NOTE: do NOT use a lint roller, brush or any method that pulls at the yarn.
2. Place the garment in a plastic bag and put it in your freezer - the temperature will cause the fibres to become less attached to each other, and excess fibres will come off easier.
3. Leave in the freezer for a few hours before taking it out and shaking it again.
4. Wash the garment according to the instructions on the yarn label.
Why does my garment pill?
Pilling is a natural process that happens to even the most exclusive of fibers. It's a natural sign of wear and tear that is hard to avoid, and that is most visible in high friction areas of your garment like a sweater's arms and cuffs.
You can make your garment look as new by removing the pilling, using a fabric comb or a pill/lint remover.
Parker |
|||||||
|
|||||||
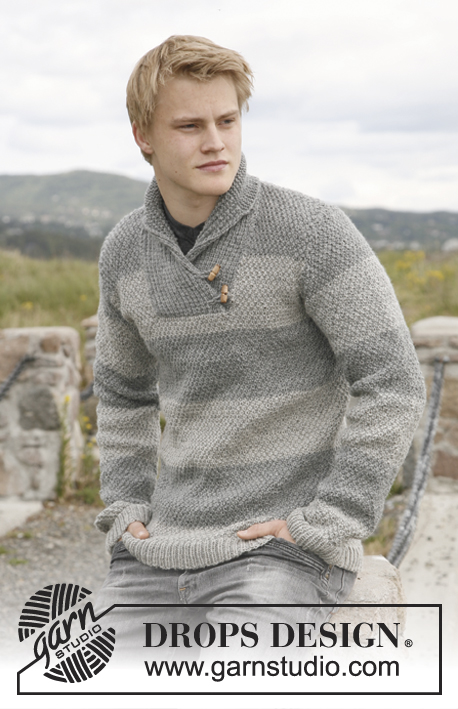
Knitter jumper for men with shawl collar, in DROPS Alpaca and DROPS Kid-Silk. Size: S to XXXL.
DROPS 135-45 |
|||||||
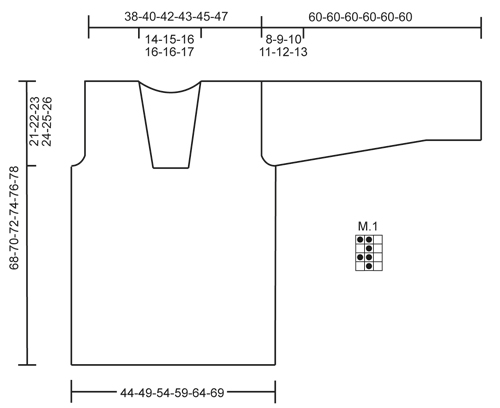
PATTERN: See diagram M.1 – diagram shows pattern from RS. ---------------------------------------------------------- FRONT PIECE: Worked back and forth on needle. Cast on 94-105-115-126-136-147 sts (includes 1 edge st in each side) on needle size 5.5 mm / US 9 with 1 strand Alpaca + 1 strand Kid-Silk. Work as follows (from RS): * K 3, K 2 tog, K 2 *, repeat from *-* until 3-0-3-0-3-0 sts remain, K these sts = 81-90-99-108-117-126 sts. Work next row from WS as follows: K 1 edge st * P 1, K 2 *, repeat from *-* until 2 sts remain, P 1 and K 1 edge st. Then work diagram M.1 over all sts, with 1 edge st in each side worked K on all rows (diagram M.1 starts and ends with 1 K st, seen from RS, before edge st in each side). When piece measures approx. 47-48-49-50-51-52 cm / 18½"-19"-19¼"-19¾"-20"-20½", work next row as follows from RS: bind off 4 sts for armhole, work 26-30-34-38-42-46 sts in diagram M.1 as before (= left front piece), bind off 21-22-23-24-25-26 sts for neck, and work the rest of row in diagram M.1 as before (= 30-34-38-42-46-50 sts). Turn and bind off 4 sts for armhole, work the rest of row = 26-30-34-38-42-46 sts remain on right front piece. Slip sts in the left side on a stitch holder. RIGHT SIDE: Continue to work diagram M.1 over sts on needle, while at the same time binding off for armhole at the beg of every row from the side: 3 sts 0-0-1-1-2-2 times, 2 sts 0-1-1-2-2-3 times and 1 st 2-3-3-4-4-5 times. AT THE SAME TIME when piece measures 54-55-56-57-58-59 cm / 21¼"-21⅝"-22"-22½"-22¾"-23¼", dec 1 st towards the neck, repeat dec when piece measures 60-61-62-63-64-65 cm / 23⅝"-24"-24⅜"-24¾"-25¼"-25½". After all bind offs and dec are done, 22-23-24-25-26-27 sts remain on needle. Bind off when piece measures 68-70-72-74-76-78 cm / 26¾"-27½"-28⅜"-29⅛"-30"-30¾". LEFT SIDE: Slip the stitches on the stitch holder back on needle and work as right side but reversed. BACK PIECE: Cast on and work as on front piece until piece measures 47-48-49-50-51-52 cm / 18½"-19"-19¼"-19¾"-20"-20½". Now bind off for armholes at beg of every row in each side: 4 sts 1 time, 3 sts 0-0-1-1-2-2 times, 2 sts 0-1-1-2-2-3 times and 1 st 2-3-3-4-4-5 times = 69-72-75-78-81-84 sts. When piece measures 66-68-70-72-74-76 cm / 26"-26¾"-27½"-28⅜"-29⅛"-30", bind off the middle 25-26-27-28-29-30 sts for neck. Work each shoulder (= 22-23-24-25-26-27 sts) separately until piece measures 68-70-72-74-76-78 cm / 26¾"-27½"-28⅜"-29⅛"-30"-30¾", bind off. SLEEVE: Worked back and forth on needle. Cast on 57-57-60-60-63-66 sts (includes 1 edge st in each side) on needle size 5.5 mm / US 9 with 1 strand Alpaca + 1 strand Kid-Silk. K 1 row from RS while at the same time dec 6 sts evenly = 51-51-54-54-57-60 sts. Work next row from WS as follows: K 1 edge st * P 1, K 2 *, repeat from *-* until 2 sts remain, finish with P 1 and K 1 edge st. Then work diagram M.1 over all sts, with 1 edge st in each side worked K on all rows. (Diagram M.1 starts and ends with K 1, seen from RS, before edge st in each side.) When piece measures 12 cm / 4¾", inc 1 st in each side inside edge st. Repeat inc every 4½-4½-4½-3-3-3 cm / 1¾"-1¾"-1¾"-1⅛"-1⅛"-1⅛" a total of 9-9-9-12-12-12 times = 69-69-72-78-81-84 sts – work the inc sts gradually in diagram M.1. When piece measures 52-51-50-49-48-47 cm / 20½"-20"-19¾"-19¼"-19"-18½" (shorter measurements in the larger sizes because of longer sleeve cap and wider shoulders) bind off at beg of every row in each side: 4 sts 1 time, 2 sts 3 times and 1 st 2-4-5-6-8-9 times. Then bind off 2 sts in each side until piece measures 59 cm / 23¼", then bind off 3 sts 1 time in each side. Bind off, the piece measures approx. 60 cm / 23⅝" in all sizes. ASSEMBLY: Sew the shoulder seams. SHAWL COLLAR: Beg mid front on left side of sts bound off for neck. Pick up on circular needle size 5.5 mm / US 9 with 1 strand Alpaca and 1 strand Kid-Silk: 38 to 45 sts up to shoulder, then pick up 26 to 32 sts in the back of neck, and finally 38 to 45 sts down along left side of neck dec = 102 to 122 sts (do not pick up sts where sts were dec in front of neck). K 1 row from WS while AT THE SAME TIME inc no of sts to 128-134-140-146-152-158. Then work rib as follows (from RS): K 2 sts that are K on all rows, * K 1, P 2 *, repeat from *-* and finish with K 1 and then K 2 sts that K on all rows. Continue like this until collar measures approx. 5 cm / 2". Now inc 1 st in each of the middle 12 P-sections, seen from RS (= back of neck) = 140-146-152-158-164-170 sts. Continue with K over K and P over P until collar measures approx. 11-11-12-12-13-13 cm / 4⅜"-4⅜"-4¾"-4¾"-5⅛"-5⅛" - adjust so that next row is from RS. Work 4 rows in stockinette st over all sts, then bind off all sts with K from RS. The outermost edge is supposed to roll. Place the collar double (right side over left side) at the bottom of neck opening and sew it to the neck line through both layers. MORE ASSEMBLY: Sew in sleeves and sew under arm and side seams in one inside 1 edge st. |
|||||||
Diagram explanations |
|||||||
|
|||||||
Have you made this or any other of our designs? Tag your pictures in social media with #dropsdesign so we can see them! Do you need help with this pattern?You'll find tutorial videos, a Comments/Questions area and more by visiting the pattern on garnstudio.com. © 1982-2024 DROPS Design A/S. We reserve all rights. This document, including all its sub-sections, has copyrights. Read more about what you can do with our patterns at the bottom of each pattern on our site. |
With over 40 years in knitting and crochet design, DROPS Design offers one of the most extensive collections of free patterns on the internet - translated to 17 languages. As of today we count 304 catalogs and 11422 patterns - 11417 of which are translated into English (US/in).
We work hard to bring you the best knitting and crochet have to offer, inspiration and advice as well as great quality yarns at incredible prices! Would you like to use our patterns for other than personal use? You can read what you are allowed to do in the Copyright text at the bottom of all our patterns. Happy crafting!
Comments / Questions (100)
Tineke wrote:
Hoi! Ik heb inmiddels ontdekt wat ik fout had gedaan. Nu gaat het wel goed en lijkt het patroon wel op dat van de foto. De instructies, m.b.t. het lezen van de teltekeningen, had ik reeds gelezen. Groetjes en bedankt! Tineke
25.02.2015 - 13:38Tineke wrote:
Goedemorgen, Op de foto zie ik een 1 recht, 1 averecht patroon. Als ik M1 volg, bereik ik niet het resultaat van de foto. Wat doe ik verkeerd? Hoe, gezien jullie antwoord op mijn vorige vraag, begin ik dan aan de verkeerde kant? Met 2 r, 1 av kom ik niet uit op het patroon van de foto. Groetjes, Tineke
25.02.2015 - 09:06DROPS Design answered:
Hoi Tineke. Het is zoals ik ook eerder heb geantwoord geen 1 r, 1 av patroon op de foto. De trui is gebreid volgens de teltekening. DUS, van de goede kant lees je van rechts naar links: 1 r, 1 av, 1 r. Op de verkeerde kant lees je van links naar rechts: 2 r, 1 av, enzovoort. Je begint en eindigt met 1 r op de goede kant (zie man antwoord van 24/2), deze 2 worden 1 av op de verkeerde kant. Nogmaals, dan kan je hier ook lezen hoe je onze teltekeningen moet lezen.
25.02.2015 - 12:43Tineke wrote:
Bedankt! En aan de verkeerde kant: *2r, 1 av* en dit herhalen? Groetjes, Tineke
24.02.2015 - 16:19DROPS Design answered:
Hoi Tineke. Ja, zoals er staat: "1 st kant st in ribbelst * 1 st av, 2 st r *, herhaal van *-* tot er 2 st over zijn, 1 st av en 1 st kant st in ribbelst. "
25.02.2015 - 12:48Tineke wrote:
Goedemiddag, Mijn vorige vraag is reeds opgelost, maar nu het volgende: Er staat in het patroon: "(telpatroon M.1 begint en eindigt met 1 rechte st, gezien aan de goede kant, naast de kant st aan iedere kant)." Bij 108 steken (=XL) kom ik met het patroon, aan het einde van de naald, uit op 1 st av., ipv. 1 st r., naast de kantsteek. Wat nu? Groetjes, Tineke
24.02.2015 - 14:40DROPS Design answered:
Hoi Tineke. Je breit het telpatroon over 106 st (108 st - 2 kantst). 1 herhaling van het patroon is 3 st = 35 herhalingen = 105. Dus je eindigt met de eerste st van M.1 = 1 r.
24.02.2015 - 15:41Tineke wrote:
Goedemorgen, Ik brei deze tui in XL en begrijp het eerste deel van het voorpand niet:" Zet 94-105-115-126-136-147 st op (incl 1 kant st in iedere kant) met nld 5.5 mm. Brei als volgt (aan de goede kant): * 3 st recht, 2 st recht samen, 2 st r *, herhaal van *-* tot er 3-0-3-0-3-0 st over zijn, brei deze st recht = 81-90-99-108-117-126 st." Er staat: "herhaal van *-* tot er 3-0-3-0-3-0 st over zijn" Wordt hier bedoeld dat ik 108 steken moet overhouden? Alvast bedankt! Tineke
24.02.2015 - 11:52Tineke wrote:
Goedemorgen, Bij materiaal heeft men niet vermeld dat er ook een rondbreinaald nodig is (Zie patroon bij sjaalkraag). Kun je de sjaalkraag ook met rechte naalden maken ? Groetjes, Tineke
24.02.2015 - 08:47DROPS Design answered:
Hoi Tineke... Ja, dat is waar. Wij zullen dat zsm toevoegen. Ik denk dat het lastig wordt om de kraag op een rechte naald te breien, dus ik zou zeker een rondbreinaald gebruiken.
25.02.2015 - 12:50Tineke wrote:
Hai! Bedankt, ben benieuwd.... Groetjes, Tineke
09.02.2015 - 15:24Tineke wrote:
Goedemorgen, Bedankt voor de uitleg en de link. Het is me nu duidelijk. Maar, volgens mij, komt het patroon bij M1 niet overeen met de afgebeelde trui. Die lijkt mij gebreid in "boordsteek". (r. av. r. av.). Klopt dat? Bedankt! Groetjes, Tineke
08.02.2015 - 08:56DROPS Design answered:
Hoi Tineke. De trui is gebreid met het motief volgens de teltekening
09.02.2015 - 14:14Tineke wrote:
Goedemorgen, Is patroon M1: Nld.1 (goede kant): 1r., 1av., 1r enz. Nld.2 (verkeerde kant): 1av., 1r., 1 av. enz. of: 2r., 1av., 2r. enz.? En hoe zit het dan met nld. 3 en 4? Is het niet eenvoudiger om de naalden uit te schrijven ipv. een diagram? Alvast bedankt! Groetjes, Tineke
06.02.2015 - 11:43DROPS Design answered:
Hoi Tineke. Nee. Je breit heen en weer, dus eerste rij (goede kant) lees je van rechts naar links en tweede rij (verkeerde kant) van links naar rechts enzovoort. Kijk op de beschrijving van de symbolen hoe je de steken moet breien. Kijk ook hier hoe je onze teltekeningen moet lezen.
06.02.2015 - 16:57Caroleve wrote:
Im confused by your explanation of M.1. What do you mean by R1+3 and R2+4. Also why a diagram why not write out the two row pattern. Thank you
06.01.2015 - 23:46DROPS Design answered:
Dear Caroleve, M.1 is worked over 3 sts and 4 rows - on row 1 (from RS) work *K1, P1, K1* repeat from *-* - on row 2 (from WS) work K2, P1 - on row 3, work as row 1 - on row 4, work as row 2. Happy knitting!
07.01.2015 - 10:32