
Popular categories
Looking for a yarn?


|
|||||||||||||
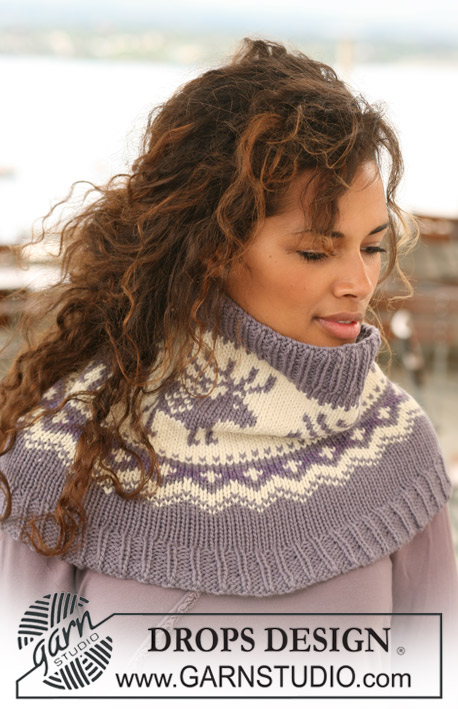
Reindeer Swing |
|||||||||||||
|
|
|||||||||||||
Knitted DROPS Christmas jumper with raglan sleeves and reindeer pattern on yoke in ”Nepal”. Size S - XXXL.
DROPS 122-43 |
|||||||||||||
|
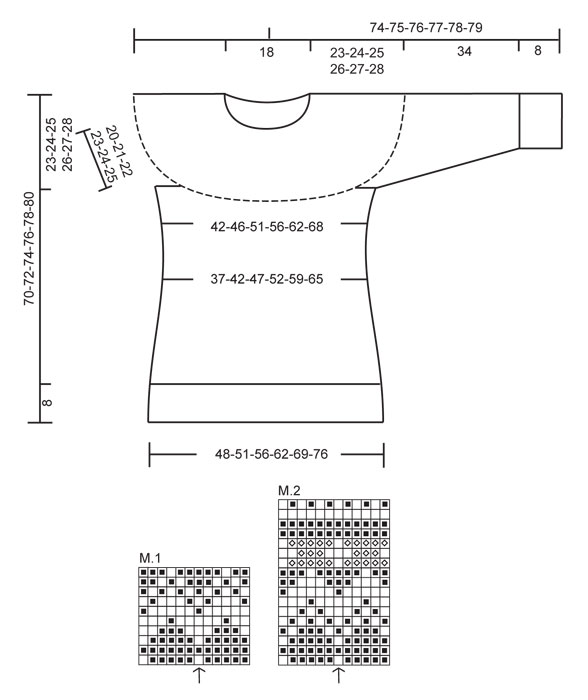
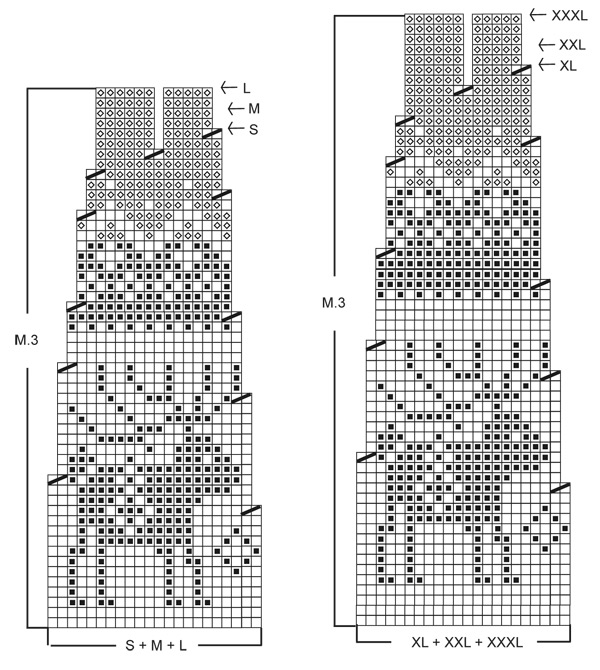
PATTERN: See diagram M.1 to M.3. The entire pattern is worked in stocking st in the round. MEASUREMENT TIP: Because of the weight of the yarn make all measurements while the garment is hanging otherwise it will be too long when worn. INCREASING TIP (applies to darts + inc at the side): Inc 1 st by picking up st from previous row and K this. DECREASING TIP (applies to darts + dec at the side): Dec as follows after marker: slip 1 st as if to K, K1, psso. Dec as follows 2 sts before marker: K2 tog. -------------------------------------------------------- BODY PIECE: See MEASUREMENT TIP! Cast on 240-255-282-312-348-384 sts on circular needle size 4 mm with grey/purple. Work rib, K1/P2. When piece measures 8 cm change to circular needle size 5 mm. K 1 round AT THE SAME TIME dec 78-81-90-102-114-126 sts evenly = 162-174-192-210-234-258 sts. Now work M.1 AT THE SAME TIME on last round dec 2 sts evenly in SIZE L (no dec in the other sizes) = 162-174-190-210-234-258 sts. After M.1 continue with grey/purple and stocking st. REMEMBER THE KNITTING TENSION! AT THE SAME TIME after M.1 insert 6 markers in piece as follows: Marker-1at beg of round (= the side). Marker-2 after 25-27-30-34-38-42 sts. Marker-3 after a further 31-33-35-37-41-45 sts. Marker-4 after a further 25-27-30-34-38-42 sts (= the side). Marker-5 after a further 25-27-30-34-38-42 sts. Marker-6 after a further 31-33-35-37-41-45 sts (= 25-27-30-34-38-42 sts left on round after last marker) – let the markers follow the piece as you go along. READ ALL OF THE FOLLOWING SECTION BEFORE CONTINUING! When piece measures 14 cm dec 1 st after marker-2 and -5 and before marker-3 and -6 – See DECREASING TIP (= darts on front and back piece). Repeat the dec on every 4.5 cm a total of 5 times. AT THE SAME TIME when piece measures 14 cm dec 1 st each side of marker-1 and -4 (= at the sides) and repeat the dec on every 6-9-9-9-9-6 cm a total of 4-3-3-3-3-4 times. After all dec there are 126-142-158-178-202-222 sts on needle. When piece measures 35-35-35-36-36-37 cm inc after marker-2 and -5 and before marker-3 and -6 – See INCREASING TIP. Repeat the inc on every 1.-1.-1,5.-1,5.-3,5.-3,5 cm a total of 4-4-4-3-2-2 times = 142-158-174-190-210-230 sts on needle. When piece measures 39-40-41-42-43-44 cm work M.2 - NOTE: adjust pattern to the middle, arrow in diagram marks the middle st front and back – pattern will not fit at the sides. When 1 round remain of M.2 (piece measures approx 47-48-49-50-51-52 cm) cast off 8 sts each side for armhole (i.e. 4 sts each side marker-1 and -4) = 63-71-79-87-97-107 sts left on front and back piece. Put piece aside and knit the sleeves. SLEEVE: READ ALL OF THIS SECTION BEFORE CONTINUING! Cast on 54-54-54-57-57-57 sts on double pointed needles size 4 mm with grey/purple. Work rib, K1/P2. When piece measures 8 cm change to double pointed needles size 5 mm , K 1 round AT THE SAME TIME dec 12-12-12-9-9-9 sts evenly = 42-42-42-48-48-48 sts. Now work M.1. After M.1 continue in grey/purple and stocking st AT THE SAME TIME dec 1 st for all sizes on round 1 = 41-41-41-47-47-47 sts. When piece measures 14-13-13-13-14-13 cm (M.1 is finished) inc 2 sts mid under sleeve. Repeat the inc on every 3-2.5-2.5-2.5-2-2 cm a total of 9-11-12-11-13-15 times = 59-63-65-69-73-77 sts. AT THE SAME TIME when piece measures 34 cm work M.2 – NOTE: adjust pattern to the middle, arrow in diagram marks the middle st on upper arm. When 1 round remain of M.2 (piece measures approx 42 cm for all sizes) cast off 8 sts mid under sleeve = 51-55-57-61-65-69 sts left on needle. Put piece aside and knit the other sleeve. YOKE: Slip sleeves on the same circular needle as body pieces where cast off for armholes = 228-252-272-296-324-352 sts. Round now beg mid back. K 1 round with eco off-white AT THE SAME TIME dec 8-10-8-10-16-0 sts evenly = 220-242-264-286-308-352 sts. Continue in M.3 – see chart for your size. After M.3 (finish pattern by arrow in diagram for your size) there are 110-121-132-143-154-176 sts on needle. K 1 round with purple/violet mix AT THE SAME TIME dec 34-41-48-55-62-80 sts evenly = 76-80-84-88-92-96 sts. NECK: Now work elevation mid back, back and forth on needle with purple/violet mix. Work row to mid front, insert a marker. K 47-50-52-55-57-60 sts, turn piece and P 18-20-20-22-22-24 sts. Turn piece, K 27-30-30-33-33-36 sts, turn piece and P 36-40-40-44-44-48 sts. Turn piece, K 45-50-50-55-55-60 sts, turn piece and P 54-60-60-66-66-72 sts. Turn piece, K all sts to marker. Change to double pointed needles size 4 mm and continue in the round. K 1 round AT THE SAME TIME inc 26-22-24-20-22-18 sts evenly = 102-102-108-108-114-114 sts. Work rib = K1/ P2 on all sts. Cast off with K over K and P over P when rib measures 14-14-15-15-16-16 cm, measured mid front. ASSEMBLY: Sew openings under sleeves. |
|||||||||||||
Diagram explanations |
|||||||||||||
|
|||||||||||||
|
|||||||||||||
|
|||||||||||||
|
Have you made this or any other of our designs? Tag your pictures in social media with #dropsdesign so we can see them! Do you need help with this pattern?You'll find tutorial videos, a Comments/Questions area and more by visiting the pattern on garnstudio.com. © 1982-2024 DROPS Design A/S. We reserve all rights. This document, including all its sub-sections, has copyrights. Read more about what you can do with our patterns at the bottom of each pattern on our site. |
|||||||||||||


With over 40 years in knitting and crochet design, DROPS Design offers one of the most extensive collections of free patterns on the internet - translated to 17 languages. As of today we count 304 catalogues and 11422 patterns - 11422 of which are translated into English (UK/cm).
We work hard to bring you the best knitting and crochet have to offer, inspiration and advice as well as great quality yarns at incredible prices! Would you like to use our patterns for other than personal use? You can read what you are allowed to do in the Copyright text at the bottom of all our patterns. Happy crafting!
Comments / Questions (69)
Bonjour, je tricote ce modèle et je voudrais m'assurer que la réhausse dos (col) commence bien à partir du milieu devant car il me semble qu'en partant du milieu devant, c'est le devant qui est rehaussé. Merci de votre réponse et bonne année Drops !
20.12.2012 - 20:28DROPS Design answered:
Bonjour Madame Cowé, le 1er rang pour la réhausse dos se tricote à partir du milieu devant, mais on tricote 47-60 m (cf taille) au 1er rang, soit jusqu'à la moitié dos + 9-12 m en fonction de la taille. Au 2ème rang, on tricote 18-24 m soit le même nombre de mailles avant et après le milieu dos, etc... On aura bien tricoté plus de rangs sur les mailles du dos. Bon tricot !
20.12.2012 - 21:02Det fortsettes å øke i siden selv om man starter på M.2. Maskene strikkes in i mønsteret.
30.01.2012 - 08:49Hei. De to siste omg. med økning blir på M2. Hvor på mønsteret? Eller er det egentlig meningen at en skal være færdig med økningene når M2 begynner? Det ville jo vært det peneste. ( jeg strikker str M)
29.01.2012 - 23:24Das Modell habe ich in dunkelbraun, camel und natur gestrickt. Die Anleitung war gut nachzuarbeiten. Habe Merino / Microfaser- Wolle genommen.
25.10.2011 - 09:40What is the price of this pattern? Need size large with bust measurements.
29.07.2010 - 00:58Beautiful as always.
11.07.2010 - 15:50Sej sweater
07.07.2010 - 20:50Isabela wrote:
Beautiful classic!
04.07.2010 - 07:53Hoi Corrie. Wij publiceren op dit moment de patronen als ze klaar zijn. Als dit patroon gepubliceerd is, dan wordt de link onder de foto actief. Dus nog even geduld ;o). Gr. Tine
01.07.2010 - 10:04Ik zou graag weten of het patroon er nog is zou het graag willen breien ik ben gek op noorse patronen voor zowel mannen als vrouwen . heb er al verschillende gebreid groeten corrie en ga zo door
30.06.2010 - 14:04