


Komentáře / Otázky (19)
![]() Claudia Daniel napsala:
Claudia Daniel napsala:
Hallo, ich stricke den cardigan in größe m. wenn ich alle 9cm ein knopfloch arbeite, hab ich am ende 6 knopflöcher, angegeben sind für gr. m 5 knöpfe, das ist leider einer zuwenig. bitte überprüft mal die anzahl der benötigten knöpfe in der anleitung liebe grüße claudia
14.07.2024 - 09:32Odpověď DROPS Design :
Liebe Claudia, die Knopflöcher selber verbrauchen ja auch noch etwas "Platz", Sie messen für das nächste Knopfloch ab dem unteren Rand des vorherigen Knopflochs. Unten ist die Jacke nicht komplett geschlossen, ab dem letzten Knopfloch nach unten bleibt sie ein Stück offen. Wenn Ihnen das nicht gefällt und Sie weiter unten auch noch gern einen Knopf hätten, können Sie ein Knopfloch mehr (samt Knopf) einarbeiten. Viel Spaß beim Stricken!
28.07.2024 - 11:32
![]() Carina napsala:
Carina napsala:
Bueno gracias pero al final he empezado los aumentos después de esas primeras 4 filas de punto jersey para que todo cuadre
22.04.2024 - 18:21
![]() Carina napsala:
Carina napsala:
Es que en esas 4 vueltas de punto jersey ya se han aumentado 4 puntos y entonces el delantero derecho no queda simétrico con el izquierdo. O es que los aumentos no se empiezan hasta que lleguen los calados? Por favor contestadme aunque sea pesada porque ya lo he deshecho 4 veces Gracias
19.04.2024 - 13:50Odpověď DROPS Design :
Hola Carina, los aumentos comienzan como se indican en el patrón. Si trabajas los aumentos incorporando los puntos nuevos en A.1, como se ha contestado en la pregunta anterior, el patrón no debería descuadrarse. Cada diagrama del delantero sigue teniendo su número de puntos concreto, mientras que el resto de puntos de los aumentos en A.2, A.3 y A.4 se trabajan con A.1, que serían como un trozo de A.2/A.3/A.4. A la hora de trabajar A.1, te aseguras de que la repetición de A.1 no interrumpa los otros diagramas. Estas repeticiones deberían quedar después de A.2, antes de A.4 y a los lados de A.3.
21.04.2024 - 23:29
![]() Carina napsala:
Carina napsala:
Es que en esas 4 vueltas de punto jersey ya se han aumentado 4 puntos y entonces el delantero derecho no queda simétrico con el izquierdo. O es que los aumentos no se empiezan hasta que lleguen los calados. Por favor contestadme aunque sea pesada porque ya lo he deshecho 4 veces Gracias
19.04.2024 - 01:57Odpověď DROPS Design :
Hola Carina, los aumentos comienzan como se indican en el patrón. Si trabajas los aumentos incorporando los puntos nuevos en A.1, como se ha contestado en la pregunta anterior, el patrón no debería descuadrarse. Cada diagrama del delantero sigue teniendo su número de puntos concreto, mientras que el resto de puntos de los aumentos en A.2, A.3 y A.4 se trabajan con A.1, que serían como un trozo de A.2/A.3/A.4. A la hora de trabajar A.1, te aseguras de que la repetición de A.1 no interrumpa los otros diagramas. Estas repeticiones deberían quedar después de A.2, antes de A.4 y a los lados de A.3.
21.04.2024 - 23:29
![]() Carina napsala:
Carina napsala:
Gracias, pero otra pregunta, en la talla XL, en A2 por ejemplo, ya no serán 28 puntos al empezar el dibujo de calados, no? Perdón por preguntar tanto, pero este patrón me está costando un poco Gracias por todo
18.04.2024 - 16:37Odpověď DROPS Design :
Hola Carina, si aumentas puntos en A.2 esos puntos dejan de ser parte de A.2 y pasan a ser parte de A.1. Estos puntos se trabajarán en punto jersey (como la gran mayoría del diagrama A.1) hasta tener suficientes como para trabajar el diagrama A.1 completo, con los calados incluidos.
21.04.2024 - 23:25
![]() Carina napsala:
Carina napsala:
Hola Entonces las 4 primeras filas en punto jersey de A2, A 3 y A4 se hacen o no? Por favor contestadme Gracias
18.04.2024 - 14:56Odpověď DROPS Design :
Hola Carina, las 4 primeras filas de A2, A 3 y A4 se hacen en punto jersey. Saludos!
18.04.2024 - 15:24
![]() Carina napsala:
Carina napsala:
Y por qué A2, A3 y A4 tienen 4 filas de punto jersey y A1 empieza ya con el patrón de calados? Este patrón no está bien explicado.
17.04.2024 - 11:59Odpověď DROPS Design :
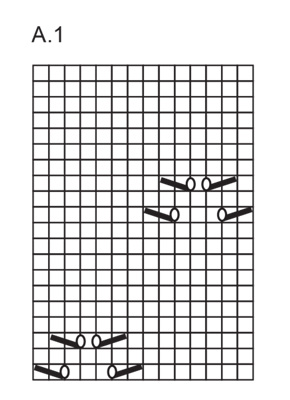
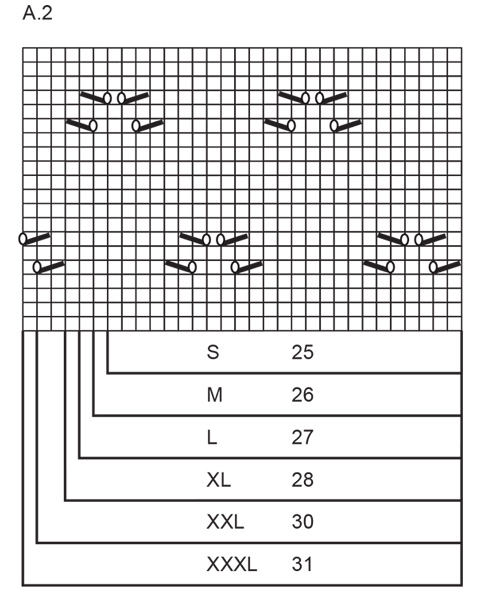
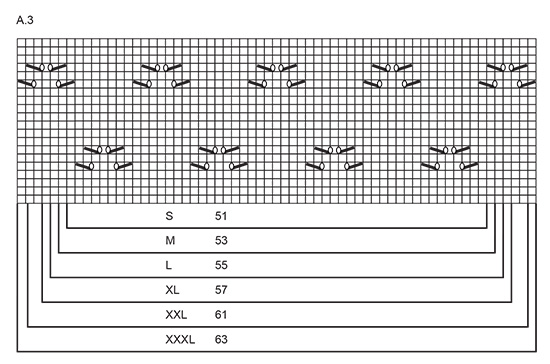
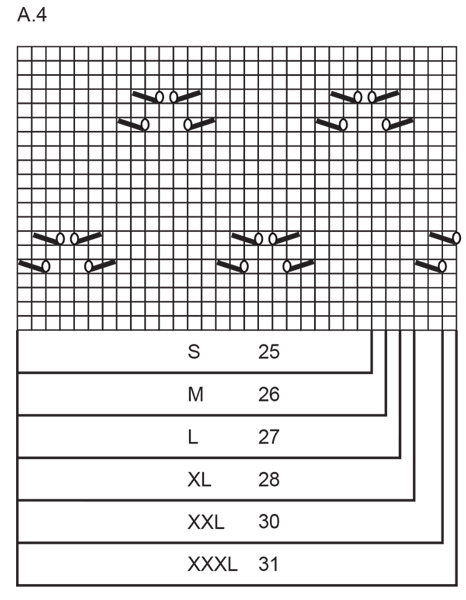
Hola Carina, A.1 muestra 1 repetición del patrón. A.2, A.3 y A.4 muestran el patrón de calados en el delantero derecho, espalda y delantero izquierdo, respectivamente. Cuando aumentemos, los puntos aumentados se trabajan según A.1. Por lo tanto, A.1 no se empieza a trabajar hasta tener suficientes puntos para ello y se trabaja dentro del patrón de calados de A.2, A.3 y A.4. Mientras que los otros comienzan con 4 filas en punto jersey y después comienzan el patrón de calados, donde se irá incorporando A.1. Por ejemplo, puedes ver que A.3 (espalda) tienes 4 repeticiones completas del diagrama A.1.
21.04.2024 - 23:18
![]() Carina napsala:
Carina napsala:
Hola otra vez Pero si el aumento coincide justo con el dibujo de los agujeritos ya se desbarata todo, no? Gracias
15.04.2024 - 11:16Odpověď DROPS Design :
Hola Carina, los aumentos no pueden coincidir con el dibujo de calados. El dibujo de calados solo se trabaja como repetición extra una vez tengas suficientes puntos como para trabajar una repetición completa del patrón de calados; en caso contrario estos puntos se trabajan en punto jersey. De esta forma, el patrón de calados no se desbarata con los aumentos.
21.04.2024 - 23:09
![]() Carina napsala:
Carina napsala:
Hola. No entiendo bien este patrón: los aumentos se hacen al mismo tiempo que A2, A3 y A4? Entonces va a ser complicado que encajen los puntos, no? Gracias
14.04.2024 - 23:11Odpověď DROPS Design :
Hola Carina, A.1, A.2. A.3 y A.4 son el mismo patrón de puntos, pero ligeramente variados o extendidos. Por lo tanto, el dibujo de calados se obtiene con cualquiera de los diagramas y son casi intercambiables, ya que mayoritariamente varían en el largo/ancho de los diagramas. Cuando vayas aumentando puntos, los puntos se trabajarán según el diagrama A.1. Por lo tanto, a medida que tengas más puntos podrás añadir más repeticiones del patrón de calados.
15.04.2024 - 00:01
![]() Sophie napsala:
Sophie napsala:
C’est la première fois que je fais un cardigan et je dois avouer que je ne comprends absolument pas vitré patron/diagramme. Je crois que je vais simplement trouver un patron plus facile.
19.02.2024 - 21:34
|
|||||||||||||||||||||||||
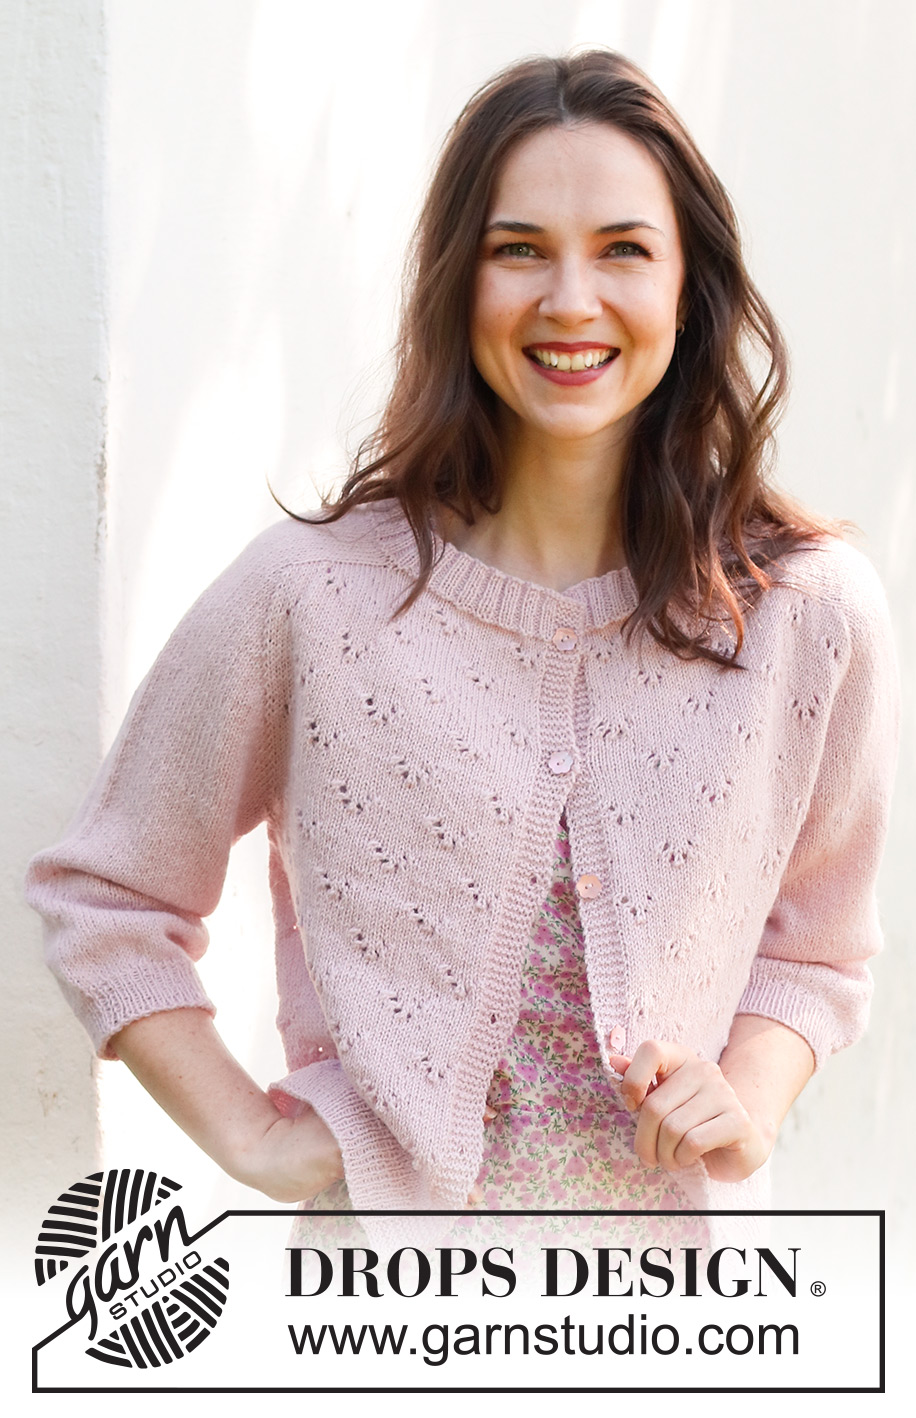
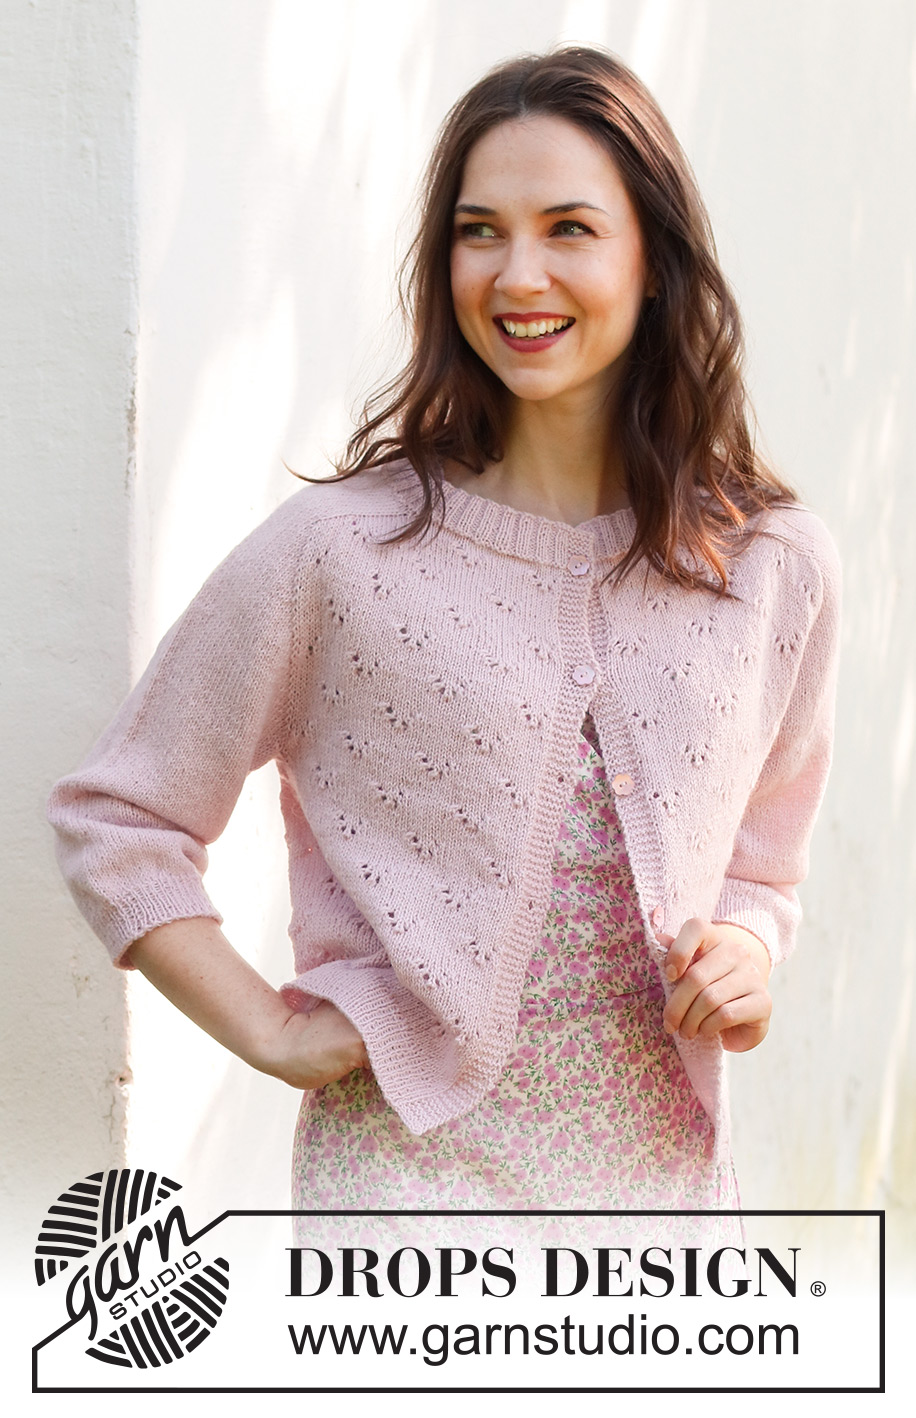
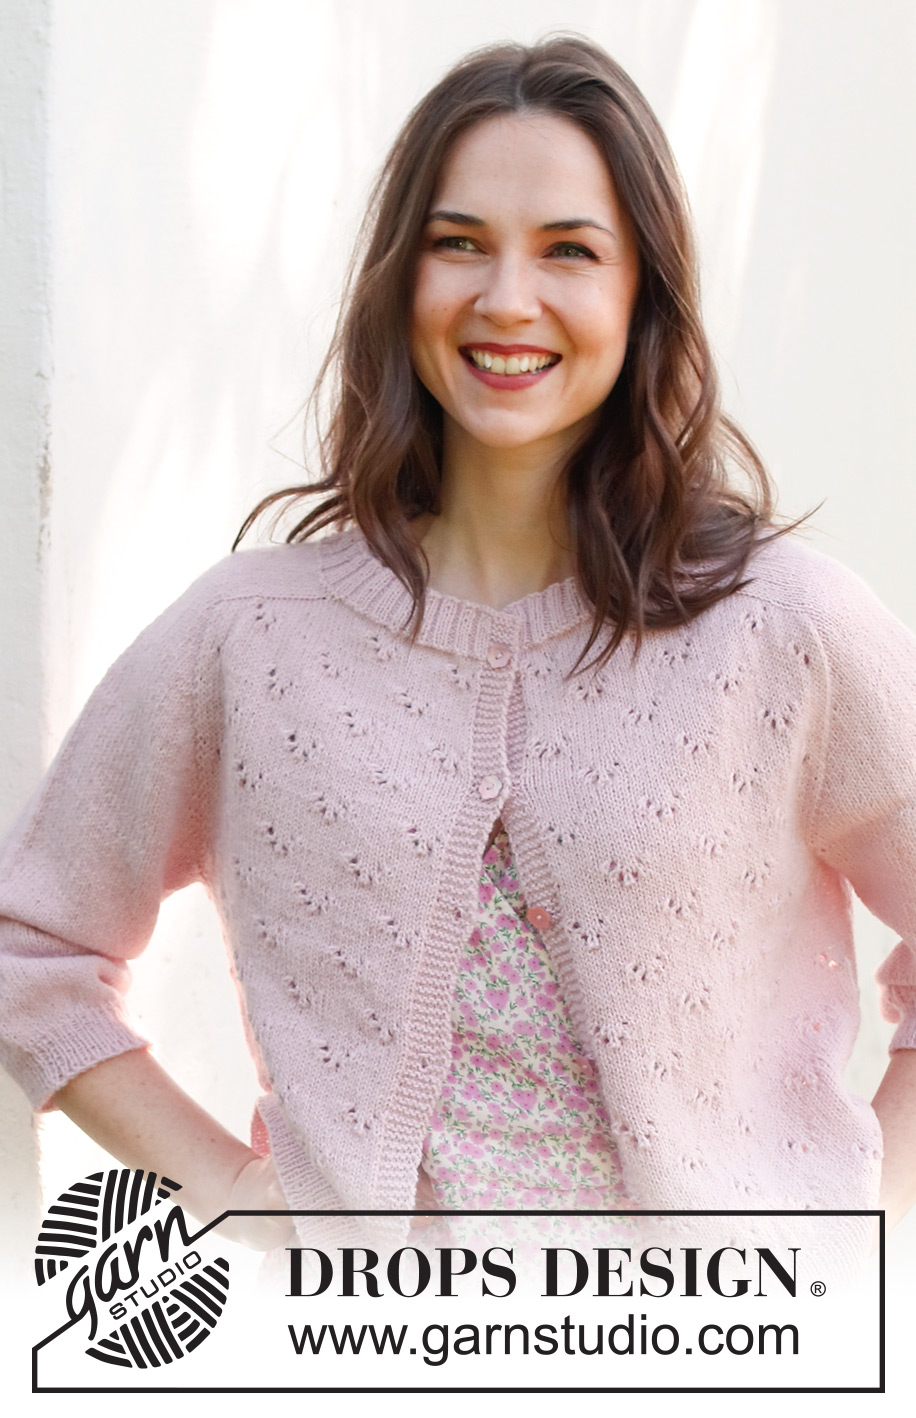
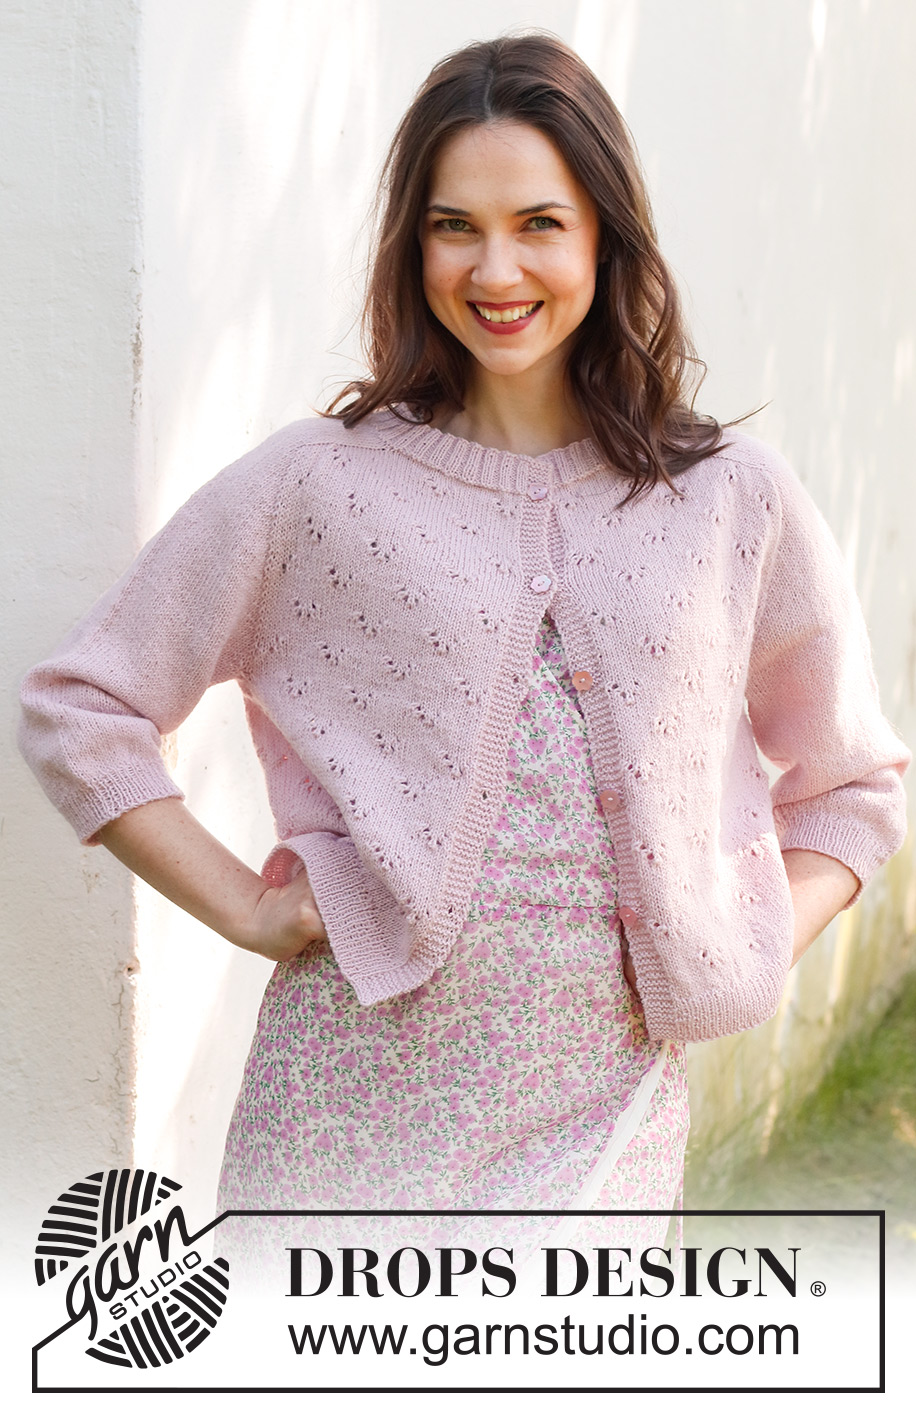
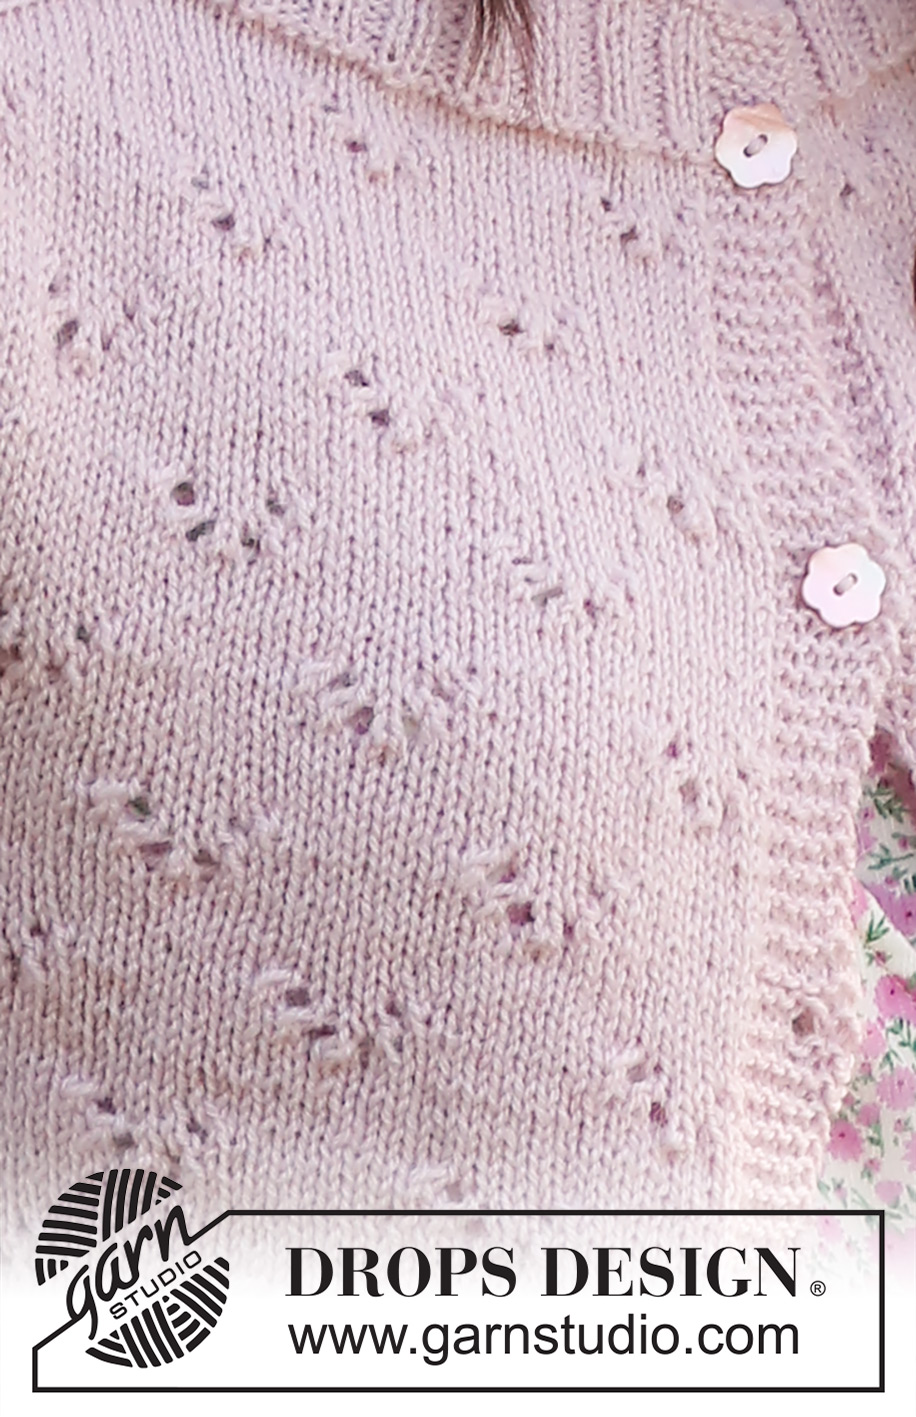
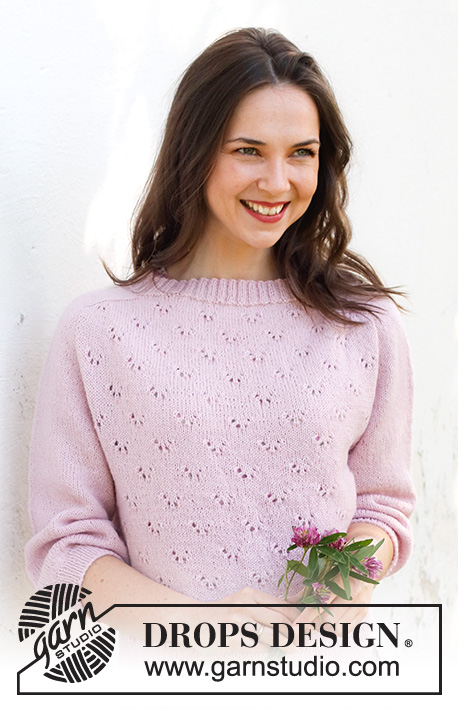
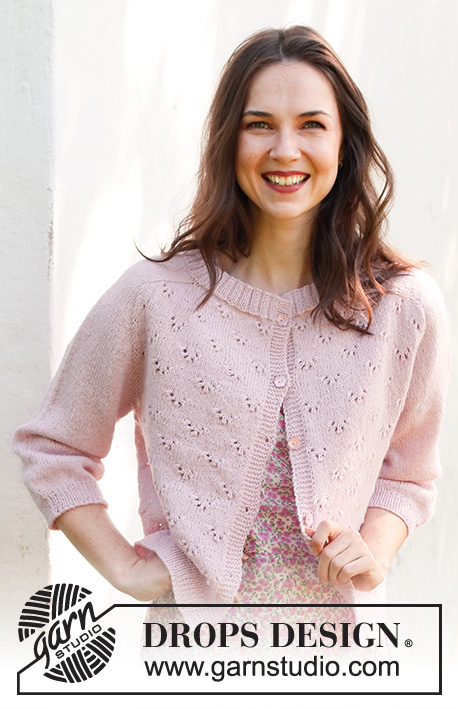
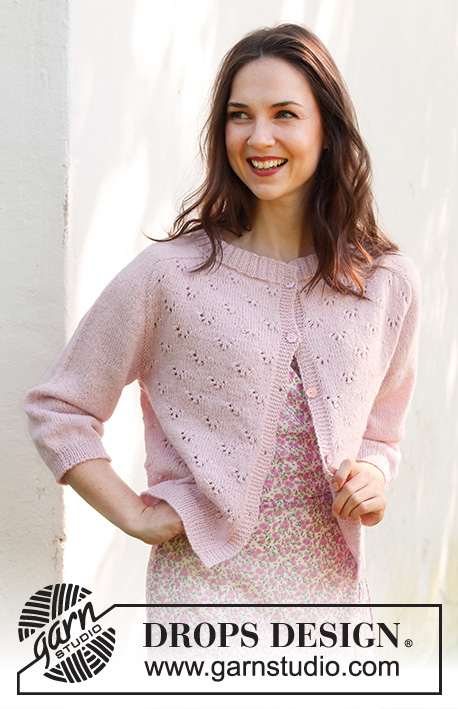
Pink Peony Cardigan#pinkpeonycardigan |
|||||||||||||||||||||||||
 |
 |
||||||||||||||||||||||||
Propínací svetr s ažurovým vzorem, sedlovými náramenicemi a ¾-rukávem pletený shora dolů z příze DROPS Flora. Velikost: S - XXXL.
DROPS 232-26 |
|||||||||||||||||||||||||
|
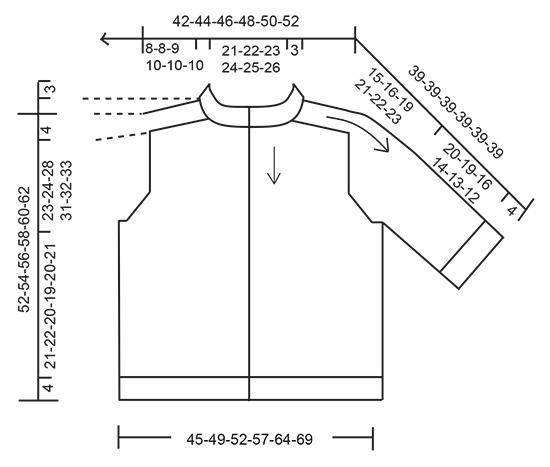
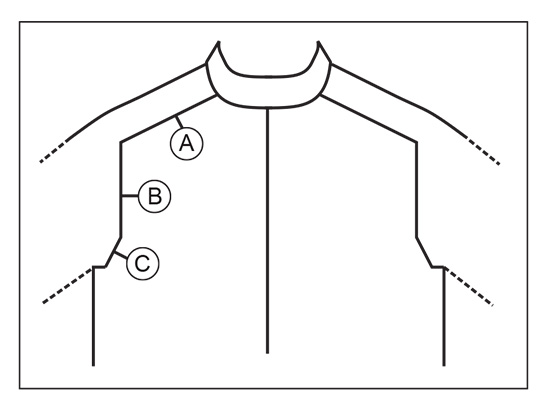
---------------------------------------------------------- VYSVĚTLIVKY K NÁVODU: ---------------------------------------------------------- VROUBKOVÝ VZOR: Pleteme stále hladce, lícové i rubové řady. 1 vroubek = 2 řady hladce. KNOFLÍKOVÉ DÍRKY: Knoflíkové dírky vyplétáme v léze pravého předního dílu (na svetr se díváme, jako by byl oblečený). 1 KNOFLÍKOVÁ DÍRKA = pleteme lícovou řadu jako dosud až po poslední 3 oka na jehlici, 1x nahodíme, spleteme 2 oka hladce a poslední oko upleteme hladce. V následující řadě (rubové), pleteme nahozené oko hladce, tím vznikne dírka. První knoflíkovou dírku vypleteme po upletení lemu průkrčníku, dalších 4-4-4-5-5-5 knoflíkových dírek pak vypleteme vždy po zhruba 9-9-9-10-10-10 cm výšky. VZOR: Viz schémata A.1 až A.4. Vybereme si schémata pro požadovanou velikost. Zobrazeny jsou všechny řady vzoru nahlížené z lícové strany. TIP PŘIDÁVÁNÍ-1 (platí pro sedlové náramecnice, rukávy a sedlo na LÍCOVÉ STRANĚ): PŘED ZNAČKOU: Nové oko se stočí doprava. Levou jehlicí nabereme zezadu přízi mezi 2 oky z předchozí řady a upleteme oko hladce. ZA ZNAČKOU: Nové oko se stočí doleva. Levou jehlicí nabereme zepředu přízi mezi 2 oky z předchozí řady a upleteme oko hladce za zadní nit. TIP PŘIDÁVÁNÍ-2 (platí pro sedlové náramecnice na RUBOVÉ STRANĚ) PŘED ZNAČKOU: Nové oko se stočí doprava. Levou jehlicí nabereme zepředu přízi mezi 2 oky z předchozí řady a upleteme oko obrace za zadní nit. ZA ZNAČKOU: Nové oko se stočí doleva. Levou jehlicí nabereme zezadu přízi mezi 2 oky z předchozí řady a upleteme oko obrace. ---------------------------------------------------------- PRÁCE ZAČÍNÁ ZDE: ---------------------------------------------------------- SVETR – JAK BUDEME POSTUPOVAT: Průkrčník a sedlo pleteme kruhovou jehlicí v řadách, shora dolů. Pak přidáme oka pro sedlové náramenice, rukávy a nakonec pro sedlo. Dále rozdělíme práci na trup a rukávy a pokračujeme v řadách na kruhové jehlici. Rukávy upleteme v kruhových řadách na ponožkových jehlicích / krátké kruhové jehlici. LEM PRŮKRČNÍKU: Na kruhovou jehlici č. 2,5 nahodíme přízí DROPS Flora 170-178-182-186-194-198 ok a upleteme 1 rubovou řadu obrace. Další lícovou řadu pleteme takto: 6 ok légy VROUBKOVÝM VZOREM - viz popis výše - * 2 oka hladce, 2 oka obrace *, část mezi *-* opakujeme až po posledních 8 ok, upleteme 2 oka hladce, a posledních 6 ok légy vroubkovým vzorem. Takto pleteme pružný lem do výšky 3 cm. Po dokončení pružného vzoru upleteme 1 rubovou řadu a SOUČASNĚ rovnoměrně ujmeme 13-17-17-17-17-17 ok (oka obou lég do ujímání nezahrnujeme = 157-161-165-169-177-181 ok. Pamatujeme také na vyplétání KNOFLÍKOVÝCH DÍREK v pravé léze – viz popis výše. Převedeme práci na kruhovou jehlici č. 3. SEDLO: Za oka légy na začátku řady vložíme značku – NYNÍ MĚŘÍME OD TOHOTO MÍSTA. Zároveň vložíme další 4 značky, které využijeme pro přidávání ok na náramenicích, měly by proto mít jinou barvu než značka na průkrčníku, kterou používáme pro měření úpletu. Značky vkládáme mezi 2 oka (oka teď nepleteme, jen vložíme značky) a rozmístíme je v těchto rozestupech: 1. značka: Začínáme uprostřed předního dílu, odpočítáme 31-32-33-34-36-37 ok (= přední díl), označíme následující oko. 2. značka: Odpočítáme 22 ok od 1. značky (= náramenice), značku vložíme před následující oko. 3. značka: Odpočítáme 51-53-55-57-61-63 ok od 2. značky (= zadní díl), značku vložíme před následující oko. 4. značka: Odpočítáme 22 ok od 3. značky (= náramenice), značku vložíme před následující oko. Za poslední značkou nám zbývá 31-32-33-34-36-37 ok. Tyto značky snímáme během práce vždy do aktuálně pletené řady. PŘIDÁVÁNÍ - NÁRAMENICE: NEŽ BUDETE PLÉST DÁL, PŘEČTĚTE SI POZORNĚ CELÝ NÁSLEDUJÍCÍ POPIS! Pokračujeme takto: 6 ok légy vroubkovým vzorem, vzor A.2 následujících 25-26-27-28-30-31 ok, dalších 22 ok lícovým žerzejem, vzor A.3 následujících 51-53-55-57-61-63 ok, dalších 22 ok lícovým žerzejem, vzor A.4 následujících 25-26-27-28-30-31 ok, a 6 ok légy vroubkovým vzorem. Vzor A.1 znázorňuje jednu sekvenci vzoru, při přidávání ok pro sedlovou náramenici zapracujeme nová oka do tohoto vzoru. SOUČASNĚ začneme tvarovat sedlové náramenice - v 1. lícové řadě přidáme 4 oka, takto: přidáme 1 oko PŘED 1. a 3. značkou a ZA 2. a 4. značkou – viz TIP PŘIDÁVÁNÍ-1 Přidáváme pouze na předních dílech a na zadním dílu, počet ok obou náramenic zůstává stejný. V následující rubové řadě přidáváme oka pro sedlové náramenice takto: přidáme 1 oko PŘED 4. a 2. značkou a a ZA 3. a 1. značkou – viz TIP PŘIDÁVÁNÍ-2. tj. oka přidáváme jinak v lícové a jinak v rubové řadě, aby oka ležela úhledně a stáčela se správným směrem. Pokračujeme v tomto rozvržení, a přidáváme oka v každé řadě (tj. z lícové i rubové strany) celkem 24-28-30-32-32-32x = 253-273-285-297-305-309 ok. Přidaná oka pak zapracujeme do vzoru A.1; dbáme na to, aby vzor A.1 navazoval na oka vzoru A.2, A.3 a A.4. Po dokončení posledního přidávání měří díl asi 8-8-9-10-10-10 cm od značky na průkrčníku. PŘIDÁVÁNÍ – RUKÁVY: Oka rukávů pleteme lícovým žerzejem, na trupu pleteme vzor jako dosud, oka obou lég pleteme vroubkovým vzorem. SOUČASNĚ v následující lícové řadě přidáme 4 oka pro rukávy takto: Přidáme 1 oko ZA 1. a 3. značkou a PŘED 2. a 4. značkou. Přidáváme pouze na rukávech, počet ok pro zadní a přední díly zůstává stále stejný. Přidaná oka pak pleteme lícovým žerzejem. Takto přidáváme v každé 2. řadě (= v každé lícové řadě) celkem 26-28-32-34-30-28x = 357-385-413-433-425-421 ok. Díl měří asi 23-24-28-30-28-27 cm od značky na průkrčníku. PŘIDÁVÁNÍ – SEDLO: Tento odstavec platí pouze pro velikosti XL, XXL a XXXL; u velikostí S, M a L je přidávání dokončeno. Nyní přesuneme všechny 4 značky tak, aby každá z těchto značek označovala jedno konkrétní oko; značky přesuneme do krajního oka na obou stranách předního i zadního dílu. Mezi označenými oky máme 90-82-78 ok na každém rukávu. V následující řadě přidáme 8 ok – přidáváme jak před, tak i za každou ze 4 značek – viz TIP – PŘIDÁVÁNÍ. Přidáme oka na předních dílech, zadním dílu a obou rukávech, přidaná oka pak pleteme vzorem A.1 na zadním a předním dílu, na rukávech pleteme lícovým žerzejem. Takto přidáváme v každé 2. řadě, celkem 2-7-11x = 449-481-509 ok. VŠECHNY VELIKOSTI: = 357-385-413-449-481-509 ok. Po dokončení veškerého přidávání měří díl asi 23-24-28-31-32-33 cm od značky na průkrčníku. Pokud je pletenina kratší, pokračujeme v pletení bez dalšího přidávání až do předepsané délky. Nyní rozdělíme pleteninu na trup a rukávy takto: Upleteme prvních 55-60-63-68-75-80 ok (= přední díl), odložíme následujících 74-78-86-94-96-100 ok na pomocnou jehlici (= rukáv) a nahodíme 8-8-10-12-14-16 nových ok na jehlici (= podpaží), upleteme následujících 99-109-115-125-139-149 ok (= zadní díl), odložíme následujících 74-78-86-94-96-100 ok na pomocnou jehlici (= rukáv), nahodíme 8-8-10-12-14-16 nových ok na jehlici (= podpaží), upleteme posledních 55-60-63-68-75-80 ok (= přední díl). Trup a rukávy dokončíme odděleně. DÍL MĚŘÍME OD TOHOTO MÍSTA! TRUP: = 225-245-261-285-317-341 ok. Pleteme v řadách vzorem A.1, na každé straně 6 ok légy vroubkovým vzorem, přičemž oka, která se na bocích nevejdou do celé sekvence vzoru A.1, pleteme lícovým žerzejem. Pleteme až do výše 21-22-20-19-20-21 cm od podpaží. Teď upleteme 1 lícovou řadu hladce a současně rovnoměrně přidáme 46-50-52-58-64-68 ok = 271-295-313-343-381-409 ok. Převedeme pleteninu na kruhovou jehlici č. 2,5 a další rubovou řadu pleteme takto: 6 ok légy vroubkovým vzorem, * 1 oko obrace, 1 oko hladce *, část mezi *-* opakujeme po posledních 7 ok, 1 oko obrace a posledních 6 ok légy vroubkovým vzorem. Takto pleteme lem do výšky 4 cm a potom oka volně uzavřeme. Svetr měří asi 52-54-56-58-60-62 cm (od ramene). RUKÁVY: Odložených 74-78-86-94-96-100 ok jednoho rukávu vrátíme z pomocné jehlice na krátkou kruhovou jehlici nebo ponožkové jehlice č. 3 a nabereme po 1 oku z 8-8-10-12-14-16 nově nahozených ok v podpaží = 82-86-96-106-110-116 ok. Doprostřed 8-8-10-12-14-16 nových ok v podpaží vložíme značku. Kruhovou řadu začínáme u značky, pleteme lícovým žerzejem až do výše rukávu 20-19-16-14-13-12 cm od podpaží - do ukončení práce nám zbývá doplést asi 4 cm. Nyní upleteme 1 kruhovou řadu hladce a SOUČASNĚ rovnoměrně ujmeme 4-4-10-16-16-16 ok = 78-82-86-90-94-100 ok. Převedeme pleteninu na ponožkové jehlice č. 2,5 a pokračujeme v kruhových řadách pružným vzorem (1 oko hladce, 1 oko obrace) do výšky 4 cm. Potom oka volně uzavřeme. Rukáv měří asi 24-23-20-18-17-16 cm od podpaží. Stejným způsobem upleteme i druhý rukáv. DOKONČENÍ: Na levou légu přišijeme knoflíky. |
|||||||||||||||||||||||||
Vysvětlivky ke schématu |
|||||||||||||||||||||||||
|
|||||||||||||||||||||||||
|
|||||||||||||||||||||||||
|
|||||||||||||||||||||||||
|
|||||||||||||||||||||||||
|
|||||||||||||||||||||||||
|
|||||||||||||||||||||||||
|
|||||||||||||||||||||||||
Dokončili jste tento model?Pak označte své fotky tagem #dropspattern #pinkpeonycardigan nebo je pošlete do galerie #dropsfan. Potřebujete s tímto návodem poradit?Otevřete-li si návod na stránce garnstudio.com, najdete tam 24 výukových video-ukázek, Komentáře/Dotazy a další užitečné informace. © 1982-2025 DROPS Design A/S. Vyhrazujeme si veškerá práva. Tento dokument, včetně všech jeho dílčích částí, podléhá autorským právům. Podrobnější komentář k možnostem užití našich návodů najdete dole pod každým návodem na našich stránkách. |
|||||||||||||||||||||||||


V oblasti pletené a háčkované módy působí DROPS Design více než 40 let. Díky tomu vám můžeme nabídnout jednu z nejrozsáhlejších kolekcí modelů s bezplatnými návody dostupnými na internetu - navíc v 17 jazycích. K dnešnímu dni máme na 314 katalogů a 11822 návodů celkem - z nich je už 7048 dostupných v [češtině].
Přidejte komentář k návodu DROPS 232-26
Rádi bychom věděli, co si o tomto modelu myslíte!
Pokud se chcete na něco zeptat, dbejte prosím na to, abyste ve formuláři níže vybrali správnou kategorii - díky tomu se dříve dozvíte, co potřebujete vědět. Povinná pole jsou označena *.