Cuddle Time by DROPS Design

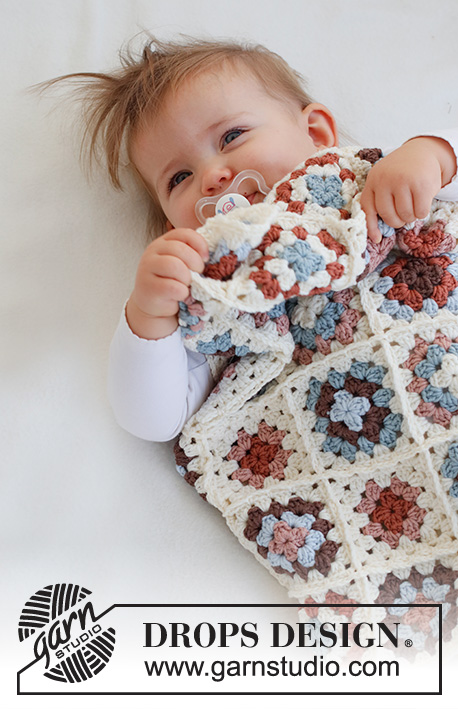
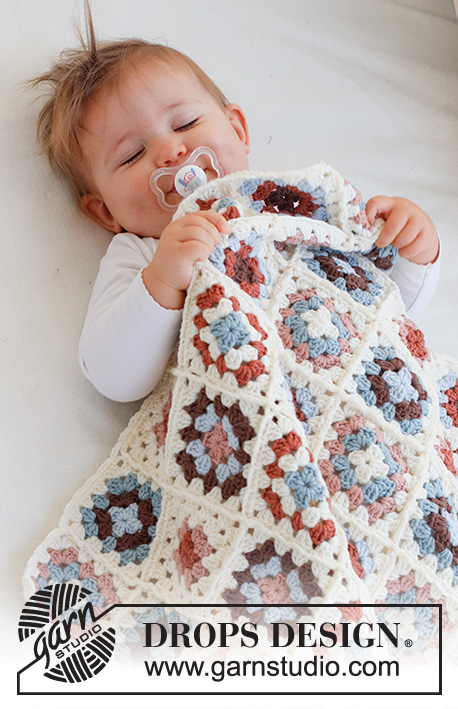
Baby deka ze čtverců háčkovaná z příze DROPS Merino Extra Fine.

DROPS Baby 42-14
DROPS Design: model me-075-by
Skupina přízí B
-------------------------------------------------------

VELIKOST:
Šířka: asi 54 cm. Délka: asi 63 cm.

MATERIÁL:
DROPS MERINO EXTRA FINE firmy Garnstudio (spadá do skupiny přízí B)
200 g, barva č. 01, smetanová
50 g, barva č. 42, cedr
50 g, barva č. 49, čokoládová
50 g, barva č. 46, pouštní růže
50 g, barva č. 15, světlá šedozelená
50 g, barva č. 39, ledová modrá

Na jednobarevnou deku je potřeba asi 350 g příze DROPS Merino Extra Fine.

HÁČEK:
DROPS HÁČEK č.4.

ZKUŠEBNÍ VZOREK:
19 dlouhých sloupků na šířku a 10 řad na výšku = 10 x 10 cm.
POZN.: Uvedená síla háčku je pouze orientační. Máte-li ve svém zkušebním vzorku více ok na 10 cm, použijte háček silnější. Pokud máte naopak méně ok na 10 cm, použijte háček slabší.

-------------------------------------------------------

Náhradní příze – Podívejte se, jak změnit přízi
Skupina přízí A až F – Neměňte návod, změňte přízi
Spotřeba příze při použití náhradní příze – Využijte náš převodník

-------------------------------------------------------


100% vlna
od 2.65 € /50g
DROPS Merino Extra Fine uni colour DROPS Merino Extra Fine uni colour 2.65 € /50g
Žienka domáca
Objednat
DROPS Merino Extra Fine mix DROPS Merino Extra Fine mix 2.65 € /50g
Žienka domáca
Objednat
needles Jehlice a háčky Objednat
Přízi na tento model můžete mít už za 23.85€. Více zde.

Návod

-------------------------------------------------------

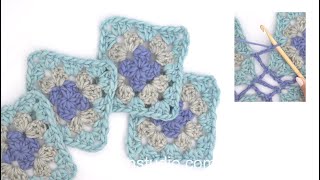
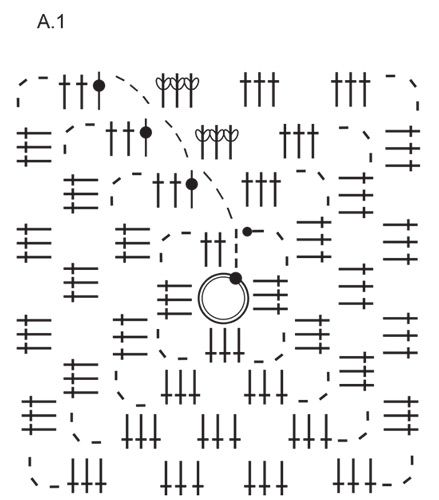
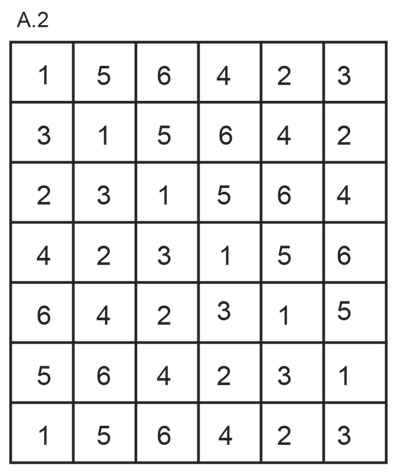
VYSVĚTLIVKY:

-------------------------------------------------------

VZOR:
Viz schémata A.1 a A.2.

ZMĚNA BARVY:
Při změně barvy příze na začátku kruhové řady uháčkujeme poslední pevné oko na konci kruhové řady předcházející už novou barvou příze, díky tomu bude změna barvy plynulá.

BAREVNÉ KOMBINACE:
ČTVEREC 1:
1. KRUHOVÁ ŘADA: smetanová
2. KRUHOVÁ ŘADA: světlá šedozelená
3. KRUHOVÁ ŘADA: pouštní růže
4. KRUHOVÁ ŘADA: smetanová

ČTVEREC 2:
1. KRUHOVÁ ŘADA: světlá šedozelená
2. KRUHOVÁ ŘADA: smetanová
3. KRUHOVÁ ŘADA: cedr
4. KRUHOVÁ ŘADA: smetanová

ČTVEREC 3:
1. KRUHOVÁ ŘADA: čokoládová
2. KRUHOVÁ ŘADA: cedr
3. KRUHOVÁ ŘADA: ledová modrá
4. KRUHOVÁ ŘADA: smetanová

ČTVEREC 4:
1. KRUHOVÁ ŘADA: pouštní růže
2. KRUHOVÁ ŘADA: ledová modrá
3. KRUHOVÁ ŘADA: čokoládová
4. KRUHOVÁ ŘADA: smetanová

ČTVEREC 5:
1. KRUHOVÁ ŘADA: ledová modrá
2. KRUHOVÁ ŘADA: čokoládová
3. KRUHOVÁ ŘADA: světlá šedozelená
4. KRUHOVÁ ŘADA: smetanová

ČTVEREC 6:
1. KRUHOVÁ ŘADA: cedr
2. KRUHOVÁ ŘADA: pouštní růže
3. KRUHOVÁ ŘADA: smetanová
4. KRUHOVÁ ŘADA: smetanová

-------------------------------------------------------

POPIS PRÁCE:

-------------------------------------------------------

DEKA ¬– JAK BUDEME POSTUPOVAT:
Deku tvoří jednotlivé čtverce, které sháčkujeme dohromady. Nakonec celou deku obháčkujeme lemem.

ČTVEREC:
Háčkem č.4 uháčkujeme přízí DROPS Merino Extra Fine po 7 čtvercích v každé ze 6 barevných kombinací – viz BAREVNÉ KOMBINACE výše. Čtverce háčkujeme podle schématu A.1 – viz ZMĚNA BARVY výše.
Celkem uháčkujeme 42 čtverců.

DOKONČENÍ:
Čtverce rozložíme podle schématu A.2 (= 6 čtverců na šířku a 7 na délku). Čísla čtverců uvedená ve schématu odpovídají číslům ze seznamu BAREVNÝCH KOMBINACÍ.
Čtverce sháčkujeme dohromady, nejprve podélně, pak na šířku.
2 čtverce položíme na sebe, rubovými stranami k sobě a háčkujeme smetanovou přízí háčkem č.4 - vpichujeme do obou vrstev: 1 krátký sloupek obloučku z řetízkových ok v rohu, *3 řetízková oka, 1 krátký sloupek kolem obloučku mezi skupinkami dlouhých sloupků*, *-* opakujeme až k následujícímu obloučku v rohu (poslední krátký sloupek háčkujeme kolem tohoto obloučku v rohu). Pak uháčkujeme 2 řetízková oka (přechod k dalším 2 čtvercům) a pokračujeme 1 krátkým sloupkem kolem obloučku v rohu.
Takto pokračujeme až do chvíle, kdy máme sháčkované všechny čtverce; nejprve podélně, pak i na šířku.

LEM:
Celou deku obháčkujeme smetanovou přízí. Začínáme jedním rohem a postupujeme takto:
Kolem rohu: 1 krátký sloupek, 3 řetízková oka, 1 krátký sloupek, 3 řetízková oka.
Podél stran: *1 krátký sloupek mezi skupinky dlouhých sloupků, 3 řetízková oka*, *-* opakujeme až k přechodu k dalším 2 čtvercům.
Přechod: 1 krátký sloupek kolem obloučku z řetízkových ok prvního čtverce, 3 řetízková oka, 1 krátký sloupek kolem obloučku z řetízkových ok dalšího čtverce, 3 řetízková oka.
uháčkujeme poslední kruhovou řadu vzoru A.1, v přechodu mezi dvěma čtverci však neháčkujeme 3 dlouhé sloupky, ale háčkujeme takto: 1 dlouhý sloupek kolem rohu prvního čtverce, 1 dlouhý sloupek do krátkého sloupku, 1 dlouhý sloupek kolem rohu druhého čtverce.
Takto olemujeme celou deku; končíme 1 pevným okem do 1. krátkého sloupku ze začátku kruhové řady.

Schéma

symbols = Zde začínáme! Uháčkujeme 4 řetízková oka a spojíme je pevným okem do kroužku - viz tečku na kružnici.
symbols = 1 řetízkové oko - pokud háčkujeme blízko hlavičky háčku, mohou být řetízková oka moc stažená; 1 řetízkové oko by mělo být stejně dlouhé, jako je 1 krátký/dlouhý sloupek široký.
symbols = 1 řetízkové oko a 1 pevné okodo 3. řetízkového oka ze začátku kruhové řady
symbols = dlouhý sloupek kolem kroužku / obloučku z řetízkových ok, mezi dlouhé sloupky z předchozí kruhové řady
symbols = 1. dlouhý sloupek v kruhové řadě - na konci kruhové řady do něj uháčkujeme pevné oko
symbols = 1 dlouhý sloupek kolem 3 řetízkových ok z předchozí kruhové řady
diagram
diagram

Potřebujete poradit s tímto návodem?

Děkujeme, že jste si vybrali návod DROPS Design. Zakládáme si na tom, že dáváme k dispozici návody ověřené a snadno srozumitelné. Všechny návody jsou přeložené z norského originálu a tak si můžete kdykoli srovnat rozměry a počty s původním návodem (DROPS Baby 42-14) .

Máte s návodem potíže? Níže najdete seznam odkazů, které vám pomohou dokončit vaše dílo co nejdříve - nebo se třeba přiučit něco nového.

signature-image signature

Máte s návodem potíže? Níže najdete seznam odkazů, které vám pomohou dokončit vaše dílo co nejdříve - nebo se třeba přiučit něco nového.

Máme takopodrobné rozpisy různých technik a postupů krok za krokem - najdete je zde.

1) Why is the knitting/crochet tension so important?

Knitting tension is what determines the final measurements of your work, and is usually measured per 10 x 10 cm. It is provided like so: number of stitches in width x number of rows in height - eg: 19 stitches x 26 rows = 10 x 10 cm.

The knitting tension is very individual; some people knit/crochet loosely while others work tightly. You adjust the knitting tension with the needle size, which is why the suggested needle size only serve as a guide! You need to adjust this (up or down) to ensure that YOUR knitting tension matches the knitting tension provided in the pattern. If you work with a different knitting tension than provided you will have a different yarn consumption, and your work will have different measurements than what the pattern suggests.

The knitting tension also determines which yarns can replace each other. As long as you achieve the same knitting tension you can replace one yarn with another.

See DROPS lesson: How to measure your tension/gauge

See DROPS video: How to make a gauge tension swatch

nahoru

2) What are the yarn groups?

All our yarns are categorised into yarn groups (from A to F) according to thickness and knitting tension – group A contains the thinnest yarns and group F the thickest. This makes it easier for you to find alternative yarns to our patterns, should you wish to switch yarn. All yarns within the same group have a similar knitting tension and can easily replace each other. However, different yarn qualities have different structures and properties which will give the finished work a unique look and feel.

Click here for an overview of the yarns in each yarn group

nahoru

3) Can I use a different yarn than what the pattern suggests?

The important thing when changing from one yarn to another is that the knitting/crochet tension remains the same. This is so that the measurements of the finished piece will be the same as on the sketch provided. It is easier to achieve the same knitting tension using yarns from the same yarn group. It is also possible to work with multiple strands of a thinner yarn to achieve the knitting tension of a thicker one. Please try our yarn converter. We recommend you to always work a test swatch.

Please NOTE: when changing yarn the garment might have a different look and feel to the garment in the photo, due to individual properties and qualities of each yarn.

See DROPS lesson: Can I use a different yarn than the one mentioned in the pattern?

nahoru

4) How do I use the yarn converter?

At the top of all our patterns you’ll find a link to our yarn converter, which is a helpful tool should you wish to use a different yarn than suggested. By filling in the yarn quality you wish to replace, the amount (in your size) and number of strands, the converter will present good alternative yarns with the same knitting tension. Additionally it will tell you how much you’ll require in the new qualities and whether you’ll need to work with multiple strands. Most skeins are 50g (some are 25g or 100g).

If the pattern is worked with multiple colours, every colour will have to be converted separately. Similarly, if the pattern is worked with several strands of different yarns (for example 1 strand Alpaca and 1 strand Kid-Silk) you will have to find alternatives for each, individually.

Click here to see our yarn converter

nahoru

5) Why do I get the wrong knitting tension with the suggested needle size?

The needle size provided in the pattern serves only as a guide, the important thing is to follow the knitting tension. And since knitting tension is very individual, you will have to adjust the needle size to ensure that YOUR tension is the same as in the pattern – maybe you’ll have to adjust 1, or even 2 needle sizes, up or down to achieve the correct tension. For this, we recommend that you work test swatches.

Should you work with a different knitting tension than the one provided, the measurements of the finished garment might deviate from the measurement sketch.

See DROPS lesson: How to measure your tension/gauge

See DROPS video: How to make a gauge tension swatch

nahoru

6) Why is the pattern worked top-down?

Working a garment top-down provides more flexibility and room for personal adjustment. For example it is easier to try the garment on while working, as well as making adjustments to length of yoke and shoulder caps.

The instructions are carefully explaining every step, in the correct order. Diagrams are adjusted to the knitting direction and are worked as usual.

nahoru

7) Why are the sleeves shorter in larger sizes?

The total width of the garment (from wrist-to-wrist) will be larger in the larger sizes, despite the actual sleeves being shorter. The larger sizes have longer sleeve caps and wider shoulders, so there will be a good fit in all sizes.

nahoru

8) What is a repeat?

Diagrams are often repeated on the round or in height. 1 repeat is the diagram the way it appears in the pattern. If it says to work 5 repeats of A.1 in the round, then you work A.1 a total of 5 times after/next to each other in the round. If it says to work 2 repeats of A.1 vertically/in height you work the entire diagram once, then begin again at the start and work the entire diagram one more time.

nahoru

9) How do I work according to a knitting diagram?

The diagram depicts all rows/rounds, and every stitch seen from the right side. It is read from bottom to top, from right to left. 1 square = 1 stitch.

When working back and forth, every other row is worked from the right side and every other row is worked from the wrong side. When working from the wrong side, the diagram will have to be worked reversed: from left to right, knit stitches are purled, purl stitches are knit etc.

When working in the round every round is worked from the right side and the diagram are worked from right to left on all rounds.

See DROPS lesson: How to read knitting diagrams

nahoru

10) How do I work according to a crochet diagram?

The diagram depicts all rows/rounds, and every stitch seen from the right side. It is worked from bottom to top, from right to left.

When working back and forth every other row is worked from the right side: from right to left and every other row is worked from the wrong side: from left to right.

When working in the round, every row in the diagram are worked from the right side, from right to left.

When working a circular diagram you start in the middle and work your way outwards, counter clockwise, row by row.

The rows usually start with a given number of chain stitches (equivalent to the height of the following stitch), this will either be depicted in the diagram or explained in the pattern.

See DROPS lesson: How to read crochet diagrams

nahoru

11) How do I work several diagrams simultaneously on the same row/round?

Instructions for working several diagrams after each other on the same row/round, will often be written like so: “work A.1, A.2, A.3 a total of 0-0-2-3-4 times". This means you work A.1 once, then A.2 is worked once, and A.3 is repeated (in width) the number of times provided for your size – in this case like so: S = 0 times, M = 0 times, L=2 times, XL= 3 times and XXL = 4 times.

The diagrams are worked as usual: begin with the first row in A.1, then work the first row in A.2 etc.

See DROPS lesson: How to read knitting diagrams

See DROPS lesson: How to read crochet diagrams

nahoru

12) Why does the piece start with more chain stitches than it’s worked with?

Chain stitches are slightly narrower than other stitches and to avoid working the cast-on edge too tight, we simply chain more stitches to begin with. The stitch count will be adjusted on the following row to fit the pattern and measurement sketch.

nahoru

13) Why increase before the rib edge when the piece is worked top-down?

The rib edge is more elastic and will contract slightly compared to, for example, stocking stitch. By increasing before the rib edge, you avoid a visible difference in width between the rib edge and the rest of the body.

nahoru

14) Why increase in the cast-off edge?

It’s very easy to cast off too tightly, and by making yarn overs while casting off (and simultaneously casting these off) you avoid a too tight cast off edge.

See DROPS video: How to bind off with yarn overs (yo)

nahoru

15) How do I increase/decrease on every 3rd and 4th row/round alternately?

To achieve an even increase (or decrease) you can increase on, for example: every 3rd and 4th row alternately, like so: work 2 rows and increase on the 3rd row, work 3 rows and increase on the 4th. Repeat this until the increase is complete.

See DROPS lesson: Increase or decrease 1 st on every 3rd and 4th row alternately

nahoru

16) Why is the pattern slightly different than what I see in the photo?

Pattern repeats can vary slightly in the different sizes, in order to get the correct proportions. If you’re not working the exact same size as the garment in the photo, yours might deviate slightly. This has been carefully developed and adjusted so that the complete impression of the garment is the same in all sizes.

Make sure to follow instructions and diagrams for your size!

nahoru

17) How can I work a jacket in the round instead of back and forth?

Should you prefer to work in the round instead of back and forth, you may of course adjust the pattern. You’ll need to add steeks mid-front (usually 5 stitches), and follow the instructions. When you would normally turn and work from the wrong side, simply work across the steek and continue in the round. At the end you’ll cut the piece open, pick up stitches to work bands, and cover the cut edges.

See DROPS video: How to knit steeks and cut open

nahoru

18) Can I work a jumper back and forth instead of in the round?

Should you prefer to work back and forth instead of in the round, you may of course adjust the pattern so you work the pieces separately and then assemble them at the end. Divide the stitches for the body in 2, add 1 edge stitch in each side (for sewing) and work the front and back pieces separately.

See DROPS lesson: Can I adapt a pattern for circular needles into straight needles?

nahoru

19) Why do you show discontinued yarns in the patterns?

Since different yarns have different qualities and textures we have chosen to keep the original yarn in our patterns. However, you can easily find options among our available qualities by using our yarn converter, or simply pick a yarn from the same yarn group.

It is possible that some retailers still have discontinued yarns in stock, or that someone has a few skeins at home that they would like to find patterns for.

The yarn converter will provide both alternative yarn as well as required amount in the new quality.

nahoru

20) How do I make a women’s size garment into a men’s size one?

If you have found a pattern you like which is available in women’s size it’s not very difficult to convert it to men’s size. The biggest difference will be the length of sleeves and body. Start working on the women size that you think would fit across the chest. The additional length will be worked right before you cast off for the armhole/sleeve cap. If the pattern is worked top-down you can add the length right after the armhole or before the first decrease on sleeve.

Regarding additional yarn amount, this will depend on how much length you add, but it is better with a skein too many than too few.

nahoru

21) How do I prevent a hairy garment from shedding?

All yarns will have excess fibres (from production) that might come off as lint or shedding. Brushed yarns (ie hairier yarns) have more of these loose, excess fibres, causing more shedding.

Shedding also depends on what is worn under or over the garment, and whether this pulls at the yarn fibres. It’s therefore not possible to guarantee that there will be no shedding

Below are some tips on how to get the best result when working with hairier yarns:

1. When the garment is finished (before you wash it) shake it vigorously so the looser hairs come off. NOTE: do NOT use a lint roller, brush or any method that pulls at the yarn.

2. Place the garment in a plastic bag and put it in your freezer - the temperature will cause the fibres to become less attached to each other, and excess fibres will come off easier.

3. Leave in the freezer for a few hours before taking it out and shaking it again.

4. Wash the garment according to the instructions on the yarn label.

nahoru

22) Where on the garment is the length measured?

The measurement sketch/schematic drawing provides information regarding the full length of the garment. If it’s a jumper or a jacket the length is measured from the highest point on the shoulder closest to the neckline, and straight down to the bottom of the garment. It is NOT measured from the tip of shoulder. Similarly, the length of yoke is measured from the highest point on the shoulder and down to where yoke is split into body and sleeves.

On a jacket measures are never taken along bands, unless specifically stated. Always measure inside band stitches when measuring the length.

See DROPS lesson: How to read a schematic drawing

nahoru

23) How do I know how many balls of yarn I need?

The required amount of yarn is provided in grams, eg: 450 g. To calculate how many balls you’ll need you first need to know how many grams are in 1 ball (25g, 50g or 100g). This information is available if you click on the individual yarn quality on our pages. Divide the amount required with the amount of each ball. For example, if each ball is 50g (the most common amount), the calculation will be as follows: 450 / 50 = 9 balls.

nahoru

Pořídili jste si přízi DROPS na tento model? Pak máte taky právo žádat po svém prodejci, u něhož jste nakoupili, pomoc a rady. Seznam DROPS obchodů najdete tady!
Pořád se nemůžete dobrat odpovědi, kterou hledáte? Pak posuňte stránku dolů a napište nám svůj dotaz, naši specialisté se vám pokusí poradit. Obvykle to zvládneme během 5 až 10 pracovních dnů.. Mezitím si můžete pročíst otázky a odpovědi, které k tomuto modelu položili ostatní, nebo navštívit skupinu DROPS Workshop na Facebooku, kde vám může poradit některá spřízněná duše!

Komentáře / Otázky (8)

country flag Mario Rotello wrote:

Dal secondo giro in poi, non c'e' nessuna catenella tra le maglie alte? solo le 3 negli angoli? Grazie

06.02.2023 - 22:11

DROPS Design answered:

Buonasera Mario, si, è corretto. Buon lavoro!

13.02.2023 kl. 22:54

country flag Dana wrote:

Unfortunately, I cannot report it myself. It can only be the company or someone that is able to legally represent the company. Sorry!

05.11.2022 - 03:17

country flag Dana wrote:

Hello! I came across a seller on Etsy that is selling your Tutti frutti basket set pattern. He used the same picture you have here on the site. This is not the first free pattern that he has taken and sold for money as I've contacted three other creators just this week. The shop name is HerculesHooks if you're interested in seeing for yourself and taking action.

04.11.2022 - 03:05

DROPS Design answered:

Dear Dana, thanks for the info - please feel free to help us by reporting this on Etsy. Happy crocheting!

04.11.2022 kl. 08:01

country flag Almudena Pérez wrote:

Me podríais decir la medida de esta manta? Gracias,

26.08.2022 - 13:05

DROPS Design answered:

Hola Almudena, puedes ver el tamaño en la sección de materiales: 54 x 63 cm.

27.08.2022 kl. 20:20

country flag Florence wrote:

Wederom een superleuk patroon. Door de duidelijke uitleg makkelijk in eigen gekozen kleuren uit te voeren. Ik heb de wol via de link besteld. Prima berekende hoeveelheid.

08.05.2022 - 16:15

country flag Daniela wrote:

Non mi e' molto chiaro il diagramma. Quando inizio un nuovo giro, si devono fare 3 catenelle e poi le 3 maglie alte? Non si crea una fila di catenelle extra? (quelle che stanno in diagonale nel diagramma) Poi dal secondo giro in poi, non c'e' nessuna catenella tra le maglie alte? solo le 3 negli angoli? Grazie

26.04.2022 - 21:19

DROPS Design answered:

Buonasera Daniela, all'inizio del giro deve lavorare 3 catenelle e poi procedere come indicato. Buon lavoro!

29.04.2022 kl. 17:34

country flag Ghyslaine wrote:

Je vous achetée ce modele et laine le kits et combien le couteras merci

24.02.2022 - 21:55

DROPS Design answered:

Bonjour Ghyslaine, retrouvez la liste des magasins DROPS livrant au Canada ici; contactez Nordic Yarns pour la liste des magasins au Canada. Bon crochet!

25.02.2022 kl. 09:36

country flag Ghyslaine wrote:

J'adore vos modèles super un gros merci pour vos publications.

24.02.2022 - 21:44

Přidejte komentář k návodu DROPS Baby 42-14

Rádi bychom věděli, co si o tomto modelu myslíte!

Pokud se chcete na něco zeptat, dbejte prosím na to, abyste ve formuláři níže vybrali správnou kategorii - díky tomu se dříve dozvíte, co potřebujete vědět. Povinná pole jsou označena *.