


Komentáře / Otázky (89)
![]() Rikke napsala:
Rikke napsala:
Hvad menes der med at der skal tages ud i den dobbelte halskant i vrang masker I hvert 2 parti
22.06.2025 - 18:17
![]() Dubois napsala:
Dubois napsala:
Dans explication col doublė : 'augmenter 1 m env dans ENVIRON 1 section en mailles env sur 2...... Ça signifie quoi? Augmenter 1 maille env ts les 4 mailles ?
07.06.2025 - 18:47Odpověď DROPS Design :
Bonjour Mme Dubois, augmentez ainsi: *1 m end, 1 m env, 1 m end, 1 m env, augmentez 1 m*, répétez de *à* tout le tour pour obtenir ainsi des côtes (1 m end, 1 m env, 1 m end, 2 m env). Bon tricot!
09.06.2025 - 09:49
![]() Cléo napsala:
Cléo napsala:
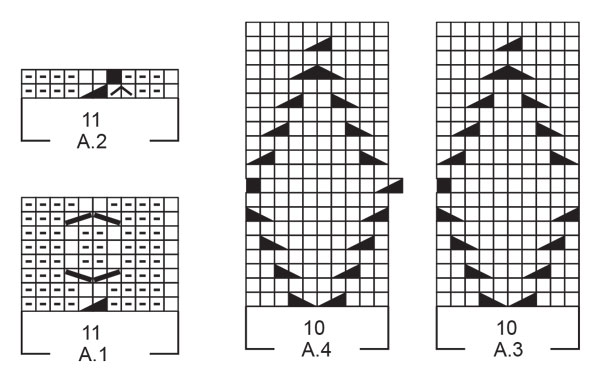
Bonjour, pour le deuxième rang de A1 fait-on bien de la façon suivante : -on termine le premier rang de A1 à l'endroit par la 1è maille de A1 et 2 mailles lisières (K3) -on tourne l'ouvrage, on commence le 2è rang (envers) avec 2 mailles lisières, la 1è maille du 1er rang de A1 (K2P1) puis on fait la deuxième ligne du diagramme (K4, torsade etc.) ? Merci !
11.05.2025 - 15:25Odpověď DROPS Design :
Bonjour Cléo, on termine, sur l'endroit par la 1ère maille de A.1 pour que le motif soit symétrique (on a ainsi 1 m endroit de chaque côté, à 2 m point mousse des bords). Sur l'envers, on tricote (les 2 m point mousse, puis) la 1ère m de A.1 à l'envers sur l'envers (cf légende), puis on lit A.1 de gauche à droite (4 m end, 2 m env, 4 m env, 2 m end) et on répète de (à) jusqu'aux 2 m point mousse. Au 3ème rang, vous tricotez (1 m end, 3 m env, les 2 torsades, et 3 m env) en terminant par 1 m end (1ère m de A.1). Bon tricot!
12.05.2025 - 08:16
![]() Carola Örnfjäll napsala:
Carola Örnfjäll napsala:
Hej! Tack för ert tålamod, jag har fattat fel o stickat 16 varv. Äntligen trillade poletten ner. Tack för stor hjälp. Hoppas jag klarar mig ett tag nu. 😊
29.04.2025 - 22:57
![]() Carola Örnfjäll napsala:
Carola Örnfjäll napsala:
Hej, jag igen! River upp o river upp. A1 helt ok första varvet. När jag går tillbaka på avig sidan varv 2 blir det ju 4 r, 2 aviga, 4 räta, en avig? Är detta varv, varv 2 på mönstret innebär det att jag ska börja på varv 3 på mönstret? Betyder detta att mönstret har8 Varv men totalt stickas 16 Varv? Jag är helt borta i detta.
28.04.2025 - 15:11Odpověď DROPS Design :
Hej Carola. Ja det stämmer att varv 2 i A.1 från avigsidan är 4 rm, 2 am, 4 rm, 1 am. Diagram A.1 har 8 varv totalt, rad 1 är rätsidan, rad 2 är avigsidan osv. Du kan läsa mer om stickdiagram här. Mvh DROPS Design
29.04.2025 - 07:55
![]() Carola Örnfjäll napsala:
Carola Örnfjäll napsala:
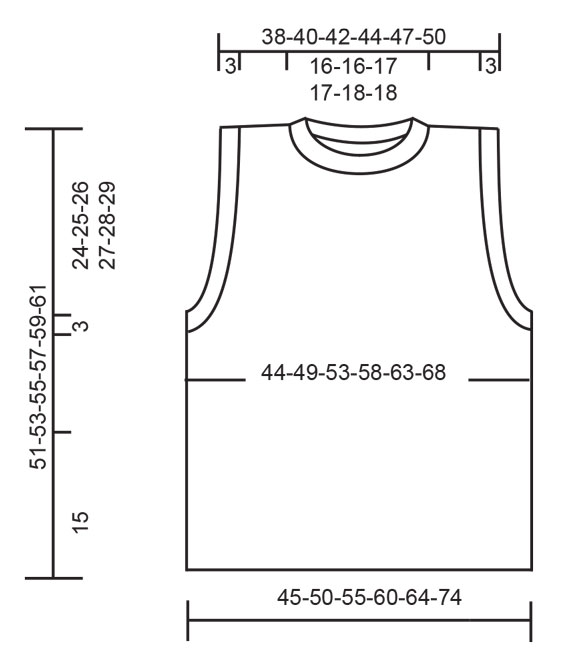
Hej! Ser nu att A.1 ska vara 15 cm när den stickats 5ggr. Jag har 19 cm nu o bara stickat 4 ggr. Jag var tvungen byta till stickor 5 så att stickfastheten skulle stämma. Hur ska jag gå till väga för att det ska stämma? Jag blir så ledsen på detta. Carola
22.04.2025 - 10:37Odpověď DROPS Design :
Hej Carola. Antingen så låter du den bli lite längre och har 19 cm istället för 15 cm för första delen, eller så får du repa upp så du har 15 cm och fortsätta enligt beskrivningen efter 15 cm. När du fortsätter får du vara extra obs på måtten i beskrivningen och följa dem, eftersom du inte har rätt stickfasthet på höjden. Mvh DROPS Design
25.04.2025 - 11:05
![]() Carola Örnfjäll napsala:
Carola Örnfjäll napsala:
Hej! Betyder det att när A1 är stickat 5 ggr på höjden så skall det vara 15 cm? Har jag läst skissen rätt?
15.04.2025 - 10:54Odpověď DROPS Design :
Hej. Ja det stämmer. Mvh DROPS Design
25.04.2025 - 11:33
![]() Laura napsala:
Laura napsala:
I've come to the point "then bind off on each side..." I'm knitting an M and I'm really having a hard time understanding how to decrease. It says I should decrease on both sides but only at the beginning of the row and something with every second/fourth row. Can you explain how I should decrease at the beginning of every second row on both sides? At the moment I am just decreasing all on the same side
13.04.2025 - 14:34Odpověď DROPS Design :
Hi Laura, If you find it easier (and it makes no difference) then you can bind off at the beginning and end of every 2nd row the correct number of times, then at the beginning and end of every 4th row the correct number of times. Happy Easter!
13.04.2025 - 17:48
![]() Carola Örnfjäll napsala:
Carola Örnfjäll napsala:
Hej!Tack för tips att läsa måttskiss men detta kommer upp! kan för närvarande inte hantera den här begäran. Sidan kan inte visas.
27.03.2025 - 19:58
![]() Carola Örnfjäll napsala:
Carola Örnfjäll napsala:
Hej igen! Undrar över ritningen på västen. Kan jag få en förklaring på vad alla siffror under västen, på vänster sida av västen, mitt på västen, och uppe på väste Vad vill dom säga?
26.03.2025 - 20:57Odpověď DROPS Design :
Hej Carola. I denna lektion kan du se hur läser måttskissen. Mvh DROPS Design
27.03.2025 - 10:33
|
|||||||||||||||||||||||||
Diamond Sky#diamondskyslipover |
|||||||||||||||||||||||||
 |
 |
||||||||||||||||||||||||
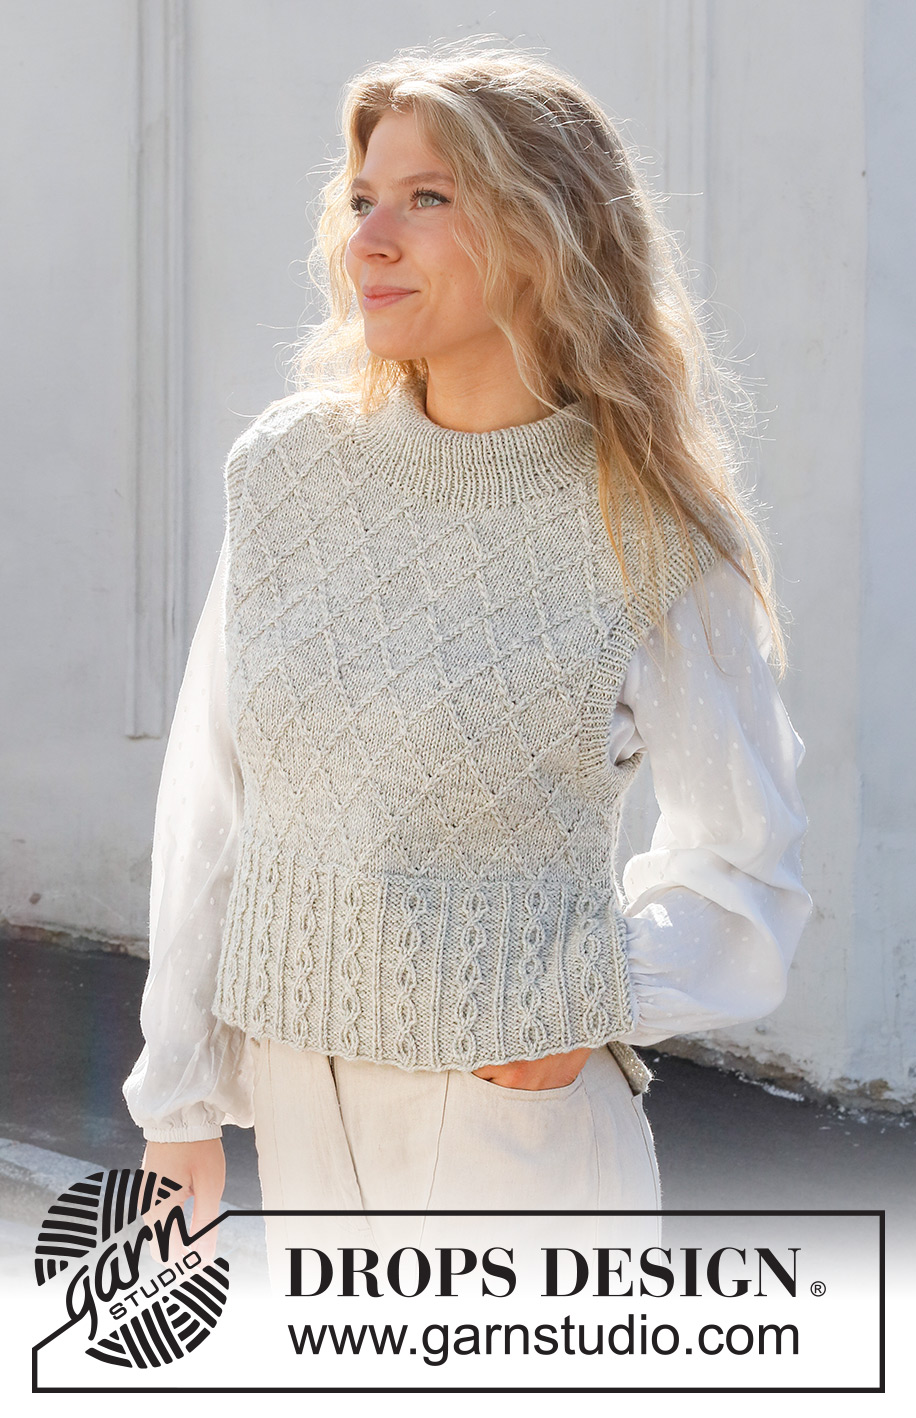
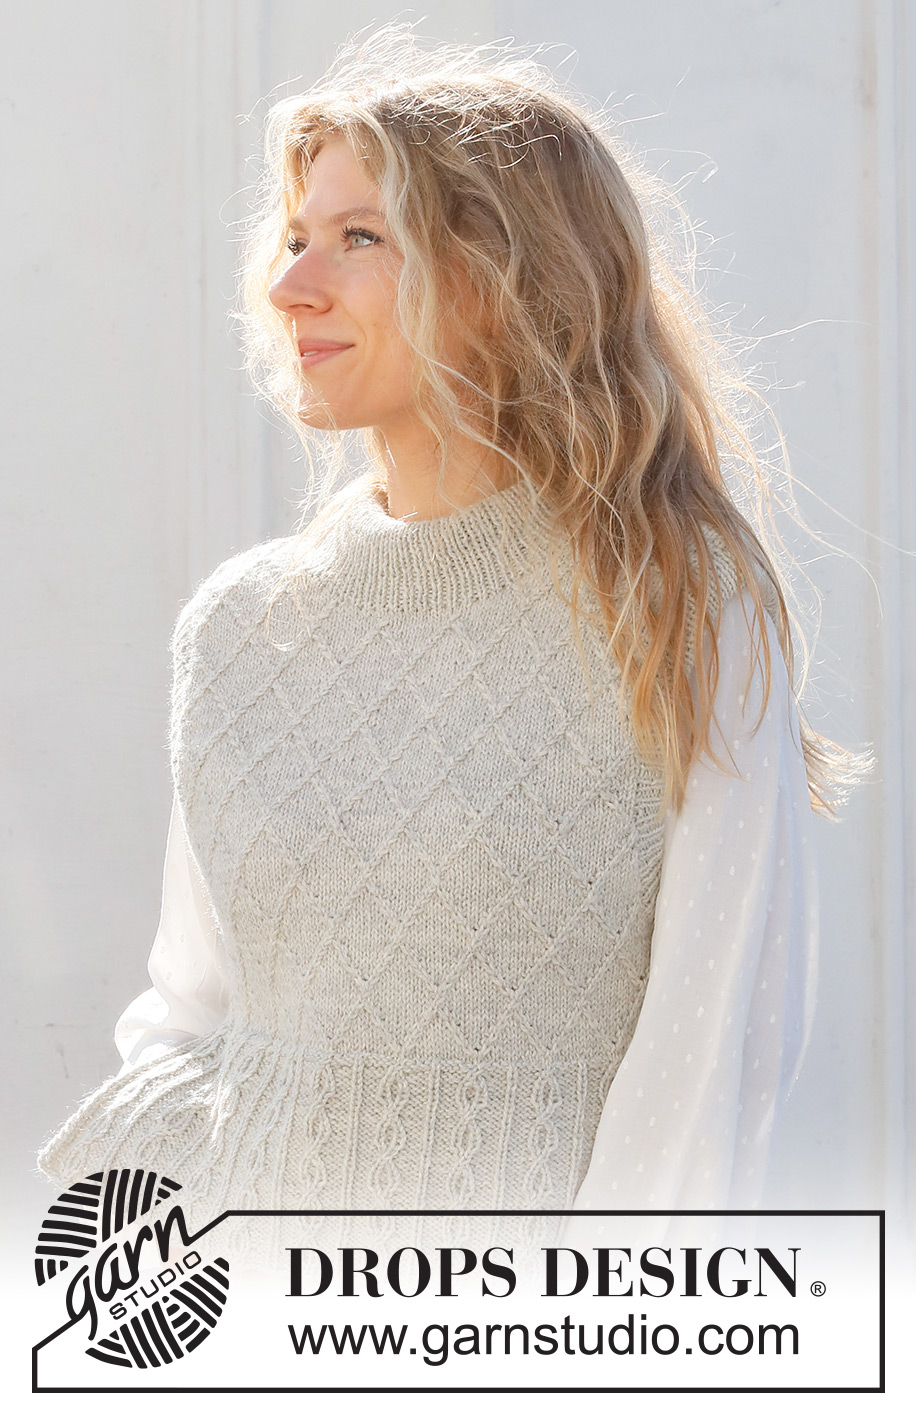
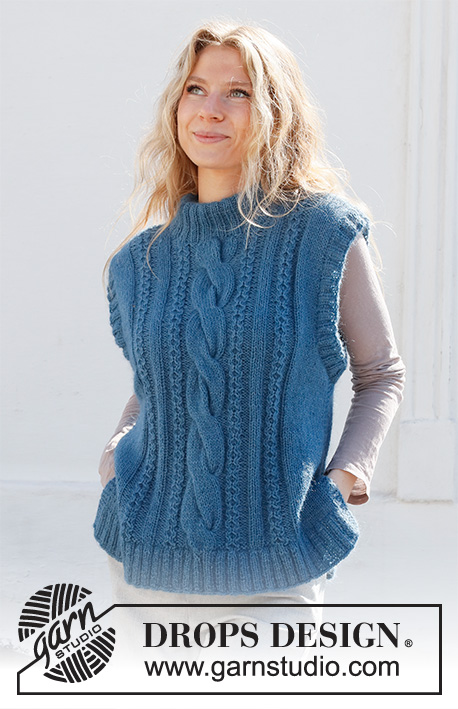
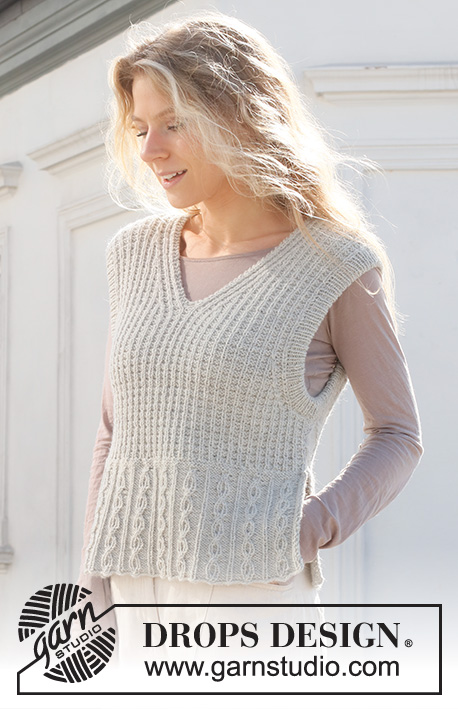
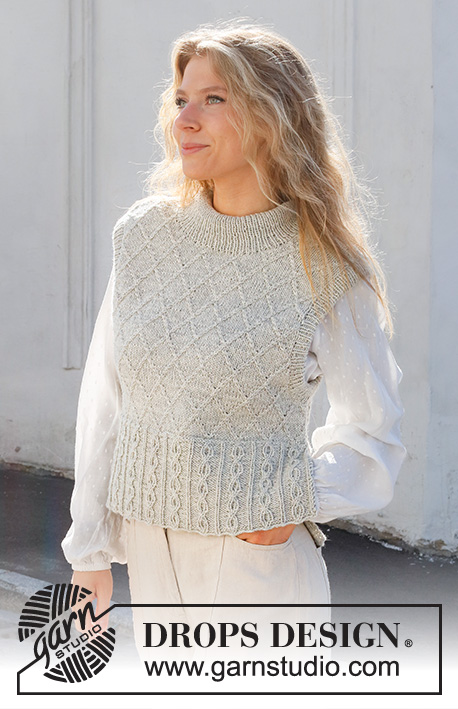
Vesta s copánkovým a plastickým vzorem pletená z příze DROPS Lima nebo DROPS Merino Extra Fine. Velikost: S - XXXL.
DROPS 228-8 |
|||||||||||||||||||||||||
|
---------------------------------------------------------- VYSVĚTLIVKY K NÁVODU: ---------------------------------------------------------- VROUBKOVÝ VZOR: Pleteme stále hladce, lícové i rubové řady. 1 vroubek = 2 řady hladce. VZOR: Viz schémata A.1 až A.4. Zobrazeny jsou všechny řady vzoru nahlížené z lícové strany. TIP - UZAVÍRÁNÍ: Abychom neměli uzavřený okraj moc stažený, můžeme na uzavírání ok použít silnější jehlice, nebo za každým zhruba 4. okem 1x nahodíme – nahození hned uzavřeme jako běžné oko. ---------------------------------------------------------- PRÁCE ZAČÍNÁ ZDE: ---------------------------------------------------------- VESTA - JAK BUDEME POSTUPOVAT: Přední a zadní díl pleteme odděleně v řadách. Potom sešijeme náramenice a postranní švy. Nakonec napleteme v kruhových řadách dvojitý lem průkrčníku a lemy průramků. ZADNÍ DÍL: Na kruhovou jehlici č. 4 nahodíme přízí DROPS Lima nebo DROPS Merino Extra Fine 104-115-126-137-148-159 ok (včetně 2 krajových ok na každé straně) a upleteme 1 rubovou řadu obrace. Potom pleteme v tomto rozvržení: 2 krajová oka VROUBKOVÝM VZOREM - viz popis výše, vzor A.1 následujících 99-110-121-132-143-154 ok (= 9-10-11-12-13-14 sekvencí vzoru po 11 okách), upleteme první oko vzoru A.1 a 2 krajová oka vroubkovým vzorem. V tomto rozvržení pleteme v řadách - vzor A.1 upleteme celkem 5x na výšku. Následující řadu pleteme takto: Spleteme 2 oka hladce (= ujmuli jsme 1 oko), nad každou sekvencí vzoru A.1 pleteme teď vzor A.2 (= v každé sekvenci vzoru A.2 ujmeme 1 oko - celkem tedy ujmeme 9-10-11-12-13-14 ok), spleteme následující 3 oka hladce (= ujmuli jsme 2 oka), na konci řady 1 oko nahodíme (= krajové oko). Práci otočíme a pleteme 1 krajové oko vroubkovým vzorem, 1 oko obrace, vzor A.2 až po poslední 1 oko, 1 oko obrace a na konci řady 1 oko nahodíme (= 1 krajové oko vroubkovým vzorem) = na jehlici teď máme 94-104-114-124-134-144 ok a práce měří asi 15 cm. Pokračujeme v tomto rozvržení: 1 krajové oko vroubkovým vzorem, 1 oko lícovým žerzejem, vzor A.3 následujících 10 ok, vzor A.4 následujících 80-90-100-110-120-130 ok (= 8-9-10-11-12-13 sekvencí vzoru po 10 okách), upleteme 1 oko lícovým žerzejem, a poslední 1 krajové oko vroubkovým vzorem. Takto pleteme v řadách. V 9. řadě vzoru A.4 upleteme po dokončení poslední sekvence vzoru 1 oko hladce. Ve výši 24-25-26-27-28-29 cm uzavřeme na začátku následujících 2 řad 6-6-9-9-12-12 ok pro průramky. Pak tvarujeme průramky - na obou stranách, tj. na začátku každé řady, uzavíráme následujícím způsobem: V každé 2. řadě uzavřeme 2 oka 1-2-2-2-2-2x, pak uzavřeme v každé 2. řadě 1 oko 1-1-1-3-3-5x, a nakonec uzavíráme v každé 4. řadě 1 oko 4-5-5-6-5-5x = 68-72-76-80-86-92 ok. Pleteme až do výšky 49-51-53-55-57-59 cm. Nyní uzavřeme prostředních 32-32-34-34-36-36 ok (= průkrčník) a každou náramenici dokončíme samostatně. V následující řadě uzavřeme na každé straně průkrčníku ještě 1 oko = na každé náramenici zbývá 17-19-20-22-24-27 ok. Každou náramenici dokončíme odděleně; pleteme až do výšky 51-53-55-57-59-61 cm a v další lícové řadě všechna oka hladce uzavřeme. Stejným způsobem upleteme i druhou náramenici. PŘEDNÍ DÍL: Nahodíme a pleteme stejným způsobem jako zadní díl. Ve výši 43-45-46-48-49-51 cm odložíme prostředních 16-16-18-18-20-20 ok na pomocnou jehlici a každou náramenici dokončíme samostatně. Tvarujeme průkrčník - v každé řadě na straně průkrčníku uzavíráme takto: 3 oka 1x, 2 oka 2x a 1 oko 2x = na náramenici zbývá 17-19-20-22-24-27 ok. Ve výši 51-53-55-57-59-61 cm všechna oka uzavřeme. Stejným způsobem upleteme i druhou náramenici. DOKONČENÍ: Sešijeme náramenice. Sešijeme postranní švy od průramků až k místu kde jsme nahodili 1 nové oko - na každé straně ponecháme asi 15 cm od dolního okraje nesešitých (= postranní rozparky). DVOJITÝ LEM PRŮRAMKU: Začínáme v podpaží, kruhovou jehlicí č.3 a přízí DROPS Lima nebo DROPS Merino Extra Fine nabereme kolem průramku asi 136 až 162 ok - celkový počet ok musí být dělitelný 2. Pleteme v kruhových řadách pružný lem 1/1 (tj. střídáme 1 oko hladce, 1 oko obrace). Když je lem vysoký 6 cm, práci uzavřeme - viz TIP - UZAVÍRÁNÍ. Lem přeložíme napolovic do rubu a přišijeme - dbáme na to, aby byl šev pružný, jinak se bude lem kroutit a ohýbat na lícovou stranu. DVOJITÝ LEM PRŮKRČNÍKU: Kruhovou jehlicí č. 3 a přízí DROPS Lima nebo DROPS Merino Extra Fine nabereme z lícové strany kolem průkrčníku asi 100 až 116 ok (včetně odložených ok na pomocné jehlici) - celkový počet ok musí být dělitelný 2. Pleteme v kruhových řadách pružný lem 1/1 (tj. střídáme 1 oko hladce, 1 oko obrace). Když je lem vysoký 10 cm, přidáme zhruba v každém druhém žebru pružného vzoru 1 oko obrace. Pak pleteme dle vzoru až do celkové výšky 14 cm. Nakonec všechna oka dle vzoru uzavřeme - dbáme na to, aby nebyl lem příliš stažený – viz TIP – UZAVÍRÁNÍ. Lem přeložíme napolovic do rubu a přišijeme - dbáme na to, aby byl šev pružný, jinak se bude lem kroutit a ohýbat na lícovou stranu. |
|||||||||||||||||||||||||
Vysvětlivky ke schématu |
|||||||||||||||||||||||||
|
|||||||||||||||||||||||||
|
|||||||||||||||||||||||||
|
|||||||||||||||||||||||||
Dokončili jste tento model?Pak označte své fotky tagem #dropspattern #diamondskyslipover nebo je pošlete do galerie #dropsfan. Potřebujete s tímto návodem poradit?Otevřete-li si návod na stránce garnstudio.com, najdete tam 28 výukových video-ukázek, Komentáře/Dotazy a další užitečné informace. © 1982-2025 DROPS Design A/S. Vyhrazujeme si veškerá práva. Tento dokument, včetně všech jeho dílčích částí, podléhá autorským právům. Podrobnější komentář k možnostem užití našich návodů najdete dole pod každým návodem na našich stránkách. |
|||||||||||||||||||||||||


V oblasti pletené a háčkované módy působí DROPS Design více než 40 let. Díky tomu vám můžeme nabídnout jednu z nejrozsáhlejších kolekcí modelů s bezplatnými návody dostupnými na internetu - navíc v 17 jazycích. K dnešnímu dni máme na 314 katalogů a 11822 návodů celkem - z nich je už 7048 dostupných v [češtině].
Přidejte komentář k návodu DROPS 228-8
Rádi bychom věděli, co si o tomto modelu myslíte!
Pokud se chcete na něco zeptat, dbejte prosím na to, abyste ve formuláři níže vybrali správnou kategorii - díky tomu se dříve dozvíte, co potřebujete vědět. Povinná pole jsou označena *.