


Komentáře / Otázky (18)
![]() Susanne Weller napsala:
Susanne Weller napsala:
Hallo Möchte gerne die Tasche häkeln, die Wolle ist ausverkauft, welche würden Sie mir empfehlen?
06.08.2024 - 10:35Odpověď DROPS Design :
Liebe Frau Weller, diese beiden Farben DROPS Paris sind immer noch verfügbar - siehe Farbkarte; gerne können Sie auch den Garnumrechner benutzen um Alternative so wie die passende Garnmenge zu finden. Viel Spaß beim Stricken!
07.08.2024 - 07:53
![]() Majo napsala:
Majo napsala:
Bonjour Quand doit-on commencer le diagramme 1?’ Ensuite je ne comprend pas l’alternance des couleurs qui n’est pas expliqué Par contre très beau modèle , mais hélas les explications ne sont pas au top , peut être problème de traduction Merci
30.04.2024 - 09:05Odpověď DROPS Design :
Bonjour Mme Majo, le diagramme a.1 se crochète en même temps que les augmentations des tours 1 à 11 - cf explications écrites. Lisez les diagrammes de haut en bas et de droite à gauche tous les tours. Cette leçon explique comment lire les diagrammes au crochet et pourra peut-être vous aider. Bon crochet!
30.04.2024 - 15:57
![]() Bine-Nes napsala:
Bine-Nes napsala:
Nadelstärke für diese Wolle (Baumwolle - Paris) ist 5 mm. Es wird mit doppeltem Faden gehäkelt, die Nadlestärke bleibt bei 5 mm, wie soll das funktionieren?
24.02.2023 - 17:47Odpověď DROPS Design :
Liebe Frau Nes, man braucht hier eine feste Textur, deshalb wird man mit einer kleineren Häkelnadel, aber beachten Sie, daß die Maschenprobe mehr wichtig als die Hakelgröße ist, dh 13 Stäbchen in der Breite und 6 Reihen in der Höhe mit 2 Fäden = 10 x 10 cm. Hier lesen Sie mehr. Viel Spaß beim häkeln!
27.02.2023 - 09:10
![]() Carmen Arteaga napsala:
Carmen Arteaga napsala:
Hola cuanto debe medir el circulo del fondo?, cuando terminan los aumentos , cual es la medida? muchas gracias por sus lindos patrones
08.08.2022 - 20:31Odpověď DROPS Design :
Hola Carmen, en este caso no damos el diámetro del bolso porque tienes que trabajar el dibujo completo. Si después de trabajar el círculo, debido a la tensión utilizada, te parece que queda demasiado pequeño para la base del bolso, puedes trabajar un par de vueltas más usando solo el hilo gris. En principio, el ancho total debería ser 43 cm.
14.08.2022 - 21:54
![]() Isa napsala:
Isa napsala:
Mille mercis pour votre réponse !!! Très bonne journée
31.05.2021 - 17:38
![]() Isa napsala:
Isa napsala:
Bonjour, je suis en train de crocheter ce sac et je suis bloquée aux tours 5 à 10. Je ne comprends pas combien de brides et d'augmentations je dois crocheter. Pouvez-vous m'aider svp ? Merci d'avance pour votre réponse.
31.05.2021 - 10:14Odpověď DROPS Design :
Bonjour Isa, vous devez continuer à augmenter 12 b rides à chaque tour, comme avant, mais avec toujours 1 bride en plus entre chaque augmentation, autrement dit, au tour 5, crochetez: *1 bride dans les 3 premières brides, 2 brides dans la suivante*, au tour 6: *1 bride dans les 4 premières brides, 2 brides dans la suivante*, et ainsi de suite, jusqu'au tour 10 (= 1 bride dans les 8 premières brides,2 dans la suivante = 120 brides). Bon crochet!
31.05.2021 - 15:41
![]() Rose napsala:
Rose napsala:
J’adore ce modèle j’ai hâte de pouvoir le faire 😍😍
23.04.2021 - 00:32
![]() Beata napsala:
Beata napsala:
Simple and beautiful.
05.04.2021 - 08:48
![]() Laila napsala:
Laila napsala:
Upea kuvitus
19.01.2021 - 23:33
![]() Melody Johnson napsala:
Melody Johnson napsala:
Summer Vacation
11.01.2021 - 19:38
|
||||||||||
Compass Tote#compasstote |
||||||||||
 |
 |
|||||||||
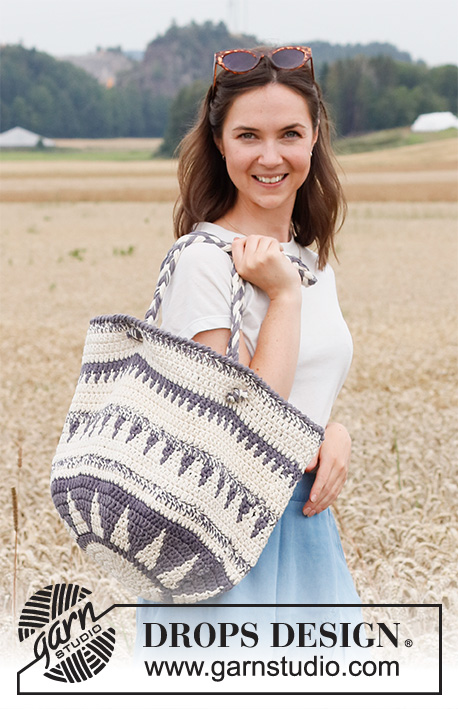
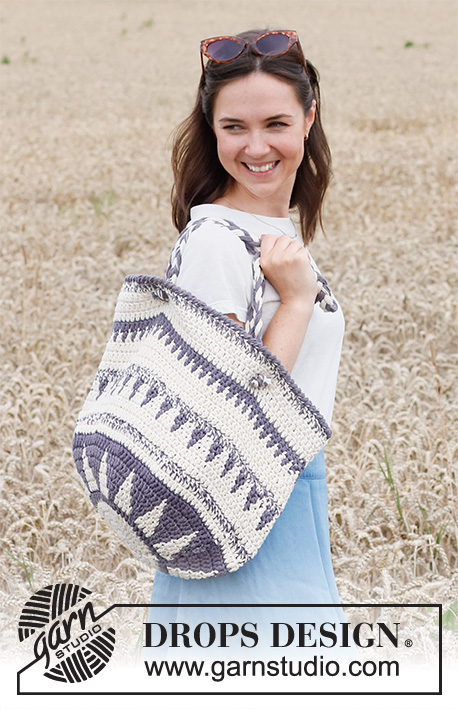
Taška s barevným vzorem a 2 uchy háčkovaná z dvojité příze DROPS Paris.
DROPS 220-25 |
||||||||||
|
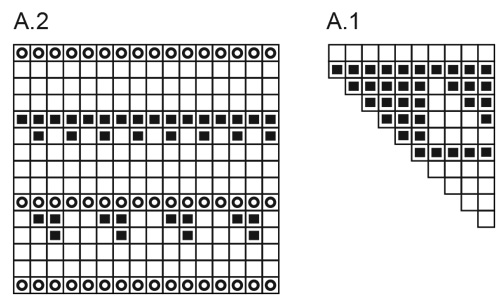
---------------------------------------------------------- VYSVĚTLIVKY: ---------------------------------------------------------- VZOR: Viz schémata A.1 a A.2. Schémata zobrazují barevné rozložení vzoru. 1 čtvereček = 1 dlouhý sloupek. TIP – DVOJITÁ PŘÍZE: Přízi můžeme odvíjet současně z povrchu i zevnitř klubíčka. INFO: První dlouhý sloupek v kruhové řadě nahrazujeme 3 řetízkovými oky; kruhovou řadu končíme 1 pevným okem do 3. řetízkového oka. TIP - UJÍMÁNÍ: Každý 14. a 15. dlouhý sloupek v kruhové řadě sháčkujeme dohromady, takto: háčkujeme 1 dlouhý sloupek, ale nedokončíme jej – před posledním protažením příze (= 2 smyčky na háčku) uháčkujeme stejným způsobem následující dlouhý sloupek a při jeho dokončování protáhneme přízi všemi 3 smyčkami na háčku = ujmuli jsme 1 dlouhý sloupek. RAČÍ SLOUPEK: Háčkujeme krátký sloupek, ale „pozpátku“, tj. vpichujeme zleva doprava. ---------------------------------------------------------- POPIS PRÁCE: ------------------------------------------------------- TAŠKA – JAK BUDEME POSTUPOVAT: Háčkujeme v kruhových řadách ode dna k hornímu okraji dvojitou přízí – viz TIP DVOJITÁ PŘÍZE. TAŠKA: Háčkem č.5 uháčkujeme 2 vlákny smetanové příze (= dvojitou přízí) 5 řetízkových ok a spojíme je pevným okem do kroužku. Dál háčkujeme v kruhových řadách vzor A.1 (= v kruhové řadě máme 12 sekvencí vzoru). 1. KRUHOVÁ ŘADA: do kroužku z řetízkových ok uháčkujeme 12 dlouhých sloupků – viz INFO. 2. KRUHOVÁ ŘADA: po 2 dlouhých sloupcích do každého dlouhého sloupku = 24 dlouhých sloupků. 3. KRUHOVÁ ŘADA: *1 dlouhý sloupek do 1. dlouhého sloupku, 2 dlouhé sloupky do následujícího dlouhého sloupku*, *-* opakujeme v průběhu celé kruhové řady = 36 dlouhých sloupků. 4. KRUHOVÁ ŘADA: *po 1 dlouhém sloupku do každého z prvních 2 dlouhých sloupků, 2 dlouhé sloupky do následujícího dlouhého sloupku*, *-* opakujeme v průběhu celé kruhové řady = 48 dlouhých sloupků. 5.-10. KRUHOVÁ ŘADA: pokračujeme v háčkování vzoru a přidáváme jako dosud, tj. v každé kruhové řadě uháčkujeme mezi dvěma přidáními vždy o 1 dlouhý sloupek více = 120 dlouhých sloupků. 11. KRUHOVÁ ŘADA: háčkujeme poslední kruhovou řadu vzoru A.1 a SOUČASNĚ ujmeme rovnoměrně 8 dlouhých sloupků – viz TIP - UJÍMÁNÍ = 112 dlouhých sloupků. 12. KRUHOVÁ ŘADA: dál háčkujeme po 1 dlouhém sloupku do každého oka, postupujeme dle schématu A.2 (= v kruhové řadě máme 7 sekvencí vzoru). Po dokončení celé sekvence vzoru A.2 (na výšku) uháčkujeme 1 kruhovou řadu dvojitou šedou přízí RAČÍMI SLOUPKY – viz výše. Přízi odstřihneme a zapošijeme. UCHO: Ustřihneme si 18 vláken příze od každé barvy, každé o délce 120 cm = 36 vláken. Vlákna složíme k sobě a cca 12 cm od konce uvážeme volný uzel. Pak vlákna rozdělíme do 3 pramenů po 12 – jeden smetanový, jeden šedý a jeden smíšený – a spleteme z nich cop dlouhý asi 68 cm. Konec copu rozdělíme na poloviny, které protáhneme stěnou tašky ve třetí kruhové řadě pod horním lemem, 1 dlouhý sloupek od sebe. Konce copu pak na lícové straně svážeme na pevný uzel. Volný uzel na začátku copu nyní rozvážeme a konec ucha připevníme k protilehlé straně tašky stejným způsobem. Stejným způsobem vyrobíme druhé ucho – viz foto. |
||||||||||
Vysvětlivky ke schématu |
||||||||||
|
||||||||||
|
||||||||||
Dokončili jste tento model?Pak označte své fotky tagem #dropspattern #compasstote nebo je pošlete do galerie #dropsfan. Potřebujete s tímto návodem poradit?Otevřete-li si návod na stránce garnstudio.com, najdete tam 11 výukových video-ukázek, Komentáře/Dotazy a další užitečné informace. © 1982-2025 DROPS Design A/S. Vyhrazujeme si veškerá práva. Tento dokument, včetně všech jeho dílčích částí, podléhá autorským právům. Podrobnější komentář k možnostem užití našich návodů najdete dole pod každým návodem na našich stránkách. |
||||||||||


V oblasti pletené a háčkované módy působí DROPS Design více než 40 let. Díky tomu vám můžeme nabídnout jednu z nejrozsáhlejších kolekcí modelů s bezplatnými návody dostupnými na internetu - navíc v 17 jazycích. K dnešnímu dni máme na 314 katalogů a 11821 návodů celkem - z nich je už 7047 dostupných v [češtině].
We work hard to bring you the best knitting and crochet have to offer, inspiration and advice as well as great quality yarns at incredible prices! Would you like to use our patterns for other than personal use? You can read what you are allowed to do in the Copyright text at the bottom of all our patterns. Happy crafting!
Přidejte komentář k návodu DROPS 220-25
Rádi bychom věděli, co si o tomto modelu myslíte!
Pokud se chcete na něco zeptat, dbejte prosím na to, abyste ve formuláři níže vybrali správnou kategorii - díky tomu se dříve dozvíte, co potřebujete vědět. Povinná pole jsou označena *.