
Catégories populaires
Vous cherchez un fil?


Commentaires / Questions (9)
![]() Vicky a écrit:
Vicky a écrit:
Hi, I am left with a large loose loop in the middle where there was excess yarn between knitting up the first half and knitting up the second half before rejoining. The video showeda very large loose loop so that the top of the completed first half was not tightly joined to the bottom of the second half. Yet once the second half is knitted up the excess yarn between the 2 halves isn't shown again. Where did I go wrong? What do I do with the loose loop? Thank you.
23.11.2024 - 17:50DROPS Design a répondu:
Dear Vicky, the joining of both halves should be quite tight. If you have excess yarn you could start pulling the thread in the adjacent stitches, so that instead of having a giant loop you can have a few smaller loops. If you have been following the video, the big thread should have been covered by the upper half and be hidden. Happy knitting!
24.11.2024 - 22:41
![]() Anna a écrit:
Anna a écrit:
Hi, I started knitting this pattern but changed the number of stitches cause it was too big and I wanted it thinner, but I'm afraid something is wrong. I cast on 12 sts, giving me 3 ribs on the RS, 2 on the WS. The problem is that after the criss cross, on the RS I only have 2 ribs instead of 3, and I don't see a way to make it 3 on the RS after the cross. Is the problem the halved sts, like, does the pattern works only with 24?
21.11.2023 - 18:59DROPS Design a répondu:
Dear Anna, it might be, as with 24 sts you get P2 in the middle and can then divide piece in 2 separate pieces. Happy knitting!
22.11.2023 - 08:45
![]() Jennifer a écrit:
Jennifer a écrit:
I am not understanding the pattern . Knit the first stitch, k2 P2 until last 3 stitches, k2, knit the last stitch. This does not make a ribbing. Edge stitch in garter to me means knit?
13.11.2023 - 23:00DROPS Design a répondu:
Dear Jennifer, you should work ribbing (K2, P2) as follows: knit 1 (garter stitch), repeat (K2, P2) until 3 sts remain, finish with K2 and K1 (garter stitch). From WS work: K1, repeat (P2, K2) until 3 sts remain, finish with P2, K1 - edge stitches are worked in garter stitch, they will be knitted on every row. Happy knitting!
14.11.2023 - 10:32
![]() Zdenka a écrit:
Zdenka a écrit:
Jak pokračuji s druhou polovinou 12 ok když mi končí příze na první polovině o 7 cm výše? Děkuji
19.10.2023 - 21:52DROPS Design a répondu:
Dobrý den, Zdenko, poté, co dopletete první polovinu (= 7 cm výšky) tato oka odložíte na pomocnou jehlici a upletete stejným způsobem tu druhou půlku (= 12 ok, která byla dosud odložená) - přízi můžete napojit třeba z druhého konce klubíčka (pokud jste dosud odvíjela přízi z povrchu klubka, můžete nyní vytáhnout konec zevnitř klubka - nebo naopak :-) ). Jakmile doplete i druhou půlku do stejné výšky, obě půlky překřížíte a pak už pletete zase nad oběma půlkami dohromady, tedy v řadách nad celou šířkou čelenky. Hodně zdaru! Hana
21.10.2023 - 19:12
![]() Joanna a écrit:
Joanna a écrit:
Czy w tym wzorze można połączyć włóczkę Snow z Kid-Silk?
05.12.2022 - 00:55DROPS Design a répondu:
Można Joanno. Pozdrawiamy!
05.12.2022 - 14:38
![]() Luz Coz a écrit:
Luz Coz a écrit:
Que es punto musgo
02.02.2021 - 21:03DROPS Design a répondu:
Hola Luz. El punto musgo, que también llaman punto bobo o punto santa clara, se trabaja haciendo todos los puntos de derecho (tanto por el lado derecho como por el lado revés).
07.02.2021 - 20:36
![]() Silvia65 a écrit:
Silvia65 a écrit:
Ich möchte gerne wissen, wie breit das Stirnband ist. Über eine kurze Rückmeldung wäre ich Ihnen sehr sehr dankbar. Mfg S. Janssen
30.10.2020 - 11:52DROPS Design a répondu:
Liebe Silvia65, diese Angabe haben wir nicht (und Stirnband haben wir nicht mehr), aber sollte Ihre Maschenprobe stimmen, dann sollte das Stirnband wie auf dem Foto aussehen. Viel Spaß beim stricken!
30.10.2020 - 13:25
![]() Lutgardis a écrit:
Lutgardis a écrit:
Graag de uitleg
06.02.2020 - 12:34
![]() Sandy a écrit:
Sandy a écrit:
Looking forward to knitting this
08.10.2019 - 03:37
|
|
Weekender#weekenderheadband |
|
 |
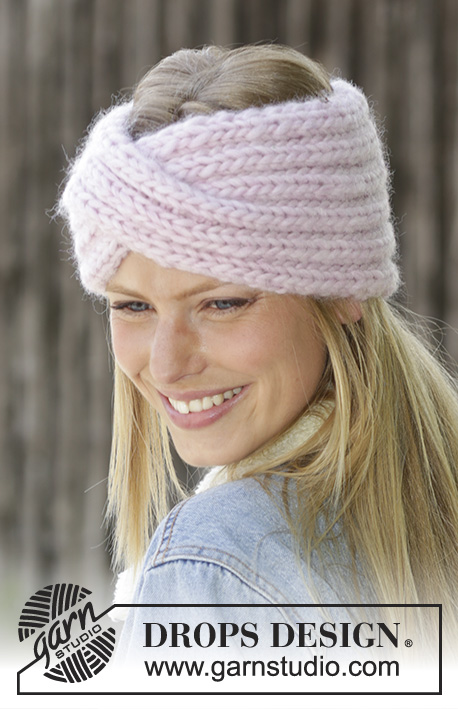 |
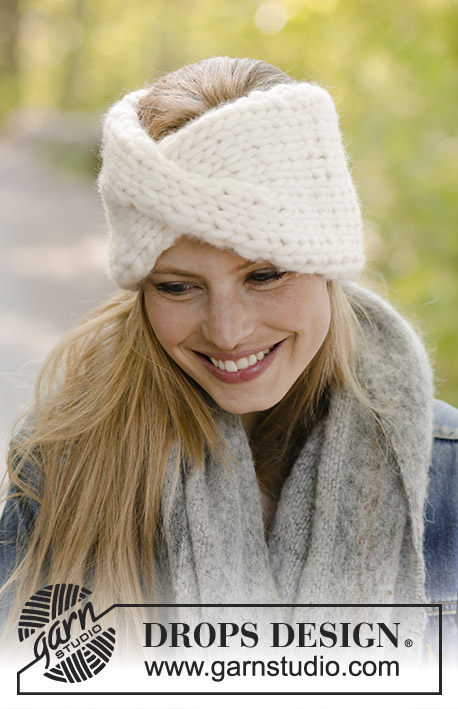
Bandeau tricoté en DROPS Snow, en côtes avec une torsade au milieu devant.
DROPS 192-1 |
|
|
TECHNIQUES EMPLOYÉES: ------------------------------------------------------- POINT MOUSSE (en allers et retours): 1 maille lisière au point mousse = tricoter la maille à l’endroit sur l’endroit et sur l’envers. ------------------------------------------------------- L'OUVRAGE COMMENCE ICI: ------------------------------------------------------- BANDEAU – PETIT APERÇU DE L'OUVRAGE: Se tricote en allers et retours à partir du milieu dos avec une couture à la fin, mais, à la moitié de l’ouvrage, on divise l’ouvrage au milieu pour former la torsade du devant. BANDEAU: Monter 24 mailles avec les aiguilles 10 en Snow. Tricoter sur l'endroit ainsi: 1 maille lisière au POINT MOUSSE – voir ci-dessus, (2 mailles endroit, 2 mailles envers) jusqu'à ce qu'il reste 3 mailles, 2 mailles endroit, 1 maille lisière au point mousse. Continuer ainsi en allers et retours. BIEN CONSERVER LA MÊME TENSION QUE POUR L'ÉCHANTILLON! Quand l'ouvrage mesure 21-22-23 cm, séparer l'ouvrage au milieu (= 12 mailles pour chaque moitié). Tricoter la première moitié en côtes comme avant avec 1 maille lisière au point mousse de chaque côté pendant 7 cm. Tricoter ensuite la deuxième moitié de la même façon. Reprendre les mailles de la première moitié mais changer l’ordre pour que les 2 moitiés se croisent au milieu devant. Continuer en côtes avec 1 maille lisière au point mousse de chaque côté jusqu'à ce que le bandeau mesure 49-51-53 cm de hauteur totale. Rabattre les mailles comme elles se présentent. ASSEMBLAGE: Faire la couture au milieu dos, en assemblant les mailles rabattues à celles du montage, bien veiller à ce que la couture ne soit pas trop serrée. Couper et rentrer le fil. |
|
Vous avez terminé ce modèle?Alors taguez vos photos avec #dropspattern #weekenderheadband ou bien présentez-les dans la galerie #dropsfan Vous avez besoin d'aide pour ce modèle ?Vous trouverez 14 tutoriels vidéo, une rubrique commentaires/questions et plus encore en vous rendant sur la page du modèle sur garnstudio.com © 1982-2026 DROPS Design A/S. Tous droits réservés. Ce document, y compris ces sous-sections, est protégé par les droits d'auteur (copyright). Apprenez-en davantage sur ce que vous pouvez faire avec nos modèles en bas de chacune des pages de notre site. |
|


Avec plus de 40 ans dans la conception de modèles tricot et crochet, DROPS Design offre l'une des plus vastes collections de modèles gratuits sur internet - traduits dans 17 langues. À ce jour, on compte 324 catalogues et 12290 modèles en français.
Nous nous efforçons de vous apporter le meilleur de ce que le tricot et le crochet peuvent vous offrir, inspiration et conseils mais également des fils de haute qualité à des prix incroyables! Vous souhaiteriez utiliser nos modèles autrement que pour un usage personnel? Vous pouvez lire ce que vous êtes autorisés à faire dans le Copyright en bas de page de chacun de nos modèles. Bon tricot!
Poster un commentaire sur le modèle DROPS 192-1
Nous aimerions connaître votre avis sur ce modèle !
Si vous souhaitez poser une question, merci de bien vouloir vérifier que vous avez choisi la bonne catégorie dans le formulaire ci-dessous afin d'accélérer la réponse. Les champs obligatoires sont indiqués par une *.