
Catégories populaires
Vous cherchez un fil?


Commentaires / Questions (26)
![]() Amanda a écrit:
Amanda a écrit:
Hej, i början av arbetet ska det sitta två stick markörer i början av arbetet, 3 maskor in. När man sen ska göra omslag ska man göra ett omslag på vardera sida om markörerna, eller vart ska de två ökningarna som beskrivs som att de ska sitta i mitten av arbetet göras?
28.02.2025 - 15:14DROPS Design a répondu:
Hej Amanda, du ökar 2 maskor på varje sida om de mittersta 55 maskorna. Yttersta omslaget är alltid innanför 2 rätstickade maskor i varje sida - och de 2 andra omslagen är alltid på varje sida om de mittersta maskorna :)
06.03.2025 - 13:35
![]() Marie a écrit:
Marie a écrit:
Bonjour. Est-ce normal qu’il n’y ai qu’une seule augmentation à gauche dans le A2b la 3ème fois. Merci pour votre réponse
01.04.2024 - 23:36DROPS Design a répondu:
Bonjour Marie, tout à fait, on n'augmente ici qu'une seule maille. Bon tricot!
02.04.2024 - 16:00
![]() Morel a écrit:
Morel a écrit:
Bonjour Je voudrais savoir si ce magnifique châle peut être transformé en cape ( fermé autour du cou ) Merci beaucoup et bravo pour votre travail 🥰
07.02.2024 - 08:22DROPS Design a répondu:
Bonjour Mme Morel, probablement, il vous faudrait juste faire les ajustements nécessaires. Bon tricot!
08.02.2024 - 08:05
![]() Amanda Karlsson a écrit:
Amanda Karlsson a écrit:
If I am supposed to increase 2 every other row, and knit 62 rows. How does that become 62 increased stitches, wouldn't it be double the amount of rows?
04.03.2023 - 13:48DROPS Design a répondu:
Dear Amanda, since you increase 2 stitches every other row you only increase on every 2 rows (for example, on even rows - work 1 row with no increases, work 1 row with increases, work 1 row with no increase, 1 row with increases...). So you increase 2 stitches on 31 rows = 62 stitches increased. Happy knitting!
05.03.2023 - 19:18
![]() Anna a écrit:
Anna a écrit:
Hei, eg har lagt opp til sjalet, men e usikker på hvordan man øker etter pinne 1 og 2. Skal man strikke 2 masker kast, så strikke 3 masker eller skal man øke 2 masker, kast, strikk 1 og så et kast
26.04.2022 - 20:57DROPS Design a répondu:
Hei Anna, Du gjentar pinner 1 og 2. Så pinne 3: 2 masker rille, 1 kast, strikke riller fram til 1. merket, 1 kast, riller fram til 2. merke, 1 kast, riller til det gjenstår 2 masker og 2 masker rille. God fornøyelse!
27.04.2022 - 07:06
![]() Uschi a écrit:
Uschi a écrit:
Hallo, sind im Diagranm die Hin- und Rückreihen gezeigt, oder stricke ich die Rückreise wie sie auf der Nadel erscheint? Viele Grüße Uschi
25.02.2021 - 23:21DROPS Design a répondu:
Liebe Uschi, die Hin- sowie die Rückreihen sind im Diagram gezeichnet, Rückreihen lesen Sie links nach rechts. Viel Spaß beim stricken!
26.02.2021 - 08:24
![]() Brenda a écrit:
Brenda a écrit:
The graph is wrong. I had to work the pattern to prove it to some one else. Never mind.
06.01.2021 - 19:01
![]() Brenda a écrit:
Brenda a écrit:
Ok to follow up. When you look at the pattern of adding and decreases the stitches it looks right but with actual knitting the increase is on the inside between the middle SKP and YO. Thus stitches get moved over one and then the YO misses a stitch. Gee this is hard to explain. When I added the extra row. The holes now flowed continuously across the shawl. Maybe you have to do a trial run to figure out what I mean. I repeated mine 3 times. We can zoom?
05.01.2021 - 17:29DROPS Design a répondu:
Dear Brenda, the diagrams just should be worked as follows, ie the yarn overs should be worked as shown in the diagram - on which row do you have this kind of worry? To get any individual assistance please feel free to contact your yarn store - even per mail or telephone, showing them your work so that it might be easier for them to see what you did. Happy knitting!
06.01.2021 - 08:13
![]() Brenda a écrit:
Brenda a écrit:
Hi. I rewrote... You need an extra row so that the YO’s all follow in a row. When you did the extra stitches the yo is ok. The next row after adding the stitches you miss a stitch with the yarn over. Therefore you have to repeat the last row over once more . Ok look at it this way. What I did to get it....Forget the pattern. Just do the YO to follow that pattern to hold the line. The line after the yarn over and on the pattern you miss the continuing the YO holes. You m
05.01.2021 - 15:14
![]() Brenda a écrit:
Brenda a écrit:
I do have every pattern sectioned off with markers. When you add a stitch there’s a yarn over missing. I can send a picture. There’s a spot where there’s a stitch and no yarn over. The pattern has to be adjusted I think. Unless the yarn over flow shows a separation? Is that it? I know I commented on this before and I’m trying once more to get it to work. I can not
05.01.2021 - 13:39DROPS Design a répondu:
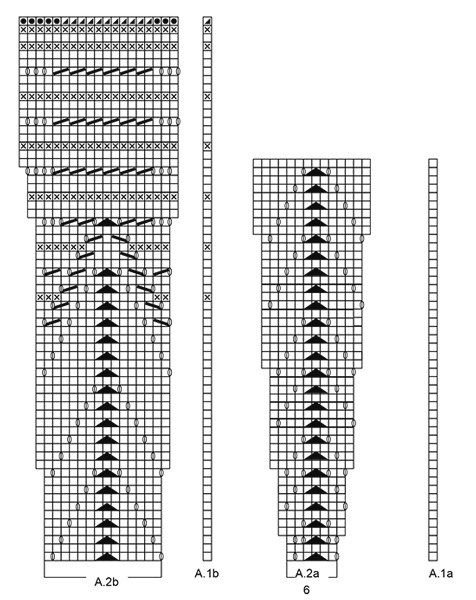
Dear Brenda, I'm sorry, I'm not following you - as examples showing the increases: you will increase 2 sts on row 3 in A.2a (= there are 4 yarn overs but only 2 sts are decreased); you will increase 2 sts on row 11 in A.2b working a total of 4 yarn overs but decreasing also only 2 sts. Hope this can help. Happy knitting!
05.01.2021 - 14:43
|
|||||||||||||||||||||||||
Majesty#majestyshawl |
|||||||||||||||||||||||||
 |
 |
||||||||||||||||||||||||
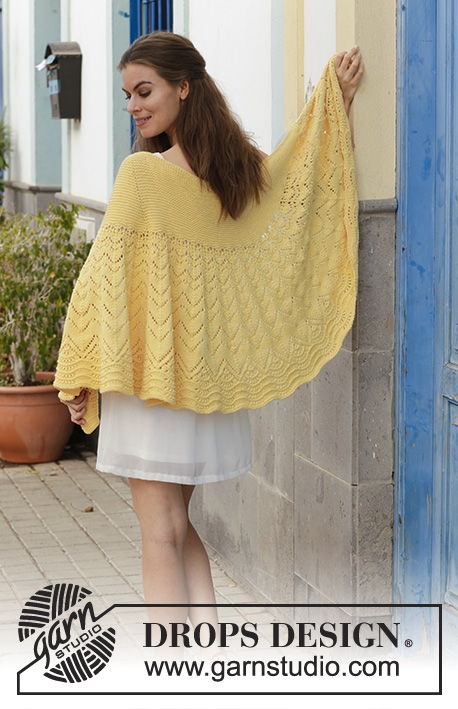
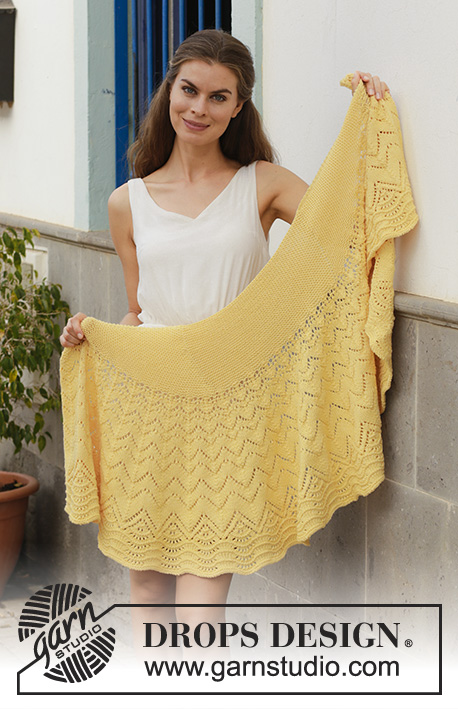
Châle tricoté avec point ajouré, point de vagues et point mousse, en DROPS Merino Extra Fine.
DROPS 187-23 |
|||||||||||||||||||||||||
|
TECHNIQUES EMPLOYÉES POINT MOUSSE (en allers et retours): 1 côte mousse = tricoter 2 rangs endroit. POINT FANTAISIE: Voir les diagrammes A.1 et A.2. Les diagrammes montrent tous les rangs du motif, vus sur l'endroit. ---------------------------------------------------------- CHÂLE: Se tricote en allers et retours sur aiguille circulaire. Monter 61 mailles avec l'aiguille circulaire 4 en Merino Extra Fine. Placer 1 marqueur à 3 mailles des bords de chaque côté (= 55 mailles entre les marqueurs). Tricoter ainsi: RANG 1 (= sur l'endroit): 2 mailles au POINT MOUSSE – voir ci-dessus, 1 jeté avant le marqueur (= on augmente 1 maille), tricoter au point mousse jusqu'au 1er marqueur, 1 jeté après le marqueur (= on augmente 1 maille), tricoter 55 mailles au point mousse (le 2ème marqueur est ici), 1 jeté (= on augmente 1 maille), tricoter au point mousse jusqu'à ce qu'il reste 2 mailles, 1 jeté (= on augmente 1 maille), terminer par 2 mailles au point mousse (= on augmente 4 mailles au total). RANG 2 (= sur l'envers): Tricoter au point mousse sur toutes les mailles, tricoter le 1er et le dernier jeté normalement, ils doivent former des trous, tricoter les 2 jetés du milieu torse, ils NE doivent PAS faire de trous. C'est-à-dire qu'on a 1 jour à 2 mailles point mousse du bord de chaque côté de l'ouvrage. Répéter les rangs 1 et 2. BIEN CONSERVER LA MÊME TENSION QUE POUR L'ÉCHANTILLON! Tricoter un total de 31 côtes mousse (= 62 rangs au total), c'est-à-dire que l'on a augmenté 62 mailles de chaque côté des 55 mailles centrales = 185 mailles. L'ouvrage mesure environ 15 cm dans le sens du tricot. Tricoter le rang suivant sur l'endroit ainsi: 2 mailles de bordure au point mousse, A.1a au-dessus de la maille suivante, répéter A.2a (= 6 mailles) jusqu'à ce qu'il reste 2 mailles (= 30 fois au total en largeur), terminer par 2 mailles de bordure au point mousse. Continuer ainsi. Quand A.1a et A.2a ont été tricotés 1 fois en hauteur, tricoter A.1b au-dessus de A.1a et A.2b au-dessus de A.2a. Quand toutes les mailles ont été augmentées dans A.2, on a 575 mailles. Rabattre comme expliqué dans le diagramme, avec 1 aiguille plus grosse si les mailles rabattues sont serrées. |
|||||||||||||||||||||||||
Légende diagramme(s) |
|||||||||||||||||||||||||
|
|||||||||||||||||||||||||
 |
|||||||||||||||||||||||||
Vous avez terminé ce modèle?Alors taguez vos photos avec #dropspattern #majestyshawl ou bien présentez-les dans la galerie #dropsfan Vous avez besoin d'aide pour ce modèle ?Vous trouverez 19 tutoriels vidéo, une rubrique commentaires/questions et plus encore en vous rendant sur la page du modèle sur garnstudio.com © 1982-2026 DROPS Design A/S. Tous droits réservés. Ce document, y compris ces sous-sections, est protégé par les droits d'auteur (copyright). Apprenez-en davantage sur ce que vous pouvez faire avec nos modèles en bas de chacune des pages de notre site. |
|||||||||||||||||||||||||


Avec plus de 40 ans dans la conception de modèles tricot et crochet, DROPS Design offre l'une des plus vastes collections de modèles gratuits sur internet - traduits dans 17 langues. À ce jour, on compte 324 catalogues et 12290 modèles en français.
Nous nous efforçons de vous apporter le meilleur de ce que le tricot et le crochet peuvent vous offrir, inspiration et conseils mais également des fils de haute qualité à des prix incroyables! Vous souhaiteriez utiliser nos modèles autrement que pour un usage personnel? Vous pouvez lire ce que vous êtes autorisés à faire dans le Copyright en bas de page de chacun de nos modèles. Bon tricot!
Poster un commentaire sur le modèle DROPS 187-23
Nous aimerions connaître votre avis sur ce modèle !
Si vous souhaitez poser une question, merci de bien vouloir vérifier que vous avez choisi la bonne catégorie dans le formulaire ci-dessous afin d'accélérer la réponse. Les champs obligatoires sont indiqués par une *.