
Catégories populaires
Vous cherchez un fil?


Commentaires / Questions (60)
![]() Crystal a écrit:
Crystal a écrit:
So do i just pick a spot and and just start the bows again? do i continue around to where i started? do i stop and then start againg or do a number of chains and turn the work going back the other way? how many bows should i have? sorry for all the questions im just not understanding and on a deadline as this is supposed to be a gift
29.07.2013 - 20:37
![]() Crystal a écrit:
Crystal a écrit:
On what bow do i start the back and forth, and how many bows do i do this on before i turn and go back the other way? also how do i turn to go back the other way? that is what i dont get.
27.07.2013 - 05:54DROPS Design a répondu:
Dear Crystal, the best thing is to start the sleeve at the point where you will have to continue back and forth, so that you will be sure to start back and forth at the right place. Happy crocheting!
29.07.2013 - 09:21
![]() Crystal a écrit:
Crystal a écrit:
I need more in depth info on how to work the sleeve and attach it to the body. i cant figure it out. what am i supposed to crochet back and forth on and how do i turn to make it correct. 13 bows is not enough to attach to the body
15.07.2013 - 22:01DROPS Design a répondu:
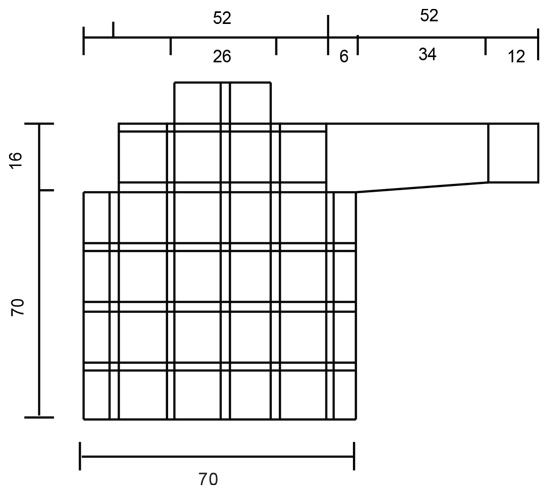
Dear Crystal, to create sleeve cap, you continue in rows when sleeve measures 46 cm [18-1/8"], and continue in rows until sleeve measures 52 cm [20.5"]. You will then have enough ch st bow with 13 + first/last ch st bow of each row worked back and forth - see fig. 1 to see how to crochet sleeve to armhole. Happy crocheting!
16.07.2013 - 10:09
![]() Crystal a écrit:
Crystal a écrit:
I get that part about having one square on the top of the hand and bottom of the hand. what does it mean when it says crochet back and forth? do we add the sleeve the same way we join the rest of the squares?
14.07.2013 - 02:03DROPS Design a répondu:
Dear Crystal, working back and forth means you will crochet the sleeve cap in rows. Sleeve is then joined to body the same way as you joined squares together. Happy crocheting!
15.07.2013 - 08:50
![]() Crystal a écrit:
Crystal a écrit:
Im trying to make the sleeve but am kinda of confused. the last part of the sleeve says "divide the work so that 1 square at the bottom of the sleeve is at the center of the hand and crochet back and forth." what do you mean by that? thanks so much for the help
13.07.2013 - 01:58DROPS Design a répondu:
Dear Crystal, when dividing sleeve for working cap, make sure you will have 1 square each side of the hand/arm (1 above, 1 below) when wearing sleeve. Happy crocheting!
13.07.2013 - 10:12
![]() Kelsey a écrit:
Kelsey a écrit:
This is such a beautiful pattern! I was getting ready to order the yarn and I was wondering how many skeins I need to purchase? Thanks!
01.07.2013 - 02:14DROPS Design a répondu:
Dear Mrs Kelsey, material required is indicated on the right side of the picture, ie, 800 g Muskat /50 g the ball Muskat = 16 balls DROPS Muskat. Happy crocheting!
01.07.2013 - 09:08
![]() T. a écrit:
T. a écrit:
I need help understanding round 4. When I start this round, I have only 8 bows. The sl st, ch1, sc at the beginning take the 1st bow. Then it * ch5, sc [in bow #2], ch5, 1 dc [in bow #3], ch10, 1dc [in bow #4] (corner), ch5, 1sc [in bow #5] *. Then I am supposed to repeat *-* a total of 3 times. But at this point, I've already used 5 of my 8 bows, how am I supposed to make it around a couple more times (not to mention the additional stuff at the end) ... what am I doing wrong?
11.06.2013 - 03:04DROPS Design a répondu:
Dear T., please check your round 3, you should have all around : *4 tr crocheted tog, ch6, dc, ch6* a total of 8 times so that you have 16 loops for round 4. Happy crocheting!
11.06.2013 - 08:59
![]() Sunshine_Melli a écrit:
Sunshine_Melli a écrit:
Ich finde den Cardigan total schön und versuche ihn nach zuarbeiten. Ich habe auch Probleme in der 4. Reihe. Dadurch, dass man die Blume wirklich nicht richtig erkennen kann, weiß ich nicht ob meine sehr komisch aussehende Blume richtig ist. "1 Kettm in der Mitte des Lm-Bogen"-welchen Lm-Bogen denn? Ich habe ja erstmal 4 D-Stb. Meint ihr den Lm-Bogen danach? Wie soll das gehen? Bin Anfängerin, vielleicht stelle ich mich auch zu doof an.
21.03.2013 - 16:23DROPS Design a répondu:
Liebe Melli, es ist immer der nächstfolgende Lm-Bogen (= 6 Lm in dieser Anleitung) gemeint. Wenn Sie Anfängerin sind, können Sie sich evtl. mit Hilfe der Videos ins Häkeln einarbeiten oder für weitere Tipps den Laden kontaktieren, in dem Sie die Wolle gekauft haben.
25.03.2013 - 09:24
![]() Kesvashy a écrit:
Kesvashy a écrit:
38074 46415
07.10.2012 - 13:00
![]() Mrose a écrit:
Mrose a écrit:
Bonjour merci m eclairer en suivant les explications pour le carre je n arrive pas a trouver 4 coins mais 5!!!!!
18.08.2012 - 13:00DROPS Design a répondu:
Bonjour Mrose, vous devez avoir un total de 8 arceaux au début pour avoir un carré. Bon crochet !
21.08.2012 - 10:07
|
|||||||||||||
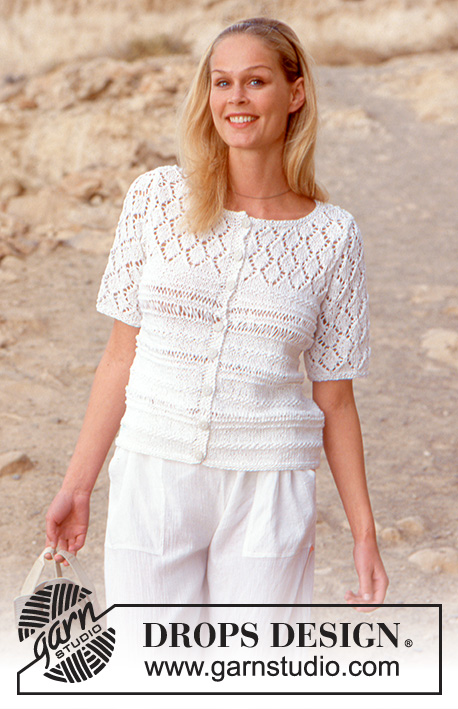
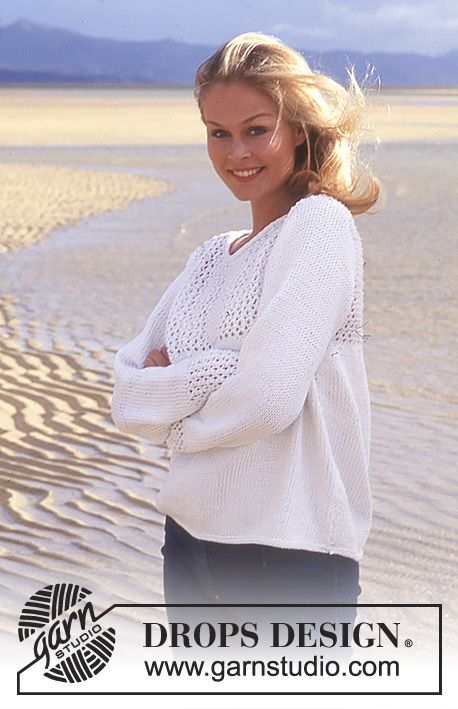
Garden Wedding Cardigan#gardenweddingcardigan |
|||||||||||||
|
|
|||||||||||||
Gilet crocheté avec carrés, en DROPS Muskat
DROPS 65-9 |
|||||||||||||
|
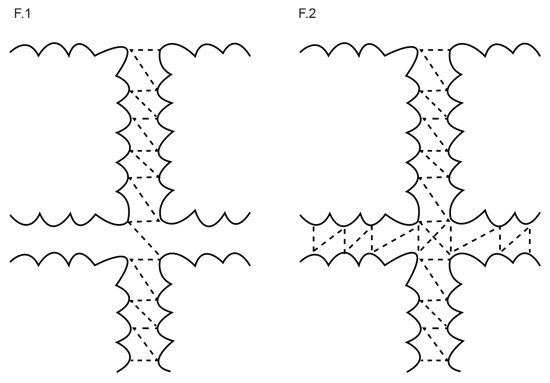
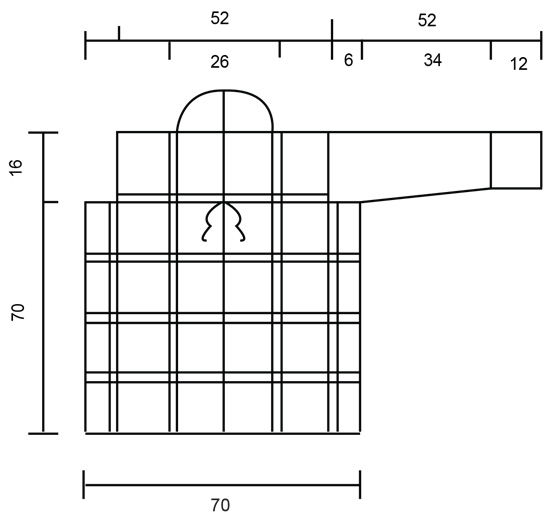
Échantillon : 1 carré = environ 12 x 12 cm Point employé : voir diagrammes ci-dessous. Carré Monter une chaînette de 8 ml et joindre en rond avec 1 mc R 1 : *1 B (remplacer la 1ère B par 3 ml), 2 ml * répéter de * à * 8 fois, joindre avec 1 mc ans la 1ère B R 2 : *4 B (remplacer la 1ère B par 3 ml) dans l'arceau, 2 ml * répéter de * à * 8 fois, joindre avec 1 mc dans la 1ère B R 3 : *4 DB rabattues ensemble dans les 4 B du rang précédent (remplacer la 1ère DB par 4 ml) – Faire la 1ère DB mais ne pas faire le dernier jeté (= 2 boucles sur le crochet), faire les 3 DB suivantes de la même façon, puis 1 jeté et passer le crochet à travers toutes les boucles)- 6 ml, 1B dans l'arceau de 2 ml, 6 ml * répéter de * à *8 fois, joindre avec 1 mc dans le 1er groupe de DB. R 4 : Aller en mc jusqu'au milieu du 1er arceau, 1 ml, 1 ms dans le 1er arceau, *5 ml, 1 ms dans l'arceau suivant, 5 ml, 1 ms dans l'arceau suivant, 10 ml, 1 ms dans l'arceau suivant (=coin), 5 ml, 1 ms dans l'arceau suivant * répéter de * à * 3 fois, puis 5 ml, 1 ms dans l'arceau suivant, 5 ml, 1 ms dans l'arceau suivant, 10 ml, 1 ms dans l'arceau suivant (=coin), 5 ml, joindre avec 1 mc dans la 1ère ms. R 5 : Aller en mc jusqu'au milieu de l'arceau, 1 ml, 1 ms dans l'arceau, *5 ml, 1 ms dans l'arceau suivant, 5 ml, 1 ms dans l'arceau suivant, 8 ml, 1 ms dans le même arceau, à environ 1 cm (= coin), 5 ml, 1 ms dans l'arceau suivant, 5 ml, 1 ms dans l'arceau suivant * répéter de * à * 3 fois, 5 ml, 1 ms dans l'arceau suivant, 5 ml, 1 ms dans l'arceau suivant, 8 ml, 1 ms dans le même arceau 1 cm plus loin (=coin), 5 ml, 1 ms dans l'arceau suivant, 5 ml, joindre avec 1 mc dans la 1ère ms GILET Dos et devant : Réaliser 50 carrés. Joindre ensuite les motifs en bandes verticales (voir fig. 1). Les bandes verticales se constituent ainsi : 1ère bande (milieu devant) = 5 carrés 2ème bande = 5 carrés 3ème bande (côté) = 4 carrés 4ème bande = 5 carrés 5ème bande = 6 carrés (le milieu dos se situe entre la 5ème et la 6ème bande) 6ème bande = 6 carrés 7ème bande = 5 carrés 8ème bande (=côté) = 4 carrés 9ème bande = 5 carrés 10ème bande (milieu devant) = 5 carrés Assembler ensuite les bandes entre elles, voir fig. 2. Joindre les épaules en suivant également le schéma fig.2 et assembler ensuite les 2 carrés du milieu dos aux 2 premières bandes des milieu devant pour former le col. Manches Réaliser 2 carrés. Assembler en rond comme indiqué dans le schéma fig. 1. Continuer les manches ainsi : R 1 : 1 ms dans le 1er arceau, *5 ml, 1 ms dans l'arceau suivant * répéter de * à * tout autour de la manche = 13 arceaux, joindre avec 1 mc dans la 1ère ms R 2 : mc jusqu'au milieu du 1er arceau, 1 ms dans l'arceau, *5 ml, 1 ms dans l'arceau suivant * répéter de * à *. Répéter le rang 2 jusqu'à ce que la manche mesure 20 cm de hauteur totale. Augmenter ensuite 1 ml pour chaque arceau (= 6 ml pour chaque arceau). Continuer ainsi jusqu'à ce que la manche mesure 28 cm de hauteur totale. Augmenter ensuite 1 ml pour chaque arceau (= 7 ml pour chaque arceau). À 38 cm de hauteur totale, augmenter 1 ml pour chaque arceau (= 8 ml pour chaque arceau). À 46 cm de hauteur totale, diviser l'ouvrage en faisant en sorte d'avoir 1 carré en bas de la manche soit sur le dessus de la main et continuer en allers retours. À 52 cm de hauteur totale, arrêter. Assemblage : Assembler les manches au dos et devant en suivant le schéma fig. 1. Crocheter la bordure suivant tout autour du gilet : R 1 : *1 ms, 1 ml * répéter de * à* R 2 : *1 ms dans la ml du rang précédent, 1 ml * répéter de * à * Crocheter environ 18 ms le long d'un carré. Assemblage: Répéter ces 2 rangs autour de l'encolure et le long des bordures devants. Crocheter 2 chaînettes d'environ 50 cm de long avec 2 fils. Coudre 1 lien de chaque côté des devants, en haut du 4ème carré à partir du bas. |
|||||||||||||
Légende diagramme(s) |
|||||||||||||
|
|||||||||||||
 |
|||||||||||||
 |
|||||||||||||
 |
|||||||||||||
Vous avez terminé ce modèle?Alors taguez vos photos avec #dropspattern #gardenweddingcardigan ou bien présentez-les dans la galerie #dropsfan Vous avez besoin d'aide pour ce modèle ?Vous trouverez 8 tutoriels vidéo, une rubrique commentaires/questions et plus encore en vous rendant sur la page du modèle sur garnstudio.com © 1982-2026 DROPS Design A/S. Tous droits réservés. Ce document, y compris ces sous-sections, est protégé par les droits d'auteur (copyright). Apprenez-en davantage sur ce que vous pouvez faire avec nos modèles en bas de chacune des pages de notre site. |
|||||||||||||


Avec plus de 40 ans dans la conception de modèles tricot et crochet, DROPS Design offre l'une des plus vastes collections de modèles gratuits sur internet - traduits dans 17 langues. À ce jour, on compte 324 catalogues et 12290 modèles en français.
Nous nous efforçons de vous apporter le meilleur de ce que le tricot et le crochet peuvent vous offrir, inspiration et conseils mais également des fils de haute qualité à des prix incroyables! Vous souhaiteriez utiliser nos modèles autrement que pour un usage personnel? Vous pouvez lire ce que vous êtes autorisés à faire dans le Copyright en bas de page de chacun de nos modèles. Bon tricot!
Poster un commentaire sur le modèle DROPS 65-9
Nous aimerions connaître votre avis sur ce modèle !
Si vous souhaitez poser une question, merci de bien vouloir vérifier que vous avez choisi la bonne catégorie dans le formulaire ci-dessous afin d'accélérer la réponse. Les champs obligatoires sont indiqués par une *.