
Catégories populaires
Vous cherchez un fil?


Commentaires / Questions (9)
![]() Maria a écrit:
Maria a écrit:
Dear DD, can you please provide correct instructions? Reply to the lady from France is completely different to my reply, please see following:(Each diagram is read starting at the bottom right on the right side, from right to left on the right side and from left to right on the wrong side (= the first 4 rows are knitted in stocking stitch) and we will cross the stitches (= cable) on the 5th row then every 8 rows.) I have already purchased your yarn and will not be able to use it without clarity.
10.12.2024 - 09:47DROPS Design a répondu:
Dear Maria, the start of the row is the upper edge of the wrist warmer, and you work downwards, towards the lower edge of the wrist warmer, which is the end of the row. So, when you start the cables, you work the first row of A.1 once, at the beginning of the row (so the upper edge of the wrist warmer), then the rest of the row downwards is worked in garter stitch. You work back, garter stitch over garter stitch and , at the end of the row, the 2nd row of A.1/A.2, worked from left to right, to work each stitch of the chart over the correct stitch in the previous row. You can count the number of stocking stitch rows in the chart and calculate how often you work the cable. Happy knitting!
15.12.2024 - 14:08
![]() Matia a écrit:
Matia a écrit:
Thank you and just so I understand correctly, I work Row1: K 6 Stitches, slip 5 sts on cable needle behind piece, K 5, K 5 from cable needle, K remaining stitches? I looked but I could not see where it says to flip the diagram clockwise, start in top right. It only states: Worked back and forth on needle.
09.12.2024 - 08:03
![]() Maria a écrit:
Maria a écrit:
Thank you for your prompt reply. I understand that the cable pattern is the same on all three patterns but the confusion is where to knit the cable edge because the diagram states to knit the edge in two places instead of one. Can you please confirm if it is the first or second place on the diagram the cable should be knitted?
08.12.2024 - 15:30DROPS Design a répondu:
Dear Maria, you work the piece sideways. So the first 10 stitches are the upper part, where the cable will be worked, while the rest of the row in garter stitch is the part starting from the cable down to after the wrist. So you would work as if rotating the chart clockwise and working it one row from the top down and the following row from the bottom up. The cable is always in that upper edge, as stated in the text. When working the second wrist warmer you will use A.2 instead of A.1 but the position is the same as before, the upper edge of the wrist warmer. Happy knitting!
08.12.2024 - 17:48
![]() Maria a écrit:
Maria a écrit:
Can you please check the Diagram? It's seems to be incorrect. It is the same as diagram Head Band using the same yarn in the same design using cable edge. Please can you correct the design?
08.12.2024 - 11:04DROPS Design a répondu:
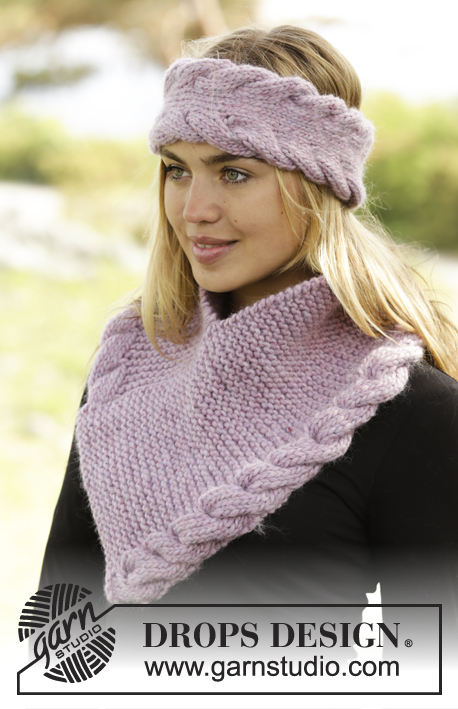
Dear Maria, the charts are identical since all three pieces (the wrist warmers, the head band and the neck warmer) use the same cable pattern. You can look at the neck warmer and see that the cable in the neck warmer and theone in the wrist warmers is exactly the same. The head band also has the same cables but because of working in stocking stitch in between the cables, instead of garter stitch as in the neck warmer and the wrist warmers, the cables look slightly different but the stitches worked in the cable are the same. Happy knitting!
08.12.2024 - 12:15
![]() Bene Elfriede a écrit:
Bene Elfriede a écrit:
Je voulais juste savoir pour les torsades vous les faites combien de fois au 1 er rang jute une fois ou tout le tour c est dire 2 ou 3 fois merci de votre reponse?
16.03.2018 - 11:19DROPS Design a répondu:
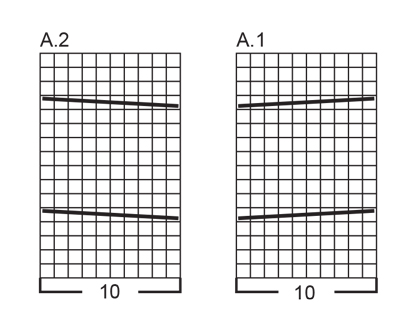
Bonjour Mme Elfriede, on tricote le diagramme tous les rangs ainsi: A.1 (ou A.2) et les mailles restantes au point mousse. Chaque diagramme se lit en commençant en bas à droite sur l'endroit, de droite à gauche sur l'endroit et de gauche à droite sur l'envers (= les 4 premiers rangs se tricotent en jersey) et on va croiser les mailles (= torsade) au 5ème rang puis tous les 8 rangs. Bon tricot!
16.03.2018 - 11:30
![]() Viktoria a écrit:
Viktoria a écrit:
Hallo liebes Drops-Team, bei der Grafik ist wohl ein kleiner Fehler unterlaufen. A1 oder A2 - einmal müssen die M vor der Arbeit liegen, oder? Ein schönes Modell und sehr einfach zu stricken! Viele Grüße, Viktoria
12.10.2017 - 12:44DROPS Design a répondu:
Liebe Viktoria, danke für die Rückmeldung, bei dem Zopf in A.2 müssen die Maschen vor der Arbeit gelegen werden, es wird korrigiert. Viel Spaß beim stricken!
12.10.2017 - 13:23
![]() Paola a écrit:
Paola a écrit:
Meno male che ho chiesto.......avevo iniziato con punti legaccio.....grazie come sempre veramente veloci nel risolvere i miei dubbi un saluto
15.09.2016 - 15:42
![]() Paola a écrit:
Paola a écrit:
Salve, molto semplice e di grande effetto questo modello, chiedo solo una precisazione, nella spiegazione dei punti date anche quella relativa alle coste a legaggio e nella spiegazione del lavoro dite di misurare lungo le coste a legaccio; intendete con ciò la semplice lavorazione a legaccio? Non mi sembra che ci siano parti con coste a legaccio. grazie 1000!!!
15.09.2016 - 15:04DROPS Design a répondu:
Buongiorno Paola. Per 1 costa a legaccio, si intendono 2 ferri a dir. La parte dove non c'è la treccia, è lavorata a coste a legaccio. Il lavoro viene misurato nella parte lavorata a legaccio, nella direzione del lavoro, quindi a partire dal ferro di avvio del lavoro, fino alle m sul ferro. Buon lavoro!
15.09.2016 - 15:16
![]() Mam'Kramby a écrit:
Mam'Kramby a écrit:
Très jolies et originales mitaines
04.06.2016 - 15:38
|
||||||||||
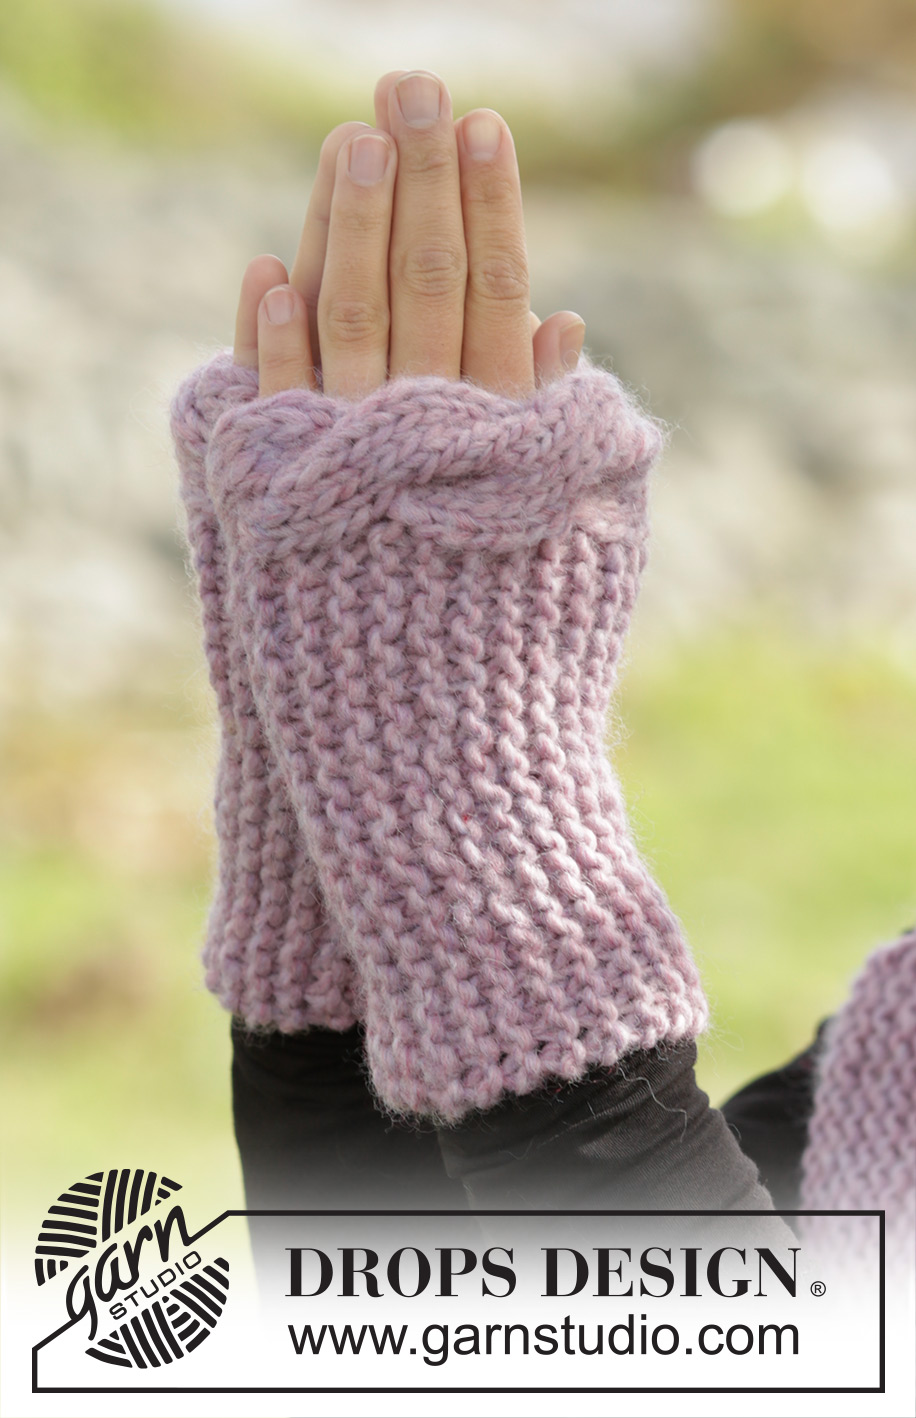
Cable Embrace#cableembracewristwarmers |
||||||||||
|
|
||||||||||
Manchettes DROPS tricotées dans le sens de la longueur, au point mousse avec bordure torsadée, en ”Andes”.
DROPS 171-57 |
||||||||||
|
POINT MOUSSE (en allers et retours): Tricoter tous les rangs à l'endroit. 1 côte mousse = 2 rangs end. POINT FANTAISIE: Voir les diagrammes A.1 et A.2. Les diagrammes montrent tous les rangs du point fantaisie, vus sur l'endroit. ---------------------------------------------------------- MANCHETTES: Se tricotent en allers et retours. Monter 29-31 m avec les aiguilles 7 en Andes. Tricoter le 1er rang ainsi sur l'endroit : A.1 (= 10 m - NOTE: il n'y a pas de m lis, c'est-à-dire tricoter la 1ère m comme indiqué dans le diagramme), puis tricoter les mailles restantes au POINT MOUSSE - voir ci-dessus. Continuer ainsi en allers et retours. PENSER À BIEN CONSERVER LA MÊME TENSION QUE POUR L'ÉCHANTILLON! À environ 18-20 cm de hauteur totale (ou longueur souhaitée – mesurer le long des côtes mousse depuis le rang de montage), rabattre toutes les mailles. ASSEMBLAGE: Coudre le rang de montage aux mailles rabattues. Tricoter une autre manchette identique, mais tricoter le diagramme A.2 (au lieu de A.1). |
||||||||||
Légende diagramme(s) |
||||||||||
|
||||||||||
 |
||||||||||
Vous avez terminé ce modèle?Alors taguez vos photos avec #dropspattern #cableembracewristwarmers ou bien présentez-les dans la galerie #dropsfan Vous avez besoin d'aide pour ce modèle ?Vous trouverez 12 tutoriels vidéo, une rubrique commentaires/questions et plus encore en vous rendant sur la page du modèle sur garnstudio.com © 1982-2026 DROPS Design A/S. Tous droits réservés. Ce document, y compris ces sous-sections, est protégé par les droits d'auteur (copyright). Apprenez-en davantage sur ce que vous pouvez faire avec nos modèles en bas de chacune des pages de notre site. |
||||||||||


Avec plus de 40 ans dans la conception de modèles tricot et crochet, DROPS Design offre l'une des plus vastes collections de modèles gratuits sur internet - traduits dans 17 langues. À ce jour, on compte 324 catalogues et 12290 modèles en français.
Nous nous efforçons de vous apporter le meilleur de ce que le tricot et le crochet peuvent vous offrir, inspiration et conseils mais également des fils de haute qualité à des prix incroyables! Vous souhaiteriez utiliser nos modèles autrement que pour un usage personnel? Vous pouvez lire ce que vous êtes autorisés à faire dans le Copyright en bas de page de chacun de nos modèles. Bon tricot!
Poster un commentaire sur le modèle DROPS 171-57
Nous aimerions connaître votre avis sur ce modèle !
Si vous souhaitez poser une question, merci de bien vouloir vérifier que vous avez choisi la bonne catégorie dans le formulaire ci-dessous afin d'accélérer la réponse. Les champs obligatoires sont indiqués par une *.