
Catégories populaires
Vous cherchez un fil?


Commentaires / Questions (68)
![]() Stacey Meyer a écrit:
Stacey Meyer a écrit:
Hello! This is a lovely detailed pattern and I so appreciate all the assistance you've provided. I'm sorry if I've overlooked it but I can't for the gauge guide for this pattern. I just want to be sure I'm not crocheting too loosely or too tight. Thank you!
15.08.2016 - 06:17DROPS Design a répondu:
Dear Mrs Meyer, tension may differ with every crocheter, so remember to adjust the crochet hook size to that you get the stated gauge ie 18 dc x 9 rows = 4'' x 4'' (10 x 10 cm). Happy crocheting!
15.08.2016 - 11:21
![]() Sara Otero a écrit:
Sara Otero a écrit:
Buenas tardes, después de la primera ronda de puntos bajos, manda a trabajar los diagramas del 1 al 3 el 2 diagrama no lo entiendo pk solo pone dos puntos bajos, ¿entonces hay que disminuir? ¿Que significa 6 t veces? Muchas gracias
12.08.2016 - 16:08DROPS Design a répondu:
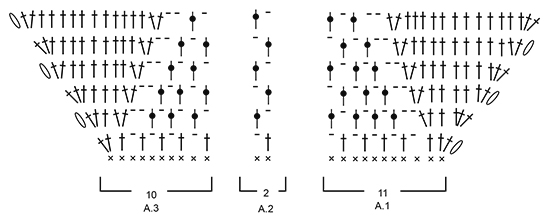
Hola Sara, el diagrama A2 se trabaja sobre un total de 12 pts, es decir, A2 (=2p.b) se repite un total de 6 veces a lo largo de la fila para la talla S.
14.08.2016 - 12:02
![]() Karen A. Hillman a écrit:
Karen A. Hillman a écrit:
How do you even out the rows on the side panels, there's always one extra row on one side panel ???????
16.07.2016 - 20:27DROPS Design a répondu:
Dear Mrs Hillmann, this will not be visible at the end - if you rather like to get both sides the same, cut the yarn and chain number of sts required for one side, work next row on the middle panel and chain number of sts required for the other side and continue as stated. Happy crocheting!
18.07.2016 - 09:15
![]() Sandy a écrit:
Sandy a écrit:
I am wondering about the purpose of the 5 chains at the beginning of each DC row. I can see they may be a decorative bit on the main part of the top, but why are they along the back strap since it will be folded over for the tube casing?
25.06.2016 - 01:04DROPS Design a répondu:
Dear Sandy, you can choose to not crochet the 5 ch at the beg of dc rows when working the last rows for tube casing if your chains are long enough to not tighten piece on the sides. Happy crocheting!
27.06.2016 - 08:33
![]() Iris a écrit:
Iris a écrit:
Hey Drops, I would like to use your recycled cotton, either #6 of #5 to make this top. Is it a problem as they aren't in the yarn category B? Thanks in advance
30.04.2016 - 13:47DROPS Design a répondu:
Dear Iris, DROPS loves you #6 belongs to group A and DROPS loves you #5 to group C so that they may be not the best alternative to a yarn group B - read more here, and contact your DROPS store for any further individual assistance choosing a yarn/a pattern. Happy crocheting!
02.05.2016 - 09:25Leona a écrit:
Hi! I don't understand the last part on how to thread the ties through the top at all. Is there a video for this, or a clearer explanation? I have no idea which holes and dc:s and loops the text is talking about. Please help!
24.04.2016 - 21:44DROPS Design a répondu:
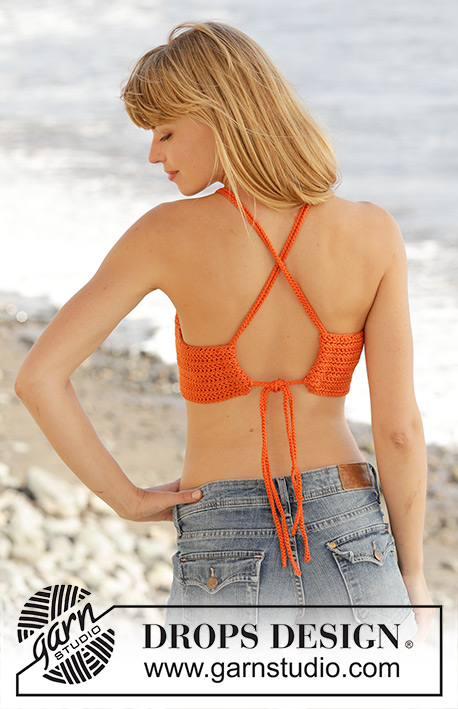
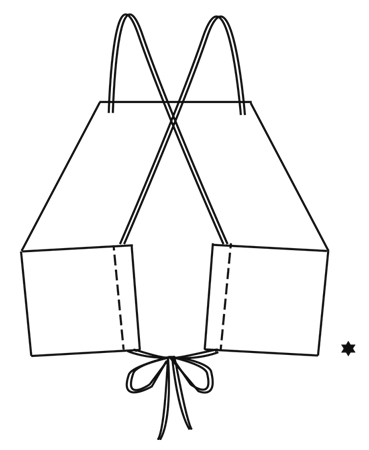
Dear Leona, you will find at the very bottom of the page when scrolling down a chart showing top from back side and how to thread the ties. Happy assembly!
25.04.2016 - 10:18
![]() KC a écrit:
KC a écrit:
Hello...I'm sorry, I'm not understanding where youre getting the measurements. or how you are measuring them. I just would like to know how to had the flaps that fold to the back side? am i supposed to add more chains or do i keep dc until it reaches a a certain length? Is there a way I could send a picture of my progress?
21.04.2016 - 20:08DROPS Design a répondu:
Dear KC, you measure total width from the fundation chain towards last row worked. On each side of piece along fold from WS the outermost 3/4" on each side to make like a hem where you will thread tie through - see charts at the bottom of the page. For any further personnal assistance you are welcome to contact the store where you bought your yarn and then show your picture. Happy crocheting!
22.04.2016 - 08:43
![]() KC a écrit:
KC a écrit:
Hi! I actually don't understand what those numbers mean and where to measure then. I've completed a.1-a.4 by the diagram. I'm not sure how to read those numbers in crochet terms
21.04.2016 - 17:02DROPS Design a répondu:
Dear KC, you will find a measurement chart at the bottom of the written patter below the diagrams - the finished measurements are the one from the very top of the piece (fundation chains) - measurements are in cm in chart and given in inches in written pattern. Happy crocheting!
21.04.2016 - 17:05
![]() KC a écrit:
KC a écrit:
After I've completed A.1 to A.4 What do i do next? How do i make the rest? all i have is the chest piece done..
21.04.2016 - 01:36DROPS Design a répondu:
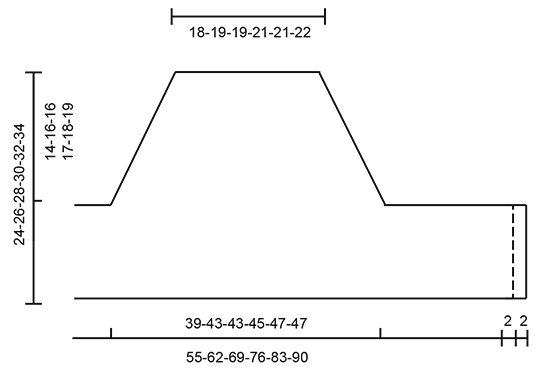
Dear Kc, After A.1-A.4 have been worked, work 1 dc in every dc until piece measures 24-26-28-30-32-34 cm / 9½"-10 1/4"-11"-11 3/4"-12½"-13½" from cast-on edge mid front. Fasten off. Happy crocheting!
21.04.2016 - 09:10
![]() Claudia Jakrlin a écrit:
Claudia Jakrlin a écrit:
Hallo Drops, warum muss ich eigentlich jede Reihe mit 5 Maschen beginnen? Das gibt derzeit ziemlich hässliche Bögen am Rand. Oder zeigt sich das später beim Tragen straff?
19.04.2016 - 15:03DROPS Design a répondu:
Liebe Claudia, normalerweise wird eine Stb-Reihe mit 3 Luftmaschen gewendet, wenn allerdings die Kante schräg ist (z.B. zurch Zunahmen), braucht man mehr Lm um die Diagonale auszugleichen. Wenn Sie sehr lockere Lm häkeln, reichen vielleicht 4 - aber die Kante darf auf keinen Fall spannen.
20.04.2016 - 07:57
|
|||||||||||||||||||
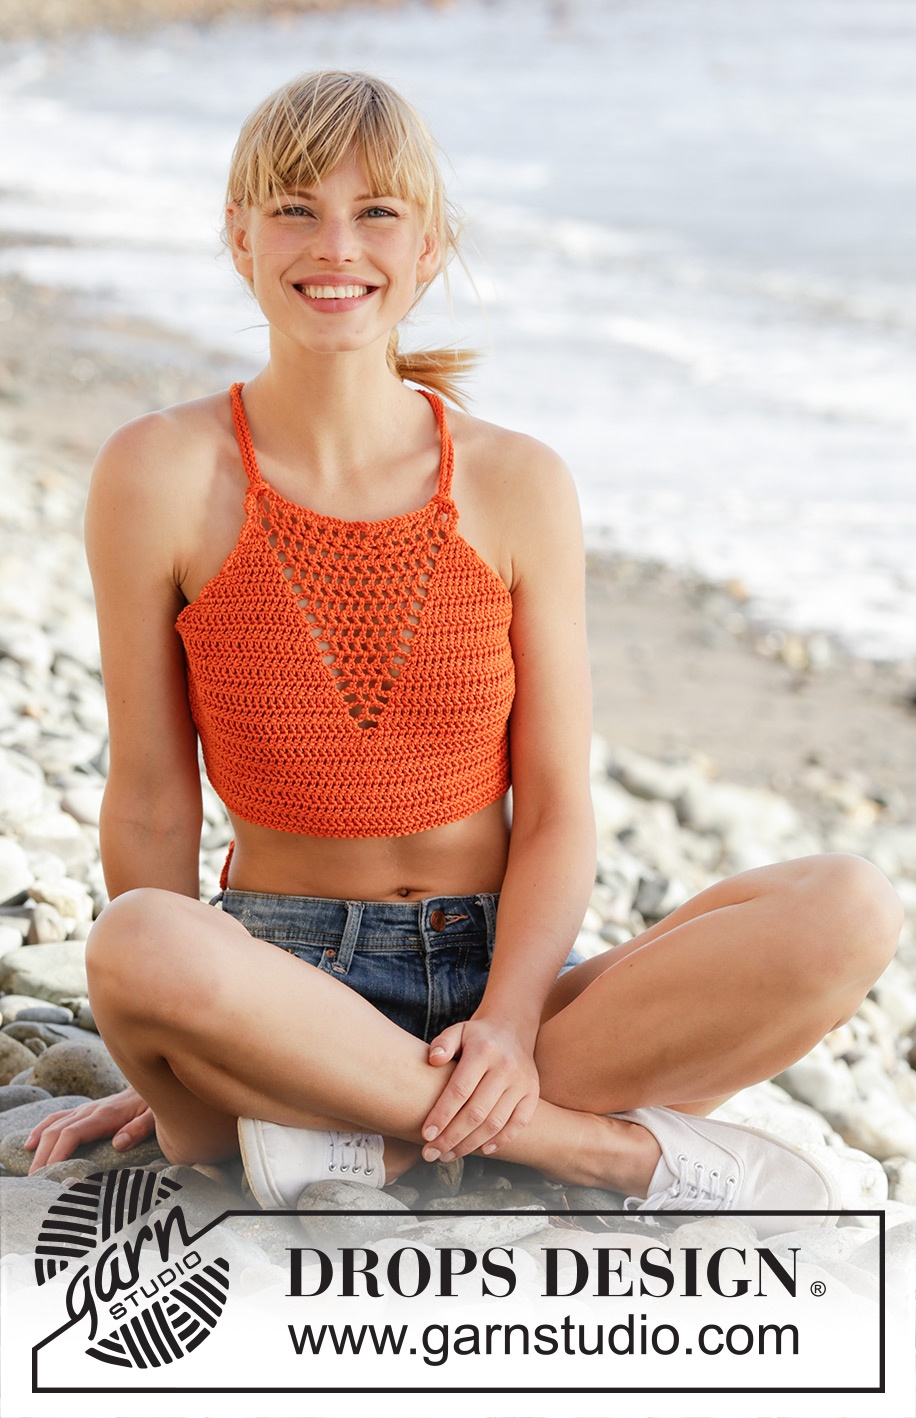
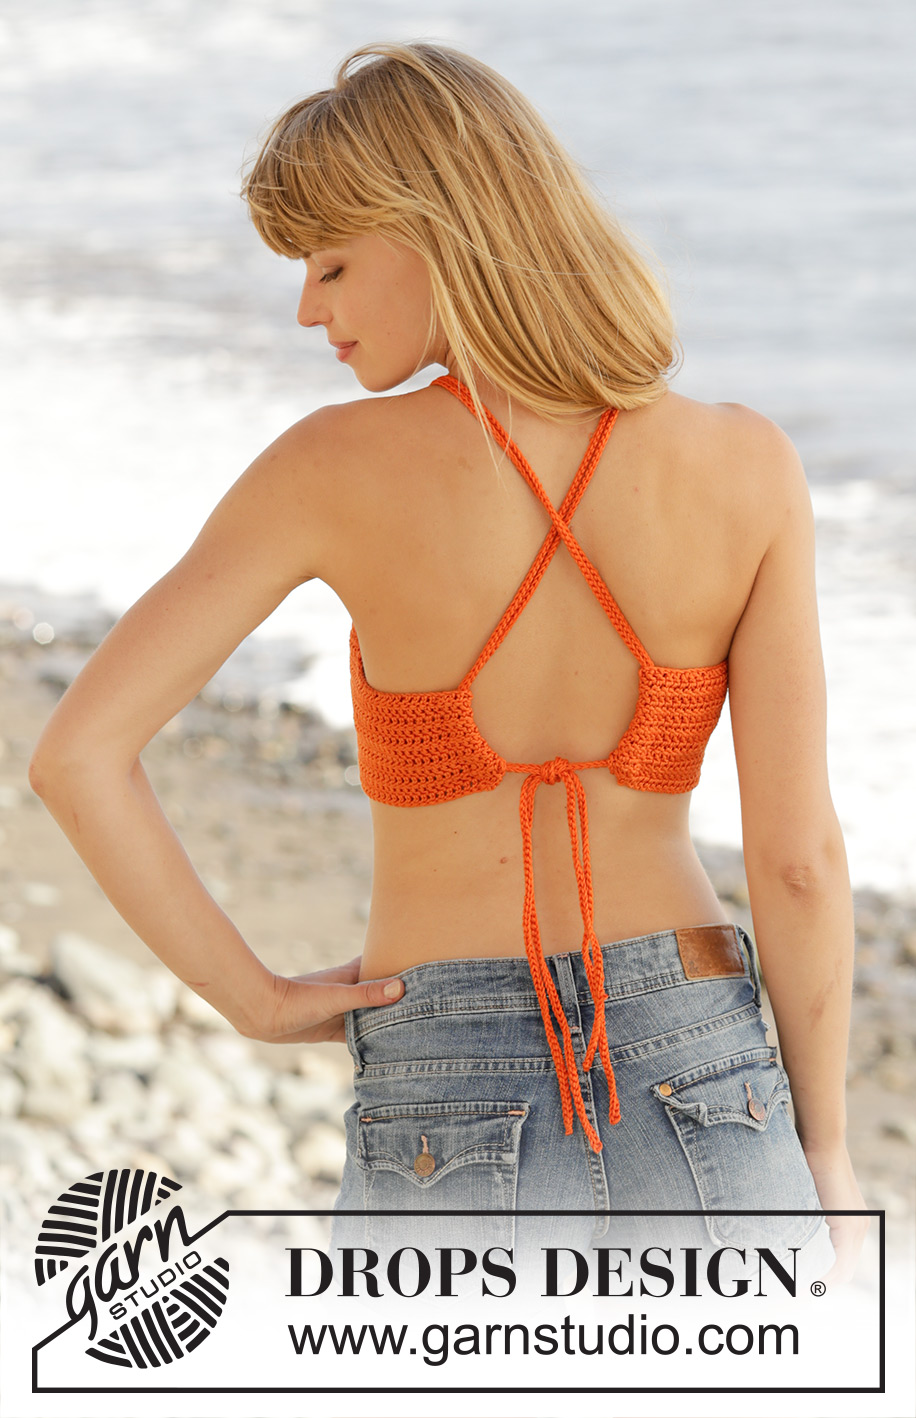
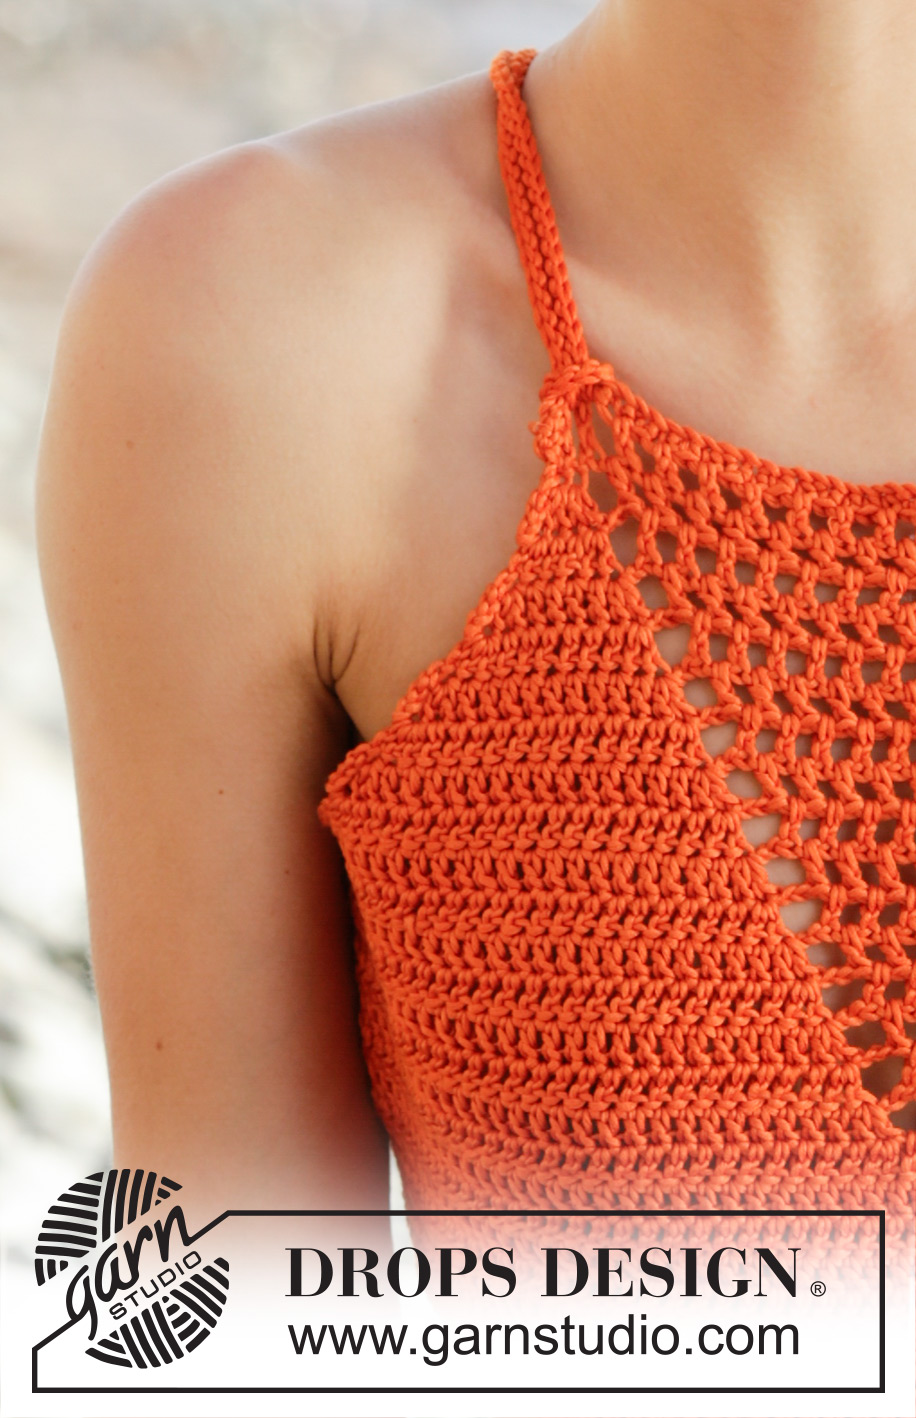
Mandarina#mandarinatop |
|||||||||||||||||||
 |
 |
||||||||||||||||||
Top DROPS au crochet, en brides, point ajouré, avec liens dans le dos, crocheté de haut en bas, en ”Muskat”. Du S au XXXL.
DROPS 170-16 |
|||||||||||||||||||
|
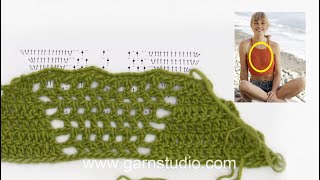
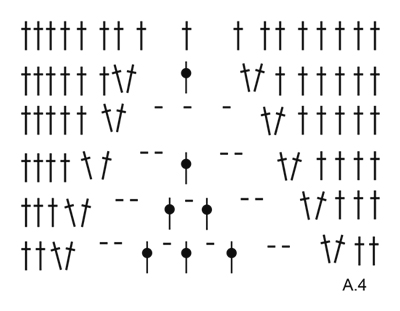
INFO CROCHET: Au début de chaque rang de B, crocheter 5 ml pour tourner. Ces 5 ml ne remplacent pas la 1ère B. POINT FANTAISIE: Voir diagrammes A.1 à A.4. ---------------------------------------------------------- TOP: Se crochète en allers et retours, de haut en bas. Monter souplement une chaînette de 42-44-44-47-47-49 ml (y compris 1 ml pour tourner) avec le crochet 4 en Muskat. Tourner et crocheter ainsi: 1 ms dans la 2ème ml à partir du crochet (= 1 ms + 1 ml pour tourner), 1 ms dans chacune des 2-4-4-2-2-4 ml suivantes, *sauter 1 ml, 1 ms dans chacune des 4 ml suiv*, répéter de *-* encore 6-6-6-7-7-7 fois, 1 ms dans chacune des 2 dernières ml = 33-35-35-37-37-39 ms. Tourner et crocheter ainsi: A.1 sur les 11 premières ms, 6-7-7-8-8-9 fois A.2 (= 2 ms) en largeur, A.3 au-dessus des 10 dernières ms - VOIR ASTUCE CROCHET! PENSER À BIEN CONSERVER LA MÊME TENSION QUE POUR L'ÉCHANTILLON! Quand les diagrammes A.1 à A.3 ont été crochetés 1 fois en hauteur, continuer le point fantaisie et augmenter de la même façon jusqu'à ce qu'un total de 13-14-14-15-16-17 rangs ait été crocheté. On a maintenant 71-77-77-81-85-85 B/ml. Les augmentations de chaque côté de A.1 et A.3 sont maintenant faites mais le point ajouré continue à diminuer en pointe au milieu devant. Continuer ainsi: crocheter 27-30-37-44-49-57 ml (y compris 5 ml pour tourner), tourner et crocheter ainsi: 1 B dans la 6ème ml à partir du crochet, 1 B dans chacune des 1-4-6-3-3-6 ml suivantes, *sauter 1 ml, 1 B dans chacune des 4 ml suivantes*, répéter de *-* encore 3-3-4-6-7-8 fois, continuer comme avant sur les 71-77-77-81-85-85 B suivantes, crocheter ensuite 27-30-37-44-49-57 ml (y compris 5 ml pour tourner). Tourner et crocheter ainsi: 1 B dans la 6ème ml à partir du crochet, crocheter ensuite 1 B dans chacune des 1-4-6-3-3-6 ml suivantes, *sauter 1 ml, 1 B dans chacune des 4 B suivantes*, répéter de *-* encore 3-3-4-6-7-8 fois, continuer comme avant au-dessus des 71-77-77-81-85-85 B suivantes, crocheter ensuite 1 B dans chacune des dernières B = 107-119-131-145-157-171 m B/ml. Continuer avec 1 B dans chaque B et continuer à diminuer le point ajouré au milieu devant, en pointe. Quand il reste 4 arceaux, terminer le motif comme indiqué dans le diagramme A.4. Crocheter ensuite 1 B dans chaque B jusqu'à ce que l'ouvrage mesure 24-26-28-30-32-34 cm depuis le montage au milieu devant. Arrêter. ASSEMBLAGE: Plier les 2 cm de chaque côté sur l'envers et coudre à petits points soignés en piquant dans les 2 épaisseurs pour créer un ourlet coulissant pour y passer les liens. LIENS: Crocheter souplement 1 lien ainsi: Avec le crochet 4 en Muskat, crocheter une chaînette de 140-150-160-170-180-190 cm, tourner et crocheter 1 mc dans chaque ml mais bien veiller à ce que les mc ne soient pas plus serrées que les ml de la chaînette. Arrêter. Crocheter un autre lien identique. En commençant sur l'endroit, enfiler une des extrémités d'un des liens dans le jour en haut du top, autour de la B et la repasser dans le jour suivant (= les 2 extrémités du lien sur l'endroit). Ajuster pour que les 2 extrémités aient la même longueur, puis passer ces 2 fils dans la boucle sur l'envers et serrer. Répéter de l'autre côté. Croiser les liens dans le dos et les enfiler dans l'ourlet coulissant – voir schéma. Attacher le top avec un nœud. |
|||||||||||||||||||
Légende diagramme(s) |
|||||||||||||||||||
|
|||||||||||||||||||
 |
|||||||||||||||||||
 |
|||||||||||||||||||
 |
|||||||||||||||||||
 |
|||||||||||||||||||
Vous avez terminé ce modèle?Alors taguez vos photos avec #dropspattern #mandarinatop ou bien présentez-les dans la galerie #dropsfan Vous avez besoin d'aide pour ce modèle ?Vous trouverez 6 tutoriels vidéo, une rubrique commentaires/questions et plus encore en vous rendant sur la page du modèle sur garnstudio.com © 1982-2026 DROPS Design A/S. Tous droits réservés. Ce document, y compris ces sous-sections, est protégé par les droits d'auteur (copyright). Apprenez-en davantage sur ce que vous pouvez faire avec nos modèles en bas de chacune des pages de notre site. |
|||||||||||||||||||


Avec plus de 40 ans dans la conception de modèles tricot et crochet, DROPS Design offre l'une des plus vastes collections de modèles gratuits sur internet - traduits dans 17 langues. À ce jour, on compte 324 catalogues et 12290 modèles en français.
Nous nous efforçons de vous apporter le meilleur de ce que le tricot et le crochet peuvent vous offrir, inspiration et conseils mais également des fils de haute qualité à des prix incroyables! Vous souhaiteriez utiliser nos modèles autrement que pour un usage personnel? Vous pouvez lire ce que vous êtes autorisés à faire dans le Copyright en bas de page de chacun de nos modèles. Bon tricot!
Poster un commentaire sur le modèle DROPS 170-16
Nous aimerions connaître votre avis sur ce modèle !
Si vous souhaitez poser une question, merci de bien vouloir vérifier que vous avez choisi la bonne catégorie dans le formulaire ci-dessous afin d'accélérer la réponse. Les champs obligatoires sont indiqués par une *.