
Catégories populaires
Vous cherchez un fil?


Commentaires / Questions (33)
![]() Maja a écrit:
Maja a écrit:
Hallo, ich arbeite den Cardigan in Größe S. Wenn ich über die 68 Maschen des Ärmel das Muster A1 arbeiten soll, bleiben 8 Maschen übrig. Was mache ich mit diesen? Schon einmal vielen Dank!
03.10.2015 - 15:03DROPS Design a répondu:
Die Antwort finden Sie unten beim Eintrag vom 20.09.
04.10.2015 - 22:09
![]() Maja a écrit:
Maja a écrit:
Hallo, ich arbeite den Cardigan in Größe S. Wenn ich über die 68 Maschen des Ärmel das Muster A1 arbeiten soll, bleiben 8 Maschen übrig. Was mache ich mit diesen? Schon einmal vielen Dank!
03.10.2015 - 14:27DROPS Design a répondu:
Antwort siehe unten! :-)
04.10.2015 - 22:13
![]() Maja a écrit:
Maja a écrit:
Hallo, ich arbeite den Cardigan in Größe S. Wenn ich über die 68 Maschen des Ärmel das Muster A1 arbeiten soll, bleiben 8 Maschen übrig. Was mache ich mit diesen? Schon einmal vielen Dank!
20.09.2015 - 13:36DROPS Design a répondu:
Antwort siehe unten! :-)
20.09.2015 - 14:12
![]() Maja a écrit:
Maja a écrit:
Hallo, ich arbeite den Cardigan in Größe S. Wenn ich über die 68 Maschen des Ärmel das Muster A1 arbeiten soll, bleiben 8 Maschen übrig. Was mache ich mit diesen? Schon einmal vielen Dank!
20.09.2015 - 03:40DROPS Design a répondu:
Diese M stricken Sie auch im Muster A.2 (nicht A.1), auch wenn es nicht aufgeht. Sie müssen das Muster von der oberen Ärmelmitte aus ausrechnen, so wie es in der Anleitung beschrieben ist, dann können Sie nach rechts und links zur unteren Ärmelmitte hin die M abzählen und ausrechnen, welche M Sie dann noch an der unteren Ärmelmitte stricken müssen. Es fällt nicht so auf, dass das Muster nicht aufgeht, da es ja unter dem Ärmel ist. Außerdem machen Sie dann ja auch Ärmelabnahmen, sodass an der unteren Ärmelmitte weitere Maschen verschwinden.
20.09.2015 - 12:56
![]() Maple a écrit:
Maple a écrit:
Hi, i am knitting drops 157-24. U say, when work WS rows have the yarn following in front of work, is that mean, purl on the wrong side when knit fair isle WS rows ????
04.09.2015 - 01:35DROPS Design a répondu:
Dear Mrs Maple, that's right, you are working in stocking st, ie rows from WS are purled (= K 1 row, P 1 row following at the same time the diagram: 1 square = 1 st x 1 row). Happy knitting!
04.09.2015 - 09:53
![]() Maple a écrit:
Maple a écrit:
Hi,i'm knitting silver stag cardigan drops 157-24. I want to know, do sliver stag cardigan have purl stitches ??? Because drops fair isle video show purl stitches on wrong side row.. is this cardigan knit all ,right side row and wrong side row,all knit stitches ????
03.09.2015 - 22:38DROPS Design a répondu:
Dear Mrs Maple, this jacket is worked in stocking st, back and forth on circular needle, ie you will K every row from RS and P every row from WS when working the body. Sleeves are then worked in the round with double pointed needles, ie you will then K every round. Happy knitting!
04.09.2015 - 09:22
![]() Maple a écrit:
Maple a écrit:
Hi i am knitting silver stag cardigan with circular needle.large size chart A.1.i try to knit row 6=(wrong side). But the floats is show on the right side... should i keep knitting row 6 even the floats is show in right side. Or i do wrong....please help...
03.09.2015 - 02:15DROPS Design a répondu:
Dear Mrs Maple, When working WS rows have the yarn following in front of work, again make sure you have the right tension on the thread. Happy knitting!
03.09.2015 - 09:30
![]() Maple a écrit:
Maple a écrit:
Hi, i am knitting sliver stag cardigan drop 157-24. I don't know how to knit row 6 and i watch the fair isle video but doesn't help me because the video use straight needle to knit fair isle. But sliver stag cardigan use circular needle to knit fair isle...i don't know how to knit fair isle with circular needle and knit wrong side row...because don't seen right...
03.09.2015 - 01:56DROPS Design a répondu:
Dear Mrs Maple, working fair isle with circular needle will be done the same way as with straight needles: at the end of each row you turn and work next row, ie you work alternately from RS and from WS, as with straigth needles. Happy knitting!
03.09.2015 - 09:29
![]() Maple a écrit:
Maple a écrit:
Hi,i am knitting sliver stag cardigan drops 157-24. I don't know how to knit row 6. I never working fair isle cardigan pattern.. after i done knitting row 5 =(right side). And i try to knit row 6=(wrong side ).but the yarn,the stitch..... long yarn...is show... i hope u understand me...
03.09.2015 - 01:37DROPS Design a répondu:
Dear Mrs Maple, when working fair isle, you will have to make sure you are working not too tight or too loose. If you are not used to work fair isle, it can be a good idea to practise a bit making a swatch with another yarn before working on the jacket. Happy knitting!
03.09.2015 - 09:27
![]() Maple a écrit:
Maple a écrit:
Hi,i am knitting sliver stag cardigan drops 157-24. I'm knitting large size, chart A.1 and i am not sure how to knit row 6 because if i knit row 6= wrong size, the yarn is not on the wrong size,the yarn is show in right side..i hope you understand what i mean...please help....
03.09.2015 - 01:21DROPS Design a répondu:
Dear Mrs Maple, you read diagram starting from the bottom corner on the right side: From RS: read from the right towards the left From WS: read from the left towards the right. This means you work row 6 as follows: 1 edge st in grey, *K3 in white, K1 in grey, K1 in white, K1 in grey, K3 in white, K1 in grey, K1 in white, K3 in grey* repeat from *-*, 1 edge st in grey. Happy knitting!
03.09.2015 - 09:23
|
||||||||||
Silver Stag Cardigan#silverstagcardigan |
||||||||||
|
|
||||||||||
Veste DROPS avec empiècement arrondi, jacquard rennes, tricotée de haut en bas (ʺ top down ʺ), en ”Karisma”. Du S au XXXL.
DROPS 157-24 |
||||||||||
|
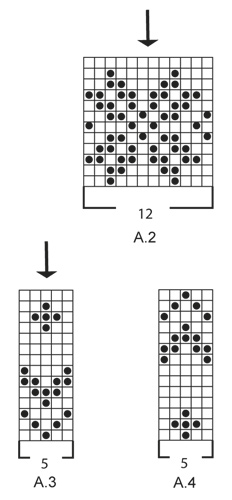
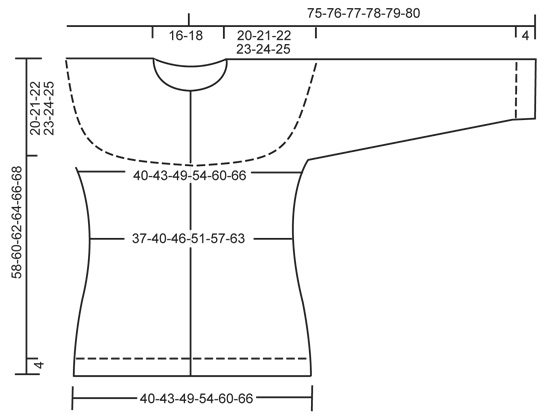
POINT MOUSSE (en allers et retours): Tricoter tous les rangs à l'endroit. 1 côte mousse = 2 rangs end. JACQUARD: Voir les diagrammes A.1 à A.4. Les diagrammes montrent tous les rangs du jacquard, vus sur l'endroit. Tricoter les diagrammes en jersey. DIMINUTIONS (côtés et manches): Diminuer avant le marqueur et 1 m end ainsi: 2 m ens à l'end. Diminuer après le marqueur et 1 m end ainsi: Glisser 1 m à l'end, 1 m end, passer la m glissée par-dessus la m tricotée. AUGMENTATIONS (côtés): Toutes les augmentations se font sur l'endroit. Augmenter 4 m au total par rang. Tricoter jusqu'à ce qu'il reste 1 m avant le marqueur, 1 jeté, 2 m jersey, 1 jeté = 2 augmentations. Au rang suivant, tricoter le jeté torse à l'env (c'est-à-dire tricoter le brin arrière du jeté au lieu du brin avant) pour éviter les trous. ---------------------------------------------------------- VESTE: Se tricote en allers et retours, de haut en bas sur aiguille circulaire. Les manches se tricotent en rond sur aiguilles doubles pointes. EMPIÈCEMENT: Monter 90-98-106-122-130-138 m avec l'aiguille circulaire 4 en gris moyen et tricoter le 1er rang ainsi (= sur l'endroit): 1 m lis POINT MOUSSE - voir ci-dessus - A.1 jusqu'à ce qu'il reste 1 m, 1 m lis au point mousse. PENSER À BIEN CONSERVER LA MÊME TENSION QUE POUR L'ÉCHANTILLON! Quand A.1 a été tricoté 1 fois en hauteur, on a 266-290-314-362-386-410 m. Tricoter 3-5-9-5-7-11 rangs jersey (avec 1 m lis au point mousse de chaque côté) en gris moyen. Tricoter ensuite le rang suivant sur l'envers ainsi: Tricoter les 38-41-47-53-59-65 premières m (y compris 1 m lis au point mousse), glisser les 58-64-64-76-76-76 m suivantes sur un arrêt de mailles (= manche), monter 10 m sous la manche, placer un marqueur au milieu de ces 10 m, tricoter les 74-80-92-104-116-128 m suivantes, glisser les 58-64-64-76-76-76 m suivantes sur un arrêt de mailles (= manche), monter 10 m sous la manche, placer un marqueur au milieu de ces 10 m, tricoter les 38-41-47-53-59-65 m restantes. DOS & DEVANTS: On a maintenant 170-182-206-230-254-278 m pour le dos et les devants. Tricoter maintenant ainsi: 1 m lis au point mousse, A.2 (= 12 m) jusqu'à ce qu'il reste 1 m, 1 m lis au point mousse. Continuer ainsi jusqu'à ce que A.2 ait été tricoté 1 fois en hauteur. Tricoter maintenant en jersey, en gris moyen. Au rang suivant sur l'endroit, diminuer 1 m de chaque côté de chaque marqueur sur les côtés - voir DIMINUTIONS. Répéter ces diminutions encore 2 fois tous les 2 cm = 158-170-194-218-242-266 m. À 12-13-14-15-16-17 cm à partir du marqueur sous les manches, augmenter 1 m de chaque côté de chaque marqueur sur les côtés – voir AUGMENTATIONS. Répéter ces augmentations encore 2 fois tous les 2 cm = 170-182-206-230-254-278 m. À 56-58-60-62-64-66 cm de hauteur totale, continuer avec l'aiguille circulaire 3 et répartir 22-26-26-30-30-34 augmentations = 192-208-232-260-284-312 m. Continuer en côtes sur l'endroit ainsi: 1 m lis au point mousse, *2 m end, 2 m env*, répéter de *-* jusqu'à ce qu'il reste 3 m, 2 m end, 1 m lis au point mousse. Quand les côtes mesurent 4 cm, rabattre les mailles comme elles se présentent. MANCHES: Reprendre les mailles en attente sur les aiguilles doubles pointes 4. On a 58-64-64-76-76-76 m pour la manche. Tricoter 1 rang jersey et monter 10 m sous la manche = 68-74-74-86-86-86 m. Placer un marqueur au milieu de ces nouvelles m. Continuer ensuite en rond. Tricoter maintenant A.2. NOTE: Ajuster pour que les 2 m centrales du diagramme (voir flèche) soient les 2 m au milieu sur la manche. Après A.2, tricoter A.3. NOTE: Ajuster pour que la m centrale du diagramme (voir flèche) soit l'une des 2 m au milieu sur la manche. EN MÊME TEMPS, au 1er tour de A.3, commencer à diminuer sous la manche - VOIR DIMINUTIONS. Répéter ces diminutions encore 9-12-12-12-12-12 fois tous les 3-2½-2½-2½-2½-2½ cm = 48-48-48-60-60-60 m. Quand la manche mesure 38 cm, tricoter A.4. NOTE: Ajuster pour que la maille centrale du diagramme (voir flèche) soit l'une des 2 m au milieu sur la manche. Après A.4, changer pour les aiguilles doubles pointes 3 et répartir 4-8-8-0-4-4 augmentations = 52-56-56-60-64-64 m. Continuer ensuite en côtes (= 2 m end/2 m env) pendant 3 cm. Rabattre les mailles comme elles se présentent. BORDURE DEVANT GAUCHE: Se tricote en allers et retours avec l'aiguille circulaire 3. Relever en gris moyen environ 144 à 168 m (nbe divisible par 4) à 1 m du bord le long du devant gauche. Tricoter en côtes ainsi sur l'envers: 1 m point mousse, *2 m env, 2 m end *, répéter de *-*, terminer par 2 m env et 1 m point mousse. Sur l'endroit, les côtes commencent et se terminent par 2 m end et 1 m point mousse. Tricoter jusqu'à ce que les côtes mesurent 3 cm. Rabattre les mailles comme elles se présentent. BORDURE DEVANT DROIT: Se tricote comme la bordure devant gauche, mais après 1 cm, ouvrir 7 boutonnières à intervalles réguliers (ouvrir les boutonnières dans les sections en mailles env, vues sur l'endroit). 1 BOUTONNIÈRE = 2 m ens à l'env, 1 jeté – la boutonnière du haut doit être à environ 6-7 cm du bord (on a 1 boutonnière sur le col), et celle du bas à environ 5-6 cm du bord. COL: Relever 96-100-104-108-112-116 m au-dessus des bordures devants et le long du rang de montage avec l'aiguille circulaire 3 en gris moyen. Tricoter en côtes ainsi: 1 m lis au point mousse, *2 m env, 2 m end *, répéter de *-* jusqu'à ce qu'il reste 3 m, 2 m env, 1 m lis au point mousse. À 1 cm de hauteur de col, ouvrir 1 boutonnière alignée au-dessus des autres de la bordure devant droit en tricotant 2 m ens à l'end, 1 jeté. Continuer ainsi jusqu'à ce que les côtes mesurent 3 cm. Rabattre les mailles comme elles se présentent. ASSEMBLAGE: Fermer l'ouverture sous les manches par une couture. Coudre les boutons sur la bordure devant gauche. |
||||||||||
Légende diagramme(s) |
||||||||||
|
||||||||||
 |
||||||||||
 |
||||||||||
 |
||||||||||
Vous avez terminé ce modèle?Alors taguez vos photos avec #dropspattern #silverstagcardigan ou bien présentez-les dans la galerie #dropsfan Vous avez besoin d'aide pour ce modèle ?Vous trouverez 29 tutoriels vidéo, une rubrique commentaires/questions et plus encore en vous rendant sur la page du modèle sur garnstudio.com © 1982-2026 DROPS Design A/S. Tous droits réservés. Ce document, y compris ces sous-sections, est protégé par les droits d'auteur (copyright). Apprenez-en davantage sur ce que vous pouvez faire avec nos modèles en bas de chacune des pages de notre site. |
||||||||||


Avec plus de 40 ans dans la conception de modèles tricot et crochet, DROPS Design offre l'une des plus vastes collections de modèles gratuits sur internet - traduits dans 17 langues. À ce jour, on compte 324 catalogues et 12290 modèles en français.
Nous nous efforçons de vous apporter le meilleur de ce que le tricot et le crochet peuvent vous offrir, inspiration et conseils mais également des fils de haute qualité à des prix incroyables! Vous souhaiteriez utiliser nos modèles autrement que pour un usage personnel? Vous pouvez lire ce que vous êtes autorisés à faire dans le Copyright en bas de page de chacun de nos modèles. Bon tricot!
Poster un commentaire sur le modèle DROPS 157-24
Nous aimerions connaître votre avis sur ce modèle !
Si vous souhaitez poser une question, merci de bien vouloir vérifier que vous avez choisi la bonne catégorie dans le formulaire ci-dessous afin d'accélérer la réponse. Les champs obligatoires sont indiqués par une *.