
Catégories populaires
Vous cherchez un fil?


Commentaires / Questions (162)
![]() Yvonne Duckstein a écrit:
Yvonne Duckstein a écrit:
Hallo, das Häkeln des Reglan bedeutet nur das oberste Teil über der Brust? Man häkelt das Musterbild nur 1x ?! Und dann kommen in den letzten beiden Reihen die Zunahmen? Habe ich das so richtig verstanden? Danke und Beste Grüße Yvonne Duckstein
30.03.2026 - 14:32DROPS Design a répondu:
Liebe Frau Duckstein, das Diagram A.z wird insgesamt 2 Mal in der Höhe gehäkelt. Die Zunahmen werden bei den 2 letzten Reihen vom 1. Rapport in der Höhe gehäkelt, dann bei den 2 letzten Reihen vom 2. Rapport in der Höhe (4 Reihen mit Zunahmen). Viel Spaß beim Häkeln!
07.04.2026 - 14:06
![]() Rebours a écrit:
Rebours a écrit:
Encolure beaucoup trop importante comment la diminuer Merci si vous avez une obtion0
19.12.2025 - 17:50
![]() Barre a écrit:
Barre a écrit:
Je me retrouve avec 12 A2
15.12.2025 - 17:50DROPS Design a répondu:
Bonjour Mme Barre, vérifiez bien votre nombre de mailles et le décompte donné hier (on commence par A.1, on répète 10 fois A.2 et on termine par A.3, on aura ainsi 12 groupes de double-brides au total pour la manche. Bon crochet!
16.12.2025 - 08:57
![]() Barre a écrit:
Barre a écrit:
Sur les ms ont continu toujours en ms si non on a plus de 10 A1 MERCI
15.12.2025 - 17:27DROPS Design a répondu:
Bonjour Mme Barre, en taille S/M vous avez sauté 40 m de l'empiècement pour la manche, vous allez crocheter ces 40 m dans le point fantaisie A.1-A.2-A.3 exactement comme avant + dans les 9 mailles crochetées sous la manche; si vous avez davantage de mailles, vous pouvez probablement ajuster en fonction de votre nombre; attention à ce que vous ayez suffisamment de mailles pour crocheter le point fantaisie. Bon crochet!
16.12.2025 - 08:56
![]() Barre a écrit:
Barre a écrit:
Je suis arrivée à la manche mais j'ai un problème j'ai mais 49 ms mais pourquoi après vous dites de continuer sur les 40 mailles sur les 9 mailles on fait quoi Merci
14.12.2025 - 19:40DROPS Design a répondu:
Bonjour Mme Barre, on crochète le tout 1er rang des manches en mailles serrées: 1 ms dans la 1ère des 8 ml et 1 ms dans les 40 ms de l'empiècement = 49 ms. Crochetez ensuite: A.1 (= 6 m), répétez 10 fois A.2 (= 8 m x 10 = 40) et terminez par A.3 (= 3 m) = 6+40+3=49 m. Commencez les tours par 4 ml pour remplacer 1 double-bride / 1 ml pour remplacer 1 ms et terminez les tours par 1 mc dans la 4ème/la 1ère ml du début du tour. Bon crochet!
15.12.2025 - 15:17
![]() Barre a écrit:
Barre a écrit:
À la fin du 1er rang du dos quand on a crocheter les 60 mailles que fait on Merci
02.12.2025 - 18:59DROPS Design a répondu:
Bonjour Mme Barre, lorsque vous divisez l'ouvrage, vous sautez les mailles des manches que vous remplacez par 8 mailles en l'air, et, au 2ème rang, vous crochetez les diagrammes comme avant en sautant les 8 mailles en l'air des emmanchures. Crochetez ainsi toutes les mailles comme avant: on va avoir ainsi, A.4, A.1 puis A.2 pour la fin du devant, tout le long du dos, au début de l'autre devant et on termine par A.4 et A.4 (vu sur l'endroit). Bon crochet!
03.12.2025 - 08:15
![]() Rebours a écrit:
Rebours a écrit:
Lorsque l'on a terminé le 1er A2il faut bien piquer dans 1maille il y a quelque chose qui m'échappe à ce moment la
12.11.2025 - 15:21DROPS Design a répondu:
Bonjour Mem Rebours, à la fin du dernier A.2 (sur les 24 mailles), vous terminez A.2 par 3 ml, vous crochetez les 8 ml et vous sautez les mailles de la manche, puis vous reprenez A.2 dans le motif suivant (1 ml, vous sautez 1 ms, les double-brides, etc...). Quand vous crochèterez le rang suivant, crochetez les 5 double-brides dans l'arceau d'1 ml comme avant et tout le rang (donc rien dans les 8 mailles en l'air de chaque côté sous les manches. Bon crochet!
12.11.2025 - 16:52
![]() Rebours a écrit:
Rebours a écrit:
Lorsqu'on arrive à la 24 ème maille du devant l'on fait une maille serrée ou une double bride Merci
10.11.2025 - 11:59DROPS Design a répondu:
Bonjour Mme Rebours, terminez le dernier A.2 en largeur par 3 mailles en l'air, sautez les 2 ms suivantes, puis crochetez 8 mailles en l'air, sautez les mailles indiquées pour la manche et commencez le A.2 du dos dans la maille suivante; au tour suivant, rappelez-vous que les 8 mailles en l'air ne seront pas crochetées. Bon crochet!
11.11.2025 - 15:59
![]() Barre a écrit:
Barre a écrit:
Excusez moi mais je ne comprend pas comment faire avec les 8 mailles en l'air
04.11.2025 - 08:31DROPS Design a répondu:
Bonjour Mme Barre, lorsque vous crochetez le rang de division manches/dos et devants, vous les crochetez à la place des manches, et au rang suivant, vous sautez ces 8 mailles en l'air, vous ne les crochetez pas pour le bas du gilet, vous les crochèterez seulement quand vous ferez les manches. Bon crochet!
04.11.2025 - 17:12
![]() Barre a écrit:
Barre a écrit:
Les 8 mailles en l'air ne font pas 40 mailles
01.11.2025 - 19:35DROPS Design a répondu:
Bonjour Mme Barre, les 8 mailles en l'air sont faites quand on saute les 40 mailles des manches, elles seront crochetées ensuite lorsque l'on termine les manches. Bon crochet!
03.11.2025 - 07:38
|
|||||||||||||||||||
Nevertheless#neverthelesscardigan |
|||||||||||||||||||
|
|
|||||||||||||||||||
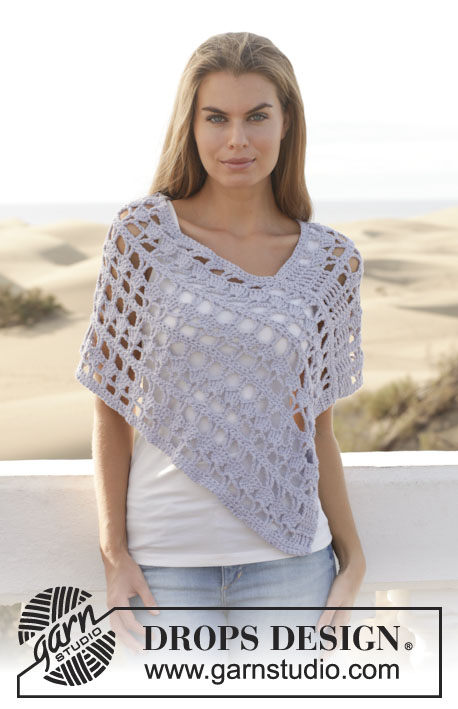
Gilet DROPS au crochet, en "Paris". Du S au XXXL.
DROPS 153-10 |
|||||||||||||||||||
|
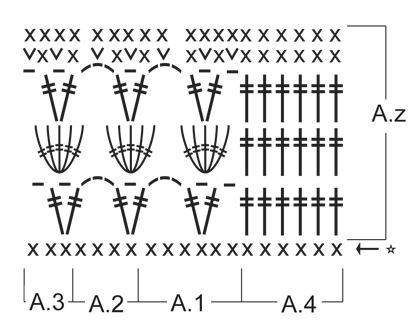
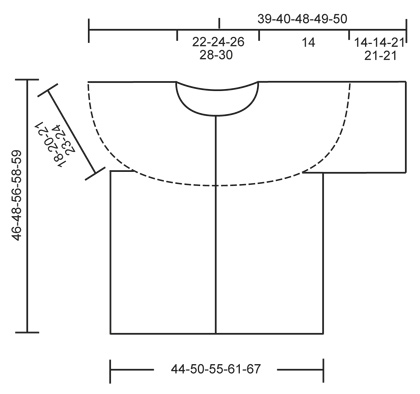
POINT FANTAISIE: Voir diagrammes A.1 à A.4. INFO CROCHET: Remplacer la 1ère ms au début de chaque rang de ms par 1 ml. Remplacer la 1ère DB au début de chaque rang de DB par 4 ml. AUGMENTATIONS: Pour augmenter, crocheter 2 ms dans 1 ms. ---------------------------------------------------------- GILET : Se réalise de haut en bas, en allers et retours, à partir du milieu devant. EMPIÈCEMENT: Monter souplement une chaînette de 156-166-177-188-198 ml (y compris 1 ml pour tourner) avec le crochet 5 en Paris. Crocheter 1er rang ainsi: 1 ms dans la 2ème ml à partir du crochet, *1 ms dans chacune des 3 ml suiv, sauter 1 ml*, répéter de *-*, et terminer par 1 ms dans chacune des 2-4-3-2-4 dernières ml = 117-125-133-141-149 ms (= 1er rang du diagramme) - VOIR INFO CROCHET. Continuer ainsi: A.4 (= bordure devant), A.1, A.2 au-dessus des 96-104-112-120-128 ms suiv (= 24-26-28-30-32 fois), terminer par A.3 et A.4 (= bordure devant). Crocheter 1 fois le diagramme A.z en hauteur, EN MÊME TEMPS, aux 2 derniers rangs, augmenter 24-28-32-36-40 m à intervalles réguliers sur chacun des 2 rangs (= 48-56-64-72-80 m augmentations au total) – VOIR AUGMENTATIONS ci-dessus. NOTE: ne pas augmenter au-dessus de A.4 = 165-181-197-213-229 m. Crocheter ensuite 1 fois le diagramme A.z en hauteur (A.2 est maintenant répété 36-40-44-48-52 fois en largeur) EN MÊME TEMPS, aux 2 derniers rangs, augmenter 22-26-30-34-38 m à intervalles réguliers sur chacun de ces 2 rangs (= 44-52-60-68-76 m augmentations au total). NOTE: ne pas augmenter au-dessus de A.4 = 209-233-257-281-305 m. DOS & DEVANTS : MESURER DÉSORMAIS À PARTIR D'ICI. Continuer ainsi: A.4, A.1, A.2 au-dessus des 24-28-32-36-40 ms suiv (= 6-7-8-9-10 fois) (= devant), 8 ml (emmanchure), sauter les 40-44-48-52-56 ms suiv du rang précédent (= manche, ces mailles sont crochetées plus tard), A.2 au-dessus des 60-68-76-84-92 ms suiv (= dos), 8 ml (emmanchure), sauter les 40-44-48-52-56 ms suiv du rang précédent (= manche, ces mailles sont crochetées plus tard), A.2 au-dessus des 24-28-32-36-40 ms suiv (= devant) et terminer par A.3 et A.4. Continuer ainsi: A.4, A.1, A.2 au-dessus des 24-28-32-36-40 ms suiv (= 6-7-8-9-10 fois en largeur) (= devant), sauter 8 ml (emmanchure), A.2 au-dessus des 60-68-76-84-92 ms suiv (= dos), sauter 8 ml (emmanchure), A.2 au-dessus des 24-28-32-36-40 ms suiv (= devant) et terminer par A.3 et A.4. Répéter A.z jusqu'à ce que l'ouvrage mesure environ 28-28-35-35-35 cm, arrêter après 1 motif complet de A.z. L'ouvrage mesure environ 46-48-56-58-59 cm à partir de l'épaule. MANCHES: Se crochètent en rond, de haut en bas. MESURER DÉSORMAIS À PARTIR D'ICI. Commencer au milieu sous la manche ainsi: Crocheter 2 ms dans la 1ère ml (des 8 ml), 1 ms dans chacune des 7 ml suiv et 1 ms dans chacune des 40-44-48-52-56 ms de l'empiècement = 49-53-57-61-65 ms. Continuer ainsi: 4 ml, A.1, A.2 au-dessus des 40-44-48-52-56 m suiv (= 10-11-12-13-14 fois en largeur), terminer par A.3 et 1 mc dans la 4ème ml. Continuer ainsi jusqu'à ce que l'ouvrage mesure environ 14-14-21-21-21 cm, arrêter après 1 motif complet de A.z. Arrêter. ASSEMBLAGE: Crocheter une bordure en ms autour de l'encolure ainsi : *1 ms dans chacune des 3 ml suiv, sauter 1 ml*, répéter de *-*, et terminer par 1 ms dans chacune des 4-6-5-4-6 dernières ml = 118-126-134-142-150 ms. Coudre les boutons sur la bordure devant gauche, à environ 7 cm les uns des autres. |
|||||||||||||||||||
Légende diagramme(s) |
|||||||||||||||||||
|
|||||||||||||||||||
 |
|||||||||||||||||||
 |
|||||||||||||||||||
Vous avez terminé ce modèle?Alors taguez vos photos avec #dropspattern #neverthelesscardigan ou bien présentez-les dans la galerie #dropsfan Vous avez besoin d'aide pour ce modèle ?Vous trouverez 6 tutoriels vidéo, une rubrique commentaires/questions et plus encore en vous rendant sur la page du modèle sur garnstudio.com © 1982-2026 DROPS Design A/S. Tous droits réservés. Ce document, y compris ces sous-sections, est protégé par les droits d'auteur (copyright). Apprenez-en davantage sur ce que vous pouvez faire avec nos modèles en bas de chacune des pages de notre site. |
|||||||||||||||||||


Avec plus de 40 ans dans la conception de modèles tricot et crochet, DROPS Design offre l'une des plus vastes collections de modèles gratuits sur internet - traduits dans 17 langues. À ce jour, on compte 324 catalogues et 12290 modèles en français.
Nous nous efforçons de vous apporter le meilleur de ce que le tricot et le crochet peuvent vous offrir, inspiration et conseils mais également des fils de haute qualité à des prix incroyables! Vous souhaiteriez utiliser nos modèles autrement que pour un usage personnel? Vous pouvez lire ce que vous êtes autorisés à faire dans le Copyright en bas de page de chacun de nos modèles. Bon tricot!
Poster un commentaire sur le modèle DROPS 153-10
Nous aimerions connaître votre avis sur ce modèle !
Si vous souhaitez poser une question, merci de bien vouloir vérifier que vous avez choisi la bonne catégorie dans le formulaire ci-dessous afin d'accélérer la réponse. Les champs obligatoires sont indiqués par une *.