
Catégories populaires
Vous cherchez un fil?


Commentaires / Questions (10)
![]() Monika Jüngling a écrit:
Monika Jüngling a écrit:
Vielen lieben Dank für die schnelle Antwort, wahrscheinlich hätte man mehr überlegen sollen. Klappt prima. Alles Gute und Gruß aus Berlin
19.09.2023 - 10:21
![]() Monika Jüngling a écrit:
Monika Jüngling a écrit:
Hallo, können Sie bitte noch einmal so nett sein, es mir in deutsch zu beantworten, wenn ich dieses tolle Teil in Runden stricken möchte. herzlichen Dank Monika Jüngling
17.09.2023 - 13:24
![]() Monika Jüngling a écrit:
Monika Jüngling a écrit:
Hallo, können Sie bitte noch einmal so nett sein, es mir in deutsch zu beantworten, wenn ich dieses tolle Teil in Runden stricken möchte. herzlichen Dank Monika Jüngling
17.09.2023 - 13:21DROPS Design a répondu:
Liebe Frau Jüngling, bei der 1. Runde stricken Sie dann (2 Maschen links, 1 Masche rechts) die ganze Runde, dann stricken Sie die 2. Runde wie bei der 2. Reihe und diese 2 Runden wiederholen Sie. Viel Spaß beim stricken!
18.09.2023 - 15:40
![]() Jacqueline Moore a écrit:
Jacqueline Moore a écrit:
Can this hat be knitted in the round on circular needles? I ask because I prefer not to have a seam.
08.12.2020 - 17:47DROPS Design a répondu:
Dear Mrs Moore, probably, you just have to cast on 2 sts less (= edge sts are not necessary when working in the round) and adjust pattern to be worked on every row from RS. Happy knitting!
09.12.2020 - 06:39
![]() Sanna Koskinen a écrit:
Sanna Koskinen a écrit:
I tryed to do this but I notice after trying that start needs to be reverse side. So when in the instruction says 1right "2wrong, 1right" this extent first layer needs to be 1wrong "2right, 1wrong" and second layer needs to be 1right "2wrong, false englsih rib"
17.09.2014 - 20:44Renée a écrit:
In your answer to my query you stated finish with P2 for the WS row. Did you mean you finish with P1? As this is what the pattern states for the WS row. Can you please clarify.
05.02.2014 - 14:45DROPS Design a répondu:
Dear Renée, you are correct, I'm sorry, WS row are worked starting with K2 and finishing with P1. Happy knitting!
05.02.2014 - 14:59RHS a écrit:
The pattern states: 'Repeat the 1st and 2nd rows AT THE SAME TIME...', but by this stage in the pattern 3 rows have been knitted. Can you tell me how you continue from this point. What are the 1st and 2nd rows that one needs to continue in/repeat. The pattern is rather unclear.
03.02.2014 - 17:25DROPS Design a répondu:
Dear RHS, you repeat row 1 (WS) and row 2 (RS) from "False english rib with double sts" until piece measures 12 cm for neckwarmer or 17-18 cm for hat. Happy knitting!
04.02.2014 - 09:03Renee a écrit:
I worked 1st (RS) and 2nd (WS) rows. Then pattern states: repeat 1st & 2nd rows. Do you continue knitting exactly as you did for the 1st & 2nd rows? Starting each RS row with K1 & then False English rib with double sts, finishing with P2? Then knit each WS row starting with K2 then False English rib & finishing with P1? Or do you just continue after the 1st and 2nd rows with the False English rib with double st pattern?
03.02.2014 - 17:09DROPS Design a répondu:
Dear Renee, from WS you start row with K2, then repeat from *-* from false english rib row 1 and finish with P2. From RS, you start with K1, repeat from *-* for row 2 in pattern, and finish with P2. Repeat these 2 rows this way. Happy knitting!
04.02.2014 - 09:02Renée a écrit:
Is this pattern a revised version of an older pattern, with pattern no. ee469? I prefer the hat in pattern ee469, but the neck warmer in this pattern, as it has a firmer around the neck. Do you think it would look odd to knit the hat from the older pattern and the neck warmer from this pattern? As slightly different stitches and needle sizes are used.
30.12.2013 - 13:19DROPS Design a répondu:
Dear Renée, ee-469 is another version of a set with this kind of pattern but different result. If you like to, you can use both patterns to make your own set. Just have a swatch and check how far you like it. Happy knitting!
30.12.2013 - 15:56
![]() Hanna a écrit:
Hanna a écrit:
Sehr harmonische Kombination. Einfach, klar und schön
11.06.2013 - 17:13
|
|
Red Hot Chili Pepper#redhotchilipepperset |
|
|
|
|
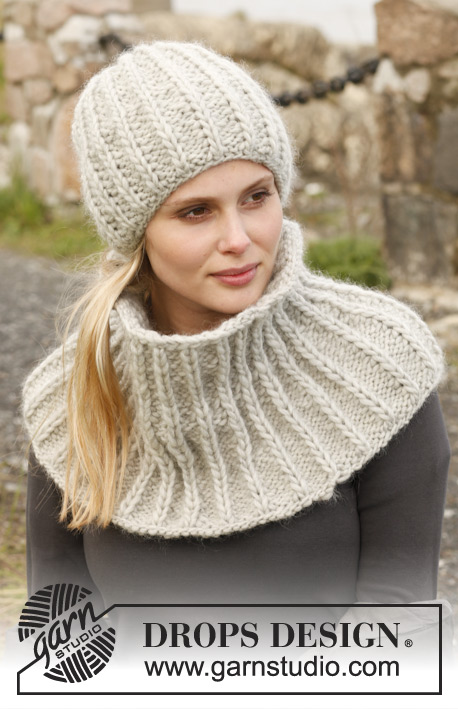
Bonnet et tour de cou tricotés en fausses côtes anglaises à mailles doubles, en DROPS Snow.
DROPS 150-34 |
|
|
FAUSSES CÔTES ANGLAISES: Rang 1 (sur l'envers): * 1 m env, 2 m end *. Rang 2 (sur l'endroit): * 2 m env, 1 m end en piquant 1 rang plus bas*, répéter de * - *. Répéter les rangs 1 et 2. AUGMENTATIONS: Augmenter sur l'endroit en faisant 1 jeté après la m end. Au rang suivant (sur l'envers) tricoter les jetés torse à l'end (c'est-à-dire tricoter le brin arrière au lieu du brin avant) pour éviter les trous. Pour l'augmentation suivante, faire le jeté avant la m end pour que les augmentations soient alternativement à gauche et à droite des sections envers. ---------------------------------------------------------- TOUR DE COU: Se tricote en allers et retours sur aiguille circulaire, de haut en bas. Monter 42 m avec l'aiguille circulaire 9 en Snow. Tricoter le 1er rang ainsi sur l'endroit: 1 m end, * 2 m env, 1 m end *, répéter de *-* et terminer par 2 m env. Tricoter ensuite ainsi sur l'envers: 2 m end, FAUSSES CÔTES ANGLAISES - voir ci-dessus, terminer par 1 m env. Au rang suivant sur l'endroit, tricoter ainsi: 1 m end, fausses côtes anglaises, terminer par 2 m env. Répéter les rangs 1 et 2, EN MÊME TEMPS, à 12 cm de hauteur totale, augmenter 1 m env dans toutes les sections 2 m env (= les sections env ont 3 m env) (vu sur l'endroit) = 14 augmentations – voir AUGMENTATIONS = 56 m. Répéter ces augmentations dans les m env à 14 cm de hauteur totale = 70 m. Augmenter ensuite de la même façon encore 3 tous les 3 cm fois = 112 m. À 24 cm de hauteur totale, rabattre souplement. Coudre le tour du cou bord à bord dans le brin avant des mailles le plus à l'extérieur. BONNET: Se tricote en allers et retours sur aiguille circulaire. Monter 44 m avec l'aiguille circulaire 9 en Snow. Tricoter en côtes 1 m end/ 1 m env jusqu'à ce que l'ouvrage mesure 4 cm. Au rang suivant sur l'endroit, augmenter 1 m dans toutes les sections envers (= 22 augmentations) = 66 m. Tricoter ensuite ainsi sur l'envers: 2 m end, FAUSSES CÔTES ANGLAISES - voir ci-dessus, terminer par 1 m env. Au rang suivant sur l'endroit, tricoter ainsi: 1 m end, fausses côtes anglaises, terminer par 2 m env. Répéter les rangs 1 et 2 jusqu'à ce que l'ouvrage mesure 17-19 cm. Au rang suivant sur l'endroit, tricoter ainsi: 1 m end, * 2 m ens à l'env, 1 m end*, répéter de *-* jusqu'à ce qu'il reste 2 m, terminer par 2 m env = 44 m. Tricoter 3 rangs les mailles comme elles se présentent puis tricoter toutes les mailles ensemble 2 par 2 à l'endroit = 22 m. Couper le fil et le passer dans les mailles restantes. Serrer et arrêter. Faire la couture du bonnet bord à bord dans le brin avant des mailles le plus à l'extérieur. |
|
Vous avez terminé ce modèle?Alors taguez vos photos avec #dropspattern #redhotchilipepperset ou bien présentez-les dans la galerie #dropsfan Vous avez besoin d'aide pour ce modèle ?Vous trouverez 13 tutoriels vidéo, une rubrique commentaires/questions et plus encore en vous rendant sur la page du modèle sur garnstudio.com © 1982-2026 DROPS Design A/S. Tous droits réservés. Ce document, y compris ces sous-sections, est protégé par les droits d'auteur (copyright). Apprenez-en davantage sur ce que vous pouvez faire avec nos modèles en bas de chacune des pages de notre site. |


Avec plus de 40 ans dans la conception de modèles tricot et crochet, DROPS Design offre l'une des plus vastes collections de modèles gratuits sur internet - traduits dans 17 langues. À ce jour, on compte 324 catalogues et 12290 modèles en français.
Nous nous efforçons de vous apporter le meilleur de ce que le tricot et le crochet peuvent vous offrir, inspiration et conseils mais également des fils de haute qualité à des prix incroyables! Vous souhaiteriez utiliser nos modèles autrement que pour un usage personnel? Vous pouvez lire ce que vous êtes autorisés à faire dans le Copyright en bas de page de chacun de nos modèles. Bon tricot!
Poster un commentaire sur le modèle DROPS 150-34
Nous aimerions connaître votre avis sur ce modèle !
Si vous souhaitez poser une question, merci de bien vouloir vérifier que vous avez choisi la bonne catégorie dans le formulaire ci-dessous afin d'accélérer la réponse. Les champs obligatoires sont indiqués par une *.