
Catégories populaires
Vous cherchez un fil?


Commentaires / Questions (101)
![]() Lisbet Holze Jespersen a écrit:
Lisbet Holze Jespersen a écrit:
Hej igen. Den 11.1.2016 havde jeg nogle spørgsmål til opskrift 151-02. Da jeg p.t. sidder og strikker denne poncho må I gerne svare hurtigste muligt.
16.01.2016 - 23:58
![]() Lisbet Holze Jespersen a écrit:
Lisbet Holze Jespersen a écrit:
Sign.forklaring: 2 skrå op 1 skrå ned. Sæt 2 m på hj.pind bag arb. 1 ret og 1 vr. + 1 ret fra hj.p.. selvom der er sat 2 m på hj.pind. Der må være noget galt??? Sign.forklaring med at hente masker op bagfra. 3 m ialt. På næste pind strikkes således:1 løs af 2 r sammen. Løs m over 2 r sammen. Iflg. sign. skal der strikkes 1 vr ???
11.01.2016 - 15:01DROPS Design a répondu:
= sæt 2 m på h.j.p bag arb, 1 ret, 1 vr + 1 ret fra hj.p. Det er de 2 sidste masker du strikker fra hjælpepinden. God fornøjelse!
26.01.2016 - 15:04
![]() M.boer a écrit:
M.boer a écrit:
In het patroon van deze poncho moet je in een naald 2 steken samenbreien/ of een overhaling. In de volgende naald kom je dus steken tekort , je kan dan niet 1 recht 1 averecht breien boven de b.v samengebreide steken want die heb je nergens toegevoegd. Graag uitleg / reactie. B.v.d. Vr.groet, Marja Boer.
05.05.2015 - 21:32DROPS Design a répondu:
Hoi Marja. Je maakt ook 1 omslag bij elke 2 samenbreien/overhaling. Zoals ik het lees kom je dan uit met een gelijk aantal steken.
06.05.2015 - 17:38
![]() Sue a écrit:
Sue a écrit:
Have you produced a video tutorial for the3/6 stitch because I have no idea where or how to even start with that? Thank you.
27.01.2015 - 22:37DROPS Design a répondu:
Dear Sue, there is no video available yet, but to work this st, *insert your needle 3/6 rows below, get yarn from WS and go back through that st with the yarn from RS (you have 1 more st on the right needle)*, then work next st and repeat from *-* once again in the same st below, you have now 3 sts on the right needle, on next round, work these 3 sts: Slip 1 as if to K, K2 tog, psso (1 st remains). Happy knitting!
28.01.2015 - 10:57
![]() Françoise Bastin a écrit:
Françoise Bastin a écrit:
Bonjour, J'ai réalisé ce poncho en rouge, il est magnifique. J'ai repris la base mais changé les deux panneaux de dessin. En fait j'ai repris presque l'entièreté d'un diagramme d'un pull pour homme (n°135-3). Je le trouve aussi magnifique. Je vais procéder de la même manière pour une autre personne et cela donnera 3 ponchos différents. Françoise.
21.01.2015 - 10:32RHS a écrit:
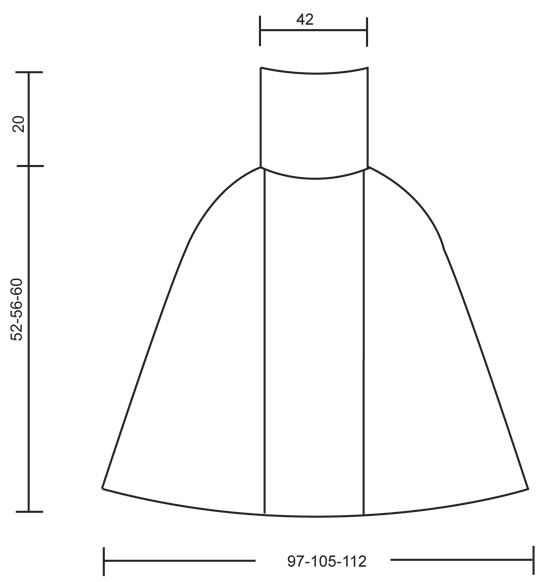
Hi Is the circumference of the neck 42cm or 84cm?
08.01.2015 - 12:25DROPS Design a répondu:
Dear RHS, measurements in chart are taken flat, from side to side, circumference of the neck will be then approx. 84 cm (neck will be 42 cm from side to side when lying flat). Happy knitting!
08.01.2015 - 13:40
![]() Sandra a écrit:
Sandra a écrit:
Hallo an Alle, weiß denn jemand wieviel Wolle für Größe S/M benötigt wird :-) ? Dankeschön
25.12.2014 - 18:56DROPS Design a répondu:
Den Garnverbrauch finden Sie neben dem Foto unter der gestrichelten Linie, dort ist das Material samt Verbrauch angegeben.
29.12.2014 - 10:11Renée a écrit:
Thank you for your help!
04.12.2014 - 15:26Renée a écrit:
Thanks for confirming. Just one final aspect I am a little unsure of regarding the insert needle 3/6 rows down, when you create the 2nd loop (the 3rd of the 3 sts), you stick the needle through the same stitch as you stuck it through to create the first loop. Is that correct? i.e. both loops/strands of yarn are pulled through the same stitch.
04.12.2014 - 13:37DROPS Design a répondu:
Dear Renée, that's correct, you will then have 3 sts instead of 1 on this place (1st st picked below + K1 + 2nd st picked below) that you will dec to 1 st on next round. Happy knitting!
04.12.2014 - 15:05Renée a écrit:
I already looked at the images you are directing me to and I did not find them particularly helpful. Can you please check my post from 29/11/14 at 15:06 where I have described what I think is required for the stitch 3/6 rows down and then confirm that this is correct or not. The description provided in the pattern is too vague and should be rewritten as it is quite misleading.
03.12.2014 - 17:02DROPS Design a répondu:
Dear Renée, you are correct, *you insert needle some rows below, get the yarn from WS and pull it through the st (= towards RS) = you will have an extra st "loop" on right needle* - work 1 st and repeat again from *-* = 3 st on right needle - on next round, work these 3 sts: Slip 1 as if to K, K2 tog, psso. Happy knitting!
03.12.2014 - 17:34
|
||||||||||||||||||||||||||||||||||||||||||||||||||||
Frozen Ivy#frozenivyponcho |
||||||||||||||||||||||||||||||||||||||||||||||||||||
|
|
||||||||||||||||||||||||||||||||||||||||||||||||||||
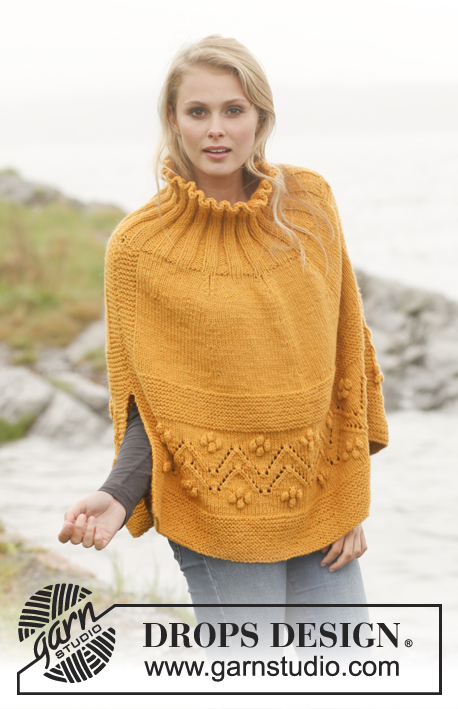
Poncho DROPS avec torsades et motif feuilles, en ”Karisma”. Du S au XXXL.
DROPS 151-2 |
||||||||||||||||||||||||||||||||||||||||||||||||||||
|
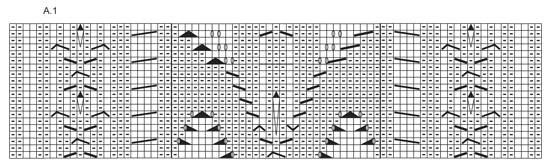
POINT FANTAISIE: Voir diagramme A.1. DIMINUTIONS: Commencer 6 m avant le marqueur et tricoter ainsi: 2 m ens à l'end, 1 m end, 2 m env, 2 m end (le marqueur se trouve au milieu de ces 2 m), 2 m env, 1 m end, glisser 1 m à l'end, 1 m end, passer la m glissée par-dessus la m tricotée. ---------------------------------------------------------- PONCHO: Monter 408-440-472 m avec l'aiguille circulaire 3.5 en Karisma. Tricoter en côtes 2 m env/2 m end pendant 8 cm. Continuer avec l'aiguille circulaire 4 et tricoter ainsi: A.1 au-dessus des 82 premières m, EN MÊME TEMPS, répartir 3 diminutions sur ces mailles (= 79 m), *26-30-34 m jersey, côtes 2 m env, 2 m end, 2 m env au-dessus des 6 m suiv (ces m sont directement au-dessus de 2 m env, 2 m end, 2 m env des côtes ) *, répéter de *-* encore 2 fois, 26-30-34 m jersey, A.1 au-dessus des 82 m suiv, EN MÊME TEMPS répartir 3 diminutions au-dessus de ces mailles (= 79 m), * 26-30-34 m jersey, 2 m env, 2 m end, 2 m env au-dessus des 6 m suiv (ces m sont directement au-dessus de 2 m env, 2 m end, 2 m env des côtes ) *, répéter de *-* encore 2 fois, 26-30-34 m jersey = 402-434-466 m. Placer 4 marqueurs ainsi: le 1er marqueur après 108-112-116 m (entre 2 m end des 1ères côtes), le 2ème marqueur marqueur après 172-184-196 m (entre 2 m end des 3èmes côtes), le 3ème marqueur après 309-329-349 m (entre 2 m end des 4èmes côtes), et le 4ème marqueur après 373-401-429 m (entre 2 m end des 6èmes côtes). Continuer ainsi EN MÊME TEMPS, à 10 cm de hauteur totale, diminuer 1 m de chaque côté des marqueurs - VOIR DIMINUTIONS. Répéter ces diminutions 19-19-19 fois tous les 2 cm, puis tous les 5-9-13 fois tous les 1 cm (24-28-32 diminutions au total) = il reste 210 m pour toutes les tailles. L'ouvrage mesure environ 52-56-60 cm. Continuer avec l'aiguille circulaire 3.5 et tricoter 1 tour end, EN MÊME TEMPS, répartir 42 diminutions = 168 m. Tricoter 1 tour env et continuer en côtes 2 m end/2 m env pendant 20 cm. Rabattre m les mailles comme elles se présentent. |
||||||||||||||||||||||||||||||||||||||||||||||||||||
Légende diagramme(s) |
||||||||||||||||||||||||||||||||||||||||||||||||||||
|
||||||||||||||||||||||||||||||||||||||||||||||||||||
 |
||||||||||||||||||||||||||||||||||||||||||||||||||||
 |
||||||||||||||||||||||||||||||||||||||||||||||||||||
Vous avez terminé ce modèle?Alors taguez vos photos avec #dropspattern #frozenivyponcho ou bien présentez-les dans la galerie #dropsfan Vous avez besoin d'aide pour ce modèle ?Vous trouverez 15 tutoriels vidéo, une rubrique commentaires/questions et plus encore en vous rendant sur la page du modèle sur garnstudio.com © 1982-2026 DROPS Design A/S. Tous droits réservés. Ce document, y compris ces sous-sections, est protégé par les droits d'auteur (copyright). Apprenez-en davantage sur ce que vous pouvez faire avec nos modèles en bas de chacune des pages de notre site. |
||||||||||||||||||||||||||||||||||||||||||||||||||||


Avec plus de 40 ans dans la conception de modèles tricot et crochet, DROPS Design offre l'une des plus vastes collections de modèles gratuits sur internet - traduits dans 17 langues. À ce jour, on compte 324 catalogues et 12290 modèles en français.
Nous nous efforçons de vous apporter le meilleur de ce que le tricot et le crochet peuvent vous offrir, inspiration et conseils mais également des fils de haute qualité à des prix incroyables! Vous souhaiteriez utiliser nos modèles autrement que pour un usage personnel? Vous pouvez lire ce que vous êtes autorisés à faire dans le Copyright en bas de page de chacun de nos modèles. Bon tricot!
Poster un commentaire sur le modèle DROPS 151-2
Nous aimerions connaître votre avis sur ce modèle !
Si vous souhaitez poser une question, merci de bien vouloir vérifier que vous avez choisi la bonne catégorie dans le formulaire ci-dessous afin d'accélérer la réponse. Les champs obligatoires sont indiqués par une *.