
Catégories populaires
Vous cherchez un fil?



























Commentaires / Questions (121)
 Ava Goei-Vujovich a écrit:
So, can you write out the repeat for the section B of 90? When I leave Section A, I am borrowing from section B and then I have to borrow 1 from section C. Please write in simple terms so I can understand it?
18.07.2019 - 02:55DROPS Design a répondu:
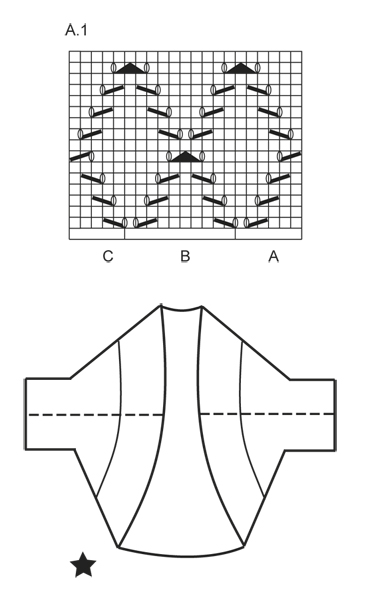
Dear Mrs Goei-Vujovich, you work the 90 sts in B a total of 9 times: (first stitch in first B has been worked with A) work until 2 sts remain in B, YO, slip the next to last st in B, K the last st in B with first st in next B together, psso, YO (= this is now the first st in next B). Repeat this until the stitches in C remain and work the same way with last 2 sts in last B tog with the first stitch in C. Happy knitting!
18.07.2019 - 10:32
Ava Goei-Vujovich a écrit:
I have the same question as Pam from the UK for row 15 where there is an overlap of A into B and then C. I have a cast on of 107 stitches. After working the first K3 stitches, I knit 4 stitches, 1 Yarn over, slip 1 sts as if to knit, k2tog (taking 1 stitch from section B), since the second stitch of the k2tog is from the B section. How then do I repeat B for the remaining 90 stitches of B and then moving on to C? Please break this explanation to A, B and C please?
17.07.2019 - 01:54DROPS Design a répondu:
Dear Mrs Goei-Vujovich, on row 15 you will work the 2 last stitches in A together with the first stitch in B (= YO, slip the next to last st in A, K the last st in A + the first st in B tog, psso, YO), the YO is now the firs stitch in B. At the end of B, work the last 2 sts in B tog with the first st in next B (then in C on last repeat) the same way. Make sure you always keep the same number of sts as before in each A, B and C. Happy knitting!
17.07.2019 - 11:05
 Carol Cooley a écrit:
Thank for your helpful comments. Naturally I would consider ordering from yourselves as you make it very easy to find a substitute. I cannot say the same about Captcha which is always a struggle, with blurred small images and often using items a non-USA person would not necessarily recognize. At my time of life anything to m ake life easier helps. Have a nice day. Is that last image a store front or garage?
26.05.2019 - 09:01
Carol Cooley a écrit:
Is there either another similar pattern or has this one being rewritten please? *Cassie by DROPS Design Knitted DROPS bolero with lace pattern in ”Big Merino”. Size: S - XXXL* I use mainly acrylic as wool can irritate, alpaca-etc are ok. Any low cost substitutes for wool are welcomed for a practice piece. Maybe garter and st.st to start off then go ahead for lace. Thank you.
14.05.2019 - 13:29DROPS Design a répondu:
Dear Carol, you can find many patterns for bloeros on our site with the search word "bolero". https://www.garnstudio.com/search.php?action=search&w=bolero&c=0&k=0&y=0&lang=en You have to understand that these patterns are written to suppoirt DROPS yarns, we cannot make alterations or suggestions for other yarns, sorry. Happy Crafting!
25.05.2019 - 10:27
Pam a écrit:
I'm having trouble with row 15 could you please write it in full for me
10.05.2019 - 20:07DROPS Design a répondu:
Hi Pam, Row 15 reading from right to left, so from the right side, - K4, 1 yarn over, slip 1 stitch, knit 2 together and pass the slipped stitch over the knitted together stitches, 1 yarn over, K7, 1 yarn over, slip 1 stitch, K2 together and pass the slipped stitch over the knitted together stitches, 1 yarn over and finally K4. Happy knitting!
11.05.2019 - 11:47
 Ava Goei-Vujovich a écrit:
I have tried a sample swatch: using 21 stitches and interpreting A1. Its a total of 21 stitches but using your explanation above: first row in A: K3, K2 tog, YO - then B: YO, slip 1 as if to K, K1, psso, K5, K2 tog, YO, K1, and C: YO, slip 1 as if to K, K1, psso, K3. I end up with 23 sts and not 21 sts
07.03.2019 - 12:40DROPS Design a répondu:
Dear Mrs Goei-Vujovich, on first row A.1A is worked as follows: K3, K2 tog, YO, K1 (= 6 sts), then work B over the next 10 sts: YO, slip 1 as if to K, K1, psso, K5, K2 tog, YO, K1, then work C: YO, slip 1 as if to K, K1, psso, K3 (= 5 sts) = 21 sts in total. You can insert a marker between each repeat to make sure you always get the correct number of sts in each part of the diagram. Happy knitting!
07.03.2019 - 14:19
Ava Goei-Vujovich a écrit:
I don't understand why a K1 is added at the end of section B - there isn't a K1 added at the end of section A if I am to read the diagram explanation as shown in A1 Row 1. I understand B is a 10 sts repeat: *YO, slip 1 as if to K, K1, psso, K5, K2 tog, YO, K1*, repeat from *-*.
07.03.2019 - 12:35
Ava Goei-Vujovich a écrit:
First row in A: K3, K2 tog, YO = 6sts. then B: YO, slip 1 as if to K, K1, psso, K5, K2 tog, YO, K1 = 12 sts (repeat B), and work C: YO, slip 1 as if to K, K1, psso, K3 = 5sts. B should only be multiples of 10, not 12.
07.03.2019 - 11:35DROPS Design a répondu:
Dear Mrs Goei-Vujovich, when working B you decrease 1 stitch 2 times (slip 1, K1, psso + K2 tog) and increase with 2 YOs = number of sts is the same = 10 sts. See previous answer for whole repeats on the row. Happy knititng!
07.03.2019 - 12:19
Ava Goei-Vujovich a écrit:
I believe your reply at 9:43 is incorrect. I have just tried in in a total of 21 stitches for a A,B,C section. It makes the entire section of section B : 12 stitches for a standard repeat when it should be 10! Standard repeat of 10 stitches and section C is 5.
07.03.2019 - 11:27DROPS Design a répondu:
Dear Mrs Goei-Vujovich, B is a 10 sts repeat: *YO, slip 1 as if to K, K1, psso, K5, K2 tog, YO, K1*, repeat from *-*. And you will work: 3 sts in garter st, A.1A (= 6 sts), repeat A.1B a total of 9-10-11-12 times (= over the 90-100-110-112 next sts), work A.1C (= 5 sts) and finish with 3 sts in garter st. Happy knitting!
07.03.2019 - 12:18
Ava Goei-Vujovich a écrit:
In section B, row 1, I start off with a *1 YO, sl1, K1, psso, k5, k2tog, 2 YO*, and then repeat from* to * for the next 90-100-etc stitches, until the last 5 stitches of that row?
07.03.2019 - 06:16DROPS Design a répondu:
Hi Ava, You are right, apart from at the end of the sequence it is 1 YO, K1, 1 YO, not 2 YOs. This sequence is repeated until the last 8 stitches, finishing with A.1 C (5 stitches) and 3 stitches in garter stitch. Happy knitting!
07.03.2019 - 08:06
|
|||||||||||||||||||
Cassie#cassiebolero |
|||||||||||||||||||
 |
 |
||||||||||||||||||
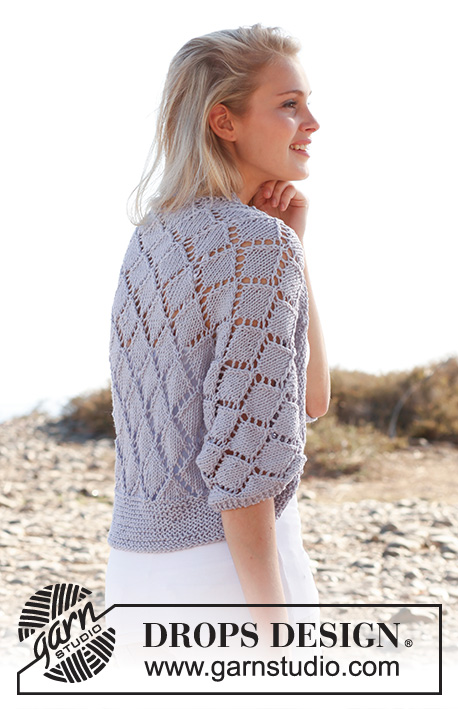
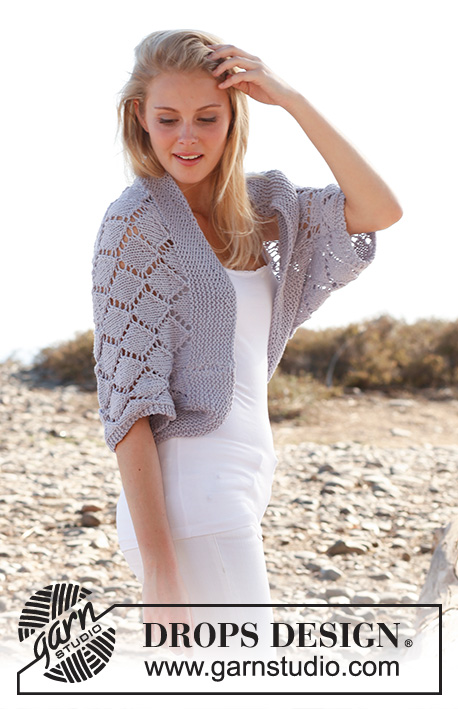
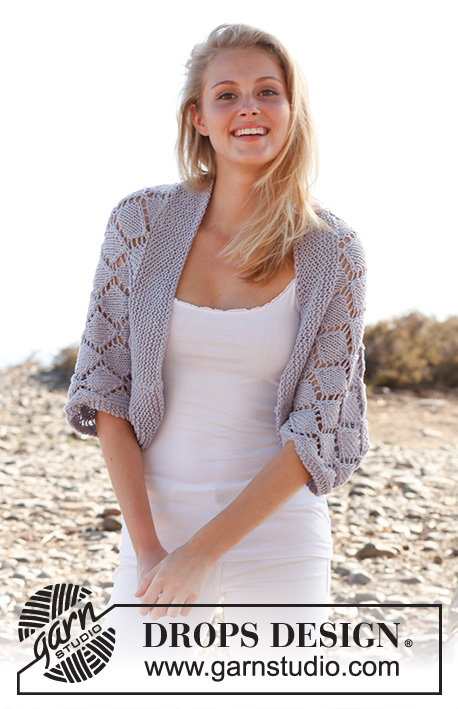
Boléro ajouré DROPS en ”Big Merino”. Du S au XXXL.
DROPS 146-16 |
|||||||||||||||||||
|
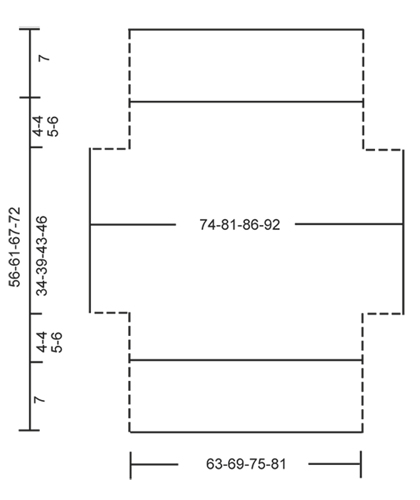
POINT MOUSSE (en allers et retours) : Tricoter tous les rangs à l'endroit. 1 "côte" mousse = 2 rangs end. POINT FANTAISIE : Voir diagramme A.1, Tous les rangs du point fantaisie sont représentés, vus sur l'endroit, dans le diagramme. --------------------------------------------------------- BOLÉRO: Se tricote en allers et retours sur aiguille circulaire pour avoir suffisamment de place pour y loger toutes les mailles. Monter 107-117-127-137 m avec l'aiguille circulaire 5 en Big Merino. Tricoter au point mousse jusqu'à ce que l'ouvrage mesure 7 cm. Tricoter ensuite ainsi sur l'endroit: 3 m au POINT MOUSSE - voir ci-dessus, A.1A (= 6 m), A.1 B au-dessus des 90-100-110-120 m suiv, terminer par A.1 C (= 5 m) et 3 m au POINT MOUSSE. Continuer A.1 avec 3 m au point mousse de chaque côté. NE PAS OUBLIER DE BIEN CONSERVER LA MÊME TENSION QUE POUR L'ÉCHANTILLON ! À 11-11-12-13 cm de hauteur totale, monter 10 m à la fin des 2 rangs suiv pour les manches = 127-137-147-157 m. Tricoter ainsi: 3 m au point mousse, A.1A (= 6 m), A.1 B au-dessus des 110-120-130-140 m suiv, terminer par A.1 C (= 5 m) et 3 m au POINT MOUSSE. NOTE! Continuer A.1 logiquement pour que le motif continue après les augmentations pour les manches. À 45-50-55-59 cm de hauteur totale, rabattre 10 m au début des 2 rangs suivants = 107-117-127-137 m. Tricoter ainsi: 3 m au point mousse, A.1A (= 6 m), A.1 B au-dessus des 90-100-110-120 m suiv, terminer par A.1 C (= 5 m) et 3 m au point mousse. À 49-54-60-65 cm de hauteur totale, tricoter au point mousse sur toutes les mailles. Rabattre à 56-61-67-72 cm de hauteur totale. ASSEMBLAGE : Faire la couture des côtés et sous les manches à 1 m lis du bord – voir ligne en pointillé dans le schéma. |
|||||||||||||||||||
Légende diagramme(s) |
|||||||||||||||||||
|
|||||||||||||||||||
 |
|||||||||||||||||||
 |
|||||||||||||||||||
Vous avez terminé ce modèle?Alors taguez vos photos avec #dropspattern #cassiebolero ou bien présentez-les dans la galerie #dropsfan Vous avez besoin d'aide pour ce modèle ?Vous trouverez 8 tutoriels vidéo, une rubrique commentaires/questions et plus encore en vous rendant sur la page du modèle sur garnstudio.com © 1982-2026 DROPS Design A/S. Tous droits réservés. Ce document, y compris ces sous-sections, est protégé par les droits d'auteur (copyright). Apprenez-en davantage sur ce que vous pouvez faire avec nos modèles en bas de chacune des pages de notre site. |
|||||||||||||||||||






Avec plus de 40 ans dans la conception de modèles tricot et crochet, DROPS Design offre l'une des plus vastes collections de modèles gratuits sur internet - traduits dans 17 langues. À ce jour, on compte 333 catalogues et 12525 modèles en français.
Nous nous efforçons de vous apporter le meilleur de ce que le tricot et le crochet peuvent vous offrir, inspiration et conseils mais également des fils de haute qualité à des prix incroyables! Vous souhaiteriez utiliser nos modèles autrement que pour un usage personnel? Vous pouvez lire ce que vous êtes autorisés à faire dans le Copyright en bas de page de chacun de nos modèles. Bon tricot!
Poster un commentaire sur le modèle DROPS 146-16
Nous aimerions connaître votre avis sur ce modèle !
Si vous souhaitez poser une question, merci de bien vouloir vérifier que vous avez choisi la bonne catégorie dans le formulaire ci-dessous afin d'accélérer la réponse. Les champs obligatoires sont indiqués par une *.