
Catégories populaires
Vous cherchez un fil?


Commentaires / Questions (59)
![]() Gilardi Claudette a écrit:
Gilardi Claudette a écrit:
Je ne comprends pas l'explication des manches.que veut dire "avec les rangs raccourcis comme avant,aux mêmes endroits" Merci
31.01.2022 - 09:02DROPS Design a répondu:
Bonjour Mme Gilardi, vous avez auparavant tricoté des rangs raccourcis sur toute la longueur, lorsque vous tricotez les manches, vous allez tourner aux mêmes endroit qu'avant (moins de fois car moins de marqueurs), et continuer ainsi les rangs raccourcis comme avant. Bon tricot!
31.01.2022 - 10:23
![]() Martens a écrit:
Martens a écrit:
Ik ben deze Eden vest aan het breien. Ik ben nu de libkermouw aan het breien. Deze moeten in verkorte toeren gebreid worden. De eerste en de tweede toer van de verkorte toeren moeten gewoon volledig heen en terug gebreid worden. Blijft dit ook gelden in de mouw? Want er zijn maar 2 verkorte toeren in de mouw ipv 3. Ik begrijp tevens niet hoe je 35 cm meet (aan de onderkant op het breedste deel) in de uitleg van de linkermouw. Kan u mij daarmee helpen, please?
09.01.2021 - 20:24DROPS Design a répondu:
Dag Martens,
De lengte van de mouw meet je aan de onderkant van de mouw op het breedste deel. Als je verkorte toeren maakt op de mouw, keer je het werk op het zelfde punt als bij de panden, dus het aantal steken vanaf de hals tot het keerpunt voor de verkorte toeren moet hetzelfde zijn. Hoe de verkorte toeren herhaald worden is verder precies hetzelfde als op de panden.
10.01.2021 - 12:15
![]() Bobby Garland a écrit:
Bobby Garland a écrit:
OK, I think I get it. I need to do 1 more row on the LF (row 1 for me) in order to end at the top. Then, I need to attach a new yarn to stitch #64 on the WS and knit the side piece. Then I will end up with the last row on the RS. Then I will cut that yarn. Then I will go back to the top edge on the LF and pick up yarn and turn to the WS to start the sleeve on those 51 sts. It would have been nice if the instructions had been more specific, instead of saying "work approximately..."
08.01.2021 - 19:57
![]() Bobby Garland a écrit:
Bobby Garland a écrit:
I get what you are saying, but I am not asking about the sleeve, as I am not there yet. I need to know if I am to cut the yarn at the lower edge of the left front piece and reattach it to the WS at stitch #64 to start the first row of the side piece so as to end on the RS of the side piece as instructed. There is no other way to end up on the RS unless you start the side piece on the WS in the middle of the work.
08.01.2021 - 17:21DROPS Design a répondu:
Dear Mrs Garland, after left front piece measures 23 cm, adjust so that next row will be worked from RS and now work this 1 cm starting from RS = from the bottom edge over the first 64 cm - adjust this 1 cm so that last row is worked from RS, then cut the yarn and join it to work sleeve (starting from RS) over the 51 sts left unworked on needle (starting from RS). Happy knitting!
11.01.2021 - 06:57
![]() Bobby Garland a écrit:
Bobby Garland a écrit:
OK, so you also cut the yarn at the end of the left front, which for me is at the lower edge, and reattach to stitch # 64 (for small size) in order to start the side piece on the WS, so as to finish last row of side piece on the RS?
08.01.2021 - 15:15DROPS Design a répondu:
Dear Mrs Garland, the last row on left front piece is worked from RS, but when you turn and work sleeve, first row on sleve is worked from WS = this means you don't need to cut the yarn between left front piece and sleeve, then after sleeve, just work the 64 sts on side at the end of a WS row. - no need to cut the yarn neither between sleeve and back piece. Happy knitting!
08.01.2021 - 16:19
![]() Bobby Garland a écrit:
Bobby Garland a écrit:
Thank you for your response. Another question....I finished the left front and ended on row 8 of short row sequence, which means the next row would be a right side row. In order to finish the side piece on the RS as instructed and have the side pieces be the same number of rows and have a marker in the middle, I would have to start the side piece on the WS. Do I cut the yarn and start at stitch number 64 at the other end from the WS?
08.01.2021 - 14:08DROPS Design a répondu:
Dear Mrs Garland, last row worked for side on front piece is worked from the right side, then cut the yarn and work sleeve. Last row worked on sleeve is from WS, after you have worked this last row on sleeve, work the stitches of the side at the end of this row = from WS, all stitches are now back on needle, turn and start short rows at the beg of next row from RS. Happy knitting!
08.01.2021 - 15:02
![]() Bobby Garland a écrit:
Bobby Garland a écrit:
For short rows, when moving from left front to sleeve to back to sleeve to right front, do you continue in the same numerical sequence from the previous section, or do you start again at row 1 or do you reverse the short row sequence, work rows 8-1? You start with row 1 at the left front border and end up with row 8 at the right front....the pieces would not be "mirrored." Even if you have the same number of rows, the short rows would not be in the same place. Does it matter?
04.01.2021 - 14:50DROPS Design a répondu:
Dear Mrs Garland, after you have worked the sleeve, work the short rows on back piece starting from row 1 of short rows. Happy knitting!
05.01.2021 - 10:43
![]() LISA RENBARGER a écrit:
LISA RENBARGER a écrit:
A friend and I are about to cast on Eden to knit at the same time. My bust measurement is between size M & L. Is there positive ease built in to the pattern?
13.01.2020 - 16:49DROPS Design a répondu:
Dear Mrs Renbarger, measure a similar garment you have and like the shape and compare these measurements to the one in the measurement chart (taken flat from side to side, in cm) to find out the matching size. You can then either decide if you want it rather tight or rather loose (with negative or positive ease). Read more here. Happy knitting!
14.01.2020 - 07:17
![]() Kironieke a écrit:
Kironieke a écrit:
If i cast on 120 stitches for size M with 23st/cm (tension) how do i get to the total height of 75cm? It only adds up to the 52cm of the body, not the yoke/sleeve part.
21.05.2019 - 20:53DROPS Design a répondu:
Dear Kironieke, the 120 stitches will measure 52 cm = whole length of jacket as shown in measurement chart (= 23 cm yoke + 29 cm body). Happy knitting!
22.05.2019 - 09:14
![]() Rosie FRANCIS a écrit:
Rosie FRANCIS a écrit:
When knitting the left sleeve, you will have between 51 and 62 stitches, how many do you work before turning on the short rows? The short row instructions work for the whole garment (between 115 and 138 stitches)
06.08.2018 - 22:35DROPS Design a répondu:
Dear Mrs Francis, you should work the short rows on the left sleeve on the same places you worked the short rows on the top of front piece before, ithe "turns" should continue and be aligned from the beg of piece. Happy knitting!
07.08.2018 - 09:38
|
||||
Eden#edencardigan |
||||
|
|
||||
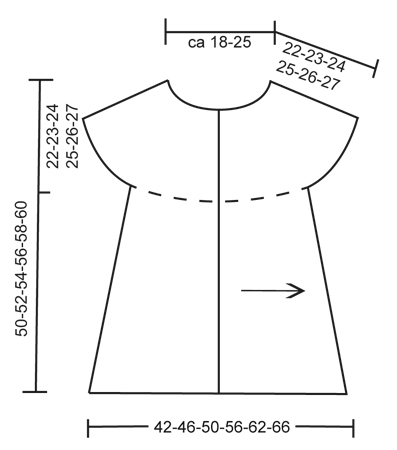
Gilet sans manches DROPS au point mousse, tricoté dans le sens de la longueur avec des rangs raccourcis, en ”Fabel”. Du S au XXXL.
DROPS 134-4 |
||||
|
ASTUCE TRICOT : Chaque fois que l'on tourne l'ouvrage en cours de rang, glisser la 1ère m à l'end, serrer le fil et tricoter le rang suivant. Ceci permet d'éviter les trous quand on tricote les rangs raccourcis. RANGS RACCOURCIS : Tricoter en rangs raccourcis au milieu de l'ouvrage pour donner au gilet une forme évasée en trapèze. Commencer à partir du bas et tricoter ainsi en remontant vers l'encolure : *tricoter toutes les mailles, tourner et tricoter le rang suivant. Tricoter 103-108-112-115-119-122 m, tourner et tricoter le rang suivant. VOIR ASTUCE TRICOT ! Tricoter 89-94-97-99-103-105 m, tourner et tricoter le rang suivant. Tricoter 71-75-77-79-81-83 m, tourner et tricoter le rang suivant*. Répéter de *-*, c'est-à-dire 1 série de rangs raccourcis = 2 rangs en haut et 8 rangs en bas. ASTUCE POUR MESURER : Poser l'ouvrage à plat pour le mesurer, il est important de ne pas étirer l'ouvrage quand on le mesure. -------------------------------------------------------- GILET SANS MANCHES : Se tricote dans le sens de la longueur, en allers et retours, en commençant par le milieu devant gauche pour terminer par le milieu devant droit. NOTE : la photo du gilet a été inversée. DEVANT GAUCHE : Se tricote entièrement au point mousse, c'est-à-dire tricoter tous les rangs à l'endroit. Monter souplement 115-120-125-129-134-138 m avec les aiguilles 3.5 en Fabel « vue sur la mer ». Le 1er rang se tricote sur l'endroit (= à partir du bas vers l'encolure). Tricoter 3 cm sur toutes les mailles (= bordure devant), arrêter après 1 rang sur l'envers. NE PAS OUBLIER DE BIEN CONSERVER LA MÊME TENSION QUE POUR L'ÉCHANTILLON ! Continuer en suivant les RANGS RACCOURCIS - voir ci-dessus ! Continuer ainsi jusqu'à ce que l'ouvrage mesure environ 23-25-27-30-33-35 cm à partir du rang de montage (mesurer en bas, du côté le plus large) – VOIR ASTUCE POUR MESURER ! Tricoter ensuite le côté ainsi : tricoter 1 cm en allers et retours sur les 64-67-70-72-74-76 m à partir du bas seulement. Placer 1 marqueur (= milieu du côté). Tricoter 1 cm en allers et retours sur les mêmes mailles, et glisser ces mailles en attente sur un arrêt de mailles (arrêter après 1 rang sur l'endroit, les mailles seront tricotées pour le dos plus tard). Tricoter ensuite la manche. MANCHE GAUCHE : = les 51-53-55-57-60-62 m sur l'aiguille. Tricoter en allers et retours avec les rangs raccourcis comme avant, aux mêmes endroits, jusqu'à ce que l'ouvrage mesure environ 30-31-32-33-34-35 cm (mesurer en bas, du côté le plus large), arrêter après 1 rang sur l'envers. DOS : Tricoter les 64-67-70-72-74-76 m en attente (sur l'envers) = 115-120-125-129-134-138 m. Continuer en rangs raccourcis comme avant. À environ 21-23-25-28-31-33 cm à partir du marqueur sur le côté (mesurer en bas du côté le plus large), placer un nouveau marqueur (= milieu dos). Continuer en rangs raccourcis jusqu'à ce que l'ouvrage mesure environ 20-22-24-27-30-32 cm à partir du marqueur au milieu dos (mesurer en bas, du côté le plus large). Tricoter ensuite le côté ainsi : tricoter 1 cm en allers et retours sur les 64-67-70-72-74-76 m à partir du bas seulement. Placer un nouveau marqueur (= milieu du côté). Tricoter 1 cm en allers et retours sur les mêmes mailles (arrêter après 1 rang sur l'endroit), puis glisser ces mailles en attente sur un arrêt de mailles. Tricoter la manche droite. MANCHE DROITE : Se tricote comme la manche gauche. DEVANT DROIT : Tricoter les 64-67-70-72-74-76 m en attente (sur l'envers) = 115-120-125-129-134-138 m. Continuer en rangs raccourcis comme pour le dos. Quand on a tricoté le même nombre de rangs pour le devant droit que pour le devant gauche (moins la bordure devant = 3 cm), tricoter la bordure devant droit ainsi : tricoter 1½ cm en allers et retours sur toutes les mailles. Au rang suivant sur l'endroit, former les boutonnières ainsi (= à partir du bas) : tricoter 12 m pour toutes les tailles, rabattre les 2 m suivantes, *tricoter 12-13-14-14-15-15 m, rabattre les 2 m suivantes*, répéter de *-* 4 fois au total, tricoter les mailles du rang restantes. Au rang suivant monter 2 m au-dessus des mailles rabattues. Tricoter sur toutes les mailles jusqu'à ce que la bordure mesure 3 cm au total. Rabattre souplement. ASSEMBLAGE : Crocheter la bordure suivante avec 2 fils brun et le crochet 4 ainsi : commencer en bas du devant droit avec 1 ms, *2 ml, sauter environ 1 cm, 1 ms *, répéter de *-* en remontant le long du devant droit, du col, de l'encolure dos et descendre le long du devant gauche. Couper et rentrer les fils. Coudre les boutons. |
||||
Légende diagramme(s) |
||||
|
||||
 |
||||
Vous avez terminé ce modèle?Alors taguez vos photos avec #dropspattern #edencardigan ou bien présentez-les dans la galerie #dropsfan Vous avez besoin d'aide pour ce modèle ?Vous trouverez 6 tutoriels vidéo, une rubrique commentaires/questions et plus encore en vous rendant sur la page du modèle sur garnstudio.com © 1982-2026 DROPS Design A/S. Tous droits réservés. Ce document, y compris ces sous-sections, est protégé par les droits d'auteur (copyright). Apprenez-en davantage sur ce que vous pouvez faire avec nos modèles en bas de chacune des pages de notre site. |
||||


Avec plus de 40 ans dans la conception de modèles tricot et crochet, DROPS Design offre l'une des plus vastes collections de modèles gratuits sur internet - traduits dans 17 langues. À ce jour, on compte 324 catalogues et 12290 modèles en français.
Nous nous efforçons de vous apporter le meilleur de ce que le tricot et le crochet peuvent vous offrir, inspiration et conseils mais également des fils de haute qualité à des prix incroyables! Vous souhaiteriez utiliser nos modèles autrement que pour un usage personnel? Vous pouvez lire ce que vous êtes autorisés à faire dans le Copyright en bas de page de chacun de nos modèles. Bon tricot!
Poster un commentaire sur le modèle DROPS 134-4
Nous aimerions connaître votre avis sur ce modèle !
Si vous souhaitez poser une question, merci de bien vouloir vérifier que vous avez choisi la bonne catégorie dans le formulaire ci-dessous afin d'accélérer la réponse. Les champs obligatoires sont indiqués par une *.