
Catégories populaires
Vous cherchez un fil?


Commentaires / Questions (89)
![]() Sybille a écrit:
Sybille a écrit:
Bei dem Stück, wo immer 10 Maschen mehr gestrickt werden, damit die Hose hinten höher wird als vorn, sind Löcher entstanden. Sie sind dort, wo jeweils gewendet wurde. Was habe ich hier denn falsch gemacht?
29.05.2022 - 16:29DROPS Design a répondu:
Liebe Sybille, wenn Sie die nächste Runde über alle Maschen stricken, dann können Sie den Faden zwischen 2 verkürzten Reihen auffassen, und diesen Faden verschränkt mit der nächsten Masche stricken - wie bei diesem Video (Timecode 4:00 z.B.) gezeigt wird. Viel Spaß beim stricken!
30.05.2022 - 08:08
![]() Sybille a écrit:
Sybille a écrit:
Wie verhält sich die Wolle/das Material nach dem Waschen? Ist die Hose dann noch genauso in Form?
21.04.2022 - 12:04DROPS Design a répondu:
Liebe Sybille, ja sicher, folgen Sie einfach die Pfelgehinweise - beachten Sie nur, daß Alpaca nicht Superwash (wie Fabel) ist, dh die Hose soll dann gewaschen werden, wie unter Alpaca beschrieben wird. Viel Spaß beim stricken!
21.04.2022 - 13:29
![]() Katrine a écrit:
Katrine a écrit:
Hei! Er det slik at de to garnene i ullbuksrmønsteret skal strikkes samtidig på pinne nr 4?
10.02.2022 - 22:04
![]() Ingunn Kjørholt Wolline a écrit:
Ingunn Kjørholt Wolline a écrit:
See previous post, answer was not helpful. I have tried binding of according to the pattern, but the finish looks sloppy with 2/3 of the leg being stockinette stitch which will naturally roll up. Would have been nice to see in the pictures how it is supposed to look. Any suggestions, other than rib finish?
03.02.2022 - 22:52DROPS Design a répondu:
Dear Mrs Kjørholt Wolline, sorry that the previous answer didn't help, the tights on the pictures have been worked/cast off as explained, ie with stitches in stocking stitch and rib as worked before. Make sure to avoid casting off too loosely to avoid a wavy edge and not too tight neither. You can then block bottom of tights/legs if necessary. Some knitters have worked ribbing edge at the bottom of leg, you can see their projects on Ravelry - if it can help. Happy knitting!
04.02.2022 - 09:00
![]() Ingunn Kjørholt Wolline a écrit:
Ingunn Kjørholt Wolline a écrit:
I am about to cast off first leg and it says to bind off in pattern, but I worry about it being too roomy at the ankles. I could of course finish in rib, but that is not the look I'm going for. The pictures are no help since the model are wearing boots, so what type of fit is this?
01.02.2022 - 18:33DROPS Design a répondu:
Dear Mrs Kjørholt Wolline, the tights on the picture ends at the bottom of leg with pattern as before, ie stocking stitch with the rib on the outer side of leg. Feel free to add some cm ribbing edge at the very bottom if you feel it necessary. Happy knitting!
02.02.2022 - 07:42
![]() Darren Paterson a écrit:
Darren Paterson a écrit:
Thank you for the previous answers. I have another question (sorry!): I seem to be doing something wrong in the transition from the initial ribbing to the stockinette + rib where the ribbing doesn't line up. I'm doing size S, and I'm starting the 19 stockinette stitches at the cast on stitch (1 before the MT). Am I starting this in the wrong place? Also: when knitting to make it longer in the back, do I knit in pattern the whole time? I.e., stockinette + sections of K2, P5?
26.01.2022 - 00:10DROPS Design a répondu:
Dear Mrs Paterson, start with the stitch with the marker: P3, K2, P5, K2, P5, K2 = 19 sts worked in stocking stitch, 33 sts in rib as before (= (P5, K2)*4 (= 28 sts) + P5, then work 37 sts in stocking st (= previously (K2,P5)x5 (= 35 sts) + K2), then work the next 33 sts in rib as before (= (P5, K2)*4 (= 28 sts) and work stocking stitch to the end of the round. Happy knitting!
26.01.2022 - 09:03
![]() Arabella a écrit:
Arabella a écrit:
Hi! I have made the tights following your pattern and they turned out great. However, as my waist is considerably smaller than my hips, they are not staying put. Any tips on how to put an inconspicuous elastic so they don't gap/fall down. Thank you!
23.01.2022 - 01:40DROPS Design a répondu:
Dear Arabella, You could try to turn the top 2 cm down sew it and add the elastic there, but if you want to keel the waistline, try sewing the elastic to the line between the ribbed and the knit part at the waist. Also, you might try to thread elastic thread into the top few rows of ribbing. Happy Stitching!
24.01.2022 - 00:46
![]() Darren Paterson a écrit:
Darren Paterson a écrit:
Another question: the first row calls for P3, *K2, P5*, repeat from *, finish with P2, but that leaves me with 2 extra stitches at the end. Is it actually P3, *K2, P5*, repeat from *, finish with K2, P2?
21.01.2022 - 19:59DROPS Design a répondu:
Correct, see also below. Happy knitting!
24.01.2022 - 08:20
![]() Darren Paterson a écrit:
Darren Paterson a écrit:
I'm really excited about trying this pattern, but I just don't understand how to get started with the placement of the marking threads. I'm doing size Small. Do I P3 before placing the first MT? Or do I place a MT and then Purl? And do I do 70 or 71 stitches before placing another MT? (Does the MT go between stitches 70 & 71, or after stitch 71?) And does "finish with P2" mean that on the last repeat of *K2, P5* I'm actually doing K2, P7? I'm hopelessly confused by that first row... :(
21.01.2022 - 19:45DROPS Design a répondu:
Dear Mrs Paterson, set the first marker in the first stitch of the round (the first of the P3), and insert the 2nd marker in the 71st stitch of the round. You work in rib starting with P3, then repeat (K2, P5) until 4 sts remain, work K2 and end with P5 (you will then have P5 all the round). Happy knitting!
24.01.2022 - 08:20
![]() Maria a écrit:
Maria a écrit:
Not really find your comment useful (see below). I want to make these specific leggings but would need some advise as per below. Many thanks.
11.01.2022 - 11:51DROPS Design a répondu:
Dear Maria, you can use both Nepal or Big Merino - calculate new amount of yarn here - Using Big Merino (Superwash yarn), you don't need to go one size down, but make sure in both cases that tension will match (and read extra tips for washing superwash yarn linked below). Happy knitting!
12.01.2022 - 09:12
|
|
Rhoda |
|
 |
 |
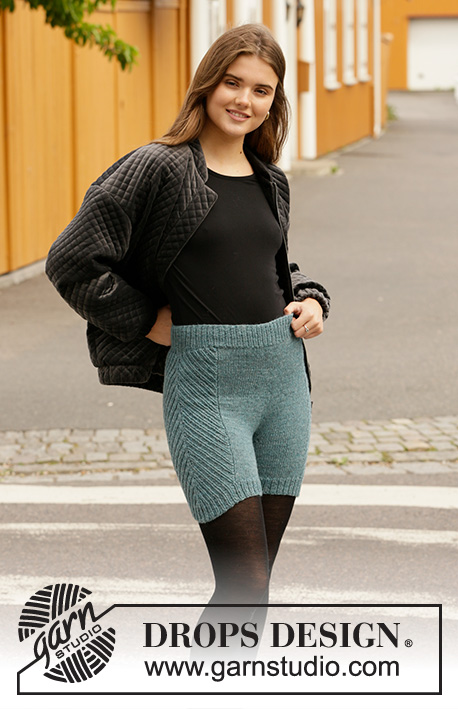
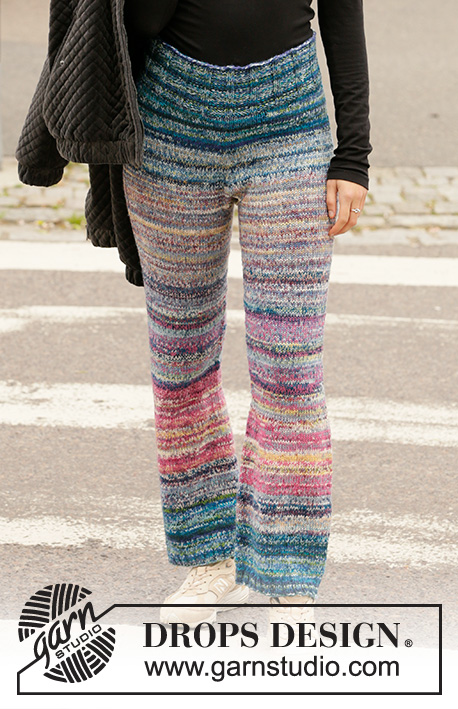
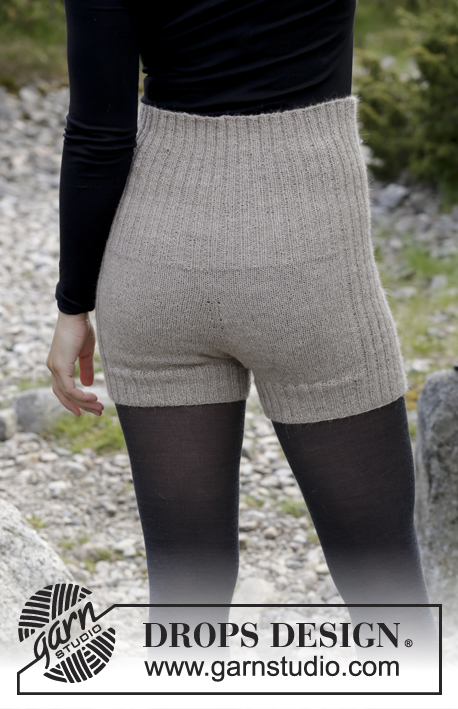
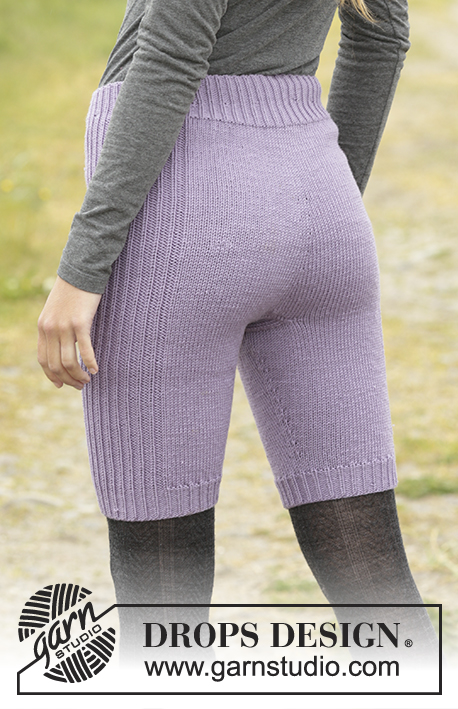
Collants sans pieds Drops en « Fabel » et « Alpaca »
DROPS 103-23 |
|
|
ÉCHANTILLON : 19 m x 25 rangs = 10 x 10 cm avec 1 fil de chaque qualité en jersey DIMINUTIONS pour les jambes : Diminuer de chaque côté du marqueur avant le marqueur : 2 m ens à l'end après le marqueur : glisser 1 m à l'end, 1 m end, passer la m glissée par dessus la m tricotée AUGMENTATIONS : Taille S, L et XXL : augmenter de chaque côté des 3 m end du milieu devant et milieu dos Taille M et XL : augmenter de chaque côté des 2 m end du milieu devant et milieu dos Augmenter ainsi : relever 1 m du rang précédent et la tricoter à l'end COLLANTS : se tricote en rond sur l'aiguille circulaire à partir du haut vers le bas. Avec 1 fil de chaque qualité et l'aiguille circulaire n° 4 monter 140-154-168-182-196 m. Tricoter 10 cm en côtes ainsi : Taille S, L et XXL : 3 m env, placer un marqueur dans la 1ère m = milieu dos, *2 m end, 5 m env * répéter de * à * et terminer par 2 m env – placer un marqueur dans la 71-85-99 ème m du rang (au milieu des 5 m env) = milieu devant Taille M et XL : placer un marqueur au début du tour = milieu dos, 1 m end, *5 m env, 2 m end * répéter de * à * et terminer par 5 m env, 1 m end – placer un marqueur après 77-91 m (au milieu de 2 m end) = milieu devant. Continuer ainsi : 19-22-26-29-33 m jersey, 33 m côtes comme avant, 37-44-51-58-65 m jersey, 33 m côtes comme avant, et 18-22-25-29-32 m jersey. A 11 cm de hauteur totale, tricoter le dos du collant de sorte qu'il soit plu long que le devant. Procéder ainsi : Tricoter 10 m après le marqueur dos, tourner, glisser la 1ère m (pour éviter un trou) et tricoter 10 m après l'autre côté du marqueur, tourner, *glisser la 1ère m après le marqueur et tricoter 10 m de plus qu'au rang précédent * répéter de * à * jusqu'à ce qu'il reste 20-14-28-22-16 m à partir du milieu devant. Tourner une dernière fois pour commencer ensuite sur l'endroit. Continuer à tricoter sur toutes les mailles. A 13-14-14-15-15 cm de hauteur totale à partir du milieu devant (soit environ 18-20-20-21-22 cm du milieu dos) augmenter sur le devant et le dos – voir augmentations ci dessus : augmenter 2 m sur le devant et sur le dos 7 fois tous les 5-5-6-6-7 tours = 168-182-196-210-224 m. A 27-29-31-33-35 cm de hauteur du milieu devant, rabattre les 6-6-7-7-8 premières m, mettre en attente sur un fil ou un arrêt de mailles les 73-79-85-91-97 m suivantes (=1 jambe), laisser les 11-12-13-14-15 m suivantes sur l'aiguille (gousset), mettre en attente les 73-79-85-91-97 m suivantes sur un fil ou un arrêt de mailles (= 1 jambe) et rabattre les 5-6-6-7-7 m restantes. Tricoter ensuite 9-10-11-12-13 cm de jersey sur les 11-12-13-14-15 cm du gousset. Rabattre et coudre le gousset aux 11-12-13-14-15 m du milieu dos. JAMBES : Glisser 73-79-85-91-97 m d'un des arrêts de mailles ou fils sur la petite aiguille circulaire (40 cm) et en plus, relever 18-20-20-22-24 m le long d'un des côtés du gousset = 91-99-105-113-121 m. Continuer en côtes sur les 33 m du côtés et en jersey sur les 58-66-72-80-88 m restantes. Placer un marqueur sur le côté intérieur de la jambe (dans les m relevées le long du gousset). A 8 cm de hauteur de jambe, diminuer 1 m de chaque côté du marqueur -voir diminutions ci dessus- : 17-20-22-25-28 fois tous les 4-3,5-3-2,5-2,5 cm = 57-59-61-63-65 m – changer pour les aiguilles doubles pointes quand il reste trop peu de mailles pour l'aiguille circulaire. Continuer jusqu'à environ 78-79-80-81-82 cm de hauteur de jambes – essayer pour vérifier la longueur. Rabattre les mailles comme elles se présentent. Reprendre les mailles en attente de l'autre jambe sur l'aiguille circulaire 4 et tricoter la 2ème jambe. |
|
Vous avez terminé ce modèle?Alors taguez vos photos avec #dropspattern ou bien présentez-les dans la galerie #dropsfan Vous avez besoin d'aide pour ce modèle ?Vous trouverez 17 tutoriels vidéo, une rubrique commentaires/questions et plus encore en vous rendant sur la page du modèle sur garnstudio.com © 1982-2026 DROPS Design A/S. Tous droits réservés. Ce document, y compris ces sous-sections, est protégé par les droits d'auteur (copyright). Apprenez-en davantage sur ce que vous pouvez faire avec nos modèles en bas de chacune des pages de notre site. |
|


Avec plus de 40 ans dans la conception de modèles tricot et crochet, DROPS Design offre l'une des plus vastes collections de modèles gratuits sur internet - traduits dans 17 langues. À ce jour, on compte 324 catalogues et 12290 modèles en français.
Nous nous efforçons de vous apporter le meilleur de ce que le tricot et le crochet peuvent vous offrir, inspiration et conseils mais également des fils de haute qualité à des prix incroyables! Vous souhaiteriez utiliser nos modèles autrement que pour un usage personnel? Vous pouvez lire ce que vous êtes autorisés à faire dans le Copyright en bas de page de chacun de nos modèles. Bon tricot!
Poster un commentaire sur le modèle DROPS 103-23
Nous aimerions connaître votre avis sur ce modèle !
Si vous souhaitez poser une question, merci de bien vouloir vérifier que vous avez choisi la bonne catégorie dans le formulaire ci-dessous afin d'accélérer la réponse. Les champs obligatoires sont indiqués par une *.