
Catégories populaires
Vous cherchez un fil?


Commentaires / Questions (13)
![]() Linda Pine a écrit:
Linda Pine a écrit:
I am COMPLETELY confused by the instructions for working the stripe pattern "at the same time inc 1 st each side on every and every other row alternately". After reading the questions and answers in the Comments section - I am even MORE confused. Surely there is a better way to describe what should be done.!!!!
06.01.2023 - 16:39
![]() Kathy Tee a écrit:
Kathy Tee a écrit:
The instructions state “ inc 1 st each side on every and every other row alternately”. What specifically does “every and every other row alternately” mean. Please provide an example in your reply eg. if I have to work a total of 10 rows, on which of those rows do I include the increases.
12.08.2022 - 03:34DROPS Design a répondu:
Dear Mrs Tee, this lesson explains how to decrease or increase on every 3rd and 4th row alternately, maybe it can help you to understand how to decrease here on every row (instead of on every 3rd row in the lesson) and 2nd row (instead of every 4th row in the lesson). Hope it can help you.
12.08.2022 - 09:57
![]() Kathy Tee a écrit:
Kathy Tee a écrit:
In your earlier reply to HCL (05.03.2020 kl. 10:06 ) you advise, ”*1 row with decreases, 1 row with decreases, 1 row without decreases*” which confirms I am to work in the first 2 of every 3 rows, but the decreases would occur on Rows 1, 2, 4, 5, 7, 8, 10, 11, 13 etc. instead. Please confirm which example, either the one shown here or the one in my previous message (12.08.2022 - 00:56.) is correct.
12.08.2022 - 01:33DROPS Design a répondu:
Dear Mrs Tee, you can also work that way, you will have decreased the same number of rows at the end with the same number of rows, decreasing alternately on every row and every other row would be more likely as previous comment. Hope it can help.
12.08.2022 - 09:51
![]() Kathy Tee a écrit:
Kathy Tee a écrit:
Based on your reply to Jane Doe (10.08.2022 kl. 16:14), if for example I worked in pattern for 13 rows, are you indicating the decreases would occur on Rows 1, 3, 4, 6, 7, 9, 10, 12, 13 etc. So, after Rows 1 and 2, I am to then decrease in the first 2 of every next 3 rows. “Row 1 - decrease, Row 2 -no decrease, then *Decrease in next 2 rows, next row (rows 5, 8, 11 etc) no decrease* repeat from *to*”. Is this correct?
12.08.2022 - 00:56DROPS Design a répondu:
Dear Mrs Tee, that's correct. Happy knitting!
12.08.2022 - 09:49
![]() Jane Doe a écrit:
Jane Doe a écrit:
Your answer is incredibly confusing! "you will decrease 1 stitch on both sides of the 2 middle stitches but you should decrease on every row and on every other row alternately, i.e.: *work 1 row with decrease, 1 row without decrease, 1 row with decrease* and repeat from *-*" So, I actually decrease every other row (1 row without decrease, 1 row with decrease). Not every row and every other row alternately.
11.08.2022 - 18:22DROPS Design a répondu:
Dear Mrs Doe, sorry for confusion, let me try again - you have to decrease 2 stitches alternately on every row and every other row, this means the decreases might occure from the right side as well as from the wrong side, after 1 row you have decreased 2 sts, after these 3 rows you will have decreased 4 sts. Hope it can help.
12.08.2022 - 09:56
![]() Kathy Tee a écrit:
Kathy Tee a écrit:
Please provide detailed explanation as to which rows inc’s and dec’s are worked in the following instructions: “inc 1 st each side on every and every other row alternately”, “Continue inc each side, at the same time dec 1 st on both sides of the 2 middle sts on every and every other row alternately”, “discontinue dec in the middle of piece and now dec each side as inc before on every and every row alternately”
10.08.2022 - 16:33
![]() Jane Doe a écrit:
Jane Doe a écrit:
After joining the two top pieces on the front, I understand that you increase at either end of every row and decrease every other row 2 stitches in the center ? Is this correct?
10.08.2022 - 13:22DROPS Design a répondu:
Dear Mrs Doe, not exactly, you will decrease 1 stitch on both sides of the 2 middle stitches but you should decrease on every row and on every other row alternately, i.e.: *work 1 row with decrease, 1 row without decrease, 1 row with decrease* and repeat from *-*. Happy knitting!
10.08.2022 - 16:14
![]() Wilma Keighley a écrit:
Wilma Keighley a écrit:
Sorry, it’s me again. I’m at the stage where the central deceased have been discontinued and decreases at the edges are happening. I can see that the side decreases are forming the shoulder but it really looks like the central decreases should continue. I am definitely correct that the central decreases should have stopped ;as the pattern says). Even the picture of the jersey looks like the central decreases continue the the end.
16.03.2022 - 15:59
![]() Wilma Keighley a écrit:
Wilma Keighley a écrit:
Re your reply. Yes tension is fine. What should mid front (where the decrease line is) measure when side measures 52cm?
08.03.2022 - 14:58DROPS Design a répondu:
Hi Wilma, When you now continue and start to decrease in each side, the sides will not get any longer, but the mid front will. When piece measures 39-40-42 cm mid front, put piece aside. :)
09.03.2022 - 09:11
![]() Wilma Keighley a écrit:
Wilma Keighley a écrit:
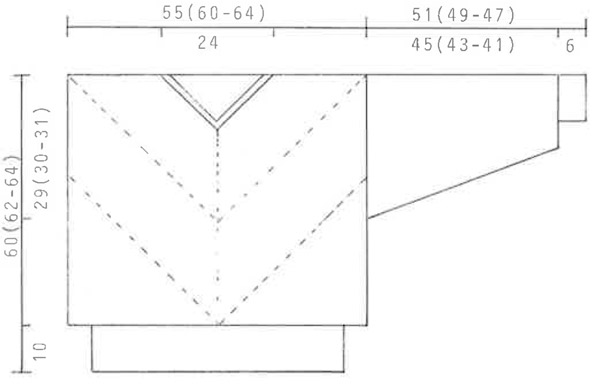
I am working on the front and the side now measures 52 cm. Looking at the diagram, I think the mid front ought to be about 26 cm but it is much less than this. Have I misunderstood where to measure the side or done something else wrong? Thanks.
07.03.2022 - 23:18DROPS Design a répondu:
Dear Mrs Keighley, do you have correct tension? ie 36 rows stocking stitch = 10 cm?
08.03.2022 - 11:09
|
|
City Jungle |
|
 |
 |
Pull tricoté en diagonale en DROPS Alpaca. Du S au L.
DROPS 9-18 |
|
|
RAYURES : Se tricotent en jersey : * 2 rangs noir, 2 rangs beige *, répéter de *-*. CÔTES : * 1 m torse à l'end, 1 m env *. Répéter de *-*. DIMINUTIONS MILIEU DEVANT : Sur l'endroit : Tricoter 2 m ens torse à l'end avant les 2 m centrales, 2 m ens à l'end après les 2 m centrales. Sur l'envers : Tricoter respectivement 2 m ens torse à l'env et 2 m ens à l'env. DEVANT : Se tricote en allers et retours en 2 parties assemblées ensuite. Monter 3 m avec les aiguilles 3 en noir et tricoter en jersey rayé, EN MÊME TEMPS augmenter 1 m de chaque côté alternativement tous les rangs et tous les 2 rangs. Pensez à bien conserver la même tension que pour l'échantillon ! Quand on a un total de 99-107-115 m, mettre en attente. Le côté mesure environ 28-30-32 cm. Tricoter 1 autre pièce identique et reprendre ensuite toutes les mailles des 2 pièces sur la même aiguille 3 = 198-214-230 m. Continuer à augmenter de chaque côté, EN MÊME TEMPS diminuer 1 m de chaque côté des 2 m centrales alternativement tous les rangs et tous les 2 rangs – voir ci-dessus. Quand le côté de l'ouvrage mesure 50-52-54 cm, arrêter les diminutions au milieu de l'ouvrage et diminuer maintenant de chaque côté comme les augmentations précédentes : alternativement tous les rangs et tous les 2 rangs. À 39-40-42 cm de hauteur totale au milieu devant, mettre en attente. DOS : Se tricote comme le devant. MANCHES : Monter 50-52-54 m en noir sur les aiguilles doubles pointes 2.5 et tricoter 6 cm de côtes. Continuer avec les aiguilles doubles pointes n° 3 en jersey rayé, EN MÊME TEMPS répartir 25 augmentations sur le 1er rang = 75-77-79 m. EN MÊME TEMPS après les côtes, augmenter 2 m sous la manche 35-37-38 fois tous les 4 tours en taille S et alternativement tous les 3 et 4 tours en taille M + L = 145-151-155 m. Rabattre quand la manche mesure 51-49-47 cm. ASSEMBLAGE : Coudre les épaules. Reprendre les mailles en attente du dos et du devant sur les aiguilles doubles pointes 2.5 et tricoter 2 cm de côtes en noir, EN MÊME TEMPS diminuer au milieu devant et au milieu dos ainsi : tricoter le tour jusqu'au 3 m milieu devant/dos, glisser la m centrale sur l'aiguille auxiliaire devant l'ouvrage, tricoter ens à l'end la 1ère et la 3ème m et passer la m centrale par-dessus la m tricotée. Diminuer ainsi tous les 4 tours. Rabattre après 2 cm. Faire la couture des côtés. Relever environ 214-222-230 m le long du bas du pull avec les aiguilles 2.5 en noir et tricoter 10 cm de côtes, rabattre. Assembler les manches. |
|
 |
|
Vous avez terminé ce modèle?Alors taguez vos photos avec #dropspattern ou bien présentez-les dans la galerie #dropsfan Vous avez besoin d'aide pour ce modèle ?Vous trouverez 27 tutoriels vidéo, une rubrique commentaires/questions et plus encore en vous rendant sur la page du modèle sur garnstudio.com © 1982-2026 DROPS Design A/S. Tous droits réservés. Ce document, y compris ces sous-sections, est protégé par les droits d'auteur (copyright). Apprenez-en davantage sur ce que vous pouvez faire avec nos modèles en bas de chacune des pages de notre site. |
|


Avec plus de 40 ans dans la conception de modèles tricot et crochet, DROPS Design offre l'une des plus vastes collections de modèles gratuits sur internet - traduits dans 17 langues. À ce jour, on compte 324 catalogues et 12290 modèles en français.
Nous nous efforçons de vous apporter le meilleur de ce que le tricot et le crochet peuvent vous offrir, inspiration et conseils mais également des fils de haute qualité à des prix incroyables! Vous souhaiteriez utiliser nos modèles autrement que pour un usage personnel? Vous pouvez lire ce que vous êtes autorisés à faire dans le Copyright en bas de page de chacun de nos modèles. Bon tricot!
Poster un commentaire sur le modèle DROPS 9-18
Nous aimerions connaître votre avis sur ce modèle !
Si vous souhaitez poser une question, merci de bien vouloir vérifier que vous avez choisi la bonne catégorie dans le formulaire ci-dessous afin d'accélérer la réponse. Les champs obligatoires sont indiqués par une *.