
Catégories populaires
Vous cherchez un fil?


Commentaires / Questions (35)
![]() Sharon Hunt-Edwards a écrit:
Sharon Hunt-Edwards a écrit:
Hello Am working on the neck of this sweater and I have taken it out one and restarted it but am still not sure 🤔 I understand the instructions. The 17 sts for the front I have bound off am I supposed to pick up sts in these sts? Also says to sew edge to edge from right side. Does this the bottom of the collar?
08.12.2023 - 21:35DROPS Design a répondu:
Dear Sharon, you pick up the stitches around the neck, but not at the bottom of the neckline, where you have cast off the 17 stitches. When you finished knitting the edge/corral, it will have an edge, that you should sew to the bottom of the neckline, to the cast off stitches. I hope this helps. Happy Knitting!
10.12.2023 - 21:15
![]() Sharon Hunt a écrit:
Sharon Hunt a écrit:
Collar: Starting at the left side of the 17 bound-off sts at center front, pick up approx. 127-163 sts (divisible by 3 + 1) on smaller circular needles around the neck, …. Dos the 125-163 included the stitches cast off for back avd from. I did not bind off these stitches because i thought the would be picked up later. Read a reply to a question which said to put the front sts on a string so I did same for the back??? S
28.11.2023 - 01:01DROPS Design a répondu:
Hi Sharon, Yes, the stitch count includes knitting up (or including the stitches on the stitch holder) mid-back of neck. Happy knitting!
28.11.2023 - 06:44
![]() Sharon Hunt a écrit:
Sharon Hunt a écrit:
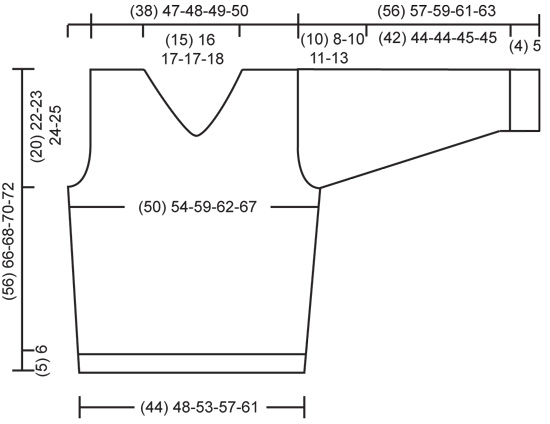
Hi the armhole on the above sweater is not long enough it is shorter than on the schematic. The armhole on the sweater I like is 28 cm. Do I just knit longer after neck and shoulder shaping. Sharon
25.11.2023 - 13:39DROPS Design a répondu:
Dear Sharon, the armhole on the schematic starts when the piece measures approx. 36 cm from the bottom of the piece (for the shortest size). After that, it should be an armhole of approx. 20cm for the smallest size. Please check the measurements in the schematic below; if you wish to make a longer armhole you will need to bind off for the armhole earlier in the piece. You can't continue working after the neck and shoulder shaping, since you will displace the shaping. That is why it's more difficult to adjust the measurements when you are working from the bottom up. Also take into account that the model is usually wearing an M size. Happy knitting!
26.11.2023 - 22:17
![]() Sharon Hunt a écrit:
Sharon Hunt a écrit:
Hi the armhole on the above sweater is not long enough it is shorter than on the schematic. The armhole on the sweater I like is 28 cm. Do I just knit longer after neck and shoulder shaping. Sharon
25.11.2023 - 13:20DROPS Design a répondu:
Dear Sharon, the armhole on the schematic starts when the piece measures approx. 36 cm from the bottom of the piece (for the shortest size). After that, it should be an armhole of approx. 20cm for the smallest size. Please check the measurements in the schematic below; if you wish to make a longer armhole you will need to bind off for the armhole earlier in the piece. You can't continue working after the neck and shoulder shaping, since you will displace the shaping. That is why it's more difficult to adjust the measurements when you are working from the bottom up. Also take into account that the model is usually wearing an M size. Happy knitting!
26.11.2023 - 22:17
![]() Sharon Hunt a écrit:
Sharon Hunt a écrit:
Hi drops, i need help her. Am making size large , pullover. I have knitted up to the armhole and I have 109 sts and I have not cast off for the neck. When do I start casting off for the neck.
22.11.2023 - 20:07DROPS Design a répondu:
Dear Mrs Hunt, in size L you start binding off for neck when piece measures 44 cm and you start to cast off for armhole when piece measures 44 cm, this means you first divide piece for neck in this size, then cast off for neck at the beg of every row from the side/armhole + decrease for neck. Happy knitting!
23.11.2023 - 08:32
![]() Sharon Hunt - Edwards a écrit:
Sharon Hunt - Edwards a écrit:
Hi am making size 46- the size that has a cast on of 113 sts. An I not supposed to cast off for the shoulders at the same time as I cast off 17 sts for the front? How many sts should i have for the shoulders. My count is not the same on both sides of the middle. Thanks
22.11.2023 - 10:31DROPS Design a répondu:
Dear Mrs Hunt-Edwards, in size L you cast off for armhole on each side 3 sts 1 time + 2 sts 2 times + 1 stitch 5 times, at the same time, cast off the middle 17 sts for neck then decrease for neck 1 stitch 9 ganger = 125 sts (before armhole) - 24 sts (armhole, ie 12 sts on each side) = 101 sts - 17 sts for neck = 42 sts for each front piece - 9 sts decreased for neck = 33 sts remain for shoulder. Cast off when piece measures 68 cm. Happy knitting!
23.11.2023 - 08:23
![]() Sharon Hunt a écrit:
Sharon Hunt a écrit:
Hei drops! Making the pullover, instruction says: Neck opening: At the same time when the piece measures 36-44-44-46-46 cm bind off the center 17 sts separately. I have already cast off 3 sts on each side. I cast off 2 sts about to cast off 17 middle sts. How many should I have between these 17 sts . Right side is facing me and I have allready cast off the first 3 sts on RS and WS. I have casted off 2 sts . So the RS is facing with 2 sts cast off. Thanks for a quick reply.
22.11.2023 - 07:28DROPS Design a répondu:
Dear Mrs Hunt, not sure even from your previous questions which size you are working, but casting off for armhole on each side (then only towards armhole after dividing for neck) and dividing + decreasing for neck will give you 24-33-33-34-34 sts left for shoulder. Happy knitting!
22.11.2023 - 09:15
![]() Sharon Hunt a écrit:
Sharon Hunt a écrit:
Hi Drops will be travelling and need to know the answer to this question. I would like yo knit this sleeve top down by picking up for the sleeve cap and following the pattern as written. Is this an impossible task. I know I could knit bottom up but want to avoid seeing. Thanks for responding. Sharon
17.11.2023 - 08:30DROPS Design a répondu:
Dear Mrs Hunt, you can probably adapt the pattern to work the sleeve top down, but we are unfortunately not able to adjust every pattern to every single request, do not hesitate to contact your yarn store for any further assistance. Thanks for your comprehension. Happy knitting!
17.11.2023 - 08:50
![]() Sharon Hunt a écrit:
Sharon Hunt a écrit:
Hi, am aking the pullover size 46,5 snd it states: Pullover): When the piece measures 36-44-45-46-47 cm bind off for armhole at each side every other row: 3 sts 1 time, 2 sts 3-1-2-4-5 times and 1 st 5-3-5-4-6 times. Question was how to decrease 3 sts? Thanks for responding Sharon
16.11.2023 - 17:48DROPS Design a répondu:
Dear Mrs Hunt, you won't have to decrease here but to cast off the stitches at the beginning of each row on each side, ie at the beginning of a row from RS and as the beginning of a row from WS. Happy knitting!
17.11.2023 - 08:47
![]() Sharon Hunt- Edwards a écrit:
Sharon Hunt- Edwards a écrit:
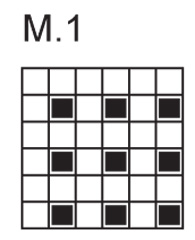
Hi! Started this sweater and decided to make it in the round. When I started M1 over 47 sts I ended with a purl st after the first row. Since am doing this in the round and not back and forth am wondering if I should start from the left instead og the right on the chart. Thanks for your help.
16.11.2023 - 07:34DROPS Design a répondu:
Dear Mrs Hunt-Edwards, it looks fine as you say, the diagram worked over 47 sts will start and end with a Purl stitch on 1st row (so that pattern is symmetrical), when working in the round, just work the stitches as they should be seen from RS, ie P1, K1 on first round and K all sts on every other round. Happy knitting!
16.11.2023 - 10:28
|
|||||||
Granite Ridge |
|||||||
|
|
|||||||
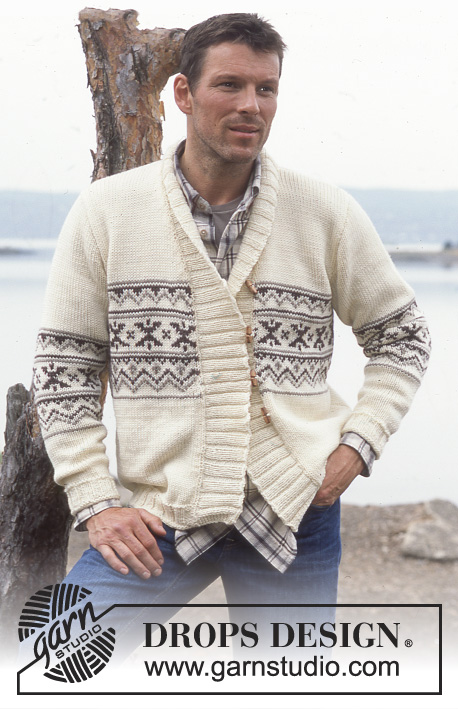
Pull tricoté avec ou sans manches, en DROPS Karisma
DROPS 85-16 |
|||||||
|
ÉCHANTILLON 21 m x 28 rangs = 10 x 10 cm en jersey avec les aiguilles 4 CÔTES : *1 m end, 2 m env* répéter de *à* POINT FANTAISIE : voir diagramme ci-dessous. Le diagramme est montré sur l’endroit. DIMINUTIONS pour les emmanchures du pull sans manches Toutes les diminutions se font sur l’endroit à 7 m du bord (sur l’end) : 1 m lis au point mousse, 1 m end, 2 m env, 1 m end, 2 m env Diminuer 1 m avant ces 7 m : glisser 1 m à l’end, 1 m end, passer la m glissée par-dessus la m tricotée Diminuer après ces 7 m : 2 m ens à l’end RÉALISATION DEVANT Avec les aiguilles 3 monter 95-104-113-122-131 m ; tricoter 3 rangs envers (1er rang = envers), puis continuer en côtes avec 1 m lis au point mousse de chaque côté (voir ci-dessus). A 5-6-6-6-6 cm de hauteur totale (ajuster de sorte que le rang suiv soit un rang end), tricoter 2 rangs end, ajuster sur le 1er rang le nombre de m à 95-103-113-121-131 m (augm ou diminuer selon le cas) Continuer avec les aiguilles 4 de la façon suivante : 1 m lis au point mousse, 25-28-32-36-40 m jersey, M1 sur les 43-45-47-47-49 m suivantes, 25-28-32-36-40 m suiv en jersey et 1 m lis au point mousse. A 10 cm de hauteur totale, augm 1 m de chaque côté 6 fois tous les 4-5-5-5-5 cm = 107-115-125-133-143 m. Lire attentivement la suite avant de continuer Emmanchure (pull sans manches) : à 34-42-43-44-45 cm de hauteur totale, tricoter ainsi sur les 13 m de chaque côté (vu sur l’endroit) : 1 m lis au point mousse, *1 m end, 2 m env* répéter de *à* 4 fois (tricoter les autres m comme avant). A 36-44-45-46-47 cm de hauteur totale, rabat 6 m de chaque côté pour les emmanchures, puis 8-2-6-9-13 fois 1 m tous les 2 rangs (voir diminutions ci-dessus). Emmanchure (pull avec manches) : à 36-44-45-46-47 cm de hauteur totale, rabat de chaque côté tous les 2 rangs : 1 fois 3 m, 3-1-2-4-5 fois 2 m et 5-3-5-4-6 fois 1 m. Encolure : EN MÊME TEMPS, à 36-44-44-46-46 cm de hauteur totale, rabat les 17 m centrales pour l’encolure. Terminer chaque côté séparément. 1er côté = 31-41-42-43-44 m Continuer en jersey et M1 sur les 13-14-15-15-16 m du milieu devant. A 45-53-55-56-57 cm de hauteur totale, diminuer 1 m côté encolure 7-8-9-9-10 fois tous les 4 rangs. Quand toutes les diminutions de l’emmanchure et de l’encolure sont faites, on obtient 24-33-33-34-34 m pour l’épaule. Continuer en jersey et point fantaisie (pour la veste : avec 7 m en côtes côté emmanchure). A 56-66-68-70-72 cm de hauteur totale, rabat toutes les m. 2ème côté : tricoter comme pour le 1er côté mais en sens inverse. DOS Monter et tricoter comme pour le devant, mais ne pas faire M1. Former les emmanchures comme pour le devant = 79-99-101-103-105 m. A 54-64-66-68-70 cm de hauteur totale, rabat les 27-29-31-31-33 m centrales pour l’encolure, puis dim 2 fois 1 m tous les 2 rangs = 24-33-33-34-34 m pour chaque épaule. A 56-66-68-70-72 cm de hauteur totale, rabat toutes les m. MANCHES (pull avec manches) Avec les aiguilles 3 monter 47-50-50-53-53 m, tricoter 3 rangs envers (1er rang = envers), puis continuer en côtes avec 1 m lis de chaque côté –voir ci-dessus. A 4-5-5-5-5 cm de hauteur totale –ajuster de sorte que le rang suiv soit un rang sur l’end- tricoter 2 rangs endroit et continuer en jersey sur les aiguilles 4. A 9-13-9-9-13 cm de hauteur totale, augm 1 m de chaque côté 15-17-20-20-23 fois tou les 2.5-2-2-2-1.5 cm = 77-84-90-93-99 m A 46-49-49-50-50 cm de hauteur totale, rabat de chaque côté tous les 2 rangs : 1 fois 4 m, 2-3-3-3-3 fois 3 m, 1-1-2-2-2 fois 2 m et 7-2-4-5-8 fois 1 m, puis 2 m jusqu’à 55-56-58-60-62 cm de hauteur totale, puis 1 fois 3 m. Rabat les m restantes. La manche mesure env 56-57-59-61-63 cm de hauteur totale. ASSEMBLAGE Coudre les épaules. Col : avec l’aiguille circulaire 3 relever autour de l’encolure en commençant à gauche des 17 m rabattues du milieu devant env 127-163 m (nbe multiple de 3 + 1), arrêter à droite des 17 m rabattues au milieu devant. Tricoter en allers retours ainsi : 1 rang end surl’env, monter 1 nouvelle m de chaque côté (=m lisière)= 129-165 m Puis continuer ainsi sur l’end : 1 m lis au point mousse, 1 m end, *2 m env, 1 m end* répéter de *à* et terminer par 1 m lis au point mousse. Mettre un marqueur à la 23-23-26-26-29ème m de chaque côté (= 1 m end sur l’end) A 3.5 cm de hauteur totale de col, augmenter 2 m env de chaque côté des m avec les marqueurs (on a 3 m env) = 133-169 m. Tricoter 2 rangs endroit sur toutes les m, et rabat souplement. Coudre les bordures du col aux 17 m du milieu devant. Pull avec manches : assembler les manches, coudre les manches et les côtés dans les m lisières Pull sans manches : Coudre les côtés dans les m lisières. |
|||||||
Légende diagramme(s) |
|||||||
|
|||||||
 |
|||||||
 |
|||||||
Vous avez terminé ce modèle?Alors taguez vos photos avec #dropspattern ou bien présentez-les dans la galerie #dropsfan Vous avez besoin d'aide pour ce modèle ?Vous trouverez 19 tutoriels vidéo, une rubrique commentaires/questions et plus encore en vous rendant sur la page du modèle sur garnstudio.com © 1982-2026 DROPS Design A/S. Tous droits réservés. Ce document, y compris ces sous-sections, est protégé par les droits d'auteur (copyright). Apprenez-en davantage sur ce que vous pouvez faire avec nos modèles en bas de chacune des pages de notre site. |
|||||||


Avec plus de 40 ans dans la conception de modèles tricot et crochet, DROPS Design offre l'une des plus vastes collections de modèles gratuits sur internet - traduits dans 17 langues. À ce jour, on compte 324 catalogues et 12290 modèles en français.
Nous nous efforçons de vous apporter le meilleur de ce que le tricot et le crochet peuvent vous offrir, inspiration et conseils mais également des fils de haute qualité à des prix incroyables! Vous souhaiteriez utiliser nos modèles autrement que pour un usage personnel? Vous pouvez lire ce que vous êtes autorisés à faire dans le Copyright en bas de page de chacun de nos modèles. Bon tricot!
Poster un commentaire sur le modèle DROPS 85-16
Nous aimerions connaître votre avis sur ce modèle !
Si vous souhaitez poser une question, merci de bien vouloir vérifier que vous avez choisi la bonne catégorie dans le formulaire ci-dessous afin d'accélérer la réponse. Les champs obligatoires sont indiqués par une *.