
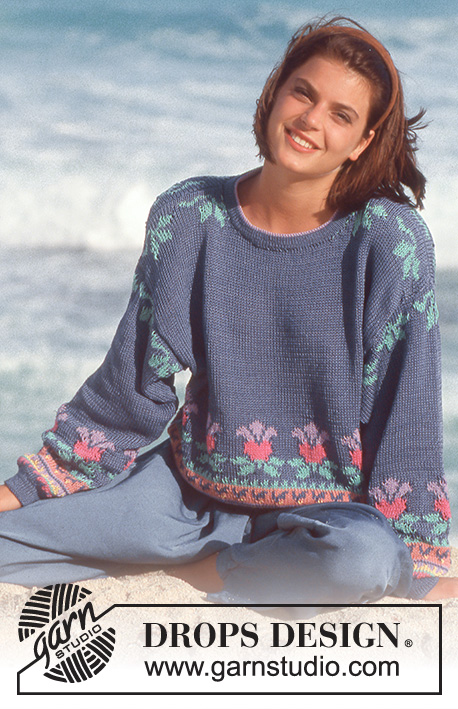
Catégories populaires
Vous cherchez un fil?


Commentaires / Questions (12)
![]() Clare a écrit:
Clare a écrit:
Hi, can you please let me know if this pattern can be updated to include larger sizes ? Like up to XXXL
21.01.2024 - 19:26
![]() Lynne Randall Caloggero a écrit:
Lynne Randall Caloggero a écrit:
I haven't begun to knit the project yet, but as I read through the instructions I'm wondering why it's necessary to shift M.1 half a pattern repeat to the right on every other row?
01.07.2020 - 15:30DROPS Design a répondu:
Dear Mrs Randall Caloggero, you will displace the diagrams so that the flowers are note the one over each other but one flower will come over 2 from previous diagram. Happy knitting!
01.07.2020 - 15:43
![]() Debra a écrit:
Debra a écrit:
Hi, I have another question about the directions. I am working on the sleeve and am almost finished. I have cast off 10 sts mid underarm, ready to work back and forth on the needles. It says to decrease 6 sts 3 times on every other row. Where do I place these decreases- at the beginning, middle, end of row or equally spaced out across the row? Please clarify for me. Thanks for all your help so far.
20.06.2020 - 01:38DROPS Design a répondu:
Dear Debra, after you have cast off 10 sts on mid under arm, you continue back and forth casting off (you don't decrease, pattern will be updated) 6 sts at the begining of every row on each side a total of 3 times (= 6 sts at the beg of next 6 rows). Happy knitting!
22.06.2020 - 07:37
![]() Debra a écrit:
Debra a écrit:
I am working on the sleeve and am questioning the instructions. Do I work M1 just once and then change to M2 as soon as it's completed or do I continue with M1 repeated several times until I have 122 sts and then switch to M2 once all 122 sts are made?
17.06.2020 - 19:41DROPS Design a répondu:
Dear Debra, diagram M.1 is worked only one time in height (but around all stitches in the round - make sure to center a diagram mid on top of sleeve), then you work M.2 (both in width and height) to the end of sleeve. Happy knitting!
18.06.2020 - 09:37
![]() Debra a écrit:
Debra a écrit:
Thanks for your answer but I am still unsure about the meaning of decreasing 2 sts 2 times and 1 st 2 times. Is that all in one row and consecutively cast off. Why doesn't it just say cast off 6 stitches? Maybe I'm not understanding and making it more complicated than it is. Please help clear this up for me.
05.06.2020 - 18:08DROPS Design a répondu:
Dear Debra, you don't cast off 6 sts 1 time to make the neck line somewhat rounded. You have to cast off the sts for neckline at the beg of row from neck towards armhole, then work row to the end, turn and work next row and repeat this 2 rows until all sts are cast off (you repeat these 2 rows 2 times casting off 2 sts at the beg of row then repeat 2 times castinf off 1 st at the beg of row). Happy knitting!
08.06.2020 - 07:35
![]() Debra a écrit:
Debra a écrit:
Can you give me more explicit details on how to shape the front neckline? I don't know what you mean by decrease 2 sts 2 times , 1 st 2 times. Are these all in the same row?How many stitches will I be decreasing in total? I assume I will be using the knit 2 together technique to do these decreases.
05.06.2020 - 02:08DROPS Design a répondu:
Dear Debra, you first cast off the middle 41 sts for neck and finish each shoulder separately, at the beginning of every row from neck towards armhole (from RS on one shoulder, from WS on the other shoulder), you will cast off (will looks nicer than decrease): 2 sts 2 times and 1 stitch 2 times = you have cast off a total of 6 sts towards neck. Happy knitting!
05.06.2020 - 07:41
![]() Debra a écrit:
Debra a écrit:
Ughhh, I have already knitted one complete diagram as before the edits. Do you know if I can continue on pearling as the original pattern and just turn the garment inside out when finished so the knit side shows? Or is there a way to retread the stitches on the needle ? Or do I have to rip it all out and begin again? Please tell me what you think.
25.05.2020 - 23:14DROPS Design a répondu:
Dear Debra, you could turn your work inside outside so that the knit side will be now towards outside (= from RS) and the purl side inside (from WS) - just do this at at the beg of the round - you might also continue working with purled sts outside and then just turn inside outside when dividing piece for armholes; Happy knitting!
26.05.2020 - 08:47
![]() Debra a écrit:
Debra a écrit:
Hi, Can you please give me some details as to how to shift the diagram half a pattern repeat to the right. Would I begin the rows on stitch 13 ? Thanks for your help.
24.05.2020 - 16:07DROPS Design a répondu:
Dear Debra, when working the 2nd M.1 in height, you can start the round with the 13rd stitch and then repeat M.1 and finish round with the 12th stitch. On 3rd repeat, start again as before and continue like this. Happy knitting!
25.05.2020 - 09:53
![]() Debra a écrit:
Debra a écrit:
This pattern diagram is starting with a pearl row and the rose is done in knit stitch. Will this mean the right side of the sweater has the pearl side facing out? in the sweater photo, it looks like the main body is stocking stitch with the knitted side showing and the rose in pearls. Can you please help? Did I do something wrong to have the right side out showing pearl stitch?
23.05.2020 - 19:36DROPS Design a répondu:
Dear Debra, diagram text has been reversed - it has been edited now, thanks for your feedback - a white square should be a K stitch and a small black square a P - Happy knitting!
25.05.2020 - 09:06
![]() Debra Briere a écrit:
Debra Briere a écrit:
I am confused with the instructions for the moss stitch pattern. It says to repeat second row but I am thinking it should say repeat these 2 rows of K1P1 over P1K1. Can you please clarify this for me?
22.05.2020 - 05:35DROPS Design a répondu:
Hi Debra, Row 2 says to knit over purl and purl over knit, which is then repeated in the following rows - so all rows consist of knit over the previous row's purl and purl over the previous row's knit. I hope this helps and happy knitting!
22.05.2020 - 07:49
|
||||||||||
DROPS 29-22 |
||||||||||
|
|
||||||||||
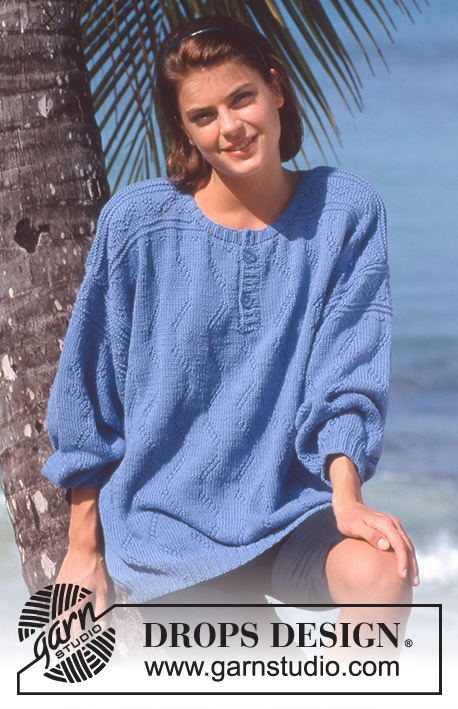
Pull DROPS avec fleurs en point structuré en "Muskat". Taille M
DROPS 29-22 |
||||||||||
|
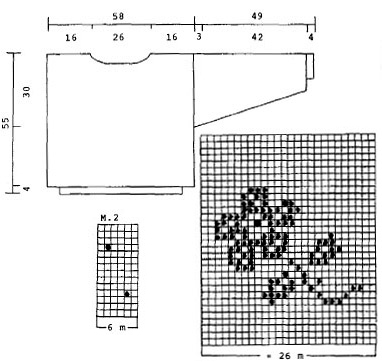
POINT FANTAISIE : Voir diagrammes ci-dessous. Les diagrammes montrent les motifs sur l'end. POINT de RIZ : R 1 : *1 m end, 1 m env * répéter de * à * R 2 : Tricoter les m end à l'envers et les m env à l'end Répéter le rang 2. VERSION LONGUE : Prévoir 100 g de fil en plus. Augmenter toutes les mesures de 14 cm, soit une hauteur totale de 69 cm. DOS & DEVANT : Se tricotent en rond sur aiguille circulaire. Monter 188 m avec les aiguilles 2.5 et tricoter 4 cm point de riz. Continuer avec les aiguilles 4, EN MÊME TEMPS répartir 46 augmentations au 1er tour = 234 m. Tricoter M.1, mais tous les 2 tours, décaler M1 d'un demi-motif à droite. PENSER À BIEN CONSERVER LA MÊME TENSION QUE POUR L'ÉCHANTILLON ! À 25 cm de hauteur totale, diviser l'ouvrage en 2 et terminer le devant et le dos séparément. Devant : = 117 m. À 50 cm de hauteur totale, rabattre les 41 m centrales pour l'encolure puis tous les 2 rangs côté encolure : 2 fois 2 m et 2 fois 1 m. Rabattre à 55 cm de hauteur totale. Dos : = 117 m. À 53 cm de hauteur totale, rabattre les 49 m centrales pour l'encolure puis 2 m côté encolure au rang suivant. Rabattre comme indiqué pour le devant. MANCHES : Se tricotent en rond sur aiguilles doubles pointes. Monter 46 m avec les aiguilles doubles pointes 2,5 et tricoter 4 cm point de riz. Continuer avec les aiguilles 4, EN MÊME TEMPS répartir 14 augmentations au 1er tour = 60 m. Tricoter M.1 (centrer 1 motif sur la manche) et, en même temps, augmenter 2 m sous la manche 31 fois au total tous les 3 tours = 122 m (tricoter les augmentations en point fantaisie au fur et à mesure). Après M.1 continuer en suivant M.2. À 46 cm de hauteur totale, rabattre 10 m sous la manche et terminer en allers retours en rabattant de chaque côté tous les 2 rangs 3 fois 6 m. Rabattre à 49 cm de hauteur totale. ASSEMBLAGE : Coudre les épaules. Relever environ 102 m autour de l'encolure avec les aiguilles doubles pointes 2,5 et tricoter 4 tours point de riz, rabattre. Crocheter la bordure suivante autour de l'encolure avec le crochet 3 : 1 ms, *3 ml, 1 B dans la 1ère ml, sauter 2 m, 1 ms*, répéter de *-*. Monter les manches. |
||||||||||
Légende diagramme(s) |
||||||||||
|
||||||||||
 |
||||||||||
Vous avez terminé ce modèle?Alors taguez vos photos avec #dropspattern ou bien présentez-les dans la galerie #dropsfan Vous avez besoin d'aide pour ce modèle ?Vous trouverez 26 tutoriels vidéo, une rubrique commentaires/questions et plus encore en vous rendant sur la page du modèle sur garnstudio.com © 1982-2026 DROPS Design A/S. Tous droits réservés. Ce document, y compris ces sous-sections, est protégé par les droits d'auteur (copyright). Apprenez-en davantage sur ce que vous pouvez faire avec nos modèles en bas de chacune des pages de notre site. |
||||||||||


Avec plus de 40 ans dans la conception de modèles tricot et crochet, DROPS Design offre l'une des plus vastes collections de modèles gratuits sur internet - traduits dans 17 langues. À ce jour, on compte 324 catalogues et 12290 modèles en français.
Nous nous efforçons de vous apporter le meilleur de ce que le tricot et le crochet peuvent vous offrir, inspiration et conseils mais également des fils de haute qualité à des prix incroyables! Vous souhaiteriez utiliser nos modèles autrement que pour un usage personnel? Vous pouvez lire ce que vous êtes autorisés à faire dans le Copyright en bas de page de chacun de nos modèles. Bon tricot!
Poster un commentaire sur le modèle DROPS 29-22
Nous aimerions connaître votre avis sur ce modèle !
Si vous souhaitez poser une question, merci de bien vouloir vérifier que vous avez choisi la bonne catégorie dans le formulaire ci-dessous afin d'accélérer la réponse. Les champs obligatoires sont indiqués par une *.