
Catégories populaires
Vous cherchez un fil?


Commentaires / Questions (30)
![]() E-L Karlsson-Bäcker a écrit:
E-L Karlsson-Bäcker a écrit:
Hej! Jag stickar storlek L. Har ökat en maska på bakstycket å då stämmer diagrammet. Men hur börjar jag framstycket ? Lika som bakstycket med de 5 sista i diagrammet? Tacksam för svar. Mvh, Eva-Lotta
04.04.2026 - 12:50DROPS Design a répondu:
Hej, framstycket stickas som bakstycket :)
09.04.2026 - 13:58
![]() Sally Ann a écrit:
Sally Ann a écrit:
Der er angivet for lidt garn i opskriften, har købt til største og strikket s/m jeg mangler ca 100g mørkt..
02.02.2026 - 09:03
![]() Sally Ann a écrit:
Sally Ann a écrit:
Højre og venstre hjerte i mønsteret er ikke ens, i højre side 4 mørke masker og i venstre 5 mørke i række 11..
28.01.2026 - 11:28
![]() Lemesle Rachel a écrit:
Lemesle Rachel a écrit:
Combien de pelote pour taille L je n' ai pas vue dans les explications merci
29.10.2025 - 12:01DROPS Design a répondu:
Bonjour Mme Lemesle, retrouvez les quantités nécessaires pour chaque taille en haut de page, soit en taille femme M/L (1ère taille) ou en taille M/L homme (2ème taille dans les parenthèses); divisez la quantité indiquée pour chaque couleur par 50 pour avoir le nombre de pelotes de chaque couleur. Bon tricot!
30.10.2025 - 18:36
![]() Emma a écrit:
Emma a écrit:
For the sleeves, it says to increase 2 stitches mid under arm on every 3rd row. Should these 2 new stitches be placed near each other? Near the beginning and end of the row? Or should they be spaced apart?
02.06.2025 - 05:03DROPS Design a répondu:
Hi Emma, The sleeves are worked in the round (not in rows back and forth) and you increase before and after the first stitch at the beginning of the round, so all the increases stay mid-under the sleeve. Regards, Drops team.
02.06.2025 - 06:31
![]() Rachel Frizzell Henige a écrit:
Rachel Frizzell Henige a écrit:
On the bottom of the 2nd page of the instructions under "Front Piece" it says "bind off to shape the neckline at the beginning of every row from mid front: 1 st 2 times." Can you explain more about where I should be binding off? Is it from the medial side of each shoulder? Or the lateral side of each shoulder? What does 1st 2 times mean?
19.05.2025 - 05:41DROPS Design a répondu:
Hi Rachel, You bind off mid-front (or medially as you say). You work the first row and bind off 1 stitch for the neckline, turn and work back, then bind off 1 stitch when you work the 3rd row = 1 stitch x 2. Hope this helps. Regards, Drops Team.
19.05.2025 - 06:54
![]() Pola a écrit:
Pola a écrit:
Are there any mire comprehensive instructions for knitting the sleeves? The instructions are not clear to me.
12.04.2025 - 18:48DROPS Design a répondu:
Dear Pola, for the sleeves, start in black and work 8 cm in rib with the 3mm needles. Change to 5.5mm needles and work in stocking stitch. In the first row in stocking stitch increase 12 (10-10) sts evenly. Then start increasing in the mid-under sleeve as stated for your size: either *1 increase round, 1 normal round, 1 increase round, 2 normal rounds*, that is, every 2nd and 3rd round alternately, or just every 3rd round (1 increase round, 2 normal rounds). As you increase the number of times necessary for your garment, when the piece measures 35 (43-41) cm, work 1 round in off white, work the full colourwork pattern and 1 round in off white. Happy knitting!
14.04.2025 - 00:28
![]() Rachel a écrit:
Rachel a écrit:
I have 208 stitches cast on for the M/L sweater. After I divide my work and inc 1 stitch each side I'll have 210 stitches total. 210 is not divisible by the 24 stitches needed for the pattern repeat. How do I evenly distribute the 24 stitch pattern on 210 stitches? Even if I leave out the 1 stitch increase I'll have 208 stitches which is still not divisible by 24.
21.02.2025 - 07:09DROPS Design a répondu:
Dear Rachel, you have 208 sts before dividing piece, then you divide in 2 = 104 sts for each piece and increase 1 stitch on the right side (not on both sides, a correction will come) so that you get 105 sts and both front piece and back piece will be then same. Happy knitting!
21.02.2025 - 13:48
![]() Rachel a écrit:
Rachel a écrit:
Hi! I have 2 questions about "Body Piece". 1: It says "K until project measures 33 cm, then start snowflake pattern. K until project measures 35 cm then divide work", does it mean that I start knitting the pattern, then divide my project into a front and back panel when I'm only halfway through knitting the pattern?
21.02.2025 - 07:07DROPS Design a répondu:
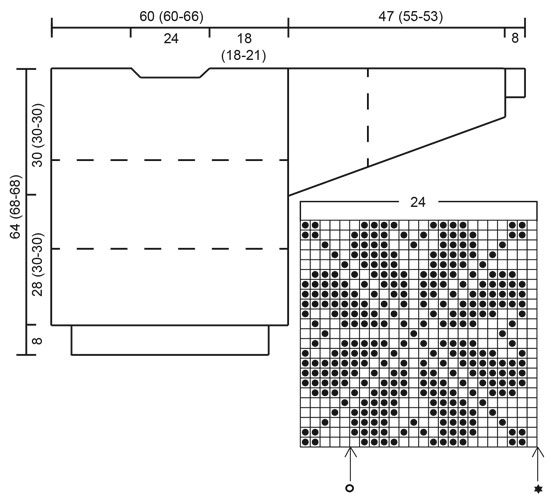
Dear Rachel, 1. you first work stocking stitch (= knit every round) until piece measures 33 cm from cast-on edge. then start working the pattern: work diagram starting from the star / circle (see diagram text) and work the half of piece/stitches then repeat over the 2nd half of piece, pattern will not match on the side but front and back pieces should be the same. When piece measures 38 cm, divide piece in 2 to finish back piece and front piece separately. Happy knitting!
21.02.2025 - 13:47
![]() Ann-Mary a écrit:
Ann-Mary a écrit:
Traveler nDROPS trøje i Alaska med nordisk stjernebort midt på ryg-n nJeg vil gerne strikke denne, men min mand ønsker kun mønsteret i hvidt, resten skal være sort, har i en ide om hvordan garn fordelingen så skal være i den største str Venlig hilsen Ann-Mary Henriksen
13.03.2024 - 17:41
|
|||||||||||||
Traveler |
|||||||||||||
 |
 |
||||||||||||
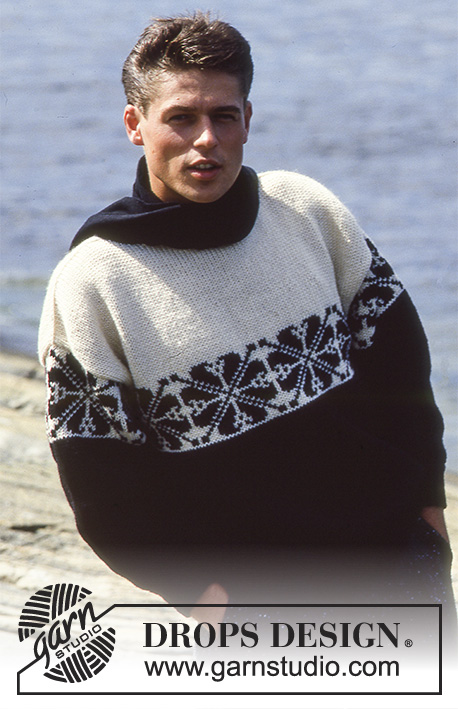
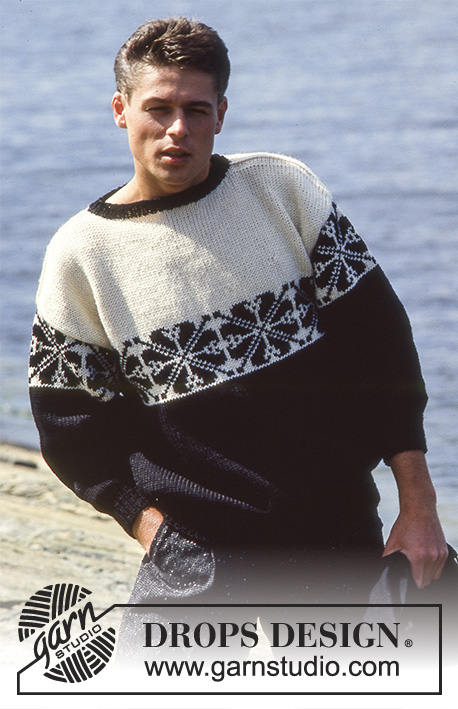
Pull tricoté en DROPS Alaska avec jacquard étoiles. Pour femme et homme. Du S au L.
DROPS 8-12 |
|||||||||||||
|
CÔTES : * 1 m end, 1 m env *, répéter de *-*. JACQUARD : Voir diagramme. Le diagramme montre tous les rangs du motif, vus sur l'endroit et se tricote entièrement en jersey. DOS & DEVANT : Se tricotent en rond sur aiguille circulaire. Monter 160 (170-176) m avec l'aiguille circulaire 3 en noir et tricoter 8 cm de côtes. Continuer avec l'aiguille circulaire 5.5 en jersey, EN MÊME TEMPS répartir 32 (22-32) augmentations au 1er tour = 192 (192-208) m. À 31 (33-33) cm de hauteur totale, tricoter 1 tour blanc puis 1 fois le jacquard – tricoter le jacquard sur le devant puis en sens inverse (miroir) sur le dos. EN MÊME TEMPS à 34 (38-38) cm de hauteur totale, diviser l'ouvrage en 2 et terminer le devant et le dos séparément. Dos : Monter 1 m à droite pour que les motifs soient identiques des 2 côtés = 97 (97-105) m. Continuer le jacquard. Après le jacquard, terminer l'ouvrage en blanc. À 62 (66-66) cm de hauteur totale, glisser en attente pour l'encolure les 35 m centrales sur un arrêt de mailles et terminer chaque côté séparément. Rabattre 1 m côté encolure au rang suivant. Rabattre les 30 (30-34) m restantes pour l'épaule à 64 (68-68) cm de hauteur totale. Devant : Continuer comme pour le dos, mais glisser en attente pour l'encolles les 33 m centrales à 60 (64-64) cm de hauteur totale. Rabattre pour l'encolure au début de chaque rang à partir du milieu devant : 2 fois 1 m. Rabattre les 30 (30-34) m restantes pour l'épaule à 64 (68-68) cm de hauteur totale. MANCHES : Se tricotent en rond sur aiguilles doubles pointes. Monter 36 (38-40) m avec les aiguilles 3 en noir et tricoter 8 cm de côtes. Continuer avec les aiguilles 5.5 en jersey, EN MÊME TEMPS répartir 12 (10-10) augmentations sur le 1er rang = 48 (48-50) m. Augmenter ensuite 2 m sous la manche 24 fois alternativement tous les 2 et 3 tours pour les tailles femme et 24-23 fois tous les 3 tours pour les tailles homme = 96 (96-96) m. En même temps, à 35 (43-41) cm de hauteur totale, tricoter 1 tour blanc puis 1 fois le jacquard et 1 tour blanc. Rabattre à 47 (55-53) cm de hauteur totale. ASSEMBLAGE : Coudre les épaules. Relever environ 80 m (y compris les mailles en attente) autour de l'encolure avec les aiguilles 3 en noir et tricoter 3 cm de côtes, rabattre. Assembler les manches. |
|||||||||||||
Légende diagramme(s) |
|||||||||||||
|
|||||||||||||
 |
|||||||||||||
Vous avez terminé ce modèle?Alors taguez vos photos avec #dropspattern ou bien présentez-les dans la galerie #dropsfan Vous avez besoin d'aide pour ce modèle ?Vous trouverez 27 tutoriels vidéo, une rubrique commentaires/questions et plus encore en vous rendant sur la page du modèle sur garnstudio.com © 1982-2026 DROPS Design A/S. Tous droits réservés. Ce document, y compris ces sous-sections, est protégé par les droits d'auteur (copyright). Apprenez-en davantage sur ce que vous pouvez faire avec nos modèles en bas de chacune des pages de notre site. |
|||||||||||||


Avec plus de 40 ans dans la conception de modèles tricot et crochet, DROPS Design offre l'une des plus vastes collections de modèles gratuits sur internet - traduits dans 17 langues. À ce jour, on compte 324 catalogues et 12290 modèles en français.
Nous nous efforçons de vous apporter le meilleur de ce que le tricot et le crochet peuvent vous offrir, inspiration et conseils mais également des fils de haute qualité à des prix incroyables! Vous souhaiteriez utiliser nos modèles autrement que pour un usage personnel? Vous pouvez lire ce que vous êtes autorisés à faire dans le Copyright en bas de page de chacun de nos modèles. Bon tricot!
Poster un commentaire sur le modèle DROPS 8-12
Nous aimerions connaître votre avis sur ce modèle !
Si vous souhaitez poser une question, merci de bien vouloir vérifier que vous avez choisi la bonne catégorie dans le formulaire ci-dessous afin d'accélérer la réponse. Les champs obligatoires sont indiqués par une *.