
Catégories populaires
Vous cherchez un fil?


Commentaires / Questions (39)
![]() Wendy a écrit:
Wendy a écrit:
Is there a complete video somewhere for this fish Tale sweater knitting pattern
17.11.2025 - 22:09
![]() Yvonne a écrit:
Yvonne a écrit:
” när arb mäter 21,5-24,5-28,5 (31,5-34,5-37,5) cm stickas axel så här: Sätt 4 m mitt under ärmen på en tråd. Sätt sedan 8 m i varje sida på tråden på vartannat v 2 ggr. Sedan sätts alla m tillbaka på st och sticka M.1. Maska av efter M.1. Arb mäter ca 26-30-34 (37-40-43) cm.” Jag har stickat ärmen runt på strumpstickor/kort rundsticka. Är det meningen att slutet av ärmen enl ovan stickas fram och tillbaka och inte runt?
11.09.2025 - 19:26DROPS Design a répondu:
Ja, ärmkullen ska stickas fram och tillbaka. Du kan sticka fram och tillbaka på rundstickan.
23.09.2025 - 19:33
![]() Lone Essom a écrit:
Lone Essom a écrit:
Jeg forstår ikke jeres beskrivelse af mønster. Hvad mener I med mønster 1, 8 cm af mønster 2??? hvilket skal man starte med og hvor mange cm?
06.05.2025 - 12:39DROPS Design a répondu:
Hei Lona. Usikker på hvor du ser 1,8 cm. I oppskriften står det at du skal strikke 6-7-7,5 (7,5-8-8,5) cm av mønster M.2. På Ryg- og forstykke i f.eks str. 3/4 år skal du etter vrangborden bytte til rundpinne 5 og strikke glattstrikk til arbeidet måler 17 cm, så skal det strikkes Mønster ryg- og forstk. Mønster ryg- og forstk er forklart øverst i oppskriften = Strikk M.1 (6 omganger), så skal du strikke etter M.2 i 6 cm, strikk M.1 (6 omganger), M.2 i 6 cm, så enda en gang: M.1 (6 omganger), M.2 i 6 cm og avslutt Ryg- og forstykke med M. 1 før det felles av. mvh DROPS Design
12.05.2025 - 09:23
![]() Lulu Kamp a écrit:
Lulu Kamp a écrit:
Kan denne opskrift ikke fås til voksne mænd ?
18.04.2025 - 15:14
![]() Cécile a écrit:
Cécile a écrit:
Je ne comprends pas comment procéder pour le haut de la manche. ..comment utiliser le porte-maille? (2mailles de chaque côté, tricoter aller-retour, puis 8 mailles)
10.05.2024 - 15:36DROPS Design a répondu:
Bonjour Cécile, quand vous avez mis en attente 4 mailles sous la manche (= 2 mailles de chaque côté du milieu sous la manche), continuez en allers et retours et mettez en attente les 8 premières mailles au début des 4 rangs suivants (= 2 x 8 mailles + 1 x 2 mailles en attente de chaque côté). Bon tricot!
10.05.2024 - 16:38
![]() Ida a écrit:
Ida a écrit:
I am having trouble with these instructions….shape the sleeve cap as follows: put 2 sts on each side of the marker on a holder. Knit the sleeve cap back and forth on the needle placing sts at each edge on a holder every other row as follows: 8 sts 2 times. Then put all sts back on needle and knit Pattern 1.
03.04.2024 - 20:42DROPS Design a répondu:
Dear Ida, When you knit the upper part of the sleeve, you knit back and forth, and while doing that, at the beginning of each row, you put the number of stitches described on a stitch-holder (after you knitted them). Then you put all the stitches back to the circular needle, and continue with the pattern. I hope this helps. Happy Knitting!
03.04.2024 - 23:20
![]() Linda Mccoy a écrit:
Linda Mccoy a écrit:
When sewing in the Sleeve s is it done from wrong side or right side?
16.01.2023 - 21:37DROPS Design a répondu:
Dear Mrs Mccoy, sleeves are generally sewn from right side - see this video. Happy assembly!
17.01.2023 - 10:12
![]() Linda Mccoy a écrit:
Linda Mccoy a écrit:
Hello and Happy New year. This has got to be the worst pattern to follow. I have been reading patterns 50 yrs. I have never had a pattern that has stumped me like this one. I realise that this has been translated from another language. However maybe someone should rewrite it so people can understand what the pattern is saying. Thank you
04.01.2023 - 19:59
![]() Lisa Hertel a écrit:
Lisa Hertel a écrit:
Does this cap take place under the arm? i cannot figure this out. I have knitted this portion of the pattern 3 times. the graphic does not show a cap for shoulder it looks straight across. again may i ask what is the purpose of this?
19.12.2022 - 15:43DROPS Design a répondu:
Dear Mrs Hertel, this portion is the sleeve cap, is you will work short rows (leaving first 2 sts 1 time then 8 sts 2 times unworked on each side of mid under sleeve, ie the first 2+8+8 sts from mid under sleeve and the last 2-8-8 sts towards mid under sleeve (the middle 36 sts under sleeve the sleeve are on a thread, 16 sts on each side of mid under sleeve) - chart is just standard and just don't show this sleeve cap. Hope it can help. Happy knitting!
19.12.2022 - 15:59
![]() Lisa Hertel a écrit:
Lisa Hertel a écrit:
I followed the directions given to Mrs. Frew. The pattern was askew and the work was done under the arm. If it is a cap, shouldn't it be on the top near the shoulder? I am very confused
18.12.2022 - 19:16DROPS Design a répondu:
Dear Mrs Hertel, please let us know if the previous answer could help you or if you need more information.
19.12.2022 - 09:40
|
|||||||
Fish Tales |
|||||||
|
|
|||||||
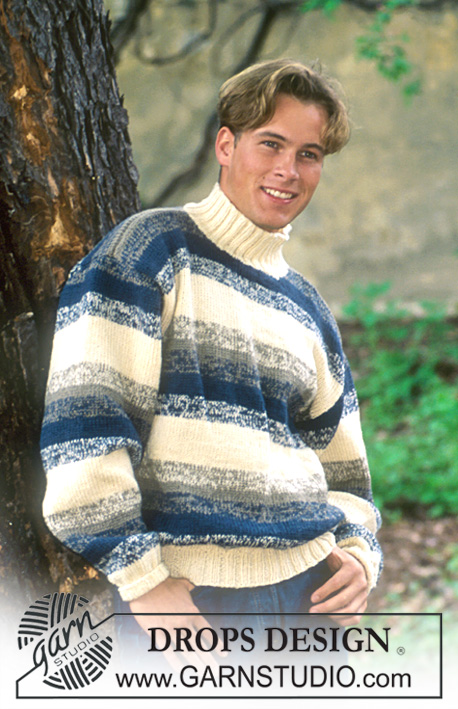
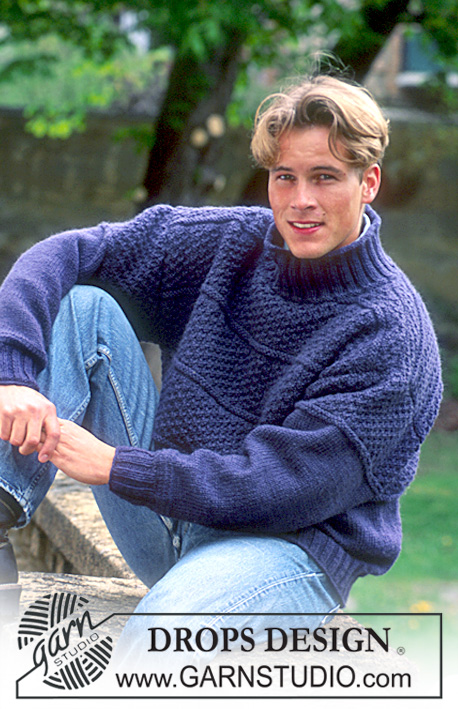
Chandail en Alaska
DROPS Children 7-5 |
|||||||
|
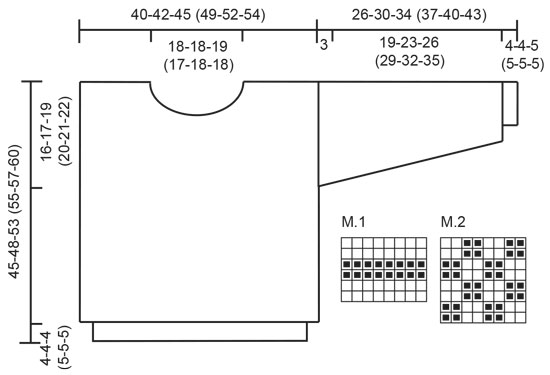
Échantillon: 17 mailles et 22 rangs sur les aiguilles 5 mm en jersey endroit = 10 x 10 cm [4" x 4"] Patron: Voir diagrammes. Un diagramme équivaut à une répétition du patron. Le patron est démontré sur l'endroit du travail. Les diagrammes sont placés à la verticale sur page. Le premier rang est au bas du diagramme. Instructions: Patron 1: * 2 rangs jersey endroit, 2 rangs jersey envers, 2 rangs jersey endroit * Patron 2: Rang 1: * 2 end, 2 env.* Rang 2: * 2 env., 2 end.* Rang 3: * 2 env., 2 end.* Rang 4: * 2 end., 2 env.* Répétez ces 4 rangs. Côtes: *2 end., 2 env.*. Répétez de * - *. Corps: Montez 136-144-152 (168-176-184) mailles avec l'aiguille circulaire 3,5 mm et le coloris bleu. Joindre, assurez-vous de ne pas tordre les mailles au premier rang. Placez un anneau marqueur à la jonction et tricotez 2 rangs en jersey endroit et ensuite tricotez en côtes jusqu'à ce que le travail mesure 4-4-4 (5-5-5) cm [1.5" - 1.5" - 1.5" (2» - 2» - 2»). Changez pour l'aiguille circulaire 5 mm et tricotez en jersey endroit. Lorsque le travail mesurera 17-17-20.5 (22.5-23-24.5) cm [6.75» - 6.75» - 8» (8.75» - 9» - 9-5/8»)], tricotez les diagrammes comme suit : Diagramme 1 une fois (6 rangs). Tricotez 6-7-7.5 (7.5-8-8.5) cm [2 38» - 2.75» - 3» (3» - 3-1/8» - 3.25») du diagramme 2. Tricotez le diagramme 1 une fois (6 rangs). Tricotez 6-7-7.5 (7.5-8-8.5) cm [2-3/8» - 2.75» - 3» (3» - 3-1/8» - 3.25»)] du diagramme 2. Tricotez le diagramme 1 une fois (6 rangs). Tricotez 6-7-7.5 (7.5-8-8.5) cm [2-3/8» - 2.75» - 3» (3» - 3-1/8» - 3.25»)] du diagramme 2. Tricotez le diagramme 1 une fois (6 rangs). Au même moment, lorsque le travail mesurera 29-31-34 (35-36-38) cm [11-3/8» - 12.25» - 13-3/8» (13.75» - 14-1/8» - 14-7/8")], divisez pour le devant et le dos et tricotez chaque partie séparément. Devant: 68-72-76 (84-88-92) mailles. Continuez à tricoter les diagrammes comme ci-haut. Lorsque le travail mesurera 41-44-49 (50-52-54) cm [16-1/8» - 17.25" - 19.25» (19.75" - 20.5» - 21.25»)], rabattre les 24-24-26 (22-24-24) mailles centrales pour l'encolure. Rabattre de chaque côté de l'encolure à tous les 2 rangs: 2 mailles 1 fois, 1 maille 1 fois. Rabattre après avoir complété le diagramme. Le travail mesurera environ 45-48-53 (55-57-60) cm [17.75» - 18-7/8» - 20-7/8» (21-5/8» - 22.5» - 23-5/8»)]. Dos: 68-72-76 (84-88-92) mailles. Continuez à tricotez les diagrammes comme pour le devant. Lorsque le travail mesurera 43-46-51 (53-55-58) cm [16-7/8» - 18-1/8» - 20" (20-7/8» - 21-5/8» - 22-7/8»)], rabattre les 26-26-28 (24-26-26) mailles centrales pour l'encolure. Rabattre 2 mailles de chaque côté de l'encolure au rang suivant. Rabattre après avoir complété le diagramme. Le travail devrait mesurer environ 45-48-53 (55-57-60) cm [17.75» - 18-7/8» - 20-7/8» (21-5/8» - 22.5» - 23-5/8»)]. Manches: Montez 30-32-32 (34-34-36) mailles avec le coloris bleu sur les aiguilles doubles pointes 3,5 mm. Joindre, assurez-vous de ne pas tordre les mailles au premier rang. Placez un anneau marqueur à la jonction et tricotez 2 rangs en jersey endroit et ensuite en côtes jusqu'à ce que le travail mesurera 4-4-5 (5-5-5) cm [1.5» - 1.5" - 2» (2» - 2» - 2»)]. Changez pour les aiguilles doubles pointes 5 mm et tricotez en jersey endroit en répartissant 4-6-8 (6-8-6) augmentations au premier rang. 34-38-40 (40-42-42) mailles. Au même moment, après les côtes, augmentez d'1 maille de chaque côté 10-10-12 (14-15-16) fois: Taille 3/4 ans: alternativement à tous les 3 et 4 rangs. Tailles 5/6 + 7/8 + 9/10 + 11/12 + 13/14 ans: alternativement à tous les 4 et 5 rangs = 54-58-64 (68-72-74) mailles. Lorsque le travail mesurera 15-18-21.5 (24.5-27-29.5) cm [5-7/8» - 7" - 8-3/8» (9-5/8» - 10-5/8» - 11 5/8»)], tricotez le diagramme 1 une fois et après 6-7-7.5 (7.5-8-8.5) cm [2-3/8» - 2.75» - 3» (3» - 3-1/8» - 3-3/8»)] du diagramme 2. Lorsque le travail mesurera 21.5-24.5-28.5 (31.5-34.5-37.5) cm [8-3/8» - 9-5/8» - 11-1/8» (12-3/8» - 13.5» - 14.75»)] formez le haut de la manche comme suit: mettre 2 mailles de chaque côté de l'anneau marqueur sur un porte-mailles. Tricotez le haut de la manche en aller-retour sur l'aiguille en plaçant les mailles de chaque côté sur le porte-mailles à tous les 2 rangs comme suit : 8 mailles 2 fois. Ensuite remettre les mailles du porte-mailles sur l'aiguille et tricotez le diagramme 1. Rabattre après le diagramme 1. Le travail devrait mesurer environ 26-30-34 (37-40-43) cm [10.25» - 11.75» - 13-3/8» (14.5" - 15.75» - 16-7/8»)]. Assemblage: Coudre les coutures d'épaule. Relevez environ 72-84 mailles avec le coloris bleu autour de l'encolure avec l'aiguille circulaire 3,5 mm, 2 rang envers, ensuite tricotez 4-4-5 (5-6-6) cm [1.5" - 1.5" - 2» (2» - 2-3/8» - 2-3/8»)] en côtes et ensuite 2 rangs en jersey endroit. Rabattre. Coudre les manches. |
|||||||
Légende diagramme(s) |
|||||||
|
|||||||
 |
|||||||
Vous avez terminé ce modèle?Alors taguez vos photos avec #dropspattern ou bien présentez-les dans la galerie #dropsfan Vous avez besoin d'aide pour ce modèle ?Vous trouverez 19 tutoriels vidéo, une rubrique commentaires/questions et plus encore en vous rendant sur la page du modèle sur garnstudio.com © 1982-2026 DROPS Design A/S. Tous droits réservés. Ce document, y compris ces sous-sections, est protégé par les droits d'auteur (copyright). Apprenez-en davantage sur ce que vous pouvez faire avec nos modèles en bas de chacune des pages de notre site. |
|||||||


Avec plus de 40 ans dans la conception de modèles tricot et crochet, DROPS Design offre l'une des plus vastes collections de modèles gratuits sur internet - traduits dans 17 langues. À ce jour, on compte 324 catalogues et 12290 modèles en français.
Nous nous efforçons de vous apporter le meilleur de ce que le tricot et le crochet peuvent vous offrir, inspiration et conseils mais également des fils de haute qualité à des prix incroyables! Vous souhaiteriez utiliser nos modèles autrement que pour un usage personnel? Vous pouvez lire ce que vous êtes autorisés à faire dans le Copyright en bas de page de chacun de nos modèles. Bon tricot!
Poster un commentaire sur le modèle DROPS Children 7-5
Nous aimerions connaître votre avis sur ce modèle !
Si vous souhaitez poser une question, merci de bien vouloir vérifier que vous avez choisi la bonne catégorie dans le formulaire ci-dessous afin d'accélérer la réponse. Les champs obligatoires sont indiqués par une *.