
Popular categories
Looking for a yarn?


Comments / Questions (18)
![]() Jacqueline Timmermans wrote:
Jacqueline Timmermans wrote:
Als a-b aan beide kanten aan elkaar genaaid worden, blijft een lang driehoekige punt over. Ik zie dat niet op de foto van het model. Waar is die punt dan?
17.02.2021 - 22:06
![]() Anne Mette wrote:
Anne Mette wrote:
Jeg har samme spørgsmål som den tyske strikker. Jeg forstår ikke helt, hvordan ponchoen skal monteres.? Vil du/I uddybe det lidt mere. Jeg synes også min "restspids" er meget spids og lang. Vedrørende montering så vil jeg høre om et godt tip til at hæfte ender? Jeg oplever, at mine ender "løsner" sig igen selv om jeg følger jeres instruktionsvideo, da maskerne jo er så store og grove. Tak for hjælpen
10.01.2021 - 19:25DROPS Design answered:
Hej Anne Mette, Vi har lavet skitsen og forklaringen i opskriften tydeligere :)
19.01.2021 - 15:00
![]() Kathrin wrote:
Kathrin wrote:
Wenn ich die abgeketteten Maschen mit den Anschlagsmaschen von oben A nach Mitte B zusammennähe, bleibt aber noch die Spitze der restlichen abgenommen Maschen übrig, da die Seitenlänge der abschrägung deutlich länger ist, als die Breite der aufgenommenen Maschen. Das funktioniert doch nicht oder mache ich etwas falsch??
07.01.2021 - 21:22DROPS Design answered:
Liebe Kathrin, Entschuldigung für die späte Antwort, ich wollte nur mit unserem Design Team mal prüfen, also ja, die Spitze kann man auf dem Bild nicht sehen, denn sie hinter (beim Rücken) ist, aber die angeschalgenen Maschen werden mit der diagonalen Seite zusammengenäht - eine neue Maßskizze kommt. Viel Spaß beim stricken!
11.01.2021 - 14:15
![]() Kathrin wrote:
Kathrin wrote:
Ich verstehe nicht, wie genau ich den Poncho zusammennähen soll. Die abgeschrägte Seite an die gerade Seite? Dann hängt die Spitze doch herunter. Bitte erklären Sie mir das. Danke!
06.01.2021 - 18:33DROPS Design answered:
Liebe Kathrin, beginnen Sie oben beim Poncho (= A in A.x) und nähen Sie zusammen die abgekettenen Maschen mit den angeschlagenen Maschen nach unten (= B in A.x), dh ungefähr nur die Hälfte in der Höhe. Viel Spaß beim zusammenstricken!
07.01.2021 - 09:43
![]() Gregorio Callegari wrote:
Gregorio Callegari wrote:
Buongiorno, i ferri consigliati per questo modello sono il n°20 mm ma sulla scheda del filato sono suggeriti il n°15 mm. C'è un errore oppure un motivo specifico per il quale si devono usare il n°20 mm? Grazie
28.11.2020 - 09:17DROPS Design answered:
Buonasera Gregorio, il poncho è lavorato con i ferri del 20 mm per renderlo più morbido. Buon lavoro!
28.11.2020 - 21:19
![]() Karin Holm wrote:
Karin Holm wrote:
Skynda er, vill sätta igång direkt!
01.09.2020 - 17:43
![]() Ann Kristin wrote:
Ann Kristin wrote:
Forslag til navn på modellen: Sassenach ( Outlander)
24.07.2020 - 09:14
![]() Birgitta Svaneblom wrote:
Birgitta Svaneblom wrote:
Hej . Den väntar jag på den är läcker
11.06.2020 - 14:31
|
||||
Collecting Pinecones#collectingpineconesponcho |
||||
 |
 |
|||
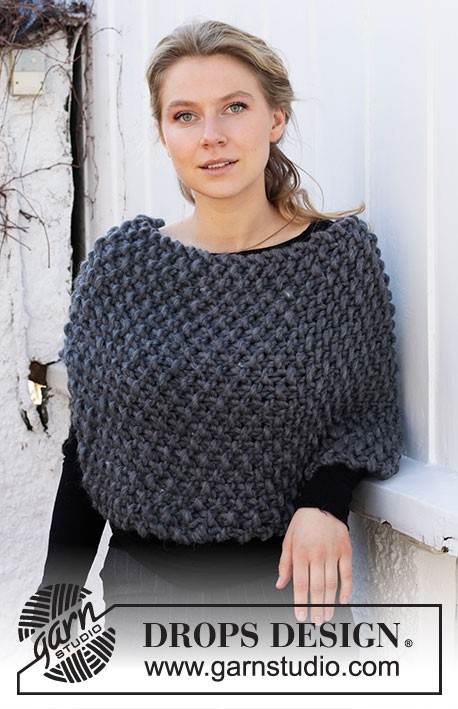
Knitted poncho in DROPS Polaris. The piece is worked back and forth in moss stitch. Sizes S - XL.
DROPS 214-47 |
||||
|
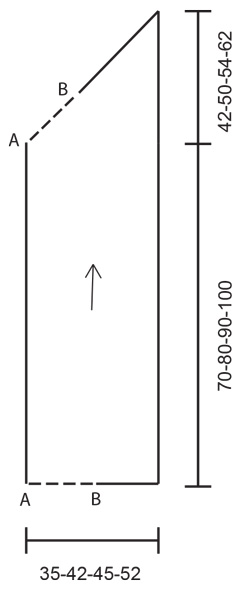
------------------------------------------------------- EXPLANATIONS FOR THE PATTERN: ------------------------------------------------------- MOSS STITCH: ROW 1: * Knit 1, purl 1 *, work from *-*. ROW 2: Knit over purl and purl over knit. Continue ROW 2 onwards. ------------------------------------------------------- START THE PIECE HERE: ------------------------------------------------------- PONCHO – SHORT OVERVIEW OF THE PIECE: The piece is worked back and forth with circular needle. When finished, the sides are sewn together, leaving a split on the sewn side. PONCHO: Cast on 21-25-27-31 stitches with circular needle size 20 mm and Polaris. Work MOSS STITCH back and forth – read description above. REMEMBER THE KNITTING TENSION! Work until the piece measures 70-80-90-100 cm from the cast-on edge. Now cast off stitches on one side of piece as follows: ROW 1: Knit 2 together, work moss stitch to end of row. ROW 2: Work moss stitch. Repeat ROWS 1 and 2 until there is 1 stitch left. Cut the strand and pull it through the last stitch. ASSEMBLY: Fold the piece so that the dotted lines (see sketch) are facing each other so that point A meets point A and point B meets point B. Start at point A and sew together down to point B (down approx. half the cast on edge) in the outermost loop of the outermost stitch along both edges. Cut and fasten the strand. |
||||
Diagram explanations |
||||
|
||||
|
||||
Have you finished this pattern?Tag your pictures with #dropspattern #collectingpineconesponcho or submit them to the #dropsfan gallery. Do you need help with this pattern?You'll find 11 tutorial videos, a Comments/Questions area and more by visiting the pattern on garnstudio.com. © 1982-2025 DROPS Design A/S. We reserve all rights. This document, including all its sub-sections, has copyrights. Read more about what you can do with our patterns at the bottom of each pattern on our site. |
||||


With over 40 years in knitting and crochet design, DROPS Design offers one of the most extensive collections of free patterns on the internet - translated to 17 languages. As of today we count 314 catalogues and 11820 patterns translated into English (UK/cm). 11820
We work hard to bring you the best knitting and crochet have to offer, inspiration and advice as well as great quality yarns at incredible prices! Would you like to use our patterns for other than personal use? You can read what you are allowed to do in the Copyright text at the bottom of all our patterns. Happy crafting!
Post a comment to pattern DROPS 214-47
We would love to hear what you have to say about this pattern!
If you want to leave a question, please make sure you select the correct category in the form below, to speed up the answering process. Required fields are marked *.