
Categorie popolari
State cercando un filato?


Commenti / Domande (34)
![]() Sue ha scritto:
Sue ha scritto:
Hi. I am using safran at the moment and I love it Is muskat the same type of cotton as safran and does it feel as soft as safran Many thanks From Sue
05.07.2018 - 01:04DROPS Design ha risposto:
Dea Sue, Muskat is somewhat thicker yarn, and unlike the Safran, it is made from mercerized cotton, which makes it a bit shinier, and slightly less soft. If you want to substitute yarn, please use our yarn concerter, and do not forget to knit or crchet, wash, bloch and measure a swatch. Happy Crafting.
05.07.2018 - 07:06
![]() Sue ha scritto:
Sue ha scritto:
Where’s the chart pattern is referring to
02.05.2018 - 22:28DROPS Design ha risposto:
Hi Sue! The chart pattern and diagrams are below, at the end of the pattern. Happy crocheting!
03.05.2018 - 07:52
![]() Sue ha scritto:
Sue ha scritto:
Thank you for your quite answer .... this will be my first garment I will be doing is it difficult... I wear size 12 USA and 5’8”, what size in your pattern should I use
02.05.2018 - 21:04DROPS Design ha risposto:
Dear Sue, for sizing please refer to the schematics you can find at the bottom of the pattern,eh drawing has all the dimension of the finished item. Happy Crafting!
03.05.2018 - 07:56
![]() Sue ha scritto:
Sue ha scritto:
Do you have a video for this sweater from start to finish
01.05.2018 - 18:33DROPS Design ha risposto:
Dear Sue, sorry but we do not have a video from start to finish, however, there are several tutprials to help you along the way. You can find the links at the left side of the page, under the modell's picture. Happy Crafting!
01.05.2018 - 21:03
![]() Nadia VB ha scritto:
Nadia VB ha scritto:
Ik begrijp het telpatroon voor het minderen bij de armsgaten niet. Volgens het diagram minder je slechts aan 1 kant, hoe gebeurt de andere zijde, spiegelbeeld lukt niet ?
03.02.2016 - 17:42DROPS Design ha risposto:
Hoi Nadia. Je mindert niet aan de eind van de toer, je keert het werk en begint dan met minderen aan de andere kant, dwz, je begint eigenlijk met minderen aan de andere kant een toer later.
04.02.2016 - 14:02
![]() Clara ha scritto:
Clara ha scritto:
Bonsoir, les nopes de ce modèle ne sont pas les mêmes que celles du vidéo?merci pour la réponse
04.05.2015 - 23:22DROPS Design ha risposto:
Bonjour Clara, effectivement ce ne sont pas les mêmes nopes, ici, on va tirer la boucle pour l'agrandir (1 cm environ), on répète 2 fois et on écoule les boucles sur le crochet en une seule fois. Bon crochet!
05.05.2015 - 09:54
![]() G.F. Braakhuis-van Wijland ha scritto:
G.F. Braakhuis-van Wijland ha scritto:
Bij de mouwen na 7 cm te hebben gehaakt moet je minderen. Volgens mij moet je meerderen, anders past het niet in de panden.
25.03.2015 - 20:52
![]() Cantryn ha scritto:
Cantryn ha scritto:
Kan nergens het haken van de nop vinden,verticaal lukt het maar de horizontale niet.
21.08.2014 - 18:30DROPS Design ha risposto:
Hoi Cantryn. Je haakt de horizontale nop op dezelfde manier als de verticale. Je haakt alleen in een andere steek - dus aan het begin van de toer 3 haak je 1 l, 1 v, 5 l, dan 1 nopje terug in de eerste v van het begin van de toer, 1 hv boven de nop van de vorige toer, 5 l enzovoort.
22.08.2014 - 11:56
![]() Karin Holm ha scritto:
Karin Holm ha scritto:
Jeg har ufatteligt svært ved at få dette mønster til at køre,- især når jeg når til 3 række hvor boblerne skal ligge ned, hækler jeg der 5 lm først og derefter boble? Hjælp
29.06.2014 - 20:46DROPS Design ha risposto:
Hej Karin. Ja, du skal haekle de 5 lm först og saa boblen tilbage i den förste fastmaske og 1 kaedemaske i boblen fra forrige omgang. Du haekler altsaa de horisontale blade i blomsten i raekke 3.
02.07.2014 - 10:33
![]() Gerda ha scritto:
Gerda ha scritto:
Vind dit erg leuk maar.......... snap niet hoe ik de nop moet maken !!!
14.02.2014 - 14:31DROPS Design ha risposto:
Hoi Gerda. Het is een beetje moeilijk helpen - ik heb geen video om te laten zien (het staat nu wel op de lijst), maar eigenlijk moet je letterlijk doen wat er staat, probeer eerst een proeflapje en oefen hoe je de nopjes maakt.
19.02.2014 - 11:24
|
||||||||||||||||
Tahitian Dream |
||||||||||||||||
|
|
||||||||||||||||
Top DROPS all’uncinetto, in "Muskat". Taglie: Dalla S alla XL.
DROPS 60-14 |
||||||||||||||||
|
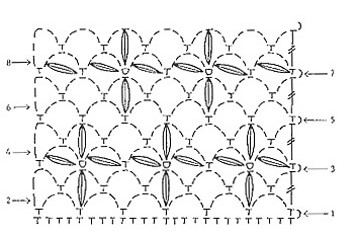
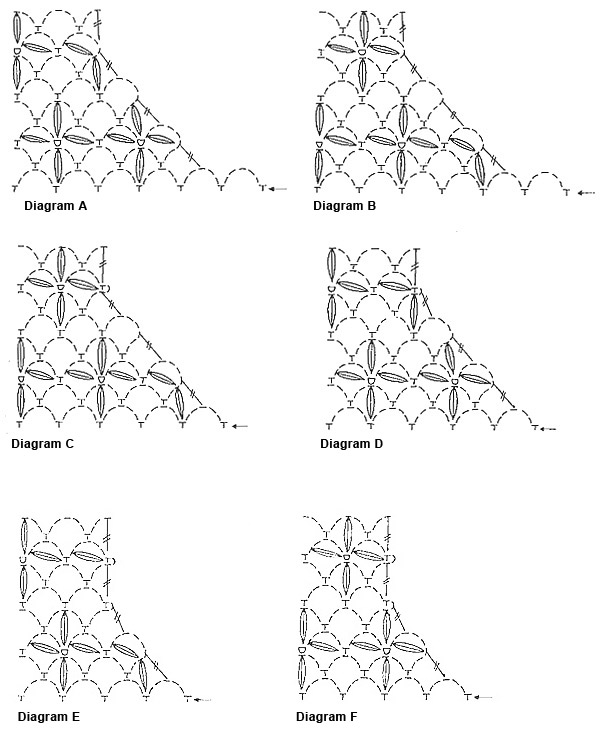
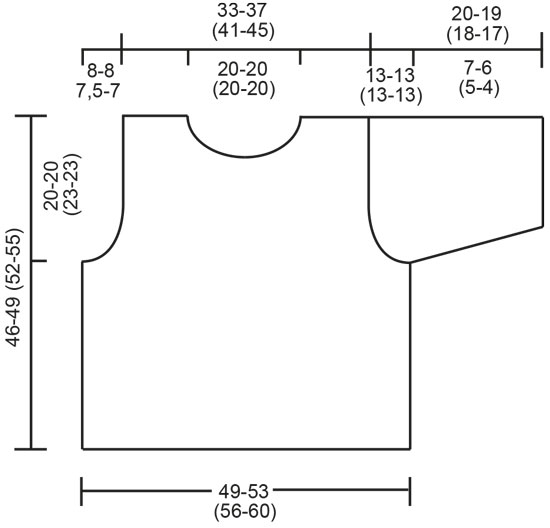
CAMPIONE: 8 m lavorate seguendo il motivo = 4 cm (1 ripetizione del motivo = 1 fiore). 20 m in larghezza x 3 fiori in altezza = 10 x 10 cm. MOTIVO: Vedere il diagramma. 1 ripetizione = 8 m. Il numero delle m deve essere divisibile per 8 + 1 m. Ripetere le righe 1 - 8. NOCCIOLINA: Puntare l’uncinetto nella m, estrarre il filo in modo che la maglia sia lunga ca. 1 cm, lavorare un’altra m in modo uguale, passare l’uncinetto attraverso tutte le m sull’uncinetto. -------------------------------------------------------- DAVANTI: Avviare 98-106 (114-122) cat. Lavorare 1 m.b nella 2a cat dall’uncinetto, poi lavorare 1 m.b in ogni cat = 97-105 (113-121) m.b. Proseguire seguendo il motivo - vedere il diagramma, ripetere le righe 1 - 8 (alla 3a riga = 12-13 (14-15) fiori). Quando il lavoro misura 26-29 (29-32) cm, lavorare gli scalfi. Seguire il diagramma per gli scalfi in base alla riga del motivo che state lavorando - se iniziate dalla prima riga del motivo, seguite il diagramma A; se iniziate dalla 5a riga del motivo seguite il diagramma B. Dopo gli scalfi, ci sono 8-9 (10-11) fiori alla 3° riga del motivo. Quando il lavoro misura 38-41 (44-47) cm – assicurarsi di aver terminato la prima riga o la 5a riga del motivo -- lavorare per le spalle da ciascun lato dei 2-3 (2-3) fiori centrali - vedere il diagramma per le spalle. Se avete completato la prima riga: Taglie S+L: seguite il diagramma C Taglie M+XL: seguite il diagramma E Se avete completato la 5a riga: Taglie S+L: seguite il diagramma D Taglie M+XL: seguite il diagramma F. Tagliare il filo. Il lavoro misura ca. 46-49 (52-55) cm. DIETRO: Lavorare come indicato per il davanti, ma senza formare lo scollo. MANICHE: Avviare 74-74 (82-82) cat. Lavorare 1 m.b nella seconda cat, poi una m.b in ogni cat = 73-73 (81-81) m. Proseguire con il motivo - vedere il diagramma; ripetere le righe 1 - 8 (alla riga 3 ci sono 9-9 (10-10) fiori). Quando il lavoro misura 7-6 (5-4) cm, diminuire da ciascun lato per l’arrotondamento della manica, come segue: lavorare un arco di cat in meno da ciascun lato ogni 2 righe. Tagliare il filo quando il lavoro misura 20-19 (18-17) cm. CONFEZIONE: Cucire le spalle. Montare le maniche. Lavorare 2 giri di m.b intorno allo scollo. |
||||||||||||||||
Spiegazioni del diagramma |
||||||||||||||||
|
||||||||||||||||
 |
||||||||||||||||
 |
||||||||||||||||
 |
||||||||||||||||
Avete terminato questo modello?Allora taggate le vostre foto con #dropspattern o inviatele alla #dropsfan gallery. Avete bisogno di aiuto con questo modello?Troverete 5 video tutorial, una sezione per i commenti/domande e molto altro guardando il modello su www.garnstudio.com © 1982-2026 DROPS Design A/S. Ci riserviamo tutti i diritti. Questo documento, compreso tutte le sue sotto-sezioni, è protetto dalle leggi sul copyright. Potete leggere quello che potete fare con i nostri modelli alla fine di ogni modello sul nostro sito. |
||||||||||||||||


Con oltre 40 anni di esperienza nel design di modelli di maglia e uncinetto, DROPS Design offre la più estesa collezione di modelli gratuiti su internet - tradotti in 17 lingue. Ad oggi vi possiamo fornire 324 cataloghi e 12290 modelli - 9561 dei quali sono tradotti in Italiano.
Ci stiamo impegnando molto per darvi il meglio che vi possiamo offrire in termini di maglia e uncinetto, ispirazioni e consigli così come filati di grande qualità ad un prezzo incredibile! Volete utilizzare i nostri modelli per qualcosa d'altro oltre al vostro uso personale? Potete leggere tutto ciò che è consentito nel testo sul Copyright in basso su tutte le pagine dei nostri modelli. Buon lavoro!
Lasciare un commento sul modello DROPS 60-14
Noi saremmo felici di ricevere i tuoi commenti e opinioni su questo modello!
Se vuoi fare una domanda, fai per favore attenzione a selezionare la categoria corretta nella casella qui sotto per velocizzare il processo di risposta. I campi richiesti sono indicati da *.