
Categorie popolari
State cercando un filato?


Commenti / Domande (19)
![]() Luz Dary Figueredo ha scritto:
Luz Dary Figueredo ha scritto:
Encontré el tutorial en idioma español en YouTube me gustaría obtenerlo pues tengo una labor por realizar con esa puntada o punto, gracias les agradezco,,
18.07.2019 - 22:44DROPS Design ha risposto:
Hola Luz. Todos nuestros tutoriales están disponibles gratis en el apartado Tips y Ayuda.
25.07.2019 - 19:55
![]() Luz Dary Figueredo ha scritto:
Luz Dary Figueredo ha scritto:
Buenas tardes soy de Colombia por favor me pueden indicar si existe tutorial en Youtube del punto? Lo estoy necesitando urgente gracias
18.07.2019 - 22:40
![]() Janni ha scritto:
Janni ha scritto:
Utrolig smuk og nem opskrift. Jeg brugte belle i stedet for cotton light det passede også godt til opskriften.
13.06.2019 - 14:15
![]() Janet Rahn ha scritto:
Janet Rahn ha scritto:
Is the diagram going left to right and top to bottom? Or which way does it go? Ty
13.06.2019 - 00:44DROPS Design ha risposto:
Dear Mrs Rahn, diagrams will be read from bottom corner on the right side towards the left from RS and from the left towards the right from WS. Read more here about crochet diagrams. Happy crocheting!
13.06.2019 - 09:10
![]() Manon Lord ha scritto:
Manon Lord ha scritto:
Merci beaucoup!
03.06.2019 - 14:03
![]() Manon Lord ha scritto:
Manon Lord ha scritto:
Bonjour, Dans votre modèle c'est indiqué de monter une chaîne de 94 mailles, alors comment se retrouve t on avec 81 brides? Merci de m'éclairer
02.06.2019 - 15:47DROPS Design ha risposto:
Bonjour Mme Lord, en crochetant A.2, on va avoir 6 brides au-dessus de 7 mailles en l'air (= on crochète 1 bride dans chacune des 3 ml suivantes, on saute 1 ml et on crochète 1 bride dans chacune des 3 ml suivantes). En sautant des mailles en l'air ainsi, on obtient un bord plus souple - plus d'infos ici. Bon crochet!
03.06.2019 - 10:16
![]() Antoinette ha scritto:
Antoinette ha scritto:
Ik heb nu een herhaling (na de beginrand) van dit patroon gehaakt en het valt me op dat de randen niet recht zijn. Verder klopt het patroon helemaal. IK maak hem in de grootste maat. Hoe kan dit?
31.05.2019 - 22:11DROPS Design ha risposto:
Dag Antoinette,
Om rechtere randen te krijgen heb je misschien wat aan deze video?
06.06.2019 - 22:10
![]() Peggy ha scritto:
Peggy ha scritto:
I have to agree. Impossible to understand. I read written patterns and graphs with ease, and these are impossible. And the helpful videos are also useless. I know how to make a chain, and double crochet, increase, etc. Doesn’t help at all in trying to interpret these instructions.
08.05.2019 - 05:06DROPS Design ha risposto:
Dear Peggy, The DROPS patterns are knitted and crocheted by thousands and thousands of people around the world. We understand however that in certain countries, with different knitting/crochet traditions than Scandinavia, our patterns might be written in a way that differs from what some are used to. But of course we want everyone to understand our patterns, we have created help resources eg how to read crochet diagrams. And remember your DROPS store will also help you reading diagram if you need any further assistance, just contact them even per mail or telephone. Happy crocheting!
08.05.2019 - 08:12
![]() Leah ha scritto:
Leah ha scritto:
I have been crocheting since the age of 8! I’m now a senior and I crochet a lot!!!!! I believe these are the worst instructions I’ve ever seen!
01.05.2019 - 00:50DROPS Design ha risposto:
Dear Leah, we are sorry to hear you have so many troubles with this pattern. There are hundred of ways to write or format crochet patterns, you may just try to read it again with new eyes. Remember: for any further individual assistance reading our patterns and diagrams (read more about crochet diagrams here you are welcome to contact your DROPS store - even per mail or telephone. Happy crocheting!
02.05.2019 - 10:15
|
|||||||||||||||||||||||||||||||||||||||||||
Butterfly Migration#butterflymigrationponcho |
|||||||||||||||||||||||||||||||||||||||||||
 |
 |
||||||||||||||||||||||||||||||||||||||||||
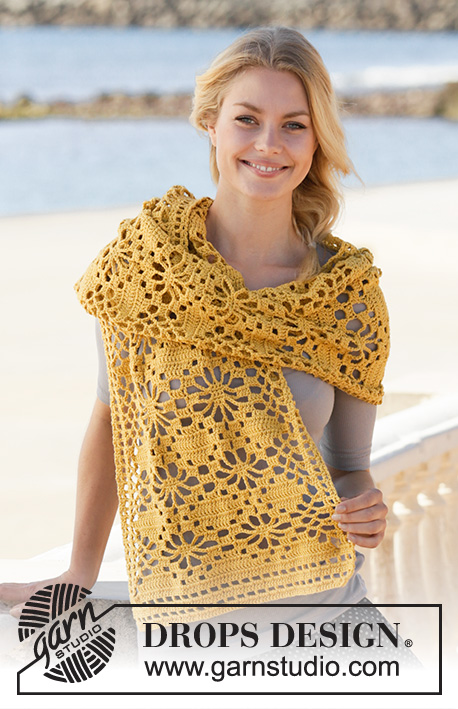
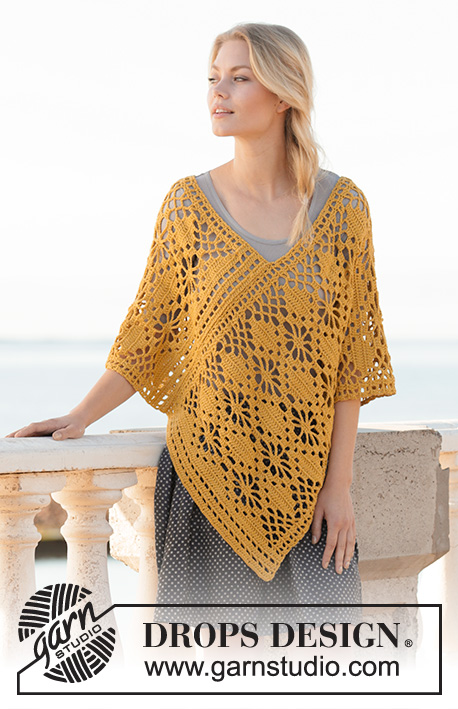
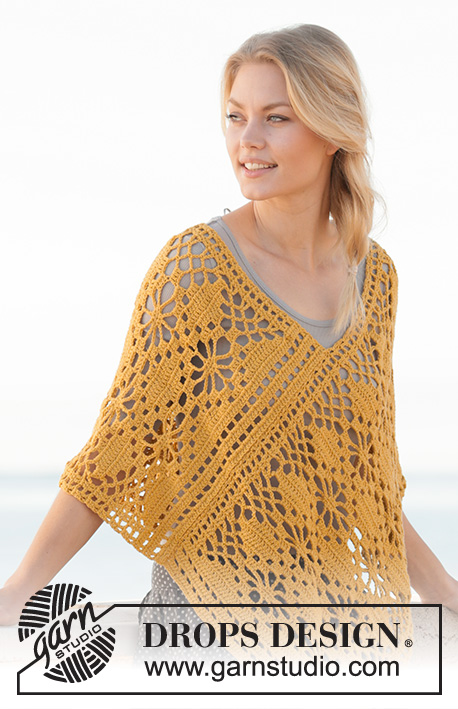
Poncho lavorato all’uncinetto in DROPS Cotton Light. Lavorato con motivo traforato. Taglie: S - XXXL.
DROPS 200-33 |
|||||||||||||||||||||||||||||||||||||||||||
|
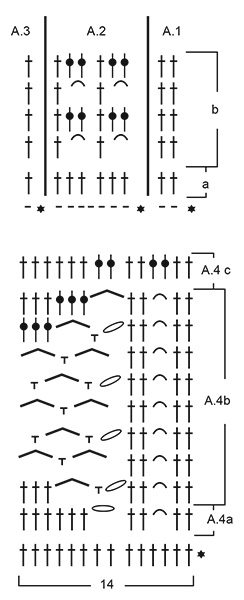
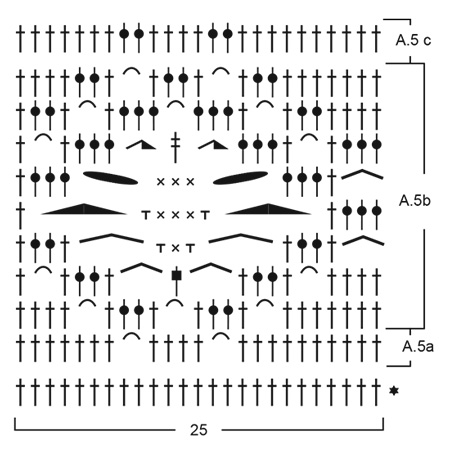
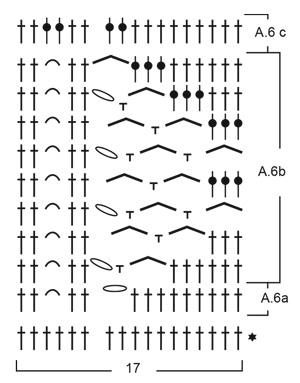
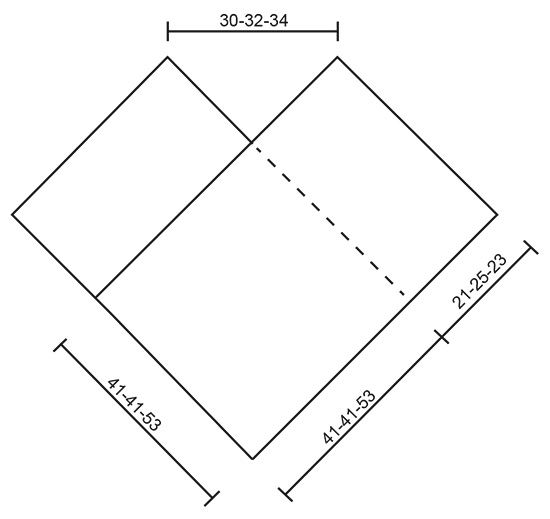
------------------------------------------------------- PRIMA DI INIZIARE: ------------------------------------------------------- INFORMAZIONI PER IL LAVORO: Sostituire la 1° maglia alta sulla riga con 3 catenelle. MOTIVO: Vedere i diagrammi A.1 - A.6. SUGGERIMENTO PER GLI AUMENTI: Lavorare 2 maglie alte nella stessa maglia (= 1 maglia alta aumentata). SUGGERIMENTO PER LE DIMINUZIONI: * Fare 1 gettato, inserire l’uncinetto nella maglia successiva, prendere il filo, fare 1 gettato e farlo passare attraverso i primi 2 occhielli sull’uncinetto *, lavorare *-* un’altra volta, fare 1 gettato e farlo passare attraverso tutti e 3 gli occhielli sull’uncinetto (= 1 maglia alta diminuita). ------------------------------------------------------- INIZIO DEL LAVORO: ------------------------------------------------------- PONCHO – BREVE RIASSUNTO DEL LAVORO: Lavorato avanti e indietro in 2 parti che vengono cucite alla fine. PRIMA SEZIONE: Avviare 94-94-122 catenelle con l’uncinetto n° 3,5 mm e Cotton Light. Leggere le INFORMAZIONI PER IL LAVORO - lavorare A.1a sulle prime 2 catenelle, ripetere A.2a sulle 91-91-119 catenelle successive (= 13-13-17 ripetizioni di 6 maglie alte sulle 7 catenelle) e finire con A.3a sull’ultima catenella = 81-81-105 maglie alte. Continuare A.1b, A.2b e A.3b. FARE ATTENZIONE ALLA TENSIONE DEL LAVORO! Alla fine di A.1b, A.2b e A.3b, continuare come segue: Lavorare A.4a sulle prime 14 maglie, A.5a sulle 50-50-75 maglie successive (= 2-2-3 ripetizioni di 25 maglie alte) – e aumentare 0-0-1 maglie alte su queste maglie – leggere il SUGGERIMENTO PER GLI AUMENTI e finire con A.6a sulle ultime 17 maglie. Continuare A.4b, A.5b e A.6b. Alla fine di A.4b, A.5b e A.6b, ripetere A.4b, A.5b eA.6b. Quando il lavoro misura circa 78-86-94 cm finire dopo un’intera ripetizione in altezza. Poi lavorare A.4c, A.5c – e diminuire 0-0-1 maglie alte su queste maglie – leggere il SUGGERIMENTO PER LE DIMINUZIONI e finire con A.6c = 81-81-105 maglie alte. Lavorare A.1b sulle prime 2 maglie alte, ripetere A.2b fino a quando rimane 1 maglia alta (= 13-13-17 ripetizioni di 6 maglie alte) e finire con A.3b sull’ultima maglia alta = 81-81-105 maglie alte. Continuare fino alla fine di A.1b, A.2b and A.3b. Tagliare e affrancare il filo. Il lavoro misura circa 83-91-99 cm. SECONDA SEZIONE: Lavorare nello stesso modo della prima sezione. CONFEZIONE: Mettere il bordo di chiusura della prima sezione verso il lato lungo destro della seconda sezione – parte inferiore del bordo di avvio e 40-40-53 cm verso l’alto – fare in modo di non tirare troppo le sezioni. Cucirle insieme con piccoli punti ordinati. Poi cucire il bordo di chiusura della seconda sezione sul lato destro della prima sezione nello stesso modo. |
|||||||||||||||||||||||||||||||||||||||||||
Spiegazioni del diagramma |
|||||||||||||||||||||||||||||||||||||||||||
|
|||||||||||||||||||||||||||||||||||||||||||
 |
|||||||||||||||||||||||||||||||||||||||||||
 |
|||||||||||||||||||||||||||||||||||||||||||
 |
|||||||||||||||||||||||||||||||||||||||||||
 |
|||||||||||||||||||||||||||||||||||||||||||
Avete terminato questo modello?Allora taggate le vostre foto con #dropspattern #butterflymigrationponcho o inviatele alla #dropsfan gallery. Avete bisogno di aiuto con questo modello?Troverete 9 video tutorial, una sezione per i commenti/domande e molto altro guardando il modello su www.garnstudio.com © 1982-2026 DROPS Design A/S. Ci riserviamo tutti i diritti. Questo documento, compreso tutte le sue sotto-sezioni, è protetto dalle leggi sul copyright. Potete leggere quello che potete fare con i nostri modelli alla fine di ogni modello sul nostro sito. |
|||||||||||||||||||||||||||||||||||||||||||


Con oltre 40 anni di esperienza nel design di modelli di maglia e uncinetto, DROPS Design offre la più estesa collezione di modelli gratuiti su internet - tradotti in 17 lingue. Ad oggi vi possiamo fornire 324 cataloghi e 12290 modelli - 9561 dei quali sono tradotti in Italiano.
Ci stiamo impegnando molto per darvi il meglio che vi possiamo offrire in termini di maglia e uncinetto, ispirazioni e consigli così come filati di grande qualità ad un prezzo incredibile! Volete utilizzare i nostri modelli per qualcosa d'altro oltre al vostro uso personale? Potete leggere tutto ciò che è consentito nel testo sul Copyright in basso su tutte le pagine dei nostri modelli. Buon lavoro!
Lasciare un commento sul modello DROPS 200-33
Noi saremmo felici di ricevere i tuoi commenti e opinioni su questo modello!
Se vuoi fare una domanda, fai per favore attenzione a selezionare la categoria corretta nella casella qui sotto per velocizzare il processo di risposta. I campi richiesti sono indicati da *.