
Categorie popolari
State cercando un filato?


Commenti / Domande (118)
James ha scritto:
US here. The increase on the sleeve is giving me trouble too. No problem on 3rd row, but 4th row increase on a half ch-st loop doesn't make sense. Can you help clear this up or am I misreading this? Thank you in advance.
23.05.2015 - 06:13DROPS Design ha risposto:
Dear James, you inc at the end of 3rd row + at the end of 4th row the same way: crochet ch 4, 1 sc in the last sc from previous row => you have inc 1 ch-space each side. Happy crocheting!
23.05.2015 - 13:57
![]() Janice Kern ha scritto:
Janice Kern ha scritto:
Thank you! I especially find the videos of the pattern extremely helpful. I would not have figured it out on my own. Muskat keeps splitting when I am doing the bobbles on the 4th row. Ouch! Thanks for your help. :)
15.05.2015 - 20:17
![]() Janice Kern ha scritto:
Janice Kern ha scritto:
Hello. Trying this pattern. Size is way off, my gauge is correct. I'm on first 2 rows and it is 11" off. Do you have a size small pattern? Do you also have "multiple of....." stitches? I am going to try 180 (?) for chain cast-on and maybe a little tighter? Thanks SOOO much for your instructional videos! That's why I've decided to do this! Very helpful! Thx
13.05.2015 - 19:21DROPS Design ha risposto:
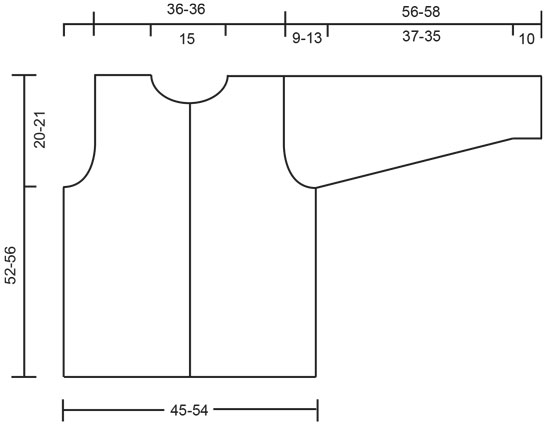
Dear Mrs Kern, you will find at the bottom of the pattern a measurement chart with all measurements in cm taken flat from side to side. Keep your gauge to get the same measurements. Diagram shows 1 repeat, if you need any adjustment you can work 1 or more repeat less (check your own measurements to check before). Happy crocheting!
15.05.2015 - 10:04
![]() Trudy ha scritto:
Trudy ha scritto:
This pattern DROPS 68-15 by DROPS Design does not say how much yarn is needed for this sweater pattern. Please advise...thanks!
17.03.2015 - 20:06DROPS Design ha risposto:
Dear Trudy, you will find requested amount of yarn for each size at the right side of the picture under tab "Materials", ie in first size, you need 500 g Muskat / 50 g a ball Muskat = 10 balls Muskat are required in size M. Happy crocheting!
18.03.2015 - 09:40
![]() Roswitha Gerlach ha scritto:
Roswitha Gerlach ha scritto:
Liebes Team, danke für die Videaoanleitung. Ich habe eine Anmerkung zur Erklärung der Noppe und des Blattes: meiner Meinung nach müßte es lauten: *1 Umschlag um die Nadel, die Nadel in die fM unterhalb stecken und den Faden nach oben ziehen* von *-* 2 Mal (und nicht 3 Mal, dann hätten wir statt 6+1 nämlich 8+1 Schlingen auf der Nadel) wiederholen = 6 Schlingen + 1 Masche auf der Nadel. Vorschlag Name für das tolle Modell: "Himmelstraum". Viele Grüße, Roswitha Gerlach
11.01.2015 - 15:27DROPS Design ha risposto:
Die Beschreibung ist korrekt so, wie sie dort steht. Sie haben ja pro Einstich 2 Schlingen auf der Nadel - den Umschlag und die nach oben geholte M. Wenn Sie das ingesamt 3 x machen, haben Sie 6 Schlingen auf der Nadel plus die Schlinge vom Anfang.
06.03.2015 - 14:17Ineke ha scritto:
Ik heb de rand met bloemen af en ben nu 5 toeren verder met de lossen (boogjes) mijn werk wordt alleen maar breder en gaat golven. ik heb 58 boogjes .Heb alle comments gelezen en zie 1 comment met hetzelfde probleem. Helaas kan ik geen foto meesturen in dit formulier. Help!!! Anders trek ik het hele geval uit. Ben zeer teleurgesteld.
01.09.2014 - 10:37DROPS Design ha risposto:
Hoi Ineke. Ik kan helaas niet zeggen waarom het werk bij jouw breeder lijkt te worden. Als je steeds hetzelfde aantal boogen hebt en de juiste stekenverhouding, dan zou het niet breder moeten worden. Probeer eventueel langs een winkel te gaan, ze kunnen het werk bekijken en misschien zien of er iets mis is. Ik kan het zo helaas niet beoordelen. Succes.
04.09.2014 - 11:45
![]() Val ha scritto:
Val ha scritto:
Bonjour, je bloque pour les augmentation de manches(3 et 5 rangs non?) et à combien de cm commence t on l'encolure du devant
01.08.2014 - 13:44DROPS Design ha risposto:
Bonjour Val, on augmente pour les manches à la fin de chaque 3ème + à la fin de chaque 4ème rang (= 1 augm de chaque côté, les augm. se font en fin de rang à chaque fois). L'encolure devant se forme à 42-46 cm de hauteur totale (cf taille). Bon crochet!
01.08.2014 - 14:10
![]() Cindy ha scritto:
Cindy ha scritto:
I have gotten to pattern 3 and I am noticing that the width of the piece has increased quite a bit. Is this normal or am I crocheting too loose?
14.06.2014 - 12:17DROPS Design ha risposto:
Dear Cindy, check your measurements in width when piece is held up and remember to keep the same tension as for your swatch. Happy crocheting!
16.06.2014 - 09:51
![]() Claudie ha scritto:
Claudie ha scritto:
Bonjour, Pouvez-vous me dire ce que signifie "un rapport" ? C'est suivi de : = un motif à répéter (ça je comprends !) Merci de votre réponse et bonne journée
26.03.2014 - 12:36DROPS Design ha risposto:
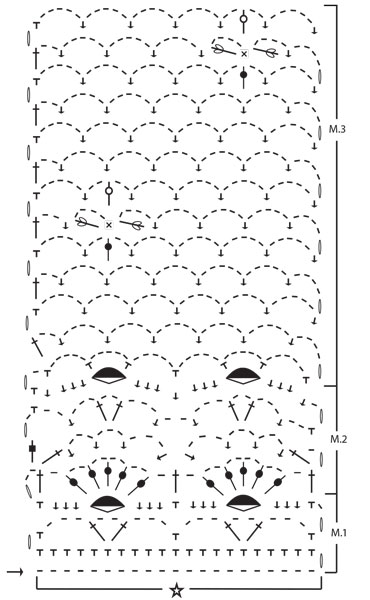
Bonjour Claudie, un rapport est un motif a répéter en largeur, comme dans la partie encadrée en bas du diagramme. Bon crochet!
26.03.2014 - 13:40Claudie ha scritto:
Merci beaucoup pour votre réponse, effectivement c'est mieux sans le son et en + les explications sont très claires J'ai hâte d'avoir un peu de temps pour refaire ces super points Merci !
26.03.2014 - 12:33
|
|||||||||||||||||||||||||||||||||||||
Midnight Lace |
|||||||||||||||||||||||||||||||||||||
|
|
|||||||||||||||||||||||||||||||||||||
Cardigan lavorato all’uncinetto in DROPS Muskat. Lavorato dal basso verso l'alto con motivo traforato e motivo a fiori. Taglie: M - L/XL.
DROPS 68-15 |
|||||||||||||||||||||||||||||||||||||
|
Campione: 1 diagramma = circa 9 cm in larghezza. 12 f. del motivo 2 = circa 10 cm in altezza. Motivo: vedere lo schema. Il motivo è visto dal diritto del lavoro. «1 rapporto» = «1 ripetizione». Nota: Tutte le misurazioni nel motivo si riferiscono all’indumento appeso o indossato, perché il motivo si accorcia e si allunga. Corpo: Lavorare 201-241 catenelle senza stringere. Girare e lavorare il motivo 1 una volta su tutta la riga (10-12 ripetizioni = 60-72 archetti). Poi lavorare il motivo 2 sulla riga successiva e ripetere per un totale di 5 volte, il lavoro misura circa 20 cm. Lavorare il motivo 3. Allo stesso tempo quando il lavoro misura circa 32-35 cm dividere e lavorare ogni parte del corpo in modo separato. Ogni davanti = 2 ripetizioni; dietro = 4 ripetizioni, diminuire 1-2 ripetizioni a ogni lato per gli scalfi. Davanti destro: Continuare con il motivo 3 su 2 ripetizioni iniziando dal centro davanti. Quando il lavoro misura circa 42-46 cm (aggiustare per finire dopo 1 fiore) continuare con il motivo 3 ma non fare i fiori. Allo stesso tempo modellare il collo come segue: lavorare fino a quando rimangono 2 archetti al centro davanti. Girare e lavorare indietro. Poi lavorare su 1 arco di catenelle in meno sul bordo del collo di righe alterne 3 volte. Continuare a lavorare il motivo fino a quando il lavoro misura 52-56 cm, chiudere. Davanti sinistro: lavorato uguale al davanti destra, invertendo le forme. Dietro: Continuare a lavorare il motivo 3 fino a quando il lavoro misura circa 42-46 cm, poi lavorare il resto senza fiori (come sul davanti). Quando il lavoro misura circa 49-53 cm lavorare la riga successiva come segue: 7 archetti = spalla, a m.b. sui 10 archetti seguenti = collo (lavorare 1 m.b. in ogni archetto e 1 m.b. in ogni m.b. tra gli archi), 7 archetti = spalla. Finire con 1 riga di archetti su ogni spalla. Il lavoro misura circa 52-56 cm, chiudere. Manica: lavorare 51-51 catenelle senza stringere. Girare e lavorare il motivo 1 una volta lungo la riga (2,5 ripetizioni = 15 archetti), poi lavorare il motivo 2 due volte, quindi continuare con il motivo 3. Quando il lavoro misura circa 10 cm aumentare 1 archetti alla fine della riga sul lato destro e sinistro del lavoro in modo alternato per un totale di 8-10 volte, aumentare alla fine di ogni 3 e 4 righe – fare gli aumenti lavorando 4 catenelle, poi 1 m.b. nell’ultima m.b. dalla riga precedente = 23-25 archetti sulla riga. Continuare fino a quando il lavoro misura circa 52-54 cm. Poi lavorare su un archetto in meno alla fine di ogni riga fino a quando il lavoro misura 56-58 cm, chiudere. Confezione: Lavorare insieme i margini delle spalle come segue: * 1 m.b. nel 1° archetto sul davanti, 1 catenella, 1 m.b. nel 1° archetto sul dietro, 1 catenella *, ripetere da * - * su ogni spalla. Lavorare insieme la manica come segue dal margine inferiore: * 1 m.b. da un lato, 2 catenelle, 1 m.b. dall’altro lato *, ripetere da * - * fino a quando rimangono circa 5-9 cm. Attaccare le maniche al corpo nello stesso modo in cui le maniche sono state lavorate insieme. Lavorare 1 riga di m.b. attorno ai bordi con i bottoni e attorno al collo – lavorare in modo stretto attorno al collo in modo che la scollatura non ceda. Occhielli per le asole: fare 3 occhielli lungo il davanti destro. Iniziare dal bordo superiore: * 1 m.b., 3 catenelle, affrancare con 1 m.b. 1 cm sotto, lavorare a m.bss. per circa 8-9 cm più in basso sul bordo * ripetere da * - * fino a quando ci sono 3 occhielli. Attaccare i bottoni sul davanti sinistro. |
|||||||||||||||||||||||||||||||||||||
Spiegazioni del diagramma |
|||||||||||||||||||||||||||||||||||||
|
|||||||||||||||||||||||||||||||||||||
 |
|||||||||||||||||||||||||||||||||||||
 |
|||||||||||||||||||||||||||||||||||||
Avete terminato questo modello?Allora taggate le vostre foto con #dropspattern o inviatele alla #dropsfan gallery. Avete bisogno di aiuto con questo modello?Troverete 7 video tutorial, una sezione per i commenti/domande e molto altro guardando il modello su www.garnstudio.com © 1982-2026 DROPS Design A/S. Ci riserviamo tutti i diritti. Questo documento, compreso tutte le sue sotto-sezioni, è protetto dalle leggi sul copyright. Potete leggere quello che potete fare con i nostri modelli alla fine di ogni modello sul nostro sito. |
|||||||||||||||||||||||||||||||||||||


Con oltre 40 anni di esperienza nel design di modelli di maglia e uncinetto, DROPS Design offre la più estesa collezione di modelli gratuiti su internet - tradotti in 17 lingue. Ad oggi vi possiamo fornire 324 cataloghi e 12290 modelli - 9561 dei quali sono tradotti in Italiano.
Ci stiamo impegnando molto per darvi il meglio che vi possiamo offrire in termini di maglia e uncinetto, ispirazioni e consigli così come filati di grande qualità ad un prezzo incredibile! Volete utilizzare i nostri modelli per qualcosa d'altro oltre al vostro uso personale? Potete leggere tutto ciò che è consentito nel testo sul Copyright in basso su tutte le pagine dei nostri modelli. Buon lavoro!
Lasciare un commento sul modello DROPS 68-15
Noi saremmo felici di ricevere i tuoi commenti e opinioni su questo modello!
Se vuoi fare una domanda, fai per favore attenzione a selezionare la categoria corretta nella casella qui sotto per velocizzare il processo di risposta. I campi richiesti sono indicati da *.