
Categorie popolari
State cercando un filato?


Commenti / Domande (118)
![]() Paula Snow ha scritto:
Paula Snow ha scritto:
I am beginning an advanced project for me, the midnight lace cardigan. I do not see instructions for Pattern 1, 2, 3, 4. Where will I find these please?
25.10.2017 - 22:56DROPS Design ha risposto:
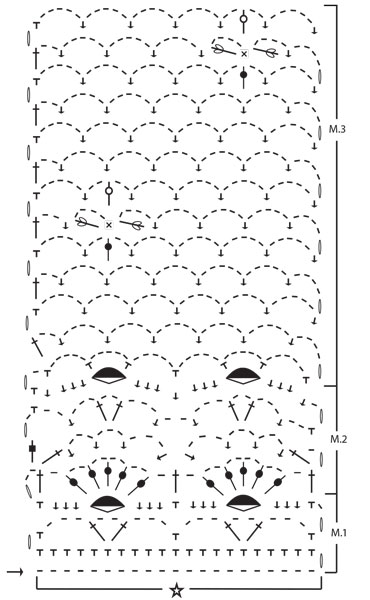
Dear Mrs Snow, you will find diagrams to pattern 1, 2 and 3 at the bottom of the page: Pattern 1 = M1, pattern 2 = M2, pattern 3 = M3. Scroll down the page to find also 2 videos showing how to work the diagrams. Happy crocheting!
26.10.2017 - 09:55
![]() Paula ha scritto:
Paula ha scritto:
I am ready to start crocheting the fronts, back and I don't understand How to decrease for the armholes and the shaping of the neck. are there more clear directions
01.08.2017 - 21:27DROPS Design ha risposto:
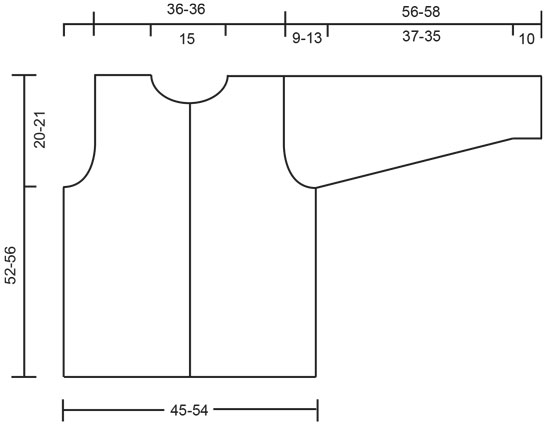
Dear Paula, for armholes, work each front piece over 2 repeats from each side and leaving unworked 1-2 repeats after right front piece and before left front piece, work back piece over the remaining middle repeats for back piece. To shape neck on front piece, work row from shoulder towards neck leaving 2 ch-spaces unworked towards neck (at the end of row from WS for right front piece), work next row from RS and at the end of next row from WS leave 1 ch-space unworked towards neck, turn and repeat the last 2 rows 2 more times. Happy crocheting!
02.08.2017 - 09:07Norma Frost ha scritto:
Hello from Canada and thank you for such a lovely pattern. I received it with picture but no pattern. I do not know what stitches of crochet I would have to use also the rows. I received the pictures of the graphes were not numbered 1 2 or 3. Where to go for that as well. Any information would be really appreciated. With blessings Norma
14.05.2017 - 20:06DROPS Design ha risposto:
Dear Mrs Frost, you'll find the pattern in US-English here - you'll also find videos showing how to work the diagrams M.1 & M.2 + M.3 at the very bottom of the page. Happy crocheting!
15.05.2017 - 09:41
![]() Rianne ha scritto:
Rianne ha scritto:
Ik wil dit vestje graag gaan halen, maar twijfel door het lezen over de 'lubber-problemen'. Kan er iemand melden hoe het uiteindelijke resultaat is geworden?
05.05.2017 - 21:47
![]() Betsy Schoormans ha scritto:
Betsy Schoormans ha scritto:
Hallo, nog even over mijn vorige vraag over patroon 3. In de handwerkwinkel waar ik net geweest ben adviseerden ze mij om met 1 naald maat dunner te haken. Dus met 3 i.p.v. 4. Boogjes van 4 had ik inderdaad ook al aan gedacht. Ik ga het nu eerst op naald nr. 3 proberen. Bedankt voor uw snelle reactie.
19.04.2017 - 13:45DROPS Design ha risposto:
Hoi Betsy, Dat is ook een goed idee. Bedankt voor het doorgeven van de tip en veel haakplezier!
19.04.2017 - 21:47
![]() Betsy Schoormans ha scritto:
Betsy Schoormans ha scritto:
Bij patroon 3 wordt het bij mij ook veel wijder, deze opmerking heb ik hierboven al meer gelezen, maar geen oplossing gevonden. Hebt u hier inmiddels een oplossing voor? Is het voldoende als ik i.p.v 5 losse, 4losse boogjes maak? Ik zou graag een foto meesturen maar dat kan hier helaas niet.
19.04.2017 - 06:54DROPS Design ha risposto:
Hoi Betsy, Het klopt dat M3 veel wijder wordt tijdens het haken. Bij dit patroon gelden de afmetingen voor als het vest gedragen wordt. Als het mogelijk is probeer het vest hangend op te meten of een beetje uitgerekt. Je bent natuurlijk vrij om het patroon voor jezelf aan tepassen en lossenboogjes van 4 te maken, ipv 5.
19.04.2017 - 11:11
![]() Lois Nordling ha scritto:
Lois Nordling ha scritto:
The directions say to use Pattern 1, Pattern 2 and Pattern 3. No where on the pages does it explain these patterns. What am I missing?
15.04.2017 - 21:01DROPS Design ha risposto:
Dear Lois, the patterns are not written out, but you find the charts at the bottom of the pattern. You have to follow the chart. I hope this helps. Happy knitting.
15.04.2017 - 22:42
![]() Cathy Van Beek ha scritto:
Cathy Van Beek ha scritto:
Ik haak met Muskat en de stekenverhouding is iets anders, maar dat kwam goed uit omdat ik de maat iets wilde aanpassen. En ik heb de stekenverhouding uitgeprobeerd met de patronen 1 en 2, maar niet met patroon 3. Ik zou nu ipv 5 lossen per boogje, 4 of misschien wel 3 haken. Dat ga ik waarschijnlijk alsnog proberen, dan komt het beter uit, denk ik.
29.08.2016 - 12:12DROPS Design ha risposto:
Hoi Cathy. Succes en veel haakplezier verder.
30.08.2016 - 12:14
![]() Cathy Van Beek ha scritto:
Cathy Van Beek ha scritto:
Ik ben het vestje aan het haken en ben bezig met het voorpand. Vanaf dat ik bezig ben met patroon 3 lubbert het haakwerk wel heel erg. Er staat ergens dat het haakweerk in de lengte uitrekt door de zwaarte van de rand. Maar hoever rekt het uit en hoe moet ik meten? Moet ik het werk meten als het op tafel ligt of moet ik het 'uitgerekt' meten? Ik heb nu het gevoel dat ik pas, als ik klaar ben, weet of het goed is.
27.08.2016 - 12:01DROPS Design ha risposto:
Hoi Cathy. Haak je misschien een beetje losser dan de stekenverhouding of met een ander soort garen, dat zou het lubberen veroorzaken. Ik zou meten als je het garen ophoudt, en als je dat niet kan, leg op tafel en rek lichtjes.
29.08.2016 - 11:50
![]() Elise Terhorst ha scritto:
Elise Terhorst ha scritto:
K ben bezig met het vestje te haken: Drops 68 patroonnr 15. Ik weet niet hoe ik het met de armsgaten moet doen. Er staat niet duidelijk omschreven wanneer en op welke hoogte je moet beginnen met de armsgaten. Kunnen jullie mij dit misschien uitleggen? Ook bij welke breedte je moet beginnen met de armsgaten? Met vriendelijke groet,Elise
21.07.2016 - 17:13DROPS Design ha risposto:
Hoi Elise. In het patroon staat: Splits het werk bij een hoogte van ca. 32-35 cm en haak de voorpanden en het achterpand afzonderlijk verder = hier begint dus de armsgaten op het lijf.
22.07.2016 - 11:06
|
|||||||||||||||||||||||||||||||||||||
Midnight Lace |
|||||||||||||||||||||||||||||||||||||
|
|
|||||||||||||||||||||||||||||||||||||
Cardigan lavorato all’uncinetto in DROPS Muskat. Lavorato dal basso verso l'alto con motivo traforato e motivo a fiori. Taglie: M - L/XL.
DROPS 68-15 |
|||||||||||||||||||||||||||||||||||||
|
Campione: 1 diagramma = circa 9 cm in larghezza. 12 f. del motivo 2 = circa 10 cm in altezza. Motivo: vedere lo schema. Il motivo è visto dal diritto del lavoro. «1 rapporto» = «1 ripetizione». Nota: Tutte le misurazioni nel motivo si riferiscono all’indumento appeso o indossato, perché il motivo si accorcia e si allunga. Corpo: Lavorare 201-241 catenelle senza stringere. Girare e lavorare il motivo 1 una volta su tutta la riga (10-12 ripetizioni = 60-72 archetti). Poi lavorare il motivo 2 sulla riga successiva e ripetere per un totale di 5 volte, il lavoro misura circa 20 cm. Lavorare il motivo 3. Allo stesso tempo quando il lavoro misura circa 32-35 cm dividere e lavorare ogni parte del corpo in modo separato. Ogni davanti = 2 ripetizioni; dietro = 4 ripetizioni, diminuire 1-2 ripetizioni a ogni lato per gli scalfi. Davanti destro: Continuare con il motivo 3 su 2 ripetizioni iniziando dal centro davanti. Quando il lavoro misura circa 42-46 cm (aggiustare per finire dopo 1 fiore) continuare con il motivo 3 ma non fare i fiori. Allo stesso tempo modellare il collo come segue: lavorare fino a quando rimangono 2 archetti al centro davanti. Girare e lavorare indietro. Poi lavorare su 1 arco di catenelle in meno sul bordo del collo di righe alterne 3 volte. Continuare a lavorare il motivo fino a quando il lavoro misura 52-56 cm, chiudere. Davanti sinistro: lavorato uguale al davanti destra, invertendo le forme. Dietro: Continuare a lavorare il motivo 3 fino a quando il lavoro misura circa 42-46 cm, poi lavorare il resto senza fiori (come sul davanti). Quando il lavoro misura circa 49-53 cm lavorare la riga successiva come segue: 7 archetti = spalla, a m.b. sui 10 archetti seguenti = collo (lavorare 1 m.b. in ogni archetto e 1 m.b. in ogni m.b. tra gli archi), 7 archetti = spalla. Finire con 1 riga di archetti su ogni spalla. Il lavoro misura circa 52-56 cm, chiudere. Manica: lavorare 51-51 catenelle senza stringere. Girare e lavorare il motivo 1 una volta lungo la riga (2,5 ripetizioni = 15 archetti), poi lavorare il motivo 2 due volte, quindi continuare con il motivo 3. Quando il lavoro misura circa 10 cm aumentare 1 archetti alla fine della riga sul lato destro e sinistro del lavoro in modo alternato per un totale di 8-10 volte, aumentare alla fine di ogni 3 e 4 righe – fare gli aumenti lavorando 4 catenelle, poi 1 m.b. nell’ultima m.b. dalla riga precedente = 23-25 archetti sulla riga. Continuare fino a quando il lavoro misura circa 52-54 cm. Poi lavorare su un archetto in meno alla fine di ogni riga fino a quando il lavoro misura 56-58 cm, chiudere. Confezione: Lavorare insieme i margini delle spalle come segue: * 1 m.b. nel 1° archetto sul davanti, 1 catenella, 1 m.b. nel 1° archetto sul dietro, 1 catenella *, ripetere da * - * su ogni spalla. Lavorare insieme la manica come segue dal margine inferiore: * 1 m.b. da un lato, 2 catenelle, 1 m.b. dall’altro lato *, ripetere da * - * fino a quando rimangono circa 5-9 cm. Attaccare le maniche al corpo nello stesso modo in cui le maniche sono state lavorate insieme. Lavorare 1 riga di m.b. attorno ai bordi con i bottoni e attorno al collo – lavorare in modo stretto attorno al collo in modo che la scollatura non ceda. Occhielli per le asole: fare 3 occhielli lungo il davanti destro. Iniziare dal bordo superiore: * 1 m.b., 3 catenelle, affrancare con 1 m.b. 1 cm sotto, lavorare a m.bss. per circa 8-9 cm più in basso sul bordo * ripetere da * - * fino a quando ci sono 3 occhielli. Attaccare i bottoni sul davanti sinistro. |
|||||||||||||||||||||||||||||||||||||
Spiegazioni del diagramma |
|||||||||||||||||||||||||||||||||||||
|
|||||||||||||||||||||||||||||||||||||
 |
|||||||||||||||||||||||||||||||||||||
 |
|||||||||||||||||||||||||||||||||||||
Avete terminato questo modello?Allora taggate le vostre foto con #dropspattern o inviatele alla #dropsfan gallery. Avete bisogno di aiuto con questo modello?Troverete 7 video tutorial, una sezione per i commenti/domande e molto altro guardando il modello su www.garnstudio.com © 1982-2026 DROPS Design A/S. Ci riserviamo tutti i diritti. Questo documento, compreso tutte le sue sotto-sezioni, è protetto dalle leggi sul copyright. Potete leggere quello che potete fare con i nostri modelli alla fine di ogni modello sul nostro sito. |
|||||||||||||||||||||||||||||||||||||


Con oltre 40 anni di esperienza nel design di modelli di maglia e uncinetto, DROPS Design offre la più estesa collezione di modelli gratuiti su internet - tradotti in 17 lingue. Ad oggi vi possiamo fornire 324 cataloghi e 12290 modelli - 9561 dei quali sono tradotti in Italiano.
Ci stiamo impegnando molto per darvi il meglio che vi possiamo offrire in termini di maglia e uncinetto, ispirazioni e consigli così come filati di grande qualità ad un prezzo incredibile! Volete utilizzare i nostri modelli per qualcosa d'altro oltre al vostro uso personale? Potete leggere tutto ciò che è consentito nel testo sul Copyright in basso su tutte le pagine dei nostri modelli. Buon lavoro!
Lasciare un commento sul modello DROPS 68-15
Noi saremmo felici di ricevere i tuoi commenti e opinioni su questo modello!
Se vuoi fare una domanda, fai per favore attenzione a selezionare la categoria corretta nella casella qui sotto per velocizzare il processo di risposta. I campi richiesti sono indicati da *.