
Categorie popolari
State cercando un filato?


Commenti / Domande (118)
![]() Joanne Lovrek ha scritto:
Joanne Lovrek ha scritto:
Hello ! Love Drops 68-15 pattern. No problems with following until the "divide and crochet each body part separately ". How are we determining where the DIVIDES between the sections are ? I am making a LARGE and finding out my flowers on M.3 aren't working out to be evenly spaced from the front edges. Am I misreading the horizontal repeat ?
03.11.2020 - 00:12DROPS Design ha risposto:
Dear Mrs Lovrek, you should work each front piece over 2 repeats and the back piece over the middle 4 repeats, this means the 2 repeats on each side will be left unworked for the armholes. Could this video help you with M.3? Happy crocheting!
03.11.2020 - 09:01
![]() Patrizia S ha scritto:
Patrizia S ha scritto:
Goodmorning in the picture upthere it seems that the flowers in m3 are crochetted in a different position than the rapport. they seem more central and symmetrical. If I follow the rapport I have to crochet a flower next to the edge. In the photo I don\'t see any flower next to the marge.
15.08.2020 - 11:30
![]() Siska ha scritto:
Siska ha scritto:
Ik zou deze graag in maat S willen haken. Welke aanpassingen doe ik dan?
12.07.2020 - 12:22DROPS Design ha risposto:
Dag Siska,
Helaas is dit, wat oudere patroon, er niet in maat S. Misschien is het een idee om met een kleinere haaknaald te haken en dan het patroon voor maat M te volgen. Maak eerst even een proeflapje. Op basis daarvan zou je uit kunnen rekenen hoe breed de panden etc. worden.
12.07.2020 - 14:24
![]() RHovestad ha scritto:
RHovestad ha scritto:
Moet er niet geminderd worden voor het armsgat ?
04.04.2020 - 14:35DROPS Design ha risposto:
Dag RHovestad,
Ja, dit staat bij het lijf beschreven: laat aan weerszijden voor de armsgaten 1-2 herhalingen ongehaakt.. En bij de mouwen haak je steeds 1 lossenboogje minder vanaf 52-54 cm.
04.04.2020 - 18:36
![]() Terri ha scritto:
Terri ha scritto:
Pattern 1, 2, and pattern 3. Where are they. Totally confusing.
21.03.2020 - 16:58DROPS Design ha risposto:
Dear Terri, pattern 1, 2 and 3 are the parts of the patterns. You can see on the right side showed with M.1, M.2 and M.3. Thus pattern1 ois the cast on + the 1st row, etc. Happy Crafting!
22.03.2020 - 11:14
![]() Mary Courtney ha scritto:
Mary Courtney ha scritto:
Crocheting the Midnight Lace pattern and loving it. However, once I have finished the border (M1 and M2) and start getting into M3, I'm finding that the from the start of M3, the size starts increasing outwards. Is there a good way to stop this happening, smaller hook, less stitches? Mary
04.02.2020 - 13:35DROPS Design ha risposto:
Dear Mrs Courtney, make sure your chain stitches are wide enough, ie they should be as wide as a double crochet/treble crochet, if they are wider, the piece will be wider on the section M.3 where you have to work a lot of chain spaces. Hope this helps. Happy crocheting!
04.02.2020 - 15:12
![]() Victoria Whipple ha scritto:
Victoria Whipple ha scritto:
How do I print the Midnight Lace pattern - need an XL
09.07.2019 - 19:22DROPS Design ha risposto:
Dear Victoria, you can print the patttern by clicking on the icon "print: pattern" at any time (see right above the pattern text). Happy crocheting!
09.07.2019 - 21:14
![]() Gunnis ha scritto:
Gunnis ha scritto:
Hej! Jag tänkte virka storlek M. Det står att man ska lägga upp 201 luftmaskor och sedan fortsätta med att virka 10 rapporter av mönster M1. 1 rapport av M1 har 21 luftmaskor i första raden. Är den första raden i M1 uppläggningsmaskorna? Då borde det väl vara 210 luftmaskor att lägga upp först. (21x10=210). Jag får inte ihop hur jag ska börja, mönstret går ju inte jämt upp med 201 luftmaskor, vad jag förstår? Tacksam för hjälp. Med vänliga hälsningar från Gunnis
02.07.2018 - 08:54DROPS Design ha risposto:
Hej Gunnis, rapporten går egentligen bara över 20 m, varv 2 börjar med 1 fm och nästa fm virkas i fm nr 11, sedan nr 21 osv. Titta också gärna på vår video :)
03.07.2018 - 11:00Kathy ha scritto:
Hi. I'm from USA. Can you give me a suggestion for a yarn for this? Thanks.
26.03.2018 - 21:45DROPS Design ha risposto:
Dear Kathy, our yarns are avalaible in your country, see list of DROPS Retailers here. Happy crocheting!
28.03.2018 - 14:57
![]() Béatrice ha scritto:
Béatrice ha scritto:
Bonjour Pour la taille L /XL ,combien de motifs restent-ils pour le devant et le dos? Pour rabattre pour les emmanchures ,dois je le faire en une seule fois les 4 motifs pour une manche( ce qui me donne une grande "ligne " droite) ou diminue t-on progressivement? Merci
13.02.2018 - 09:41DROPS Design ha risposto:
Bonjour Béatrice, C'est tout à fait exact: vous avez 2 motifs pour chaque devant et 4 motifs pour le dos, soit 2 motifs qui ne sont plus crochetés entre le dos et chacun des devants. Continuez simplement les devants/le dos sur 2/4 motifs en laissant 2 motifs non crochetés pour les emmanchures. Bon crochet!
13.02.2018 - 09:58
|
|||||||||||||||||||||||||||||||||||||
Midnight Lace |
|||||||||||||||||||||||||||||||||||||
|
|
|||||||||||||||||||||||||||||||||||||
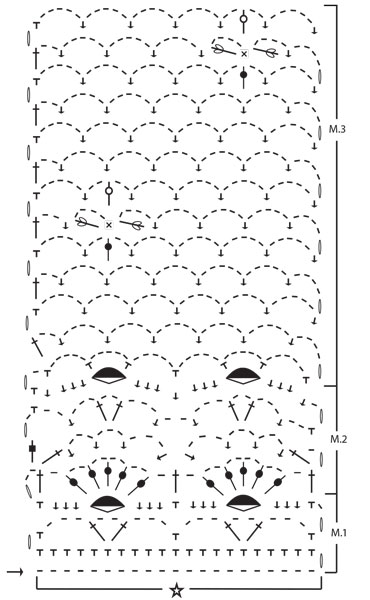
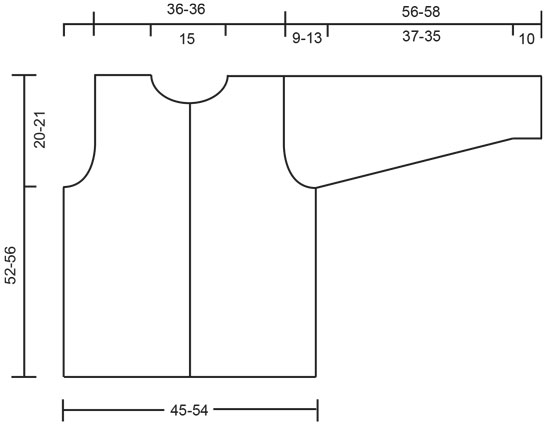
Cardigan lavorato all’uncinetto in DROPS Muskat. Lavorato dal basso verso l'alto con motivo traforato e motivo a fiori. Taglie: M - L/XL.
DROPS 68-15 |
|||||||||||||||||||||||||||||||||||||
|
Campione: 1 diagramma = circa 9 cm in larghezza. 12 f. del motivo 2 = circa 10 cm in altezza. Motivo: vedere lo schema. Il motivo è visto dal diritto del lavoro. «1 rapporto» = «1 ripetizione». Nota: Tutte le misurazioni nel motivo si riferiscono all’indumento appeso o indossato, perché il motivo si accorcia e si allunga. Corpo: Lavorare 201-241 catenelle senza stringere. Girare e lavorare il motivo 1 una volta su tutta la riga (10-12 ripetizioni = 60-72 archetti). Poi lavorare il motivo 2 sulla riga successiva e ripetere per un totale di 5 volte, il lavoro misura circa 20 cm. Lavorare il motivo 3. Allo stesso tempo quando il lavoro misura circa 32-35 cm dividere e lavorare ogni parte del corpo in modo separato. Ogni davanti = 2 ripetizioni; dietro = 4 ripetizioni, diminuire 1-2 ripetizioni a ogni lato per gli scalfi. Davanti destro: Continuare con il motivo 3 su 2 ripetizioni iniziando dal centro davanti. Quando il lavoro misura circa 42-46 cm (aggiustare per finire dopo 1 fiore) continuare con il motivo 3 ma non fare i fiori. Allo stesso tempo modellare il collo come segue: lavorare fino a quando rimangono 2 archetti al centro davanti. Girare e lavorare indietro. Poi lavorare su 1 arco di catenelle in meno sul bordo del collo di righe alterne 3 volte. Continuare a lavorare il motivo fino a quando il lavoro misura 52-56 cm, chiudere. Davanti sinistro: lavorato uguale al davanti destra, invertendo le forme. Dietro: Continuare a lavorare il motivo 3 fino a quando il lavoro misura circa 42-46 cm, poi lavorare il resto senza fiori (come sul davanti). Quando il lavoro misura circa 49-53 cm lavorare la riga successiva come segue: 7 archetti = spalla, a m.b. sui 10 archetti seguenti = collo (lavorare 1 m.b. in ogni archetto e 1 m.b. in ogni m.b. tra gli archi), 7 archetti = spalla. Finire con 1 riga di archetti su ogni spalla. Il lavoro misura circa 52-56 cm, chiudere. Manica: lavorare 51-51 catenelle senza stringere. Girare e lavorare il motivo 1 una volta lungo la riga (2,5 ripetizioni = 15 archetti), poi lavorare il motivo 2 due volte, quindi continuare con il motivo 3. Quando il lavoro misura circa 10 cm aumentare 1 archetti alla fine della riga sul lato destro e sinistro del lavoro in modo alternato per un totale di 8-10 volte, aumentare alla fine di ogni 3 e 4 righe – fare gli aumenti lavorando 4 catenelle, poi 1 m.b. nell’ultima m.b. dalla riga precedente = 23-25 archetti sulla riga. Continuare fino a quando il lavoro misura circa 52-54 cm. Poi lavorare su un archetto in meno alla fine di ogni riga fino a quando il lavoro misura 56-58 cm, chiudere. Confezione: Lavorare insieme i margini delle spalle come segue: * 1 m.b. nel 1° archetto sul davanti, 1 catenella, 1 m.b. nel 1° archetto sul dietro, 1 catenella *, ripetere da * - * su ogni spalla. Lavorare insieme la manica come segue dal margine inferiore: * 1 m.b. da un lato, 2 catenelle, 1 m.b. dall’altro lato *, ripetere da * - * fino a quando rimangono circa 5-9 cm. Attaccare le maniche al corpo nello stesso modo in cui le maniche sono state lavorate insieme. Lavorare 1 riga di m.b. attorno ai bordi con i bottoni e attorno al collo – lavorare in modo stretto attorno al collo in modo che la scollatura non ceda. Occhielli per le asole: fare 3 occhielli lungo il davanti destro. Iniziare dal bordo superiore: * 1 m.b., 3 catenelle, affrancare con 1 m.b. 1 cm sotto, lavorare a m.bss. per circa 8-9 cm più in basso sul bordo * ripetere da * - * fino a quando ci sono 3 occhielli. Attaccare i bottoni sul davanti sinistro. |
|||||||||||||||||||||||||||||||||||||
Spiegazioni del diagramma |
|||||||||||||||||||||||||||||||||||||
|
|||||||||||||||||||||||||||||||||||||
 |
|||||||||||||||||||||||||||||||||||||
 |
|||||||||||||||||||||||||||||||||||||
Avete terminato questo modello?Allora taggate le vostre foto con #dropspattern o inviatele alla #dropsfan gallery. Avete bisogno di aiuto con questo modello?Troverete 7 video tutorial, una sezione per i commenti/domande e molto altro guardando il modello su www.garnstudio.com © 1982-2026 DROPS Design A/S. Ci riserviamo tutti i diritti. Questo documento, compreso tutte le sue sotto-sezioni, è protetto dalle leggi sul copyright. Potete leggere quello che potete fare con i nostri modelli alla fine di ogni modello sul nostro sito. |
|||||||||||||||||||||||||||||||||||||


Con oltre 40 anni di esperienza nel design di modelli di maglia e uncinetto, DROPS Design offre la più estesa collezione di modelli gratuiti su internet - tradotti in 17 lingue. Ad oggi vi possiamo fornire 324 cataloghi e 12290 modelli - 9561 dei quali sono tradotti in Italiano.
Ci stiamo impegnando molto per darvi il meglio che vi possiamo offrire in termini di maglia e uncinetto, ispirazioni e consigli così come filati di grande qualità ad un prezzo incredibile! Volete utilizzare i nostri modelli per qualcosa d'altro oltre al vostro uso personale? Potete leggere tutto ciò che è consentito nel testo sul Copyright in basso su tutte le pagine dei nostri modelli. Buon lavoro!
Lasciare un commento sul modello DROPS 68-15
Noi saremmo felici di ricevere i tuoi commenti e opinioni su questo modello!
Se vuoi fare una domanda, fai per favore attenzione a selezionare la categoria corretta nella casella qui sotto per velocizzare il processo di risposta. I campi richiesti sono indicati da *.