
Categorie popolari
State cercando un filato?


Commenti / Domande (73)
![]() SandraB ha scritto:
SandraB ha scritto:
Hallo! Ik wil graag dit patroon maken. Heb nog niet zovaak kleren gehaakt. Daarom begrijp ik de tweede tekening met de maten niet zo goed. Hoe moet ik die zien?
01.07.2017 - 08:37DROPS Design ha risposto:
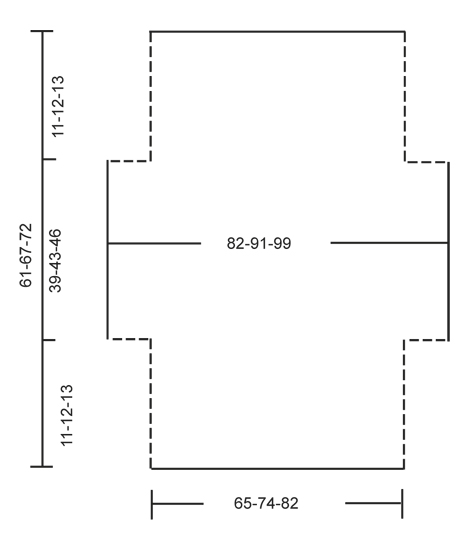
Hoi Sandra, In de tweede tekening zie je het werk wanneer je klaar bent met haken, maar nog niet in elkaar genaaid hebt. Het kledingstuk wordt op de horizontale lijn dubbel gevouwen en op op de stippellijnen aan elkaar gehaakt.
01.07.2017 - 12:01
![]() Elizabeth Baker ha scritto:
Elizabeth Baker ha scritto:
I have finished my 21 1/2 inches and pattern says to not work 12 stitches on either side how then do I start my next row
21.05.2017 - 19:07DROPS Design ha risposto:
Dear Mrs Baker, work next row until 12 sts remain, turn and work next row until 12 sts remain, turn and work next row. You will have now 12 sts unworked on each side. Happy crocheting!
22.05.2017 - 09:54
![]() Elizabeth Baker ha scritto:
Elizabeth Baker ha scritto:
I have finished my 21 1/2 inches and pattern says to not work 12 stitches on either side, how do I start next row?
20.05.2017 - 19:02
![]() Elizabeth Baker ha scritto:
Elizabeth Baker ha scritto:
After I have finished row 8 to continue do I start with A1 or A2 to repeat
01.05.2017 - 16:43DROPS Design ha risposto:
Dear Mrs Baker, after you have worked A.2 1 time in height, repeat A.2 from row 1. Happy croccheting!
02.05.2017 - 11:48
![]() Elizabeth Baker ha scritto:
Elizabeth Baker ha scritto:
After I have finished row 8 do I start with row A1 or A2
01.05.2017 - 16:20DROPS Design ha risposto:
Dear Elizabeth, after row 8, you should continue and repeat pattern A.2. I hope this helps. Happy crocheting!
06.05.2017 - 11:06
![]() GB ha scritto:
GB ha scritto:
Hi, in the pattern directions it says the picot has a DC in the first of the chain 3s, but the video shows a sc instead. Could you clarify please? Thanks!
15.04.2017 - 17:14DROPS Design ha risposto:
Dear GB, you should work 1 dc in 1st of the 3 ch as explained in the pattern and not 1 sc as worked in the video, thanks for noticing. Happy crocheting!
19.04.2017 - 15:24
![]() Mary Ancira ha scritto:
Mary Ancira ha scritto:
The letter sizes, (example- S, M, L,) are not showing what size the bust is like it normally does. Should I assume the sizes are the same on all the patterns?
03.04.2017 - 10:24DROPS Design ha risposto:
Dear Mrs Ancira, you will find at the bottom of the pattern a measurement chart with measurements for each size in cm, taken flat from side to side. Compare these to a similar garment you have and like the shape to find out the matching size. Read more about sizing and convert into inches here. Happy crocheting!
03.04.2017 - 11:25
![]() Stephanie ha scritto:
Stephanie ha scritto:
Bonjour je ne comprends pas l'augmentation, au rang 6 avec l'ajout de maille en l'air que l'on crochete apres avec une bride un ml une bride et ensuite crochete le reste comment ? c'est la que je saisis pas , parce que logiquement on serait sur le rang 7 mais ensuite encore au rang 7 ,pouvez vous m'expliquer merci
14.02.2017 - 00:10DROPS Design ha risposto:
Bonjour Stéphanie, la 1ère augmentation sur le côté se fait à la fin du rang 5 (= le rang suivant sera le rang 6), on crochète 14 ml à la fin de ce rang, on tourne, on crochète 11B, puis le rang 6 de A.2 et on crochète 15 ml à la fin du rang 6, on tourne, on crochète 1B, 1 ml sur les nouvelles ml et on continue le rang 7 comme A.2. Puis on continue A.2 sur toutes les mailles. Bon crochet!
14.02.2017 - 09:32
![]() Jasmine ha scritto:
Jasmine ha scritto:
Dear Jasmine, "on row 1 in A.1 work 1 dc in each st," So since I have 92 stitches in A.1 I need to do 92 DC stitches all the way across?
21.01.2017 - 03:45DROPS Design ha risposto:
Dear Jasmine, you should have 92 dc on first row, then work: A.1A (= 4 sts), repeat A.1B a total of 7 times (= 7 x 12 sts), and finish with A.1C (= 4 sts), ie: 3 + (x12=84) + 4= 91 sts. Happy crocheting!
23.01.2017 - 09:29Leonore ha scritto:
This pattern doesnt make any sence. Row one is clear to work. From there on i dont understand anything! Please write out the pattern. I dont work with diagrams or whatever this confusuon is called. Please help!
17.12.2016 - 18:45DROPS Design ha risposto:
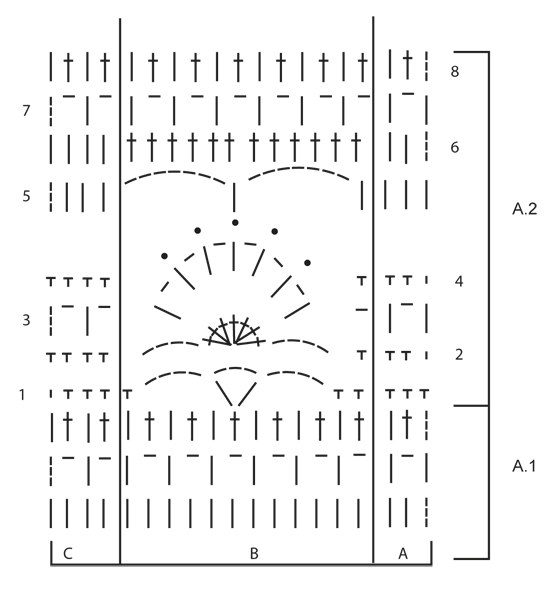
Dear Leonore, there is only diagram to this pattern, start reading diagram from the bottom corner on the right side and read towards the left from RS and from left to right from WS. Each symbol represents 1 st/group of sts. work A.1A (= 3 sts), then repeat A.1B (= 12 sts) and finish with A.1C (= 4 sts). You are welcome to contact your DROPS store for any further individual assistance. Happy crocheting!
19.12.2016 - 09:17
|
||||||||||||||||
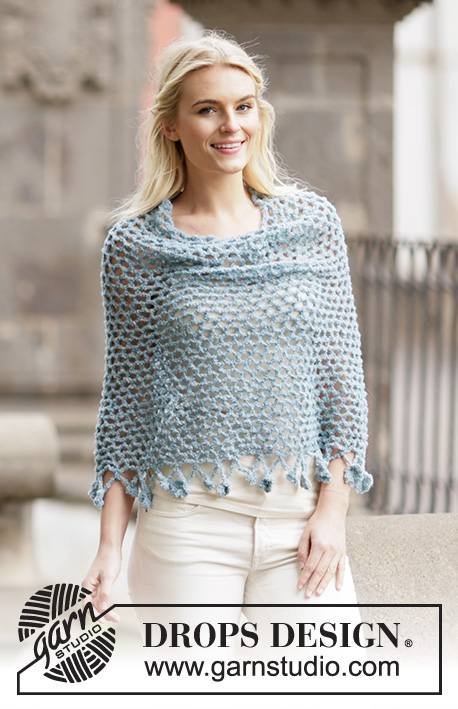
Blue Wonder#bluewondershoulderpiece |
||||||||||||||||
 |
 |
|||||||||||||||
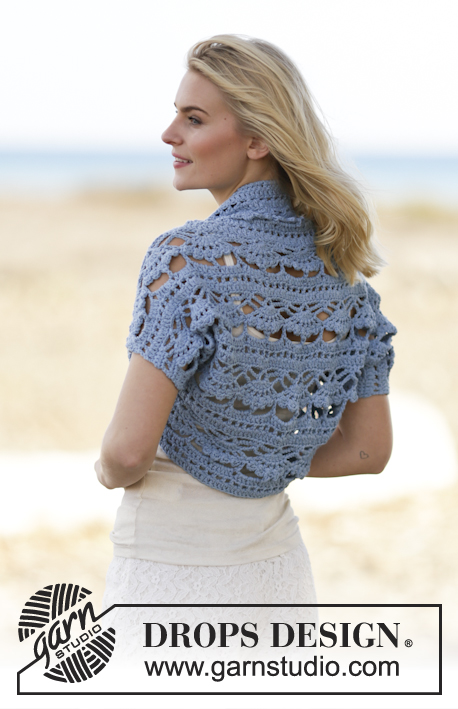
Coprispalle DROPS lavorato all’uncinetto in "Paris". Taglie S - XXXL.
DROPS 162-34 |
||||||||||||||||
|
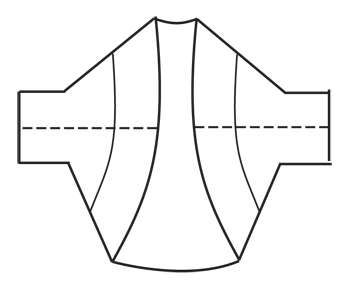
MOTIVO: Vedere i diagrammi A.1 e A.2. --------------------------------------------------------- COPRISPALLE: Avviare 110-125-139 cat con l’uncinetto n° 5 mm con Paris. RIGA 1: Girare e lavorare 1 m.a nella 4° cat dall’uncinetto (= 2 m.a), lavorare 1 m.a in ognuna delle 4-1-3 cat successive, * saltare 1 cat, 1 m.a in ognuna delle 5 cat successive *, ripetere *-* = 91-103-115 m.a. RIGA 2: Poi lavorare secondo il diagramma A.1 come segue: A.1 A, A.1 B 7-8-9 volte in totale, finire con A.1 C. Quando A.1 è stato lavorato 1 volta in verticale, ripetere A.2 verso l’alto. ALLO STESSO TEMPO quando il lavoro misura circa 11-12-13 cm (aggiustarlo in modo che la riga successive sia la 6° riga di A.2), lavorare 14 cat alla fine della riga (= riga 5). Girare e lavorare 1 m.a nella 4° cat dall’uncinetto, poi lavorare 1 m.a in ognuna delle 10 nuove cat successive. Continuare con la 6° riga di A.2, alla fine della riga lavorare 15 nuove cat. Girare e lavorare 1 m.a nella 6° cat dall’uncinetto, * lavorare 1 cat, saltare 1 cat, 1 m.a nella cat successiva *, ripetere *-* sulle 9 nuove cat successive, finire con 1 cat. Lavorare il resto della riga secondo A.2. Sulla riga successiva lavorare come prima fino alle nuove m alla fine della riga, lavorare 1 m.a in ogni spazio di cat e 1 m.a in ogni m.a. Sono state aumentate 12 m.a a ogni lato = 115-127-139 m.a. Poi continuare sulla riga 8 come segue: A.2 A, A.2 B 9-10-11 volte in totale, finire con A.2 C. Quando il lavoro misura circa 50-55-59 cm (aggiustarlo in modo che la riga successive sia la 7° riga), non lavorare sulle 12 m.a a ogni lato = 91-103-115 m.a. Continuare a lavorare come segue: A.2 A, A.2 B 7-8-9 volte in totale, finire con A.2 C. Continuare fino a quando il lavoro misura circa 61-67-72 cm – aggiustarlo dopo un’intera ripetizione di A.2. Chiudere e affrancare. CONFEZIONE: Cucire i margini dei lati e sotto il braccio all’interno della m di vivagno. |
||||||||||||||||
Spiegazioni del diagramma |
||||||||||||||||
|
||||||||||||||||
 |
||||||||||||||||
 |
||||||||||||||||
 |
||||||||||||||||
Avete terminato questo modello?Allora taggate le vostre foto con #dropspattern #bluewondershoulderpiece o inviatele alla #dropsfan gallery. Avete bisogno di aiuto con questo modello?Troverete 7 video tutorial, una sezione per i commenti/domande e molto altro guardando il modello su www.garnstudio.com © 1982-2026 DROPS Design A/S. Ci riserviamo tutti i diritti. Questo documento, compreso tutte le sue sotto-sezioni, è protetto dalle leggi sul copyright. Potete leggere quello che potete fare con i nostri modelli alla fine di ogni modello sul nostro sito. |
||||||||||||||||


Con oltre 40 anni di esperienza nel design di modelli di maglia e uncinetto, DROPS Design offre la più estesa collezione di modelli gratuiti su internet - tradotti in 17 lingue. Ad oggi vi possiamo fornire 324 cataloghi e 12290 modelli - 9561 dei quali sono tradotti in Italiano.
Ci stiamo impegnando molto per darvi il meglio che vi possiamo offrire in termini di maglia e uncinetto, ispirazioni e consigli così come filati di grande qualità ad un prezzo incredibile! Volete utilizzare i nostri modelli per qualcosa d'altro oltre al vostro uso personale? Potete leggere tutto ciò che è consentito nel testo sul Copyright in basso su tutte le pagine dei nostri modelli. Buon lavoro!
Lasciare un commento sul modello DROPS 162-34
Noi saremmo felici di ricevere i tuoi commenti e opinioni su questo modello!
Se vuoi fare una domanda, fai per favore attenzione a selezionare la categoria corretta nella casella qui sotto per velocizzare il processo di risposta. I campi richiesti sono indicati da *.