
Categorie popolari
State cercando un filato?


Commenti / Domande (66)
![]() Saskia ha scritto:
Saskia ha scritto:
Oh dus alleen A3 3 keer herhalen. ik snap het.Bedankt.
02.02.2016 - 15:44
![]() Saskia ha scritto:
Saskia ha scritto:
Ik haak de grootste maat. ketting van 100 lossen en na toer twee zijn er 85 steken over.\ Dan komt toer 3, a1=8 stk dan a2 (18)en a3(17), 3 maal...dat zijn dus 3 maal 35 steken? Dat zijn 105 steken..en dan nog eens 8 stk van A4 Dus 121 steken totaal.....niet 85. of zie ik dit nu compleet verkeerd?
01.02.2016 - 14:03DROPS Design ha risposto:
Hoi Saskia. Je leest het patroon als volgt: Haak in PATROON volgens telpatroon A.1 (= 8 stk), haak dan A.2 (= 18 stk), A.3 (= 17 stk) 3 keer in de breedte en eindig met A.4 (= 8 stk). Dus 8 + 18 + 51 (3 keer 17 st A.3) + 8 = 85 st
01.02.2016 - 15:49
![]() Helene ha scritto:
Helene ha scritto:
Hei! Kan noen forklare (med teskje og i detalje) hvordan jeg skal gjøre etter jeg har sett merket? Der det står: 1 RAD 6 løse lm.start på rad 5 i A.X og hekle slik....klarer ikke å skjønne det her...
11.11.2015 - 14:10DROPS Design ha risposto:
Hej Helene, Du starter ved pilen i diagrammet = 5.rad, men springer ind til A.2 og hækler videre derfra. Se også gerne tidligere spørgsmål og svar. God fornøjelse!
26.11.2015 - 09:17
![]() Emily ha scritto:
Emily ha scritto:
I finished a.y. With the last stitch on my left, I will cut the yarn, ch 6, en join on the right hand side of the piece OPPOSITE from where I cut the yarn. Is this correct, OR do I cut, ch 6, then start stitching at the same end where I cut?
29.10.2015 - 19:35DROPS Design ha risposto:
Dear Emily, the last row in A.Y is worked from WS, cut the yarn, turn work - next row will be worked from RS after the ch6. Happy crocheting!
30.10.2015 - 09:56
![]() Emily ha scritto:
Emily ha scritto:
Sorry for the repeat posts. After cutting, do I join on the opposite end from where I cut?
29.10.2015 - 11:03DROPS Design ha risposto:
Dear Emily, after cutting yarn, next row has to be worked from RS - see below. Happy crocheting!
29.10.2015 - 11:56
![]() Emily ha scritto:
Emily ha scritto:
Thank you so much for your previous prompt reply!! I have completed A.Y. I don't see why it is necessary to cut the yarn. But, if I do cut, then do I simply flip the piece and reattach on the opposite end?
29.10.2015 - 10:58DROPS Design ha risposto:
Dear Emily, after you have cut your yarn (after A.Y), crochet loosely 6 ch, then work 5th row in A.X from RS : work A.2 1 time, then work A.4 5 times, and finish with 8 loose ch (= 5 ch to inc + 3 ch to turn with that replace 1st tr) = these ch on each side are worked for the "body" of bolero so that inc are symetrical. Happy crocheting!
29.10.2015 - 11:55
![]() Emily ha scritto:
Emily ha scritto:
Thank you so much for your previous prompt reply!! I have completed A.Y. I don't see why it is necessary to cut the yarn. But, if I do cut, then do I simply flip the piece and reattach on the opposite end?
29.10.2015 - 03:06DROPS Design ha risposto:
Dear Emily, after A.Y you cut the yarn and continue with row 1 from RS by crocheting 6 loose ch, then work A.X as stated, and finish first row with 8 loose ch (so that increase on each side are symetricals). Happy crocheting!
29.10.2015 - 09:25
![]() Emily ha scritto:
Emily ha scritto:
I'm working for the largest size, After A.X worked 1 time, continue middle 4 repetitions, "increase in each side of piece." DOES THIS MEAN increase by one DC at both ends of each row?
27.10.2015 - 14:03DROPS Design ha risposto:
Dear Emily, after A.X has been worked 1 time in height, work as before and increase following A.Y at the beg and end of row, and work the 4 middle repetitions as before. When A.Y has been worked 1 time in height, insert a maarker and cut the yarn. Happy crocheting!
27.10.2015 - 15:09
![]() Doenja ha scritto:
Doenja ha scritto:
Dit is een super mooi Model maar ik snap niet de TIP van 5 losse meer....ivm de 3 losse ipv het 1e stokje...dus ik zou in TTL 8 lossen ipv. het 1e stokje moeten haken ? Ook al krijg je dan grote gaten aan het begin van de rij .? Alvast bedankt voor de opheldering.
20.08.2015 - 15:32DROPS Design ha risposto:
Hoi Doenja. Normaal vervang je het eerste stk door 3 l, maar volgens de tip kan je vervangen door 5 om de rand wat losser te krijgen. Je haakt dus in totaal 5 ipv 3 en GEEN 8
24.08.2015 - 14:57
![]() Maria ha scritto:
Maria ha scritto:
Jeg lurte på hvordan jeg skal jøre det fra : vidre hekles det slik fra retten. 1.rad: 6 løse lm. start på 5.rad i A.X og hekle slik A.2 1 gang over den første raporten i høyre side av arb. jeg er ikke helt sikker på hvordan jeg skal starte der.
22.05.2015 - 13:10DROPS Design ha risposto:
Du starter ved pilen i diagrammet = 5.rad, men springer ind til A.2 og hækler videre derfra. God fornøjelse!
27.05.2015 - 15:11
|
|||||||||||||||||||||||||||||||
Such A Doll#suchadollbolero |
|||||||||||||||||||||||||||||||
 |
 |
||||||||||||||||||||||||||||||
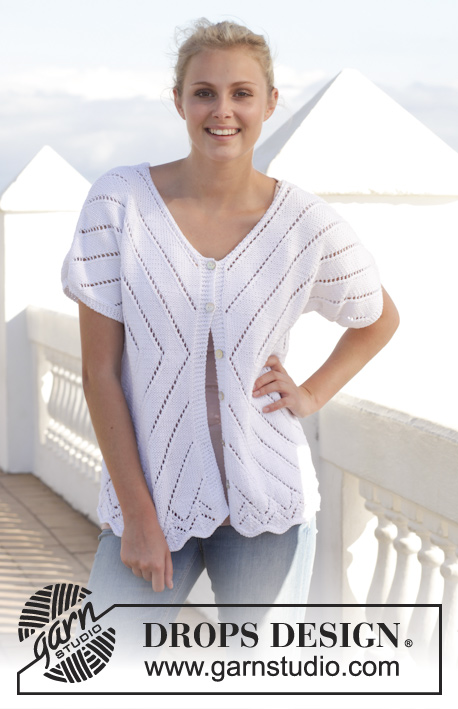
Bolero DROPS all’uncinetto, con motivo traforato e maglia alte, in "Safran". Taglie: Dalla S alla XXXL.
DROPS 152-20 |
|||||||||||||||||||||||||||||||
|
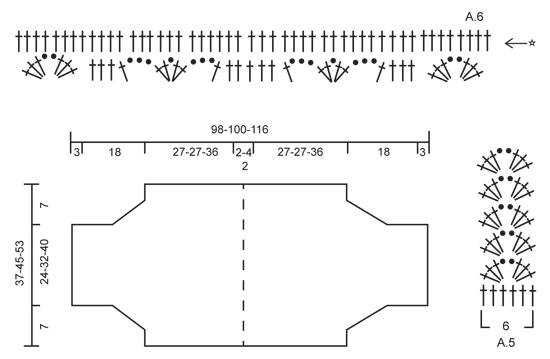
INFORMAZIONI PER IL LAVORO: Sostituire la prima m.a all’inizio di ogni riga di m.a con 3 cat. SUGGERIMENTO PER IL LAVORO: Per evitare che i bordi siano troppo stretti, avviare 5 cat in più per girare il lavoro, da ciascun lato. MOTIVO: Vedere i diagrammi da A.1 a A.6. I diagrammi mostrano tutte le righe del motivo, viste sul diritto del lavoro. ---------------------------------------------------------- BOLERO: Si lavora in due parti, unite insieme al centro, sul dietro. PRIMA PARTE: Con l’uncinetto n° 4 ed il filato Safran avviare 61-81-100 cat morbide. Lavorare la prima riga come segue (= diritto del lavoro): 1 m.a nella 4a cat dall’uncinetto (= 2 m.a), 1-0-1 m.a in ognuna delle 1-0-5 cat successive, * saltare 1 cat, 1 m.a in ognuna delle 6 cat successive *, ripetere da *-* altre 7-10-12 volte (8-11-13 volte in tutto) = 51-68-85 m.a. Girare e lavorare 1 riga con 1 m.a in ogni m.a della riga precedente. ATTENZIONE! Questa riga è la seconda riga dei diagrammi A.1, A.2, A.3 e A.4. Proseguire come segue sul diritto del lavoro – VEDERE IL SUGGERIMENTO PER IL LAVORO: RIGA 1: (= 3a riga dei diagrammi A.1, A.2, A.3 e A.4). Lavorare il MOTIVO seguendo il diagramma A.1 (= 8 m.a). Proseguire con il diagramma A.2 (= 18 m.a), ripetere il diagramma A.3 (= 17 m.a) 1-2-3 volte in larghezza, finire con il diagramma A.4 (= 8 m.a). Proseguire con il motivo seguendo i diagrammi A.1, A.2, A.3 e A.4 avanti e indietro in questo modo fino all’11a riga del motivo. Nel corso dell’11a riga, lavorare da ciascun lato 9 m.a triple al posto delle m.a (quindi nei diagrammi A.1 e A.4, nella prima m del diagramma A.2 e nell’ultima m del diagramma A.3). Quando il diagramma A.X è stato lavorato 1 volta in verticale, proseguire le 2-3-4 ripetizioni al centro come prima; ALLO STESSO TEMPO, aggiungere ai lati (quindi nei diagrammi A.1 e A.4) una nuova ripetizione del motivo, da ciascun lato delle maniche (= A.Y). Quando il diagramma A.Y è stato lavorato 1 volta in verticale, inserire un segno in questa riga. Tagliare il filo. Proseguire come segue sul diritto del lavoro: RIGA 1: avviare 6 cat morbide. Iniziare dalla riga 5 del diagramma A.X e lavorare come segue: diagramma A.2 1 volta sulle prime ripetizioni sulla destra (= la ripetizione aggiunta del diagramma A.1), ripetere il diagramma A.3 3-4-5 volte in tutto. Finire con 8 cat morbide (comprese 3 cat per girare il lavoro = 1 m.a). Girare il lavoro. RIGA 2: Lavorare il diagramma A.5 (=6 m.a), iniziare nella 4a cat dall’uncinetto. ATTENZIONE! Le 3 cat con cui girare il lavoro = prima m.a del diagramma A.5. Ripetere il diagramma A.3 3-4-5 volte in tutto, diagramma A.2 1 volta e prima riga del diagramma A.5 nelle 6 cat successive. Girare il lavoro. RIGA 3: Avviare 5 cat per girare il lavoro - vedere il SUGGERIMENTO PER IL LAVORO. Proseguire con il motivo come prima. Lavorare il motivo in questo modo avanti e indietro finché il lavoro non misura 48-48-57 cm dall’inizio del bordo e finché non sono state lavorate 3-3-4 ripetizioni in verticale dal segno. Proseguire con il bordo a m.a seguendo il diagramma A.6. ATTENZIONE! Lavorare seguendo la 2a riga del diagramma. Tagliare il filo. Lavorare la seconda parte in modo uguale. CONFEZIONE: Cucire le due parti insieme al centro, sul dietro. Piegare il bolero in due nel senso della lunghezza, e cucire insieme iniziando dalla parte inferiore di ogni manica e risalendo fino al segno sul lato - cucire bordo contro bordo per evitare una cucitura troppo spessa. |
|||||||||||||||||||||||||||||||
Spiegazioni del diagramma |
|||||||||||||||||||||||||||||||
|
|||||||||||||||||||||||||||||||
 |
|||||||||||||||||||||||||||||||
 |
|||||||||||||||||||||||||||||||
Avete terminato questo modello?Allora taggate le vostre foto con #dropspattern #suchadollbolero o inviatele alla #dropsfan gallery. Avete bisogno di aiuto con questo modello?Troverete 5 video tutorial, una sezione per i commenti/domande e molto altro guardando il modello su www.garnstudio.com © 1982-2026 DROPS Design A/S. Ci riserviamo tutti i diritti. Questo documento, compreso tutte le sue sotto-sezioni, è protetto dalle leggi sul copyright. Potete leggere quello che potete fare con i nostri modelli alla fine di ogni modello sul nostro sito. |
|||||||||||||||||||||||||||||||


Con oltre 40 anni di esperienza nel design di modelli di maglia e uncinetto, DROPS Design offre la più estesa collezione di modelli gratuiti su internet - tradotti in 17 lingue. Ad oggi vi possiamo fornire 324 cataloghi e 12245 modelli - 9515 dei quali sono tradotti in Italiano.
Ci stiamo impegnando molto per darvi il meglio che vi possiamo offrire in termini di maglia e uncinetto, ispirazioni e consigli così come filati di grande qualità ad un prezzo incredibile! Volete utilizzare i nostri modelli per qualcosa d'altro oltre al vostro uso personale? Potete leggere tutto ciò che è consentito nel testo sul Copyright in basso su tutte le pagine dei nostri modelli. Buon lavoro!
Lasciare un commento sul modello DROPS 152-20
Noi saremmo felici di ricevere i tuoi commenti e opinioni su questo modello!
Se vuoi fare una domanda, fai per favore attenzione a selezionare la categoria corretta nella casella qui sotto per velocizzare il processo di risposta. I campi richiesti sono indicati da *.