
Categorie popolari
State cercando un filato?


Commenti / Domande (66)
![]() Kerry Field ha scritto:
Kerry Field ha scritto:
Brilliant thank you so much for your clarification 💖
26.06.2020 - 09:54
![]() Kerry Field ha scritto:
Kerry Field ha scritto:
Thank you for your prompt response to my question but if we loosely chain 6 do we then work Row 5 into the chain stitches if so there isn’t enough for the 8 trebles that should be in that section or is A1 ignored from the repetition stages? Thanks!
26.06.2020 - 07:43DROPS Design ha risposto:
Dear Mrs Field, at the beginning of this row crochet the 6 chains (you will crochet A.5B in these 6 chains on row 2), then crochet A.2 and repeat A.3, crochet 8 chains (= 5 chains + 3 to turn with). Turn and crochet now A.5 over the chains before A.3, repeat A.3 and work A.2 + A.5 over the 6 chains worked at the beg of row 1. (you don't crochet A.1 anymore). Hope this will help.
26.06.2020 - 08:03
![]() Kerry Field ha scritto:
Kerry Field ha scritto:
After AX and AY have been completed once and the marker has been inserted I understand the yarn is cut and then we work again from the right side. Please can you confirm the amount of trebles that should be at the start and end of Row 1 and Row 2 - is it 12 as per row 5?
25.06.2020 - 19:06DROPS Design ha risposto:
Dear Mrs Field, A.2 starts on row 5 with 5 trebles (= worked over a total of 18 trebles). The first 8 trebles at the arrow 5 are the 8 stitches in A.1. Happy crocheting!
26.06.2020 - 07:20
![]() LINDA ha scritto:
LINDA ha scritto:
I am having problems with the measurments. The startin chain of 81, is that going to be the back OR the sleeve opening? I might be crocheting too loose as it seems to become huge
02.05.2020 - 06:04DROPS Design ha risposto:
Dear Linda, each side is worked from mid back towards sleeve edge, ie the 81 chains is for mid back, on first row you should have only 68 sts - since the fundation chain is most of the time too tight, you cast on here more chains and skip chains evenly on first row to avoid tight edge - if your foundation chain is not that tight you can cast on the number of stitches required - remember to replace the first st with 3 chains; Happy crocheting!
04.05.2020 - 11:32
![]() Susanne Ortvald ha scritto:
Susanne Ortvald ha scritto:
Jeg har læst tidligere kommentaren. Men forstår det stadig ikke. Skal jeg når jeg har hæklet række 1-11 I A.X, fortsætte med at hækle række 5-11 2 gange mere, så jeg I alt har dette mønster 3 gange, før jeg fortsætter med række 12 og A.Y?
27.02.2019 - 15:45DROPS Design ha risposto:
Hei Susanne. Etter at du har heklet A.x 1 gang i høyden (til og med omgang 12) hekler du som vist i A.Y. Det vil si at A.2 og A.3 fortsetter som før, mens det vokser ut 1 ny rapport av mønsteret i hver side (altså A.1 og A.4). Når A.Y er heklet ferdig i høyden hekler du videre fra rad 5 i A.X, med luftmasker i hver side som forklart under 1. RAD. God fornøyelse
07.03.2019 - 15:11
![]() Lara ha scritto:
Lara ha scritto:
Ik haak de kleinste maat. Mij is alleen niet duidelijk vanaf waar ik moet gaan herhalen en hoe vaak. Dit is voor het eerst dat ik zo’ n soort project als een vestje haak, dus best ingewikkeld.. Bedankt alvast!
12.06.2018 - 14:19Oana ha scritto:
Hi! I crochet toys so this is a first for me. Can you please explain the 3rd row for me. It says to crochet A1,A2,A3 for 1,2,3 guessing those are the sizes, then finish with A4. I'm working a xl and apparently I don't have enough chains to repeat 3 times. So what should I repeat and what am I doing wrong? Sorry for the bad English, i'm from Romania.
07.11.2017 - 18:52DROPS Design ha risposto:
Dear Oana, in size XL you have 68 tr (UK-English)/dc(US-English) and work the 3rd row as follows: A.18 (= over the first 8 tr/dc), work then A.2 (= 18 tr/dc) over the next 18 sts, then repeat A.2 (=17 tr/dc) over the next 34 sts (= 2 times in width), and finish with A.4 over the last 8 sts: 8 + 18 + 34 + 8 = 68 sts. Happy crocheting!
08.11.2017 - 08:42
![]() Natasja Buijk ha scritto:
Natasja Buijk ha scritto:
Hallo , Ik wil graag de bolero maken. Alleen kom ik Uit het volgende niet uit : klopt het dat je bij de mouwen begint ? En wat word er met de volgende stukje patroon bedoeld ? ( ik snap met name het stukje van dan1-0-1 stk in elke van de volgende 1-0-5 l) Ik hoop dat ik geholpen kan worden Groetjes Natasja
02.04.2017 - 21:55DROPS Design ha risposto:
Hoi Natasja, Dat klopt; je haakt vanaf de mouw naar midden achter. 1-0-1 stk slaat op de verschillende maten, dus 1 stokje voor maat S/M, 0 stjokjes voor maat L/XL enzovoort. Dus als je bijv. in de maat XXXL haakt, dan haak je 1 stokje in elk van de volgende 5 lossen, dan sla je 1 losse over, dus daar haak je geen stokje in en dan haak je 1 stokje in elk van de volgende 6 lossen. Dit herhaal je nog 12 keer.
03.04.2017 - 08:36
![]() France Boisseau ha scritto:
France Boisseau ha scritto:
Bonjour, j'ai un problème avec le point de fantaisie. Lorsque vous dites "crocheter en aller-retour", est-ce que je dois crocheter par exemple A.2 tel qu'il se présente sur le diagramme ou dois-je le faire à rebours sur le rang envers? Merci.
01.09.2016 - 14:38DROPS Design ha risposto:
Bonjour Mme Boisseau, quand on crochète en allers et retours, on lit les diagrammes de droite à gauche sur l'endroit et de gauche à droite sur l'envers. Bon crochet!
01.09.2016 - 15:09
![]() Jolanda ha scritto:
Jolanda ha scritto:
Hoeveel losse zet ik op voor maat XL? (als dit maat 46 is)
03.05.2016 - 22:16DROPS Design ha risposto:
Hoi Jolanda. Dan kies je maat L/XL: 81 lossen
09.05.2016 - 14:40
|
|||||||||||||||||||||||||||||||
Such A Doll#suchadollbolero |
|||||||||||||||||||||||||||||||
 |
 |
||||||||||||||||||||||||||||||
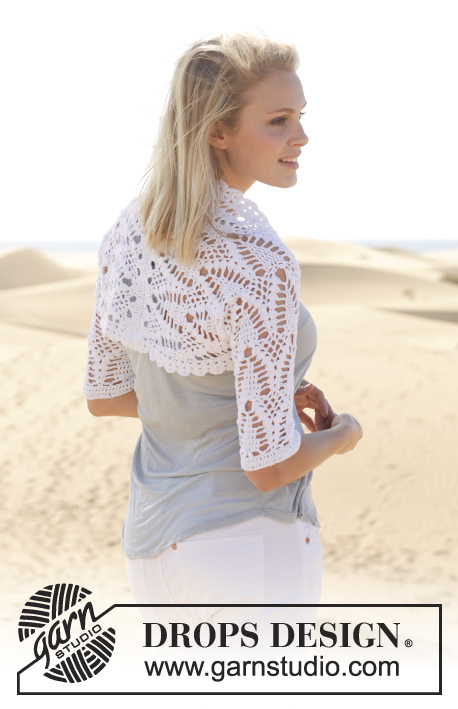
Bolero DROPS all’uncinetto, con motivo traforato e maglia alte, in "Safran". Taglie: Dalla S alla XXXL.
DROPS 152-20 |
|||||||||||||||||||||||||||||||
|
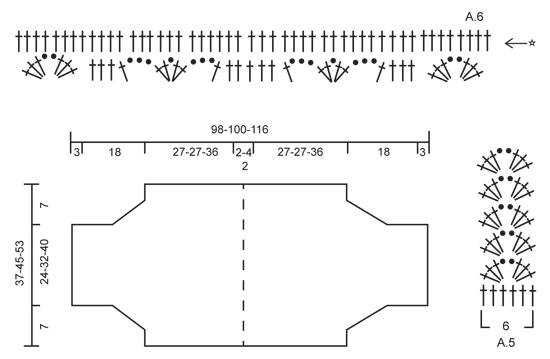
INFORMAZIONI PER IL LAVORO: Sostituire la prima m.a all’inizio di ogni riga di m.a con 3 cat. SUGGERIMENTO PER IL LAVORO: Per evitare che i bordi siano troppo stretti, avviare 5 cat in più per girare il lavoro, da ciascun lato. MOTIVO: Vedere i diagrammi da A.1 a A.6. I diagrammi mostrano tutte le righe del motivo, viste sul diritto del lavoro. ---------------------------------------------------------- BOLERO: Si lavora in due parti, unite insieme al centro, sul dietro. PRIMA PARTE: Con l’uncinetto n° 4 ed il filato Safran avviare 61-81-100 cat morbide. Lavorare la prima riga come segue (= diritto del lavoro): 1 m.a nella 4a cat dall’uncinetto (= 2 m.a), 1-0-1 m.a in ognuna delle 1-0-5 cat successive, * saltare 1 cat, 1 m.a in ognuna delle 6 cat successive *, ripetere da *-* altre 7-10-12 volte (8-11-13 volte in tutto) = 51-68-85 m.a. Girare e lavorare 1 riga con 1 m.a in ogni m.a della riga precedente. ATTENZIONE! Questa riga è la seconda riga dei diagrammi A.1, A.2, A.3 e A.4. Proseguire come segue sul diritto del lavoro – VEDERE IL SUGGERIMENTO PER IL LAVORO: RIGA 1: (= 3a riga dei diagrammi A.1, A.2, A.3 e A.4). Lavorare il MOTIVO seguendo il diagramma A.1 (= 8 m.a). Proseguire con il diagramma A.2 (= 18 m.a), ripetere il diagramma A.3 (= 17 m.a) 1-2-3 volte in larghezza, finire con il diagramma A.4 (= 8 m.a). Proseguire con il motivo seguendo i diagrammi A.1, A.2, A.3 e A.4 avanti e indietro in questo modo fino all’11a riga del motivo. Nel corso dell’11a riga, lavorare da ciascun lato 9 m.a triple al posto delle m.a (quindi nei diagrammi A.1 e A.4, nella prima m del diagramma A.2 e nell’ultima m del diagramma A.3). Quando il diagramma A.X è stato lavorato 1 volta in verticale, proseguire le 2-3-4 ripetizioni al centro come prima; ALLO STESSO TEMPO, aggiungere ai lati (quindi nei diagrammi A.1 e A.4) una nuova ripetizione del motivo, da ciascun lato delle maniche (= A.Y). Quando il diagramma A.Y è stato lavorato 1 volta in verticale, inserire un segno in questa riga. Tagliare il filo. Proseguire come segue sul diritto del lavoro: RIGA 1: avviare 6 cat morbide. Iniziare dalla riga 5 del diagramma A.X e lavorare come segue: diagramma A.2 1 volta sulle prime ripetizioni sulla destra (= la ripetizione aggiunta del diagramma A.1), ripetere il diagramma A.3 3-4-5 volte in tutto. Finire con 8 cat morbide (comprese 3 cat per girare il lavoro = 1 m.a). Girare il lavoro. RIGA 2: Lavorare il diagramma A.5 (=6 m.a), iniziare nella 4a cat dall’uncinetto. ATTENZIONE! Le 3 cat con cui girare il lavoro = prima m.a del diagramma A.5. Ripetere il diagramma A.3 3-4-5 volte in tutto, diagramma A.2 1 volta e prima riga del diagramma A.5 nelle 6 cat successive. Girare il lavoro. RIGA 3: Avviare 5 cat per girare il lavoro - vedere il SUGGERIMENTO PER IL LAVORO. Proseguire con il motivo come prima. Lavorare il motivo in questo modo avanti e indietro finché il lavoro non misura 48-48-57 cm dall’inizio del bordo e finché non sono state lavorate 3-3-4 ripetizioni in verticale dal segno. Proseguire con il bordo a m.a seguendo il diagramma A.6. ATTENZIONE! Lavorare seguendo la 2a riga del diagramma. Tagliare il filo. Lavorare la seconda parte in modo uguale. CONFEZIONE: Cucire le due parti insieme al centro, sul dietro. Piegare il bolero in due nel senso della lunghezza, e cucire insieme iniziando dalla parte inferiore di ogni manica e risalendo fino al segno sul lato - cucire bordo contro bordo per evitare una cucitura troppo spessa. |
|||||||||||||||||||||||||||||||
Spiegazioni del diagramma |
|||||||||||||||||||||||||||||||
|
|||||||||||||||||||||||||||||||
 |
|||||||||||||||||||||||||||||||
 |
|||||||||||||||||||||||||||||||
Avete terminato questo modello?Allora taggate le vostre foto con #dropspattern #suchadollbolero o inviatele alla #dropsfan gallery. Avete bisogno di aiuto con questo modello?Troverete 5 video tutorial, una sezione per i commenti/domande e molto altro guardando il modello su www.garnstudio.com © 1982-2026 DROPS Design A/S. Ci riserviamo tutti i diritti. Questo documento, compreso tutte le sue sotto-sezioni, è protetto dalle leggi sul copyright. Potete leggere quello che potete fare con i nostri modelli alla fine di ogni modello sul nostro sito. |
|||||||||||||||||||||||||||||||


Con oltre 40 anni di esperienza nel design di modelli di maglia e uncinetto, DROPS Design offre la più estesa collezione di modelli gratuiti su internet - tradotti in 17 lingue. Ad oggi vi possiamo fornire 324 cataloghi e 12245 modelli - 9515 dei quali sono tradotti in Italiano.
Ci stiamo impegnando molto per darvi il meglio che vi possiamo offrire in termini di maglia e uncinetto, ispirazioni e consigli così come filati di grande qualità ad un prezzo incredibile! Volete utilizzare i nostri modelli per qualcosa d'altro oltre al vostro uso personale? Potete leggere tutto ciò che è consentito nel testo sul Copyright in basso su tutte le pagine dei nostri modelli. Buon lavoro!
Lasciare un commento sul modello DROPS 152-20
Noi saremmo felici di ricevere i tuoi commenti e opinioni su questo modello!
Se vuoi fare una domanda, fai per favore attenzione a selezionare la categoria corretta nella casella qui sotto per velocizzare il processo di risposta. I campi richiesti sono indicati da *.