
Categorie popolari
State cercando un filato?


Commenti / Domande (62)
![]() Leena ha scritto:
Leena ha scritto:
Thank you for your reply. I did manage to work it out and now well on my way to finishing this beautiful neck warmer.
06.10.2025 - 09:56
![]() Leena ha scritto:
Leena ha scritto:
I don’t understand how to get 256 trebles. Whatever I do, there are only 128. Please help. Thank you
24.09.2025 - 10:11DROPS Design ha risposto:
Dear Leena, first you work 1 round in the back loops of the ch = 128 tr. Now we work 1 round in the front loops of these same ch = 128 tr. 128+128 = 256 tr. Now you will work the 2nd round over all 256 tr. Happy crochetting!
05.10.2025 - 23:49
![]() Georgina ha scritto:
Georgina ha scritto:
I am sure some people love your charts. Not me! I would prefer written instructions for all your patterns. Any chance you can provide both? Thanks
28.09.2016 - 12:00DROPS Design ha risposto:
Dear Georgina, this pattern is only available with a diagram, you will find each symbol and the matching st it reprensents under "diagram text". start reading diagram on the bottom corner on the left side and read every round from the right towards the left. Remember your DROPS store will also have tips and advices for you. Happy crocheting!
28.09.2016 - 12:05
![]() Willy De Groot ha scritto:
Willy De Groot ha scritto:
De 1e tour heb ik met stokjes gehaakt en toen gesloten, maar nu snap de 2e tour niet, hoe ik aan die 256 steken krijg
26.05.2016 - 21:39DROPS Design ha risposto:
Hoi Willy. Dat komt door dat je doorgaat met haken in de voorste lus. Je hebt eerst 128 st gehaakt in de achterste lus, dan verder in de rondte over de 128 st nog een keer, maar nu in de voorste lus = 128+128 = 256 st.
27.05.2016 - 12:41
![]() Martina ha scritto:
Martina ha scritto:
Danke für die schnelle Antwort! Das hat mir echt geholfen!
15.09.2014 - 19:39
![]() Martina ha scritto:
Martina ha scritto:
Hallo, muss ich nach der Runde mit den LM/fM noch eine Runde mit Kettmaschen und LM machen, ehe ich zum Mustersatz komme? Oder wie ist das in der Häkelschrift gemeint? Ich meine die Reihe mit "v und -". Danke schon mal für die Antwort.
14.09.2014 - 12:11DROPS Design ha risposto:
Die 1. R im Diagramm (mit den Stb-Symbolen) ist die 2. Rd in der Beschreibung, die 2. R im Diagramm (mit den Symbolen für fM und Lm) ist die 3. Rd in der Beschreibung. Dann kommt die R mit dem Sternchen: 2 Kett-M (= 2x das Symbol "v") und 3 Lm (= 3 senkrechte Striche übereinander) um den 1. Lm-Bogen, dann um den nächsten Lm-Bogen 3 Stb, 1 Lm und 3 Stb, dann um den nächsten Bogen 1 Stb, um den nächsten Bogen 3 Stb 1 Lm und 3 Stb usw.
14.09.2014 - 20:45
![]() Marleen Staessens ha scritto:
Marleen Staessens ha scritto:
Ok! ik heb op video geklikt en nu verschenen alle video's o.a moeibus mijn vraag is dus beantwoord
03.02.2014 - 16:48DROPS Design ha risposto:
Hoi Marleen. Mooi - veel werkplezier.
04.02.2014 - 13:59
![]() Marleen Staessens ha scritto:
Marleen Staessens ha scritto:
Hoe raak ik aan deze video aub? Onder welke naam moet ik kijken ?
03.02.2014 - 16:37
![]() Sylvia ha scritto:
Sylvia ha scritto:
Wird am musteranfang M1 immer eine kettmasche gemacht, ich verstehe das Zeichen nicht danke
20.11.2013 - 21:16DROPS Design ha risposto:
Liebe Sylvia. am Anfang von M1 häkeln Sie 4 Lm in der Höhe, daher ist das Symbol der Lm längs dargestellt und nicht quer.
21.11.2013 - 08:09
![]() Sarah ha scritto:
Sarah ha scritto:
What are the broken lines on the right side of the chart supposed to be? Chain stitches?
30.05.2013 - 20:58DROPS Design ha risposto:
Dear Sarah, you are correct, they represent the ch sts that replace first dc (3 ch) or first tr (4 ch). Happy crocheting!
31.05.2013 - 09:30
|
||||||||||||||||
Catalina#catalinaneckwarmer |
||||||||||||||||
 |
 |
|||||||||||||||
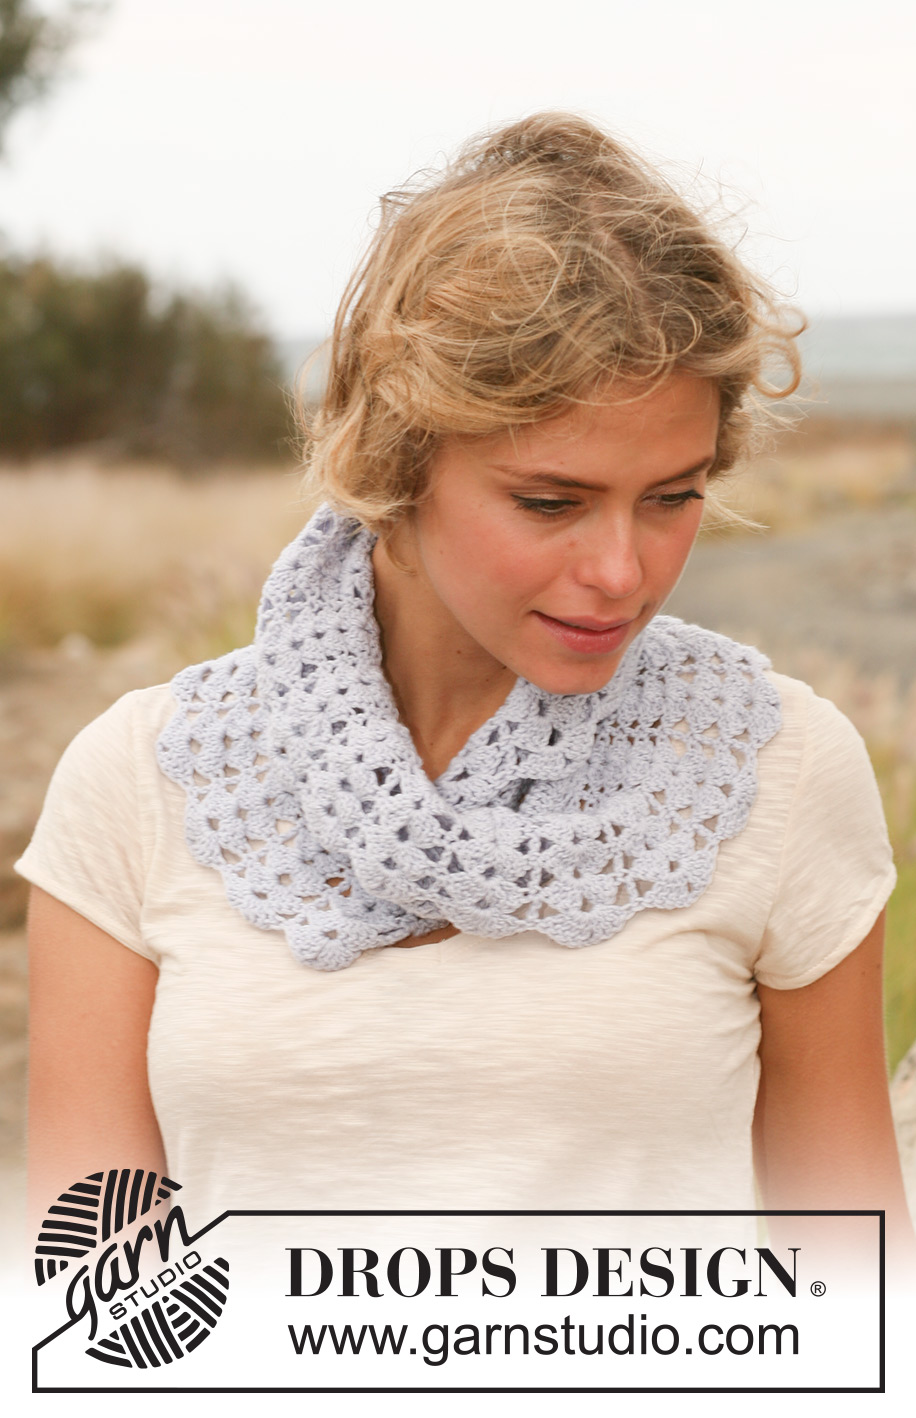
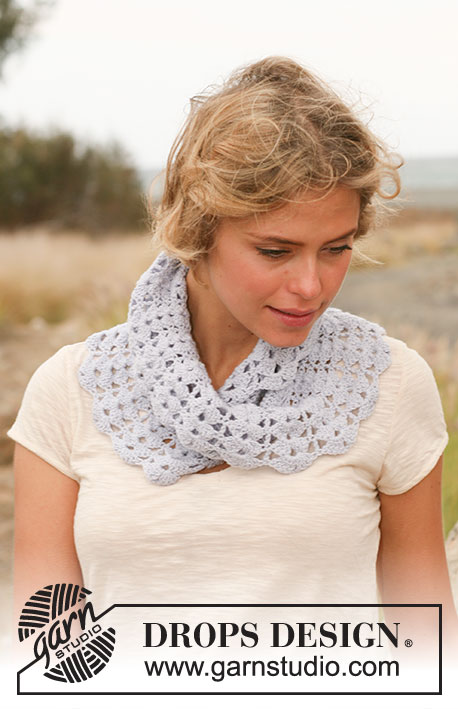
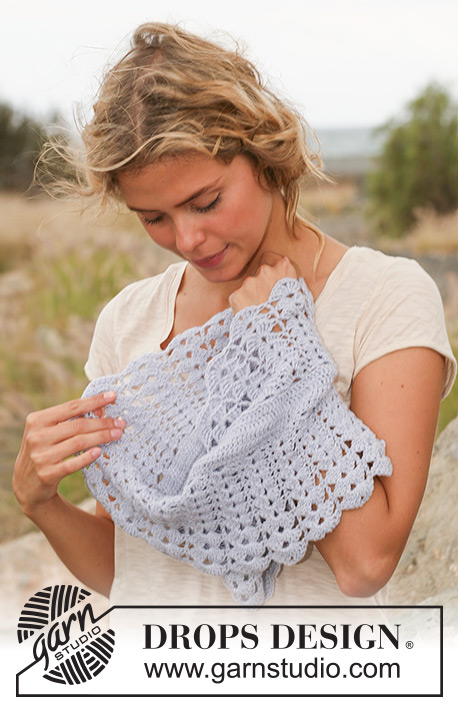
Collo Moebius DROPS in "BabyMerino".
DROPS 129-12 |
||||||||||||||||
|
MOTIVO: Ved diag M.1. Cominciare a lavorare al giro indicato con una stella sul diag. -------------------------------------------------------- MOEBIUS: Lavorare una catena di 128 cat con l’uncinetto 3,5 ed il filo Baby Merino e formare un anello con 1 m.bss. 1° GIRO: lavorare 3 cat (= 1 m.a), saltare la 1° cat, 1 m.a in ogni cat tutto il giro, lavorare soltanto la parte/maglia posteriore della catenella = 128 m.a. Continuare in tondo e lavorare poi 1 m.a in ogni cat nella parte/maglia anteriore della cat (vuol dire che ci sarà una ”croce” nel passaggio) = 256 m.a tutto il giro. 2° GIRO: Iniziare con 1 m.a nella 3° cat d’inizio giro del giro precedente, poi lavorare 1 m.a in ogni m.a tutto il giro = 256 m.a. Lasciare 1 segno/filo = inizio giro. 3° GIRO: Lavorare 1 m.b nella 1° m.a, * saltare 3 m.a, 3 cat, 1 m.b nella m.a seguente *, ripetere da *-* tutto il giro e terminare saltando 3 m.a, 3 cat e 1 m.bss nella m.b d’inizio giro. Continuare seguendo il motivo M.1 in tondo su tutte le m. Iniziare con il giro indicato con 1 stella sul diag. Lavorare così: M.1A, ripetere M.1B e terminare con M.1C. Quando M.1 è stato lavorato 1 volta in altezza, tagliare il filo e fissarlo bene. |
||||||||||||||||
Spiegazioni del diagramma |
||||||||||||||||
|
||||||||||||||||
 |
||||||||||||||||
Avete terminato questo modello?Allora taggate le vostre foto con #dropspattern #catalinaneckwarmer o inviatele alla #dropsfan gallery. Avete bisogno di aiuto con questo modello?Troverete 7 video tutorial, una sezione per i commenti/domande e molto altro guardando il modello su www.garnstudio.com © 1982-2026 DROPS Design A/S. Ci riserviamo tutti i diritti. Questo documento, compreso tutte le sue sotto-sezioni, è protetto dalle leggi sul copyright. Potete leggere quello che potete fare con i nostri modelli alla fine di ogni modello sul nostro sito. |
||||||||||||||||


Con oltre 40 anni di esperienza nel design di modelli di maglia e uncinetto, DROPS Design offre la più estesa collezione di modelli gratuiti su internet - tradotti in 17 lingue. Ad oggi vi possiamo fornire 325 cataloghi e 12291 modelli - 9562 dei quali sono tradotti in Italiano.
Ci stiamo impegnando molto per darvi il meglio che vi possiamo offrire in termini di maglia e uncinetto, ispirazioni e consigli così come filati di grande qualità ad un prezzo incredibile! Volete utilizzare i nostri modelli per qualcosa d'altro oltre al vostro uso personale? Potete leggere tutto ciò che è consentito nel testo sul Copyright in basso su tutte le pagine dei nostri modelli. Buon lavoro!
Lasciare un commento sul modello DROPS 129-12
Noi saremmo felici di ricevere i tuoi commenti e opinioni su questo modello!
Se vuoi fare una domanda, fai per favore attenzione a selezionare la categoria corretta nella casella qui sotto per velocizzare il processo di risposta. I campi richiesti sono indicati da *.