
Oblíbené kategorie
Hledáte přízi?


Komentáře / Otázky (17)
![]() Natalia napsala:
Natalia napsala:
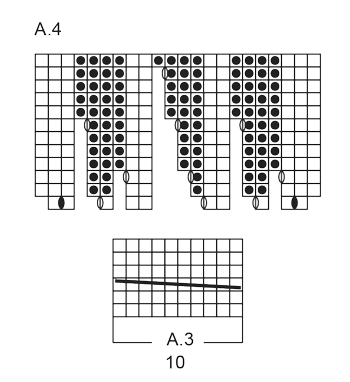
I don't understand A3 schema, and do not see any video how to do it. Tried multiple variants and still do not know how should it be done: "zdjąć 5 o. na drut pomocniczy przed robótką, 5 o.p., 5 o. z drutu pomocniczego przer. na prawo"
28.10.2025 - 16:32Odpověď DROPS Design :
Hi Natalia, Here is a link to a video showing you how to work cables (which is what A.3 is describing): https://www.garnstudio.com/video.php?id=19&lang=en Regards, Drops Team.
29.10.2025 - 07:04
![]() Charmain napsala:
Charmain napsala:
Can I have this pattern in downloadable form in PDF please
26.03.2021 - 16:19Odpověď DROPS Design :
Dear Chairman, to have the pattern as a PDF please click on the print icon, and select "print as PDF". Happy Crafting!
27.03.2021 - 02:11
![]() Helena napsala:
Helena napsala:
Another question - neck warmer, it says "when piece measures 20-24cm adjust after one whole repetition of A6", what is meant by 'adjust'? What adjustment is required, other than just to repeat once more A6 before finishing it with A5?
30.01.2021 - 01:37Odpověď DROPS Design :
Dear Helena, this means that you should emphasize pattern more than height in cm. You can stay with 19 cm or with 25 - important is knit up whole repetition of A.6. Height in cm may vary slightly depends on your personal gauge. Happy knitting!
30.01.2021 - 09:36
![]() Helena napsala:
Helena napsala:
Hi, my question refers to the neck warmer; in the photo, the neck warmer seems to have holes where the yarn overs are, but in the instructions it says to knit yo twisted to avoid holes. I get it for the headband as there should not be holes. But the neck warmer looks like it has holes left where the yo were made. Can you please clearify? Thank you
30.01.2021 - 00:37Odpověď DROPS Design :
Hi Helena, there is a mistahe here. I'll report it. Thank you. Happy knitting!
30.01.2021 - 19:20
![]() Simone napsala:
Simone napsala:
Hallo! Leider verstehe ich beim Stirnband nicht, wie das Muster A.3 gestrickt wird. Ich stricke zuerst eine Hinreihe rechts und eine Rückreihe links. Dann ziehe ich die Hälfte der Maschen (5 Maschen) auf eine andere Nadel. Aber wie stricke ich dann weiter? Danke im Voraus für die Antwort.
10.11.2020 - 20:55Odpověď DROPS Design :
Liebe Simone, ja genau die 5 ersten Maschen legen Sie vor die, dann stricken Sie die 5 letzten Maschen und stricken jetzt die 5 Maschen von der Hilfsnadel - dieses Video zeigt, wie man einen (anderen) Zopf über alle Maschen auf der Nadel strickt, es kann Ihnen sicher weiterhelfen. Viel Spaß beim stricken!
11.11.2020 - 08:41
![]() Mari Gjerdåker napsala:
Mari Gjerdåker napsala:
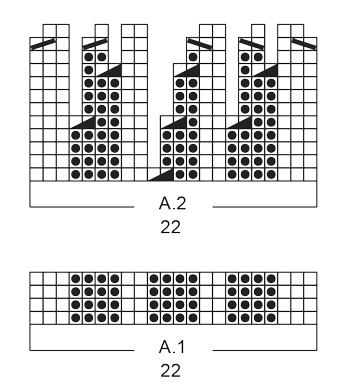
Hei! Jeg lurer på hva de diagonale stripene på nest siste pinne på A2 betyr? Regner med at de kal settes på hjelpepinne, men har det noe å si hvilken vei diagonalen er?
24.07.2020 - 20:01Odpověď DROPS Design :
Hej Mari, du finder symbolerne i symbolforklaringen: 2 r sammen og ta 1 m løst av p, 1 r, løft den løse m over. God fornøjelse!
03.08.2020 - 14:47
![]() Mallory napsala:
Mallory napsala:
Hi there, although this is a beautiful pattern, I feel like it was poorly written and drawn out in the diagrams. Multiple times I would look at the diagram and then my stitches. There where stitches that would disappear on the diagram (still on my needle) and then reappear on another row. As well as the twist, if you K5 from your working and K5 from the new, it will NOT come out right. Beautiful pattern, Horrible instructions.
11.01.2020 - 18:01
![]() Sondra napsala:
Sondra napsala:
Working the headband (straight needles) and confused by “missing boxes” in pattern A.2. Row 1, for example, appears to start on 2nd stitch and skip 4th and 5th, 7th (ie boxes missing). How do I interpret the empty spaces? Also not sure how to interpret heavy short diagonal line intermittent across second row. Nothing in diagram key matches exactly. Thabks
10.01.2019 - 01:23Odpověď DROPS Design :
Dear Sondra, start reading the diagram from the bottom corner on the right side towards the left from RS (and from the left towards the right from WS), working A.2 you will then dec 1 st (= P2 tog) in the middle of A.2, on next row the missing stitch is matching the st you decreased before. Happy knitting!
10.01.2019 - 10:03
![]() Monica Panera napsala:
Monica Panera napsala:
Buongiorno , Volevo fare un'ultima domanda. Ogni riga di uno schema è un ferro e rappresenta i punti da fare sul diritto del lavoro ,ciò significa che ogni riga è un ferro diritto è un ferro rovescio? Spero di essere stata chiara.Grazie dell'aiuto.
14.12.2018 - 07:38Odpověď DROPS Design :
Buongiorno Monica. Nel diagramma trova tutti i ferri da lavorare seguendo il motivo stesso. Quindi: primo ferro (dal basso) si lavora sul diritto del lavoro; secondo ferro si lavora sul rovescio del lavoro; terzo ferro sul diritto e così via. Buon lavoro!
14.12.2018 - 08:29
![]() Monica Panera napsala:
Monica Panera napsala:
Buonasera, non riesco a capire lo schema A3 della fascia per capelli modello Warm Lavender. Non capisco perché devo mettere 5 punti su un ferro ausiliario e come procedere con il lavoro. Ho un buio totale. Grazie per il vostro aiuto. Panera Monica
13.12.2018 - 19:05Odpověď DROPS Design :
Buonasera Monica, le 5 maglie vengono messe in sospeso per creare la treccia. Deve metterle su un ferro ausiliario sul davanti del lavoro, lavorare 5 maglie a diritto e lavorare le 5 maglie in sospeso a diritto, creando così la treccia. Buon lavoro!
13.12.2018 - 22:22
|
|||||||||||||||||||||||||
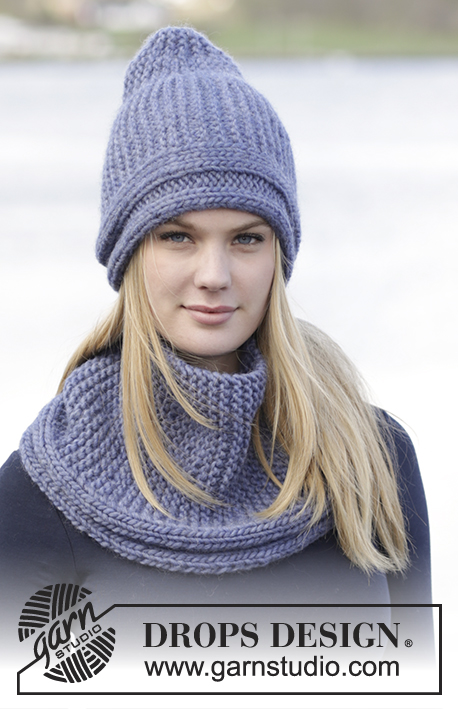
Warm Lavender |
|||||||||||||||||||||||||
|
|
|||||||||||||||||||||||||
DROPS souprava: čelenka a nákrčník pletené pružným vzorem z příze "Snow".
DROPS Extra 0-1234 |
|||||||||||||||||||||||||
|
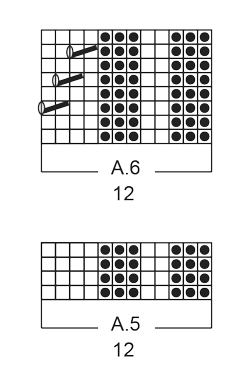
VROUBKOVÝ VZOR: Pleteme stále hladce, lícové i rubové řady. 1 vroubek = 2 řady hladce. VZOR: Viz schémata A.1 až A.6; zobrazeny jsou všechny řady vzoru nahlížené z lícové strany. ---------------------------------------------------------- ČELENKA: Pleteme v řadách na jehlici. Na jehlici č.7 nahodíme přízí Snow 22 ok a upleteme 1 vroubek vroubkovým vzorem – viz výše. Pak pleteme vzor A.1 (= 22 ok). Sekvenci vzoru A.1 opakujeme až do výše 14-15-16 cm (končíme rubovou řadou). Pak pleteme nad vzorem A.1 vzor A.2. Po dokončení celé 1 sekvence vzoru A.2 (na výšku) máme na jehlici 10 ok. Upleteme 1 celou sekvenci vzoru A.3 (na výšku). Pak pleteme nad vzorem A.3 vzor A.4. Nahození ve vzoru pleteme za zadní nit. Po dokončení 1 celé sekvence vzoru A.4 (na výšku) máme na jehlici 22 ok. Poté pleteme vzor A.1 až do výše 48-50-52 cm. Upleteme 1 vroubek a všechna oka uzavřeme. Čelenku sešijeme. ---------------------------------------------------------- NÁKRČNÍK: Pleteme v kruhových řadách na kruhové jehlici. Na kruhovou jehlici č.8 nahodíme přízí Snow 72-84 ok a pleteme vzor A.5 (= 12 ok) – sekvenci vzoru opakujeme v kruhové řadě celkem 6-7x. Ve výši 4 cm pleteme nad vzorem A.5 vzor A.6. Ve výši 20-22 cm, končíme po dopletení celé sekvence vzoru A.6, pleteme nad vzorem A.6 vzor A.5. Ve výši 24-26 cm všechna oka uzavřeme. |
|||||||||||||||||||||||||
Vysvětlivky ke schématu |
|||||||||||||||||||||||||
|
|||||||||||||||||||||||||
 |
|||||||||||||||||||||||||
 |
|||||||||||||||||||||||||
 |
|||||||||||||||||||||||||
Dokončili jste tento model?Pak označte své fotky tagem #dropspattern nebo je pošlete do galerie #dropsfan. Potřebujete s tímto návodem poradit?Otevřete-li si návod na stránce garnstudio.com, najdete tam 18 výukových video-ukázek, Komentáře/Dotazy a další užitečné informace. © 1982-2026 DROPS Design A/S. Vyhrazujeme si veškerá práva. Tento dokument, včetně všech jeho dílčích částí, podléhá autorským právům. Podrobnější komentář k možnostem užití našich návodů najdete dole pod každým návodem na našich stránkách. |
|||||||||||||||||||||||||


V oblasti pletené a háčkované módy působí DROPS Design více než 40 let. Díky tomu vám můžeme nabídnout jednu z nejrozsáhlejších kolekcí modelů s bezplatnými návody dostupnými na internetu - navíc v 17 jazycích. K dnešnímu dni máme na 324 katalogů a 12290 návodů celkem - z nich je už 7605 dostupných v [češtině].
We work hard to bring you the best knitting and crochet have to offer, inspiration and advice as well as great quality yarns at incredible prices! Would you like to use our patterns for other than personal use? You can read what you are allowed to do in the Copyright text at the bottom of all our patterns. Happy crafting!
Přidejte komentář k návodu DROPS Extra 0-1234
Rádi bychom věděli, co si o tomto modelu myslíte!
Pokud se chcete na něco zeptat, dbejte prosím na to, abyste ve formuláři níže vybrali správnou kategorii - díky tomu se dříve dozvíte, co potřebujete vědět. Povinná pole jsou označena *.