
Oblíbené kategorie
Hledáte přízi?


Komentáře / Otázky (91)
![]() Knitting Well Done napsala:
Knitting Well Done napsala:
Hello , I don't understand how to centered the diagram even if I follow the lesson... do you have a video that show exactly what to do to center it and make the sleeve? Thank you 👱🏻♀️
13.03.2022 - 11:29
![]() Vale napsala:
Vale napsala:
I'm so sorry to have to ask again but I don't understand: how can I decrease every 2,5 cm if there's a pattern? With 2 tog decrease, it will be deformed the pattern motif... I'm so confused .. I'm referring to this "When A.2 has been worked, continue with A.3. NOTE: Adjust pattern so that the middle st in diagram (see arrow) is one of the 2 middle sts on sleeve, AT THE SAME TIME beg dec under sleeve - remember DECREASE TIP" The decrease tip mean to knit just 2 stitches together?
20.02.2022 - 00:33Odpověď DROPS Design :
Dear Vale, if your tension is right in height, you should decrease approx. on every 7th round in size M = ca on every 2,5 cm; decrease as explained under DECREASE TIP , ie work until 3 sts remain before marker and decrease as shown in this video - the pattern will not match anymore at the transitions between rounds, that's just okay. Happy knitting!
21.02.2022 - 09:58
![]() Vale napsala:
Vale napsala:
I'm sorry to ask but: I don't understand how to decrease every 2,5 cm, if I have a pattern? If I decrease, the pattern will be deformed... also, what decrease I should do? (2 tog?) how? This is the pattern I'm referring: "When A.2 has been worked, continue with A.3. NOTE: Adjust pattern so that the middle st in diagram (see arrow) is one of the 2 middle sts on sleeve, AT THE SAME TIME beg dec under sleeve - remember DECREASE TIP" Thank you...seems difficult without a chart.
20.02.2022 - 00:29
![]() Vale napsala:
Vale napsala:
Sorry, I have problems again in the instructions " When A.2 has been worked, continue with A.3. NOTE: Adjust pattern so that the middle st in diagram (see arrow) is one of the 2 middle sts on sleeve, AT THE SAME TIME beg dec under sleeve - remember DECREASE TIP. Repeat dec every 3-2½-2½-2½-2½-2½ cm / 1 1/8"-7/8"-7/8"-7/8"-7/8"-7/8" 9-12-12" etc . I don't also understand how to adjust "pattern so that the middle st in diagram is one of the 2 middle". what mean? Please..help...
19.02.2022 - 15:30Odpověď DROPS Design :
Dear Vale, this lesson will explain you how to center a diagram. Happy knitting!
21.02.2022 - 09:17
![]() Pattern napsala:
Pattern napsala:
Sorry again but I don't understand the previously answer, in your comment says "you should increase a total of 60 sts in size L and get so 228", but I don't know what increase of 60 stitches is it exactly? Thank you again....
01.02.2022 - 17:29Odpověď DROPS Design :
Oops sorry, I mistyped, I meant you have 204 sts on the needle in size L - you now increase 24 sts evenly (this lesson explains how to increase evenly on a round), there are now 228 sts and you will repeat K2, P2 all the round - US-pattern will be edited asap. Happy knitting!
02.02.2022 - 07:34
![]() Patterns Difficult napsala:
Patterns Difficult napsala:
Hello, this pattern have a mistake in the Body instructions. Yesterday I had to try and try. I have 230 stitches and it says to "Continue to work rib as follows: * K 2, P 2 *, repeat from *-* until 2 sts remain, K 2. When rib has been worked for 4 cm / 1½'', bind off with K over K and P over P." But with 230 stitches, it will end with 2Kand start with 2K so I will have 4 K between the others 2k p2 2k p2 etc. What happened? Why 230 stitches?It's not an Even number to do ribbing...Thanks..
01.02.2022 - 12:22Odpověď DROPS Design :
Hi, it looks like there is a mistake in the US-English pattern, you should increase a total of 60 sts in size L and get so 228 sts and work K2 P2 over these 228 sts (= 57 times (K2,P2). thanks for noticing. Happy knitting!
01.02.2022 - 16:13
![]() Karine napsala:
Karine napsala:
Koon L suurust. Siis kui on vaja kududa varrukale mustrit A4 (5silmust) on silmuseid 48 3 simust jääb üle kuidas neid kududa?
03.01.2022 - 19:49Odpověď DROPS Design :
Tere Karine! Koo nii palju silmuseid mustrisse, kui mahub, ülejäänud nii, kuidas ilusam jääb. Head kudumist!
07.01.2022 - 21:55
![]() Val napsala:
Val napsala:
Sorry , I have to ask again, is it sure that decrease is "work until 3 sts remain before the marker this: K2 tog, K1, slip marker, K1, slip 1 as if to K, K1, psso, and work until 3 sts remain before next marker on the other side of the jumper and repeat the decrease.”" I see that in the psso passage, Should not be simply : slip marker, K1, slip 1 as if to K , and psso? Why K1 is repeated 2 times? the video tutorial says this only (not 2 times k2) : K1, slip 1 psso
14.12.2021 - 18:16Odpověď DROPS Design :
Dear Val, when working body you will decrease a total of 4 stitches on the round (= 2 sts decreased at each marker) / when working sleeve you will decrease that way only 2 sts (only 1 marker, mid under sleeve). Happy knitting!
15.12.2021 - 08:25
![]() Val napsala:
Val napsala:
Sorry >
14.12.2021 - 18:13
![]() Val napsala:
Val napsala:
Hello,I was able to adjust everything.I'm now again the beginning of the round, before start the dec tip. So, I hope this time I 've understood well: So I have to: knit the first 12 stitches, but before reach the first stitch marker of the round, 3 stitches before, I have to “work until 3 sts remain before the marker, K2 tog, K1, slip marker, K1, slip 1 as if to K, K1, psso, and work until 3 sts remain before next marker on the other side of the jumper and repeat. Right? Thank you again!
14.12.2021 - 17:43Odpověď DROPS Design :
Dear Val, looks right, I'm just wondering about the first 12 stitches, rounds were worked on yoke from mid back, so that you continue from mid back towards the side, and then work until 3 sts remain before 1st marker on the side and decrease etc.. But if you could find the sides of the jumper, it looks then fine, as the decreases are worked on each side (below sleeves). Happy knitting!
15.12.2021 - 07:55
|
||||||||||
Silver Stag#silverstagsweater |
||||||||||
 |
 |
|||||||||
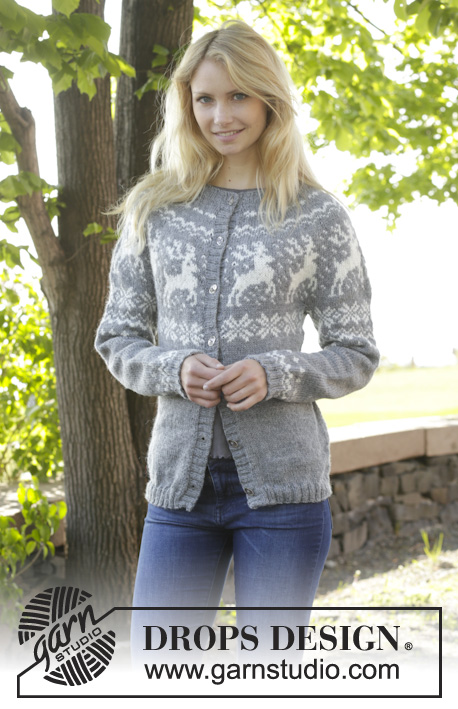
Vánoční svetr / pulovr s kruhovým sedlem a vyplétanými soby, pletený shora dolů z příze DROPS Karisma. Velikost: S-XXXL.
DROPS 157-23 |
||||||||||
|
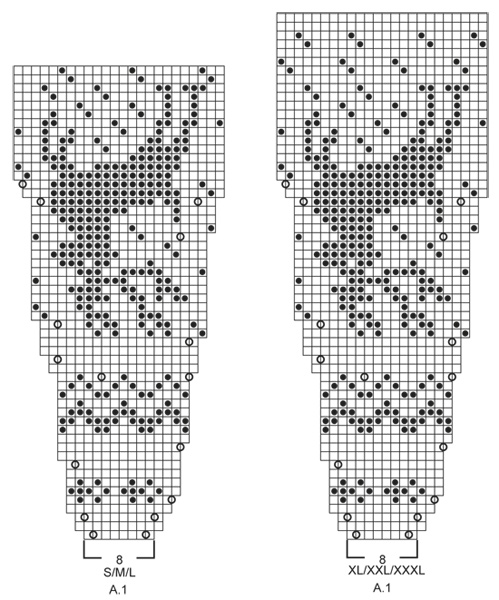
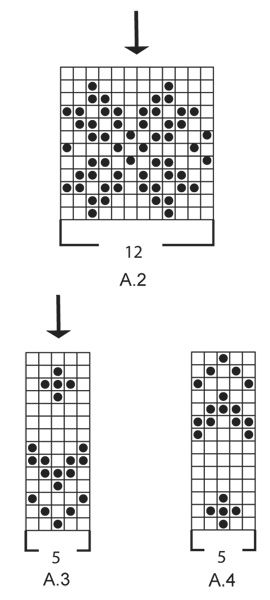
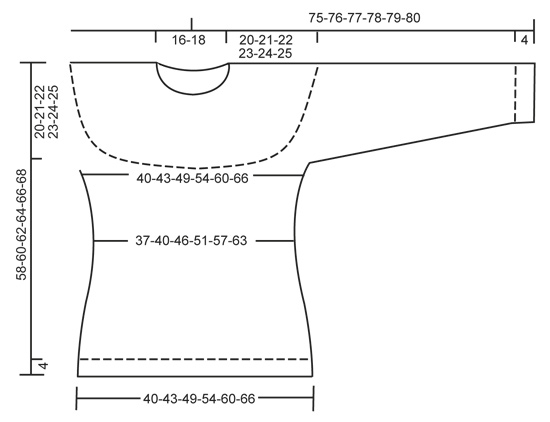
VYPLÉTANÝ VZOR: Viz schémata A.1-A.4. Zobrazeny jsou všechny řady vzoru nahlížené z lícové strany. Celý vzor pleteme lícovým žerzejem. TIP – UJÍMÁNÍ (boky a rukávy): PŘED značkou a 1 okem hladce splétáme 2 oka hladce. ZA značkou a 1 okem hladce ujímáme přetažením, tj. 1 oko sejmeme hladce, 1 upleteme hladce a sejmuté přes ně přetáhneme. TIP – PŘIDÁVÁNÍ (boky): V jedné řadě přidáme celkem 4 oka. Pleteme po poslední 1 oko před značkou, 1x nahodíme, 2 oka upleteme lícovým žerzejem, 1x nahodíme = přidali jsme 2 oka. V následující kruhové řadě pleteme nahození hladce za zadní nit, aby se v pletenině netvořily dírky. ---------------------------------------------------------- PULOVR Pleteme shora dolů, tj. od průkrčníku k dolnímu okraji, v kruhových řadách na kruhové jehlici. Rukávy pleteme v kruhových řadách na ponožkových jehlicích. SEDLO: Na kruhovou jehlici č.3 nahodíme šedou přízí 88-92-96-100-104-108 ok a pleteme pružným vzorem 2/2 (tj. střídáme 2 oka obrace, 2 hladce) do výše 3 cm. Pleteninu převedeme na kruhovou jehlici č.4 a upleteme 1 kruhovou řadu lícovým žerzejem. SOUČASNĚ přidáme rovnoměrně 0-4-8-20-24-28 ok = 88-96-104-120-128-136 ok. Dále pleteme vzor A.1 (= 8 ok) – v kruhové řadě máme na šířku 11-12-13-15-16-17 sekvencí vzoru. Po dokončení 1 celé sekvence vzoru A.1 (na výšku) máme v kruhové řadě 264-288-312-360-384-408 ok. Upleteme 2-5-8-4-7-10 kruhových řad šedou přízí. POZN.: Pro velikost S, L, XL a XXXL končíme 24 ok (= 1 sekvenci vzoru) před dokončením poslední kruhové řady. Začátek kruhové řady je nyní zde. Poté, co jsme oka rozdělili na rukávy a trup, je teď vzor správně rozmístěn. Následující kruhovou řadu pleteme takto: upleteme prvních 37-40-46-52-58-64 ok (= polovina zadního dílu), následujících 58-64-64-76-76-76 ok odložíme na pomocnou jehlici (= rukáv), nahodíme 10 ok nových (= podpaží), doprostřed těchto nových ok vložíme značku, upleteme dalších 74-80-92-104-116-128 ok (= přední díl), následujících 58-64-64-76-76-76 ok odložíme na pomocnou jehlici (= rukáv), nahodíme 10 ok nových (= podpaží), doprostřed těchto nových ok vložíme značku, upleteme zbylých 37-40-46-52-58-64 ok (= polovina zadního dílu). TRUP: Na jehlici máme 168-180-204-228-252-276 ok trupu. Nyní pleteme vzor A.2 (= 12 ok) nad všemi oky v kruhové řadě. Po dokončení 1 celé sekvence vzoru A.2 (na výšku) pleteme lícovým žerzejem šedou přízí. V následující kruhové řadě ujmeme 1 oko na každé straně každé značky na boku - viz TIP - UJÍMÁNÍ. Toto ujímání opakujeme vždy po 2 cm výšky pleteniny ještě 2x = 156-168-192-216-240-264 ok. Ve výši 12-13-14-15-16-17 cm od značky v podpaží přidáme na každé straně každé značky na boku 1 oko – viz TIP - PŘIDÁVÁNÍ. Toto přidávání opakujeme vždy po 2 cm výšky pleteniny ještě 2x = 168-180-204-228-252-276 ok. Ve výši 56-58-60-62-64-66 cm převedeme pleteninu na kruhovou jehlici č.3 a přidáme rovnoměrně 20-24-24-28-28-32 ok = 188-204-228-256-280-308 ok. Pleteme pružným vzorem 2/2, takto: *2 oka hladce, 2 obrace*, *-* opakujeme. Když je pružný lem vysoký 4 cm, všechna oka dle vzoru uzavřeme. RUKÁV: Nejprve pleteme vzorem, pak rukáv dokončíme šedou přízí. Odložená oka vrátíme z pomocné jehlice zpět na ponožkové jehlice č.4 (= 58-64-64-76-76-76 ok) a upleteme 1 řadu lícovým žerzejem. Pak nahodíme 10 ok nových (= podpaží, označíme si střed) = 68-74-74-86-86-86 ok. Dále pleteme v kruhových řadách. Pleteme vzor A.2 – POZN.: vzor upravíme dle středu pleteniny tak, že šipka ve schématu označuje 2 středová oka rukávu. Po dokončení celé sekvence vzoru A.2 (na výšku), pleteme vzor A.3. POZN.: vzor upravíme dle středu pleteniny tak, že šipka ve schématu označuje jedno ze 2 středových ok rukávu. SOUČASNĚ začneme na vnitřní straně rukávu ujímat – viz TIP – UJÍMÁNÍ. Ujímání opakujeme vždy po 3-2,5-2,5-2,5-2,5-2,5 cm výšky pleteniny ještě 9-12-12-12-12-12x = 48-48-48-60-60-60 ok. Ve výši 38 cm pleteme vzor A.4. POZN.: vzor upravíme dle středu pleteniny tak, že šipka ve schématu označuje jedno ze 2 středových ok rukávu. Po dokončení celé sekvence vzoru A.4 (na výšku) převedeme pleteninu na ponožkové jehlice č.3 a přidáme rovnoměrně 4-8-8-0-4-4 oka = 52-56-56-60-64-64 ok. Pak upleteme 3 cm výšky pružným vzorem 2/2 (tj. střídáme 2 oka hladce, 2 obrace) a následně všechna oka dle vzoru uzavřeme. Stejným způsobem upleteme i druhý rukáv. DOKONČENÍ: Sešijeme otvory v podpaží. |
||||||||||
Vysvětlivky ke schématu |
||||||||||
|
||||||||||
 |
||||||||||
 |
||||||||||
 |
||||||||||
Dokončili jste tento model?Pak označte své fotky tagem #dropspattern #silverstagsweater nebo je pošlete do galerie #dropsfan. Potřebujete s tímto návodem poradit?Otevřete-li si návod na stránce garnstudio.com, najdete tam 24 výukových video-ukázek, Komentáře/Dotazy a další užitečné informace. © 1982-2026 DROPS Design A/S. Vyhrazujeme si veškerá práva. Tento dokument, včetně všech jeho dílčích částí, podléhá autorským právům. Podrobnější komentář k možnostem užití našich návodů najdete dole pod každým návodem na našich stránkách. |
||||||||||


V oblasti pletené a háčkované módy působí DROPS Design více než 40 let. Díky tomu vám můžeme nabídnout jednu z nejrozsáhlejších kolekcí modelů s bezplatnými návody dostupnými na internetu - navíc v 17 jazycích. K dnešnímu dni máme na 324 katalogů a 12291 návodů celkem - z nich je už 7611 dostupných v [češtině].
We work hard to bring you the best knitting and crochet have to offer, inspiration and advice as well as great quality yarns at incredible prices! Would you like to use our patterns for other than personal use? You can read what you are allowed to do in the Copyright text at the bottom of all our patterns. Happy crafting!
Přidejte komentář k návodu DROPS 157-23
Rádi bychom věděli, co si o tomto modelu myslíte!
Pokud se chcete na něco zeptat, dbejte prosím na to, abyste ve formuláři níže vybrali správnou kategorii - díky tomu se dříve dozvíte, co potřebujete vědět. Povinná pole jsou označena *.