Kommentaarid / Küsimused (93)
![]() Karen Jones kirjutas:
Karen Jones kirjutas:
I am starting the second attempt on the sleeves with the L/XL pattern. Repeating as I'm reading leaves the sleeves at mid arm. A little help please?
15.02.2021 - 06:22DROPS Design vastas:
Dear Mrs Jones, I'm sorry I don't understand what you mean there, could you please give us more details? Until where exactly have you now worked on the pattern (armholes or sleeve, which height/row, ..) thank you!
15.02.2021 - 09:27
![]() Annemarie Kappen kirjutas:
Annemarie Kappen kirjutas:
Het lukt mij niet na de cirkel, om de aantal hoeveelheid kloppende meerderingen te maken ?
11.01.2021 - 16:04
![]() Lyndy kirjutas:
Lyndy kirjutas:
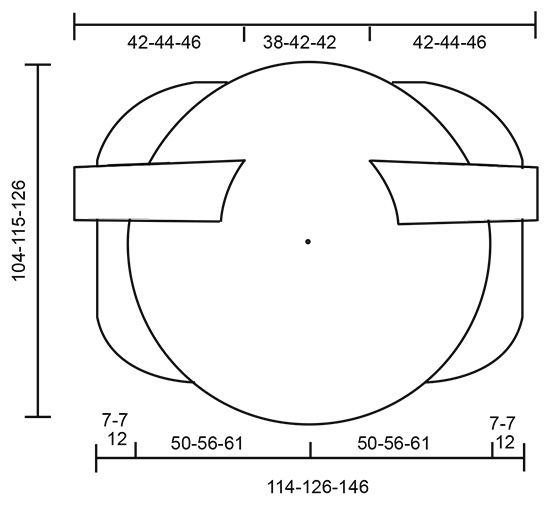
Hi, with reference to pattern z833 Blue Helix, can you tell me if the pattern has been translated at all into a normal text written type of pattern? Following diagram of jacket on page 7 (I cannot see that this diagram forms a circle) does this diagram indicate that jacket is made up in several pieces and then comes together to make the circle? I have spent nearly £100 on yarn & still deciphering pattern before comencing. It is almost impossible to unpick mohair without waste
30.10.2020 - 14:48DROPS Design vastas:
Dear Lyndy, this pattern has only diagrams - you will find how to read crochet diagrams here and especially here how to read a fraction of circle here as A.1 shows - A.1 will be worked a total of 7 rounds in the round, ie on round 1 you work 2 treble crochets x 7 repeats = 14 trebles etc.. Hope this will help. Happy crocheting!
30.10.2020 - 15:25
![]() Conny kirjutas:
Conny kirjutas:
Hallo,kan de bleu helix ook gehaakt worden met acryl wol ?Groetjes
24.09.2020 - 17:55DROPS Design vastas:
Dag Conny,
Ja, je kunt dit patroon natuurlijk met ander garen maken. Het gaat erom dat je eenzelfde stekenverhouding hebt, zodat je uitkomt met de maten.
18.11.2020 - 13:40
![]() Carolina kirjutas:
Carolina kirjutas:
Hej!! I början av mönstret står det att jag ska använda båda garnerna men när ska jag endast använda en tråd? Eller är det dubbelt hela tiden? Tänker att det är olika mängd på garnerna. Mvh Carolina
06.07.2020 - 08:08DROPS Design vastas:
Hej Carolina. Du ska använda en tråd av varje garn hela tiden. Anledningen till att det är olika mängder garn är att det är olika antal meter per gram garn. Lycka till!
06.07.2020 - 08:33
![]() Margie Harner kirjutas:
Margie Harner kirjutas:
Is there a complete round by round written pattern instruction? I am really trying to follow the diagram pattern and struggling terribly. I cannot get past round 2. I am not very visually oriented for patterns. I am more of a written word pattern follower. Can you help? Is there a complete written pattern? I would love to make this pattern but cannot get past round 2. HELP please?
03.07.2020 - 03:56DROPS Design vastas:
Hi Margie, Sadly there is no written pattern for the garment at this stage. Regards, Drops Team.
03.07.2020 - 07:12
![]() Pamela L Victory kirjutas:
Pamela L Victory kirjutas:
I made this jacket for my daughter and it is beautiful! Thanks for posting the pattern!
07.04.2020 - 18:24
![]() Angelika kirjutas:
Angelika kirjutas:
In der Anleitung sind 2 verschiedene Garne angegeben. Ich kann in der Anleitung nichts darüber lesen. Drops Nord und Drops Kid Silk. Vielen Dank im Vorab
29.03.2020 - 12:57DROPS Design vastas:
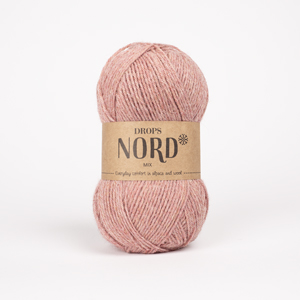
Liebe Angelika, diese Jacke wird mit 1 Faden DROPS Nord + 1 Faden Kid-Silk (= mit 1 Faden von jeder Garnqualität bzw zweifädig) gehäkelt - siehe Material und Maschenprobe. Viel Spaß beim häkeln!
30.03.2020 - 10:31
![]() Pamela Victory kirjutas:
Pamela Victory kirjutas:
I am making this pattern in size 3XL. I have just completed the 2nd round in A.2, creating the armholes. The directions state to then work the 3rd round in A.3 without increasing. ?? The directions that follow for all sizes state to work diagram A.3 along with the respective increases depending on garment size. Please help.
06.03.2020 - 19:31DROPS Design vastas:
Dear Mrs Victory, after you have worked the 2nd round in A.2, work the 3rd row in A.2 (not A.3 - there is a mistake in the EN pattern and it will be edited asap). Then work a.3 inc as explained for your size. Happy crocheting!
09.03.2020 - 09:35
![]() Pamela Victory kirjutas:
Pamela Victory kirjutas:
I am nearing the completion of A.1 so the 49 chains before A.2 does not make sense. There are 49 chains in total after the 7th round in A.1 plus 21 chains more in each of the 7 sections. Please explain. Thanks.
04.03.2020 - 02:33DROPS Design vastas:
Dear Mrs Victory, when you crochet the armhole round you have: 7 ch-spaces, 35-ch-space (armhole over the 8 skipped ch-spaces), 19 ch-spaces, 35-ch-space (armhole over the 8 skipped ch-spaces) and 7 ch-spaces, Then work A.2: over the first 7-ch-spaces inc 2 ch-sp (= 9 ch-sp) + 10 ch-spaces around the 35-ch-space + 19-ch-spaces inc 7 ch-spaces (=26 ch-sp) + 10 ch-spaces around the 35-ch-space + 7 ch-spaces inc 2 ch-sp (= 9 ch-sp) = 9+10+26+10+9=64 chain spaces in total on first row in A.2. Happy crocheting!
04.03.2020 - 09:04
Blue Helix#bluehelixjacket |
|||||||||||||||||||||||||||||||||||||
 |
 |
||||||||||||||||||||||||||||||||||||
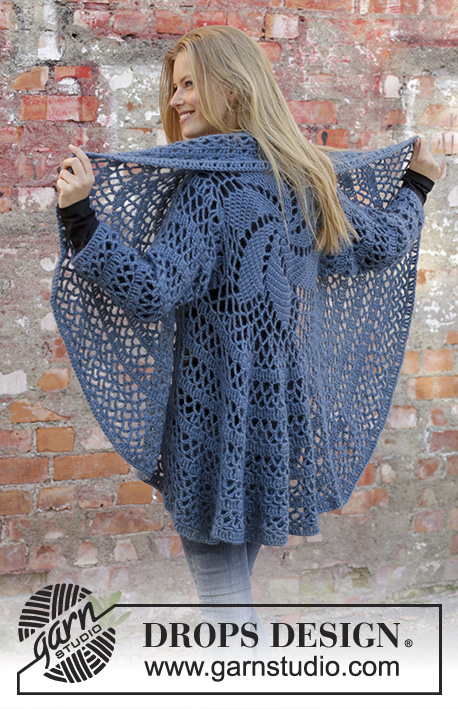
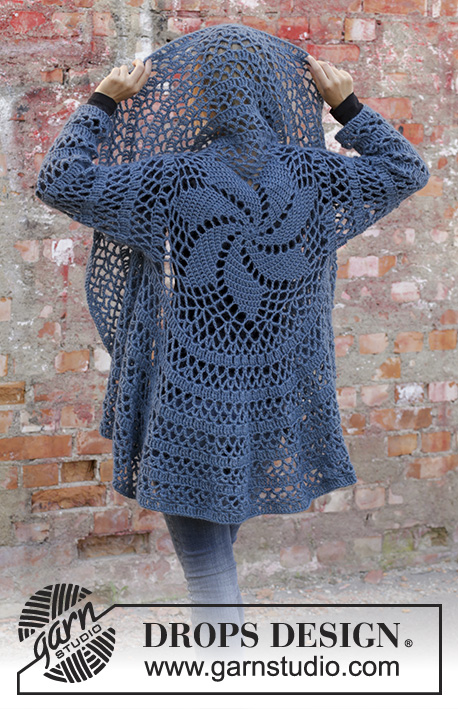
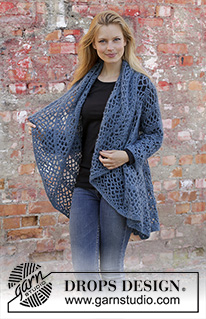
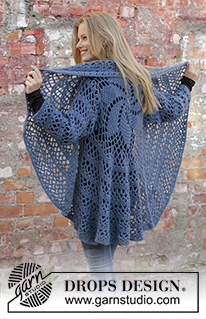
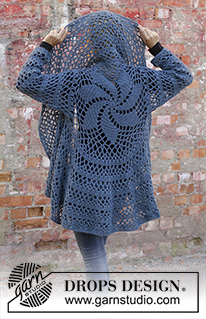
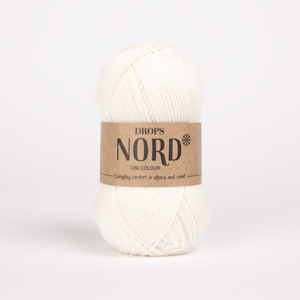
DROPS Nord ja DROPS Kid-Silk lõngadest heegeldatud pitsmustriga avar ratasjakk – kardigan suurustele S kuni XXXL
DROPS 194-36 |
|||||||||||||||||||||||||||||||||||||
|
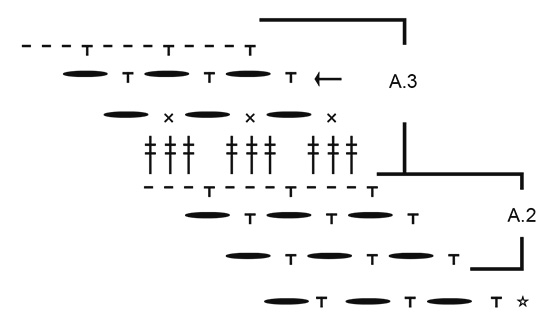
---------------------------------------------------------- NÕUANDED ---------------------------------------------------------- MUSTER Vaata skeeme A.1 kuni A.3. HEEGELDAMISE INFO 1 Asenda esimene kinnissilmus ringi alguses 1 ahelsilmusega, ringi lõpus tee aassilmus esimesse ahelsilmusesse ringi algul. Asenda esimene ühekordne sammas ringi alguses 3 ahelsilmusega, ringi lõpus tee aassilmus kolmandasse ahelsilmusesse ringi algul. Asenda esimene kahekordne sammas ringi alguses 4 ahelsilmusega, ringi lõpus tee aassilmus neljandasse ahelsilmusesse ringi algul. HEEGELDAMISE INFO 2 (üleminekul uuele ringil) Heegelda aassilmuseid ringi esimese silmuseni. Kui järgmise ringi alguses on ahelsilmustest kaar, heegelda aassilmuseid kuni selle ahelsilmustest kaare tippu. NB! Tee nii alates skeemi A.1 3. ringi lõpust kuni valmimiseni. KASVATAMISE NIPP Kasvata 1 ahelsilmustest kaar järgmiselt: tee * 1 kinnissilmus + 1 ahelsilmustest kaar *, korda * kuni * kokku 2 korda ümber sama ahelsilmustest kaare. KAHANDAMISE NIPP (varrukal) NB! Ringi algus nihkub mustrit tehes paigast, aga säti nii, et 2 kahandust oleks varruka sisekülje keskel. Kahanda 1 ahelsilmustest kaar järgmiselt: tee 1 kinnissilmus ümber ahelsilmustest kaare, 1 kinnissilmus ümber järgmise ahelsilmustest kaare, tee 6 ahelsilmust. ---------------------------------------------------------- ALUSTA SIIT ---------------------------------------------------------- JAKK – KOKKUVÕTE Heegeldatakse ringselt keskelt alustades. Käeaukude jaoks jäetakse ringile avad. Hõlmad heegeldatakse edasi-tagasi, lõpuks tehakse äärepits ümber terve jaki. Varrukad heegeldatakse ringselt, ülevalt alla. RING Tee 4 ahelsilmust kahekordse lõngaga (1 Nord + 1 Kid-Silk) ja 5 mm heegelnõelaga, ning ühenda ringiks 1 aassilmusega esimesse ahelsilmusesse. Siis heegelda ringselt mustrit skeemil A.1 kokku 7 korda ringil - loe HEEGELDAMISE INFOT 1 ja HEEGELDAMISE INFOT 2. JÄLGI HEEGELDAMISE TUGEVUST! Kui skeem A.1 on tehtud vertikaalselt, on viimasel ringil 49 ahelsilmustest kaart. Ketta läbimõõt on umbes 34 cm. Katkesta lõng, ning alusta ringi 4. ahelsilmustest kaarest = seljaosa keskkoht/kaelus. Jätka eri suurustel järgmiselt: SUURUS S/M: = 49 ahelsilmustest kaart. Heegelda skeemi A.2 esimene ring, SAMAL AJAL tee käeaugud nii: heegelda ümber esimese 7 ahelsilmustest kaare, siis tee 35 lõtva ahelsilmust (= käeauk), jäta vahele 8 ahelsilmustest kaart, heegelda ümber järgmise 19 ahelsilmustest kaare, siis tee 35 lõtva ahelsilmust (= käeauk), jäta vahele 8 ahelsilmustest kaart, heegelda ümber iga järgmise 7 ahelsilmustest kaare. Korda 2. ringi skeemil A.2, SAMAL AJAL kasvata - loe KASVATAMISE NIPPI, järgmiselt: heegelda ümber esimese 7 ahelsilmustest kaare ja kasvata neil 2 ahelsilmustest kaart, tee 10 ahelsilmustest kaart/ kinnissilmust ümber käeaugu (= 2 kasvatust), heegelda ümber iga järgmise 19 ahelsilmustest kaare ja kasvata neil 7 ahelsilmustest kaart, tee 10 ahelsilmustest kaart/ kinnissilmust ümber käeaugu (= 2 kasvatust), heegelda ümber iga viimase 7 ahelsilmustest kaare ja kasvata neil 2 ahelsilmustest kaart (= 15 kasvatust kokku ringil) = 64 ahelsilmustest kaart. Siis heegelda 3. ring skeemil A.3 ilma kasvatusteta. Ringi läbimõõt on umbes 45 cm. SUURUSED L/XL - XXL/XXXL: = 49 ahelsilmustest kaart. Heegelda 1. ring skeemil A.2, SAMAL AJAL kasvata 15 ahelsilmustest kaart ühtlaste vahedega (st. kasvata 1 ahelsilmustest kaar umbes iga kolmanda ahelsilmustest kaare kohale) - loe KASVATAMISE NIPPI = 64 ahelsilmustest kaart. Heegelda 2. ring skeemil A.2, SAMAL AJAL tee käeaugud nii: heegelda ümber esimese 8 ahelsilmustest kaare, siis tee 38-41 lõtva ahelsilmust (= käeauk), jäta vahele 9 ahelsilmustest kaart, heegelda ümber järgmise 30 ahelsilmustest kaare, siis tee 38-41 lõtva ahelsilmust (= käeauk), jäta vahele 9 ahelsilmustest kaart, heegelda ümber iga järgmise 8 ahelsilmustest kaare. Siis heegelda 3. ring skeemil A.3 ilma kasvatusteta. Ringi läbimõõt on umbes 45 cm. KÕIK SUURUSED = 64 ahelsilmustest kaart kõikidel suurustel. Siis heegelda ringselt skeemi A.3, kokku 5-6-7 korda vertikaalselt (kõrguses), SAMAL AJAL kasvata noolega märgitud ringil – vaata KASVATAMISE NIPPI, järgmiselt: kasvata 16 ahelsilmustest kaart igal kasvatuse ringil, st. 1. KORD: kasvata 1 ahelsilmustest kaar ümber iga 4. ahelsilmustest kaare = 80 ahelsilmustest kaart. 2. KORD: kasvata 1 ahelsilmustest kaar ümber iga 5. ahelsilmustest kaare = 96 ahelsilmustest kaart. 3. KORD: kasvata 1 ahelsilmustest kaar ümber iga 6. ahelsilmustest kaare = 112 ahelsilmustest kaart. 4. KORD: kasvata 1 ahelsilmustest kaar ümber iga 7. ahelsilmustest kaare = 128 ahelsilmustest kaart. 5. KORD: kasvata 1 ahelsilmustest kaar ümber iga 8. ahelsilmustest kaare = 144 ahelsilmustest kaart. Nüüd jätka eri suurustel järgmiselt: SUURUS S/M: Katkesta ja kinnita lõng. Ringi läbimõõt on umbes 100 cm. SUURUS L/XL: 6. KORD: kasvata 1 ahelsilmustest kaar ümber iga 9. ahelsilmustest kaare = 160 ahelsilmustest kaart. Katkesta ja kinnita lõng. Ringi läbimõõt on umbes 111 cm. SUURUS XXL/XXXL: 6. KORD: kasvata 1 ahelsilmustest kaar ümber iga 9. ahelsilmustest kaare = 160 ahelsilmustest kaart. 7. KORD: kasvata 1 ahelsilmustest kaar ümber iga 10. ahelsilmustest kaare = 176 ahelsilmustest kaart. Katkesta ja kinnita lõng. Ringi läbimõõt on umbes 122 cm. KÕIK SUURUSED = 144-160-176 ahelsilmustest kaart. Nüüd heegelda ainult 40-44-47 ahelsilmustest kaare kohale mõlemal küljel, st. ära heegelda 32-36-40 ahelsilmustest kaare kohale kaela pool ning 32-36-42 ahelsilmustest kaare kohale seljaosa allääres. Jätka vasaku hõlmaga. VASAK HÕLM = 40-44-47 ahelsilmustest kaart. Jätka edasi-tagasi heegeldamist järgmiselt: 1. RIDA: tee aassilmuseid kuni esimese ahelsilmustest kaare keskele, tee 1 kinnissilmus, * 6 ahelsilmust, 1 kinnissilmus ümber järgmise ahelsilmustest kaare *, korda * kuni *, lõpus tee 1 kinnissilmus ümber viimase ahelsilmustest kaare = 39-43-46 ahelsilmustest kaart. Korda 1. rida veel 3-3-7 korda. Hõlma esiserval on 36-40-39 ahelsilmustest kaart. katkesta lõng. PAREM HÕLM Heegelda samamoodi nagu vasakut hõlma, 40-44-47 ahelsilmustest kaare kohale. Katkesta ja kinnita lõng. ÄÄRIS Nüüd heegelda ääris ümber terve ringi järgmiselt: tee skeemi A.3 viimane ring, st tee iga ahelsilmustest kaare kohale 1 kinnissilmus ja 3 ahelsilmust. Siis heegelda skeemi A.3 1. ring, st. heegelda iga ahelsilmustest kaare ümber 3 kahekordset sammast. Katkesta ja kinnita lõng. Jaki kõrgus on umbes 104-115-126 cm ja umbes 114-126-146 cm lai. VARRUKAD Varrukad heegeldatakse ringselt käeaugust alla. Alusta varruka siseküljel ja heegelda 57-63-66 kahekordset sammast ühtlaste vahedega ümber käeaugu (= umbes 3 kahekordset sammast ümber iga ahelsilmustest kaare) = skeemi A.3 1. ring. Jätka ringselt skeemiga A.3. Siis korda skeemi A.3 vertikaalselt, SAMAL AJAL kahanda 2 ahelsilmustest kaart varruka siseküljel, kahanda skeemil noolega märgitud ringil – loe KAHANDAMISE NIPPI. Kahanda nii igal noolega märgitud ringil kokku 4-5-5 korda = 11-11-12 ahelsilmustest kaart. Jätka ilma kahandusteta, kuni varruka pikkus on umbes 42-44-46 cm – lõpeta pärast kahekordsete sammaste ringi. Katkesta ja kinnita lõng. Tee teine varrukas samamoodi. |
|||||||||||||||||||||||||||||||||||||
Skeemi seletused |
|||||||||||||||||||||||||||||||||||||
|
|||||||||||||||||||||||||||||||||||||
 |
|||||||||||||||||||||||||||||||||||||
 |
|||||||||||||||||||||||||||||||||||||
 |
|||||||||||||||||||||||||||||||||||||
Kas oled teinud seda mustrit?Lisa oma piltidele viide #dropspattern #bluehelixjacket või saada link projektile meie #dropsfan galeriisse. Vajad abi selle mustriga?Garnstudio.com kodulehel on 8 õppevideot, küsimuste/vastuste osa ja muudki. © 1982-2026 DROPS Design A/S. Kõik õigused kaitstud. See dokument, ning selle alajaotused on kaitsud autoriõigustega. Loe rohkem, mida meie mustritega võib teha, iga mustrilehe alt meie kodulehel. |
|||||||||||||||||||||||||||||||||||||








Jäta kommentaar mustrile DROPS 194-36
Ootame kommentaare selle mustri kohta!
Kui soovid midagi küsida, siis kiiremaks vastuse saamiseks veendu, et valid õige kategooria alloleval formil. Vajaliku väljad *.