
Populaarsed kategooriad
Otsid lõnga?


Kommentaarid / Küsimused (6)
![]() Barbara Kamm kirjutas:
Barbara Kamm kirjutas:
Thanks you for those latest instructions. So the cable is not really a cable but I. Your last instructions I still don’t see the pattern for the o dented cable like pattern but I guess I can try to figure it out. Are there only 3 stitches in the cable like pattern?
05.09.2023 - 04:41DROPS Design vastas:
Dear Mrs Kamm, the cable is a real cable but you will either cross the first 6 sts or the last 6 sts - work 3rd row A.1 as follows: slip 3 sts on cable needle behind piece, K 3, K 3 from cable needle, K3, and work 11th row as follows: K3, slip 3 sts on cable needle behind piece, K 3, K 3 from cable needle. Happy knitting!
05.09.2023 - 13:35
![]() Barbara Kamm kirjutas:
Barbara Kamm kirjutas:
Wow, that I do not understand. I’m going to have to look for an American pattern. I don’t know how to read diagrams. It’s greek to me. So frustrating
03.09.2023 - 22:39
![]() Barbara Kamm kirjutas:
Barbara Kamm kirjutas:
I have 46 stitches on my needles, 4 stitches in garter, purl 1, 29 stitches in stocking knit, that 34 stitches than plus 3 at the end of the row =37, the other nine must be for the cable pattern. Which is on a diagonal. I don’t see any instructions on how to work the cable and the other stitches ?
02.09.2023 - 04:21DROPS Design vastas:
Dear Mrs Kamm, on right front piece in larger size, work the 46 sts as follows from right side: 4 front band stitches in garter stitch, work the 9 sts A.1 (= knit on 1st row, cable on 3rd row), then purl 1 and knit to the end of the row. from wrong side, work: K3, P29, K1, P9, K4. In A.1 as well as in A.2 all the stitches will not be crossed for the cable; in A.1 cross the first 6 sts and knit the last 3; then knit the first 3 and cross the last 6. Happy knitting!
04.09.2023 - 09:20
![]() Barbara Kamm kirjutas:
Barbara Kamm kirjutas:
I am sorry to keep bothering you. But I don’t see in The instructions how to do the cable pattern. I am totally lost
02.09.2023 - 03:57DROPS Design vastas:
Dear Barbara, the instructions for the cable pattern are in the charts A.1 and A.2, where, on specific rows, you will slip 3 stitches to the cable needle, knit 3 and place the stitches back onto the main needle. So you will have 1 stitch in garter stitch before the cable in A.2 and purl 1 after A.2. On the other front piece you will have A.1 instead of A.2 and 1 purl before the cable and the edge stitch after the cable. Happy knitting!
03.09.2023 - 20:08
![]() Barbara Kamm kirjutas:
Barbara Kamm kirjutas:
Hi: I am starting the right front and I am confused with the instructions. I am making the 3X size. I have knitted the first 4 stitches that you call Band. Then it states A.2, P1 which I assume is for pearl 1. That confuses me. Then it states 29 stitches in stocking knit. If I am looking at the picture and the right side is on the left, I am not sure what kind of stitch you do before and after the cable? I would think I would do pearl stitches bebore the cable and the cable is zig zag about
29.08.2023 - 05:39DROPS Design vastas:
Dear Mrs Kamm, on right front piece, work from RS as follows: 4 sts in garter stitch (K them on every row), then work A.2 (see diagram, read from right towards the left from RS and from the left towards the right from WS), purl 1 (this stitch will be knitted from WS), and work the next 29 sts in stocking stitch (= these stitches will be knitted from RS and purled from WS), end with 3 sts in garter stitch (knit them on every row). Happy knitting!
29.08.2023 - 09:27
![]() Barbara Kamm kirjutas:
Barbara Kamm kirjutas:
It confuses me that on the back piece of this sweater it say to do garter stitch on 3 stitches on each side and I interpret that at the beginning and end of the back ?? Why is that? I understand using it on the front pieces
19.08.2023 - 18:05DROPS Design vastas:
Dear Barbara, the 3 stitches in garter stitch in each side of the back form a small border for the vent at the lower part of the jacket. After finishing the vent, you will have a single edge stitch in garter stitch, which will be used for the seam. Happy knitting!
20.08.2023 - 17:19
|
||||||||||
Winter Sparkle Cardigan |
||||||||||
|
|
||||||||||
DROPS Cloud või kahekordsest Air lõngast kootud palmikutega kardigan suurustele S kuni XXXL
DROPS Extra 0-1188 |
||||||||||
|
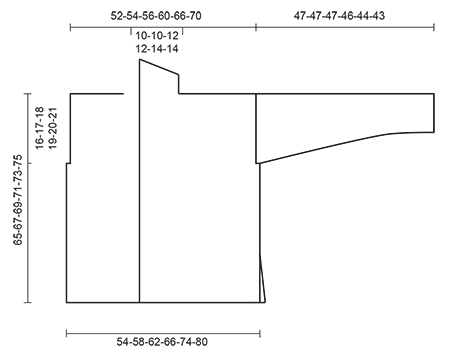
RIPSKUDE (edasi-tagasi kududes): koo kõik silmused parempidi igal real. 1 ripsivall = 2 rida ripskoes. MUSTER Vaata skeeme A.1-A.2. Muster on vaadatuna töö paremalt poolt (töö PP) ja näitab iga rida. NÖÖPAUGUD Tee 4 nööpauku paremale nööbiliistule töö PP pool. 1 NÖÖPAUK = koo 2 s esiserval, tee 1 õhksilmus, koo järgmised 2 pr kokku. Järgmisel real koo õs pr silmusena. Tee nööpaugud, kui töö pikkus on: SUURUS S: 20, 29, 38 ja 47 cm. SUURUS M 20, 29, 38 ja 47 cm. SUURUS L 24, 33, 42 ja 51 cm. SUURUS XL: 24, 33, 42 ja 51 cm. SUURUS XXL: 25, 35, 45 ja 55 cm. SUURUS XXXL: 25, 35, 45 ja 55 cm. ----------------------------------- SELJAOSA Kootakse edasi-tagasi ringvarrastega. Loo 8 mm ringvarrastele 54-58-62-66-74-80 s Cloud või kahekordse Air lõngaga. Koo 4 rida ripskoes - vaata ülevalt. Võta 9 mm ringvardad. Koo parempidises koes, tehes 3 s ripskoes mõlemal küljel. Kui töö pikkus on 14 cm (= lõhik), koo mõlema külje 3 ripskoes silmust nüüd parempidises koes, SAMAL AJAL loo 1 ääresilmus mõlemale küljele järgmise 2 rea lõpus = 56-60-64-68-76-82 s. Koo ääresilmused ripskoes. JÄLGI KOETIHEDUST! Kui töö pikkus on 49-50-51-52-53-54 cm, koo maha käeaukude jaoks 2-3-4-4-5-6 s kahe järgmise rea alguses = 52-54-56-60-66-70 s. Kui töö pikkus on 63-65-67-69-71-73 cm, koo maha keskmised 10-10-12-12-14-14 s kaelaaugu jaoks = 21-22-22-24-26-28 s jääb õlale. Koo parempidises koes, kuni töö on 64-66-68-70-72-74 cm pikkune. Koo 2 rida ripskoes. Koo silmused maha. Tee teine õlg samamoodi. PAREM HÕLM Loo 31-33-35-37-41-44 s (k.a 4 nööbiliistusilmust ripskoes) 8 mm ringvardale Cloud või kahekordse Air lõngaga. Koo 4 rida ripskoes, SAMAL AJAL kasvata viimasel real 2 s ühtlaste vahedega = 33-35-37-39-43-46 s. Võta 9 mm ringvardad. Järgmine rida (töö PP pool): 4 nööbiliistu silmust ripskoes, skeemi A.2, 1 ph, 16-18-20-22-26-29 s parempidises koes, 3 s ripskoes. Kui töö pikkus on 14 cm, koo 3 ripskoes silmust töö PP rea lõpus nüüd parempidises koes, SAMAL AJAL loo vardale 1 ääresilmus töö PP rea lõpus = 34-36-38-40-44-47 s. Koo ääresilmused ripskoes. ÄRA UNUSTA NÖÖPAUKE - vaata ülevalt! Kui töö pikkus on 49-50-51-52-53-54 cm, koo maha 2-3-4-4-5-6 s käeaugu jaoks töö PH rea alguses = 32-33-34-36-39-41 s vardal. Kui töö pikkus on 64-66-68-70-72-74 cm, järgmine rida on töö PH pool, koo 2 rida ripskoes kõigil silmustel. Siis koo maha esimesed 21-22-22-24-26-28 s õlal = 11-11-12-12-13-13 s jääb sallkrae jaoks. Jätka neil silmustel ripskoes, SAMAL AJAL koo lühendatud ridu, alustades kaela poolt (töö PP pool) nii: * koo 2 rida ripskoes kõigil silmustel (= 2 rida parempidi silmuseid). Järgmisel töö PP real koo 9 pr, pööra ja koo tagasi *, korda * kuni *, kuni töö pikkus on 7-7-8-8-9-9 cm õlasilmuste mahakudumisest (lühemal serval). Siis koo kõik silmused lõdvalt maha. VASAK HÕLM Koo nagu paremat hõlma, aga peegelpildis ja koo skeemi A.1 skeemi A.2 asemel. Loo ääresilmused töö PH rea lõpus. Koo maha käeaugu jaoks töö PP real alguses. Koo maha õlasilmused töö PP real alguses. VARRUKAS Kootakse edasi-tagasi ringvarrastega. Loo 8 mm ringvarrastele 24-24-24-26-26-26 silmust Cloud või kahekordse Air lõngaga. Koo 4 rida ripskoes. Võta 9 mm ringvardad. Koo parempidises koes, tehes 1 ääresilmuse mõlemal serval ripskoes. Kui töö pikkus on 9 cm, kasvata 1 s ühe ääresilmuse kõrval (seespool) mõlemal serval, korda kasvatamist iga 9-7-6-5,5-4,5-4 cm järel kokku 4-5-6-6-7-8 korda = 34-36-38-40-42-44 s. Koo silmused maha, kui töö on 47-47-47-46-44-43 cm pikkune. NB! Suurematel suurustel lühemad mõõdud, kuna õlad on laiemad. Koo ka teine varrukas. VIIMISTLUS Õmble kokku õlaõmblused. Ühenda külge varrukad. Õmble kokku varruka ja küljeõmblused ühe ääresilmuse kõrvalt (jäta u. 14 cm lõhik alläärde). Õmble kokku krae otsad. Kinnita krae kaelakaarele seljaosal, õmble servad vastastikku, et vältida paksu õmblust. Õmble nööbid vasakule hõlmale. |
||||||||||
Skeemi seletused |
||||||||||
|
||||||||||
 |
||||||||||
 |
||||||||||
Kas oled teinud seda mustrit?Lisa oma piltidele viide #dropspattern või saada link projektile meie #dropsfan galeriisse. Vajad abi selle mustriga?Garnstudio.com kodulehel on 26 õppevideot, küsimuste/vastuste osa ja muudki. © 1982-2026 DROPS Design A/S. Kõik õigused kaitstud. See dokument, ning selle alajaotused on kaitsud autoriõigustega. Loe rohkem, mida meie mustritega võib teha, iga mustrilehe alt meie kodulehel. |
||||||||||


Tegeledes üle 40 aasta kudumise ja heegeldamise disainidega, pakub DROPS Design ühte suurimat tasuta mustrite kollektsiooni internetis - tõlgituna 17 keelde. Tänaseks on meil 324 kataloogi ja 12272 mustrit - millest 9412 on tõlgitud Eesti keelde.
Me anname endast parima, et tuua teieni kõike mida kudumine ja heegeldamine võib pakkuda - inspiratsiooni, nõuandeid ning ka kvaliteetseid lõngu parima hinnaga! Soovid kasutada mustreid muukski, kui ainult oma tarbeks? Loe infot meie Copyright osas iga lehekülje all. Rõõmsat loomist!
Jäta kommentaar mustrile DROPS Extra 0-1188
Ootame kommentaare selle mustri kohta!
Kui soovid midagi küsida, siis kiiremaks vastuse saamiseks veendu, et valid õige kategooria alloleval formil. Vajaliku väljad *.