
Populaarsed kategooriad
Otsid lõnga?


Kommentaarid / Küsimused (127)
![]() Debbie kirjutas:
Debbie kirjutas:
Can you make a you tube video showing how this is made?
20.05.2015 - 01:53DROPS Design vastas:
Dear Debbie, you will find videos related to the sts used under tab "videos", you can work either following diagram or written pattern. Should you need any further assistance, you are welcome to ask your question here or to contact your DROPS store. Happy crocheting!
20.05.2015 - 10:02
![]() Judi Ames kirjutas:
Judi Ames kirjutas:
For Ruth, to put it more clearly, at end of first row, you turn, chain 3 (= first stitch) for turning chain...after the ch stitch do 2 more stitches, then stitch in ch-sp, ch 3 and continue...I was wondering why I had no turning chain and the rows were getting wider, too...does this help?
07.05.2015 - 22:35
![]() Lia kirjutas:
Lia kirjutas:
Ik ben met het voorpand bezig .Moet ik 3 stokjes in de 3 lossen tussen de tussen de stokjes in de hoek maken of in het eerst losse boogje? Keer de tweede toer 1st. in de eerst 3losse maar er zijn toch gen losse alleen 3 stokjes ? Moet je om een om aan het begin van de toer 3 stokjes haken of alleen maar boogjes?
30.04.2015 - 20:32
![]() Vivian kirjutas:
Vivian kirjutas:
Thx for the response about the sleeves! I woke up this morning and reread the instructions and understand them completely now!
27.04.2015 - 17:03
![]() Vivian kirjutas:
Vivian kirjutas:
I have the question about the increase every sixth round on the back panel. I think I understand what the instructions say…every 6th round you would have a DC ch3 DC all in the same ch sp on either side of the corners as you go round equaling 8 extra DC & ch3 per sixth round? BUT, I do not see that in the picture, which makes me question whether I understand clearly.
27.04.2015 - 17:01DROPS Design vastas:
Dear Vivian, diagram shows only first 4 rounds, increase starts on round 5, then every 6th round where you will work 1 dc + 3ch +1dc +3 ch in same ch-space each side of each corner (= 2 dc more per side = 8 dc inc per inc round). Happy crocheting!
27.04.2015 - 17:14
![]() Vivian kirjutas:
Vivian kirjutas:
I am totally lost on the directions for the sleeves. Is there any possibility I could get a simplified explanation on dec the sleeves? I just don't understand the way it is written. Also, when I enlarge the picture of the back piece, I don't see where the inc are in the example? I don't think I did that part right :( , all I did was put in one extra DC, but I am plowing ahead anyhow. thx!
27.04.2015 - 07:06DROPS Design vastas:
Dear Vivian, mid under sleeve replace 1 dc+3 ch that way: work next dc in next ch-space but wait with last pull through (2 sts on hook, work next dc in next ch space and on last pull through, pull yarn through all sts on hook. For any individual assistance, remember you can get help from your DROPS store. Happy crocheting!
27.04.2015 - 11:42
![]() Ruth kirjutas:
Ruth kirjutas:
Nope, sorry, still don't understand what you do at the turn after the first row...any chance of a picture? To clarify - I finish the first row with 3ch, 3 tr in ch-loop in the corner, I turn and then....what??!!
26.04.2015 - 23:22DROPS Design vastas:
Dear Ruth, on 2nd row start with 3 ch (= 1st tr), 1 tr in each of the first 2 tr, then repeat *1 tr in ch-space, 3 ch* to the end of row and finish with 1 tr in the last ch-space, 1 tr in each of the last 3 tr. On 3rd row, turn and work 3 ch, 1 tr in each of the next 2 tr, *3 ch, 1 tr in next ch-space*, repeat to the end of row and finish with 1 tr in each of the last 3 tr. Repeat then row 2 and 3. Happy crocheting!
27.04.2015 - 14:19
![]() Ruth kirjutas:
Ruth kirjutas:
Nope, sorry, still don't understand what you do at the turn after the first row...any chance of a picture?
26.04.2015 - 23:10
![]() Ruth kirjutas:
Ruth kirjutas:
I am struggling to understand what happens at the corners when you turn on the frontpiece. A close up picture might help - the pattern makes no sense to me and I am so close! After severalf restarts I have done the main body and arms and it's looking good, but I can't figure out the turns. Help!.
24.04.2015 - 22:44DROPS Design vastas:
Dear Ruth, when you work only on front piece, crochet 3 tr in 1st ch-loop in the corner, then repeat *3 ch, 1 tr around ch-loop*, finish with 3ch, 3 tr in ch-loop in the corner. And continue then repeating row 2 and 3 - remember to replace 1st tr with 3 ch at the beg of row. Happy crocheting!
25.04.2015 - 10:19
![]() Lelel Mas kirjutas:
Lelel Mas kirjutas:
En el delantero, como se continua el patrón sin que salgan aumentos, si se trabaja un punto alto en cada arco aumenta igual que antes.
01.04.2015 - 09:34DROPS Design vastas:
Hola Lelel, gracias por escribir. Repasando el patrón he encontrado una corrección del delantero sin actualizar en español. Ahora está actualizado. Sentimos las molestias y esperamos que la corrección te ayude a realizar el delantero.
05.04.2015 - 12:12
|
||||||||||||||||||||||
Around the World#aroundtheworldcardigan |
||||||||||||||||||||||
 |
 |
|||||||||||||||||||||
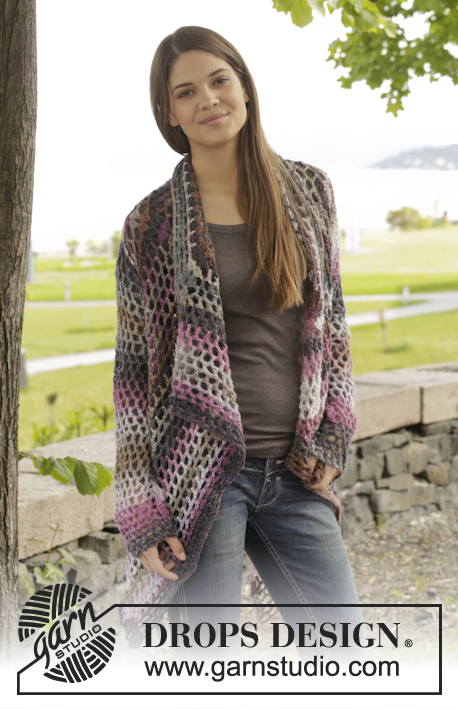
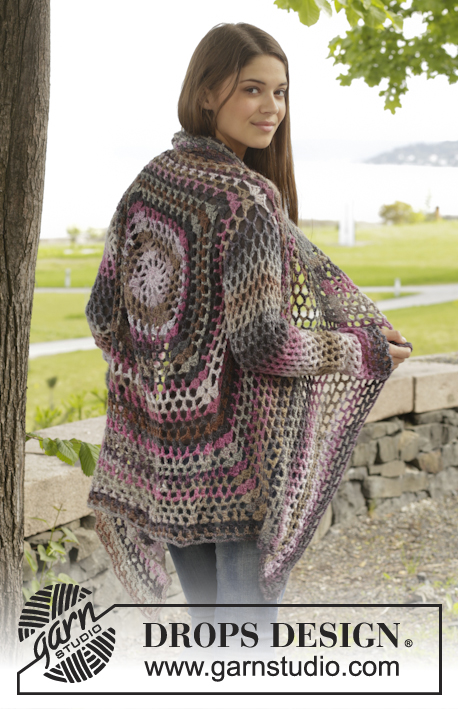
DROPS Big Delight lõngast heegeldatud pitsmustriga jakk suurustele S kuni XXXL
DROPS 156-42 |
||||||||||||||||||||||
|
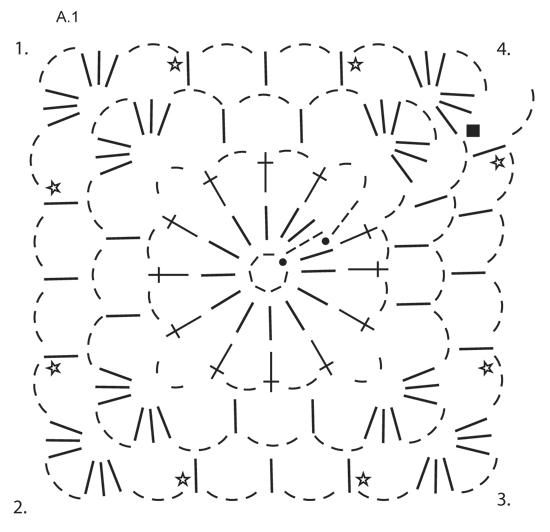
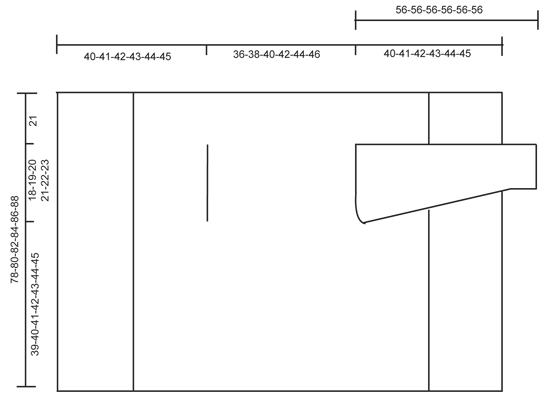
MUSTER Vaata skeemi A.1. KAHANDAMISE NIPP (varrukatel) Kahanda 1 mustrikordus (= 1 ühekordne sammas (sm) + 3 ahels), aga ära tee ahelsilmuseid, vaid tee 2 sm ühte sambasse nii: tee 1 sm, ainult ära tee viimast lõnga läbitõmmet (= 2 aasa heegelnõelal), siis tee järgmine sm, aga viimasel lõnga läbitõmbel, tõmba läbi kõigi silmuste heegelnõelal. ---------------------- KEHAOSA Heegeldatakse ringselt, alustades seljaosa keskelt. Tee 6 ahels 5 mm heegelnõelaga Big Delight lõngaga ja ühenda 1 aass-ga ringiks. Heegelda skeemi A.1, st. heegelda järgmiselt: 1. RING: tee 3 ahels, 13 sm ahels-ringi, lõpus tee 1 aass kolmandasse ahels-sse ringi algul. 2. RING: 5 ahels, jäta vahele 1 sm, 1 sm järgmisesse sm-sse, *2 ahels, 1 sm järgmisesse sm-sse*, korda *kuni* tervel ringil, lõpus tee 2 ahels = 12 sm + 2 ahels. 3. RING: nüüd heegelda ring ruuduks, st. tee nii: tee 3 sm + 3 ahels + 3 sm (= nurk) esimesse ahels-kaarde, 3 ahels, 1 sm järgmisesse ahels-kaarde, 3 ahels, 1 sm järgmisesse ahels-kaarde, 3 ahels, *3 sm + 3 ahels + 3 sm (= nurk) järgmisesse ahels-kaarde, 3 ahels, 1 sm järgmisesse ahels-kaarde, 3 ahels, 1 sm järgmisesse ahels-kaarde, 3 ahels*, korda *kuni* kokku 3 korda, 1 sm järgmisesse ahels-kaarde (= eelmise ringi 2 viimast ahles), 3 ahels. 4. RING: tee esimesse ahels-kaarde 3 sm + 3 ahels + 3 sm (= nurk), *3 ahels, 1 sm järgmisesse ahels-kaarde, 3 ahels, 1 sm järgmisesse ahels-kaarde, 3 ahels, 1 sm järgmisesse ahels-kaarde, 3 ahels, järgmisesse ahels-kaarde tee 3 sm + 3 ahels + 3 sm (= nurk)*, korda *kuni* kokku 3 korda, 3 ahels, 1 sm järgmisesse ahels-kaarde, 3 ahels, 1 sm järgmisesse ahels-kaarde, 3 ahels, 1 sm järgmisesse ahels-kaarde, 3 ahels, 1 sm järgmisesse ahels-kaarde, 3 ahels. JÄLGI KOETIHEDUST! Korda 4-ndat ringi koos kasvatamistega, st. heegelda 1 sm + 3 lisaahels iga nurga vahele igal ringil (= 4 kasvatust ringil), SAMAL AJAL kasvata igal 6-ndal ringil 1 sm + 3 lisaahels mõlemal pool igal nurgal – vaata tähti skeemil (= 8 lisa kasvatust ringil). Jätka sedasi, kuni ruudu mõõt on 36-38-40-42-44-46 cm x 36-38-40-42-44-46 cm. Nüüd heegelda käeaugud järgmiselt: heegelda nagu enne, kuni esimese nurgani, tee 3 sm + 3 ahels + 3 sm ahels-kaarde nurgal. Nüüd heegelda ahelsilmuseid, kuni järgmise serva keskosani (st. keskkoht 1. ja 2. nurga vahel) nii: tee 1 ahels igasse vahele jäetud ahels-sse/sm- sse. Siis heegelda mustrit nagu enne, kuni keskkohani 3. ja 4. nurga vahel. Nüüd heegelda ahels-d, kuni ringi alguseni nii: tee 1 ahels igasse vahele jäetud ahels-sse/sm-sse. Järgmisel ringil tee mustrit ja kasvata nagu enne kõikidel silmustel, samuti ahelsilmustel käeaukudel. Jätka sedasi, kuni ruudu mõõt on 78-80-82-84-86-88 cm x 78-80-82-84-86-88 cm (st. 21 cm kõikidel suurustel käeaugust). Kinnita lõngaots. ESIOSA Nüüd heegelda edasi-tagasi esimese ja teise nurga vahele. NB! Tee esiosa ilma kasvatamisteta. 1. RIDA: heegelda esimesest nurgast nii: 3 sm nurga ahels-kaarde, * 3 ahels, 1 sm ahels-kaarde*, korda * kuni*, lõpuks 3 ahels ja 3 sm nurka. 2. RIDA: Pööra ja heegelda nii: 1 sm igasse esimesse 3 sm-sse, * 1 sm ahels-kaarde, 3 ahels *, korda * kuni *, lõpuks 1 sm viimasesse ahels-kaarde ja 1 sm igasse 3 sm-sse. 3. RIDA: Pööra ja heegelda nii: 1 sm igasse esimesse 3 sm-sse, * 3 ahels, 1 sm ahels-kaarde*, korda * kuni * ja lõpuks 3 ahels ja 1 sm igasse viimasesse 3 sm-sse. Korda 2. ja 3. rida. Jätka sedasi, kuni edasi-tagasi on heegeldatud 19-20-21-22-23-24 cm, kinnita lõngaots. Korda teisel serval ja nüüd heegelda edasi-tagasi kolmanda ja neljanda nurkade vahele. Lõpuks heegelda ringselt ümber terve ruudu, tee mustrit nagu enne, ainult igasse nurga ahels-kaarde tee 6 sm. Kinnita lõngaots. VARRUKAS Heegelda ringselt, käeaugust alla, alusta varruka siseküljest töö PP. 1. RING: tee 6 ahels (= 1 sm + 3 ahels), *1 sm järgmisesse ahels-kaarde, 3 ahels*, korda *kuni* kokku 16-17-18-19-20-21 korda, lõpus tee 1 aass kolmandasse ahels-sse. 2. RING: tee 5 ahels, * 1 sm järgmisesse ahels-kaarde, 3 ahels*, korda *kuni* kokku 16-17-18-19-20-21 korda, tee 1 ahels, lõpus tee 1 aass kolmandasse ahels-sse ringi algul. Korda 1. ja 2. RINGI, SAMAL AJAL kahanda varruka siseküljel 1 sm + 3 ahels iga 4.-6.-6.-8.-8.-6-nda ringi algul heegeldades 2 sm kokku – loe KAHANDAMISE NIPPI. Korda kahandamist igal 6.-6.-6.-4.-4.-4-ndal ringil = 12-12-13-13-14-14 sm. Korda ringi ilma kahandamisteta, kuni varruka pikkus kõikidel suurustel on umbes 56 cm. Kinnita lõngaots. Heegelda teine varrukas. |
||||||||||||||||||||||
Skeemi seletused |
||||||||||||||||||||||
|
||||||||||||||||||||||
 |
||||||||||||||||||||||
 |
||||||||||||||||||||||
Kas oled teinud seda mustrit?Lisa oma piltidele viide #dropspattern #aroundtheworldcardigan või saada link projektile meie #dropsfan galeriisse. Vajad abi selle mustriga?Garnstudio.com kodulehel on 7 õppevideot, küsimuste/vastuste osa ja muudki. © 1982-2026 DROPS Design A/S. Kõik õigused kaitstud. See dokument, ning selle alajaotused on kaitsud autoriõigustega. Loe rohkem, mida meie mustritega võib teha, iga mustrilehe alt meie kodulehel. |
||||||||||||||||||||||


Tegeledes üle 40 aasta kudumise ja heegeldamise disainidega, pakub DROPS Design ühte suurimat tasuta mustrite kollektsiooni internetis - tõlgituna 17 keelde. Tänaseks on meil 324 kataloogi ja 12290 mustrit - millest 9431 on tõlgitud Eesti keelde.
Me anname endast parima, et tuua teieni kõike mida kudumine ja heegeldamine võib pakkuda - inspiratsiooni, nõuandeid ning ka kvaliteetseid lõngu parima hinnaga! Soovid kasutada mustreid muukski, kui ainult oma tarbeks? Loe infot meie Copyright osas iga lehekülje all. Rõõmsat loomist!
Jäta kommentaar mustrile DROPS 156-42
Ootame kommentaare selle mustri kohta!
Kui soovid midagi küsida, siis kiiremaks vastuse saamiseks veendu, et valid õige kategooria alloleval formil. Vajaliku väljad *.