
Populaarsed kategooriad
Otsid lõnga?


Kommentaarid / Küsimused (127)
![]() Loele Van Den Bergh kirjutas:
Loele Van Den Bergh kirjutas:
Kan iemand mij uitleggen hoe de mouwen gehaakt worden. Ik begrijp het principe wel, maar als ik op de goede kant haak en met de 5 losse de nieuwe toeren begin loopt de hele mindering gedraaid over de voorkant van de mouw. Ik heb overigens ook meer losse bogen dan aangegeven in het patroon. Dit kan ik oplossen door midden onder te minderen maar hoe voorkom ik dat het begin van de rondes over de mouw lopen?
03.01.2016 - 18:02DROPS Design vastas:
Hoi Loele. Je moet ervoor zorgen, dat de minderingen steeds op dezelfde plek worden gemaakt. Het lijkt dat je de minderingen op de toer opschuift waardoor ze zich verplaatsen en het mouw "draait". Ik zou ook kijken of je het patroon volgt zodat er niet steeds meer bogen komen.
05.01.2016 - 15:39
![]() Yvonne Pottgießer-Bündgen kirjutas:
Yvonne Pottgießer-Bündgen kirjutas:
Meine Frage vom 20.12.15 wurde leider noch nicht beantwortet. Darf ich mich nochmal in Erinnerung rufen? Vielen Dank.
30.12.2015 - 17:33DROPS Design vastas:
Sie müssen bis zur Mitte einer Seite des Quadrats häkeln, Sie häkeln also die Hälfte dieser Seite, dann überspringen Sie den Rest der Seite (also die andere Hälfte), indem Sie statt der Maschen die entsprechende Anzahl an Luftmaschen häkeln. Die Ecke häkeln Sie dann wieder normal und wiederholen das Ganze dann an der gegenüberliegenden Seite. Die Armausschnitte umfassen also jeweils die Hälfte einer Seite.
05.01.2016 - 19:18
![]() Christine Hohenstein kirjutas:
Christine Hohenstein kirjutas:
Are any further questions being answered????? I have a customer waiting on this item to be made. Can someone else help me if the creator isnt available to help me?
29.12.2015 - 16:55DROPS Design vastas:
Dear Mrs Hohenstein, please find answer below and thank you very much for your patience. Happy crocheting!
02.01.2016 - 15:17
![]() Christine Hohenstein kirjutas:
Christine Hohenstein kirjutas:
I am so confused as to how to do the sleeve. I got the first corner done. But from there I do not understand the written instructions I have also read many comments and answers and am still confused is there anyway that you can try and in a very simple way explain how to do the first side including the first sleeve? Please and thank you
27.12.2015 - 21:39DROPS Design vastas:
Dear Mrs Hohenstein, to shape armholes, work to 1st corner, work 3 dc+3ch+3 dc in corner, then you will work a chain to shape the hole for the sleeve as follows: count number of sts from the 1st corner to the middle of side between 1st and 2nd corner and chain this number of sts, continue working as before from middle of this side to 2nd corner, continue as before to the 3rd corner, then work as before from the corner to the mid of side between 3rd and 4th corner, you will now skip the next sts to the 4th corner and replace these skipped sts by a chain of the number of skipped sts. Finish round as before. Happy crocheting!
02.01.2016 - 14:19
![]() Yvonne Pottgießer-Bündgen kirjutas:
Yvonne Pottgießer-Bündgen kirjutas:
Ich habe Probleme mit den Ärmelausschnitten. Verstehe ich das richtig, dass ich ein Stäbchen gehäkelt habe, dann 3 Lfm + nochmal 3 Lfm um das nächste Stb.zu überspringen,dann wieder 3 Lfm und das nächste Stb häkele? Wenn ja, wie wiederhole ich dass in der nächsten Runde? Verdoppele ich die Lfm zum überspringen, da ja auch der Luftmaschenbogen breiter ist? Ich hoffe, ich habe mich einigermaßen verständlich ausgedrückt. Vielen Dank.
20.12.2015 - 18:15DROPS Design vastas:
Antwort siehe oben!
25.01.2016 - 11:09
![]() Tara kirjutas:
Tara kirjutas:
Sorry, I wasn't talking about the armholes, but the sides. It's under the "Front Piece" section of the pattern.
18.11.2015 - 02:35DROPS Design vastas:
Dear Tara and sorry, my mistake - the 2nd front piece is worked as you did for the first side but this time crochet between the 3rd and 4th corner (seen from RS): crochet row 1 starting in the 3rd corner and finishing in the 4th corner. Happy crocheting!
18.11.2015 - 09:44
![]() Tara kirjutas:
Tara kirjutas:
This is under the Front section: Repeat on the other side, now work back and forth from third to fourth corner. So am I working this on 3 out of 4 sides? If so, on the bottom side, do I go all the way to the front corners or just the middle to connect the sides (which would not make the sides any longer in front)? I hope this makes sense. I appreciate the help!
17.11.2015 - 14:32DROPS Design vastas:
Dear Tara, first armhole is worked between 1st corner and middle of side before 2nd corner, 2nd armhole is worked from middle of side after 3rd corner (work to the middle of the side as before) to the 4th corner (ch same number of ch you crocheted for 1st armhole and skip same number of sts as for 1st armhole). Happy crocheting!
17.11.2015 - 16:39
![]() Tara kirjutas:
Tara kirjutas:
I have read through all the comments and I am confused on Lauren's question. She said that on the 4th side there is an extra DC + 3ch but you said there should not be. However, in the diagram if you count the DC lines it shows 4 on the 4th side and 3 on the other side. When does this get straightened out to be an equal number of DC's on each side? Thanks in advance.
11.11.2015 - 03:10DROPS Design vastas:
Dear Tara, your question has been forwarded. Thank you in advance for your patience and comprehension.
12.11.2015 - 09:49Helen Watt kirjutas:
Hi there! I would like some clarification regarding the increase on the body after the chain for the armhole. The pattern reads"On next round work pattern and inc as before OVER ALL STS, also in ch for armholes." To increase over all sts would make the garment very large? I assume this is incorrect and the increase is the same as previous to the making the armhole. Therefore increasing every 6th row? I just want to make sure that this is correct.
05.11.2015 - 10:06DROPS Design vastas:
Dear Mrs Watt, yes that's correct, you continue as before and increase as you did before (= continue increasing every 6h row). Happy crocheting!
05.11.2015 - 10:27
![]() Sarah kirjutas:
Sarah kirjutas:
I am not sure what to do on round 5, it says to increase on each corner, which is a total of 4 increases? Correct? Where do i increase and do i still do the extra treble and chain 3 in the last chain space?
01.11.2015 - 17:42DROPS Design vastas:
Dear Sarah, on round 5 continue as before (there will be 3 ch, 1 tr more between corners), and on round 6 start inc with 1 tr + 3 ch more in every place with a star in the diagram. Happy crocheting!
02.11.2015 - 09:22
|
||||||||||||||||||||||
Around the World#aroundtheworldcardigan |
||||||||||||||||||||||
 |
 |
|||||||||||||||||||||
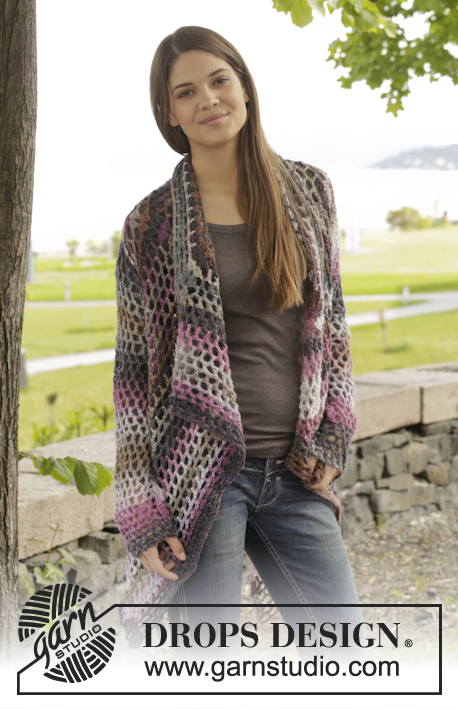
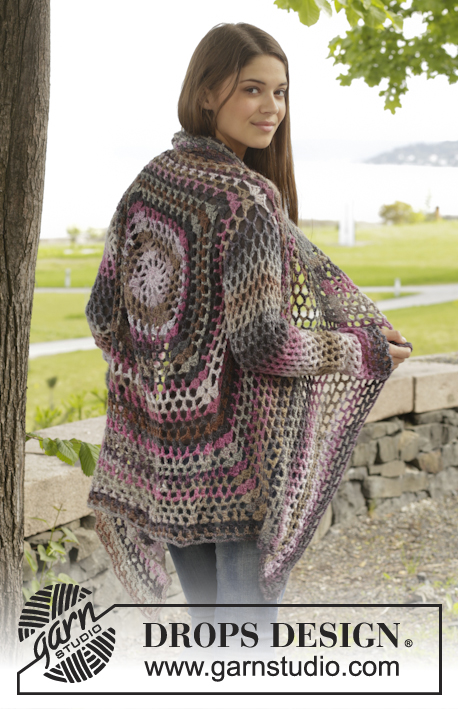
DROPS Big Delight lõngast heegeldatud pitsmustriga jakk suurustele S kuni XXXL
DROPS 156-42 |
||||||||||||||||||||||
|
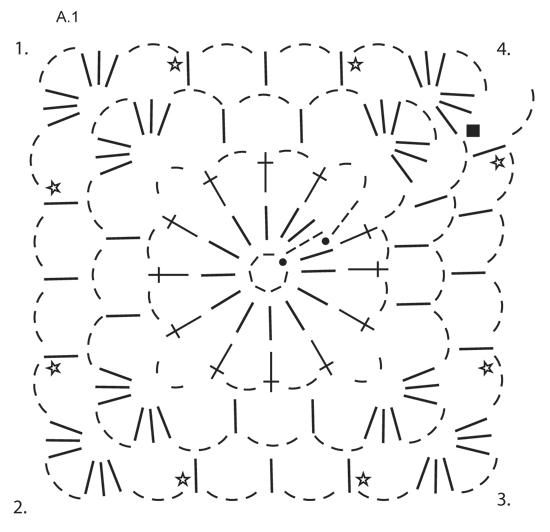
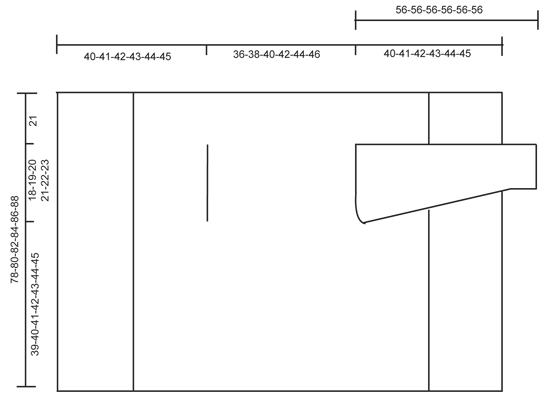
MUSTER Vaata skeemi A.1. KAHANDAMISE NIPP (varrukatel) Kahanda 1 mustrikordus (= 1 ühekordne sammas (sm) + 3 ahels), aga ära tee ahelsilmuseid, vaid tee 2 sm ühte sambasse nii: tee 1 sm, ainult ära tee viimast lõnga läbitõmmet (= 2 aasa heegelnõelal), siis tee järgmine sm, aga viimasel lõnga läbitõmbel, tõmba läbi kõigi silmuste heegelnõelal. ---------------------- KEHAOSA Heegeldatakse ringselt, alustades seljaosa keskelt. Tee 6 ahels 5 mm heegelnõelaga Big Delight lõngaga ja ühenda 1 aass-ga ringiks. Heegelda skeemi A.1, st. heegelda järgmiselt: 1. RING: tee 3 ahels, 13 sm ahels-ringi, lõpus tee 1 aass kolmandasse ahels-sse ringi algul. 2. RING: 5 ahels, jäta vahele 1 sm, 1 sm järgmisesse sm-sse, *2 ahels, 1 sm järgmisesse sm-sse*, korda *kuni* tervel ringil, lõpus tee 2 ahels = 12 sm + 2 ahels. 3. RING: nüüd heegelda ring ruuduks, st. tee nii: tee 3 sm + 3 ahels + 3 sm (= nurk) esimesse ahels-kaarde, 3 ahels, 1 sm järgmisesse ahels-kaarde, 3 ahels, 1 sm järgmisesse ahels-kaarde, 3 ahels, *3 sm + 3 ahels + 3 sm (= nurk) järgmisesse ahels-kaarde, 3 ahels, 1 sm järgmisesse ahels-kaarde, 3 ahels, 1 sm järgmisesse ahels-kaarde, 3 ahels*, korda *kuni* kokku 3 korda, 1 sm järgmisesse ahels-kaarde (= eelmise ringi 2 viimast ahles), 3 ahels. 4. RING: tee esimesse ahels-kaarde 3 sm + 3 ahels + 3 sm (= nurk), *3 ahels, 1 sm järgmisesse ahels-kaarde, 3 ahels, 1 sm järgmisesse ahels-kaarde, 3 ahels, 1 sm järgmisesse ahels-kaarde, 3 ahels, järgmisesse ahels-kaarde tee 3 sm + 3 ahels + 3 sm (= nurk)*, korda *kuni* kokku 3 korda, 3 ahels, 1 sm järgmisesse ahels-kaarde, 3 ahels, 1 sm järgmisesse ahels-kaarde, 3 ahels, 1 sm järgmisesse ahels-kaarde, 3 ahels, 1 sm järgmisesse ahels-kaarde, 3 ahels. JÄLGI KOETIHEDUST! Korda 4-ndat ringi koos kasvatamistega, st. heegelda 1 sm + 3 lisaahels iga nurga vahele igal ringil (= 4 kasvatust ringil), SAMAL AJAL kasvata igal 6-ndal ringil 1 sm + 3 lisaahels mõlemal pool igal nurgal – vaata tähti skeemil (= 8 lisa kasvatust ringil). Jätka sedasi, kuni ruudu mõõt on 36-38-40-42-44-46 cm x 36-38-40-42-44-46 cm. Nüüd heegelda käeaugud järgmiselt: heegelda nagu enne, kuni esimese nurgani, tee 3 sm + 3 ahels + 3 sm ahels-kaarde nurgal. Nüüd heegelda ahelsilmuseid, kuni järgmise serva keskosani (st. keskkoht 1. ja 2. nurga vahel) nii: tee 1 ahels igasse vahele jäetud ahels-sse/sm- sse. Siis heegelda mustrit nagu enne, kuni keskkohani 3. ja 4. nurga vahel. Nüüd heegelda ahels-d, kuni ringi alguseni nii: tee 1 ahels igasse vahele jäetud ahels-sse/sm-sse. Järgmisel ringil tee mustrit ja kasvata nagu enne kõikidel silmustel, samuti ahelsilmustel käeaukudel. Jätka sedasi, kuni ruudu mõõt on 78-80-82-84-86-88 cm x 78-80-82-84-86-88 cm (st. 21 cm kõikidel suurustel käeaugust). Kinnita lõngaots. ESIOSA Nüüd heegelda edasi-tagasi esimese ja teise nurga vahele. NB! Tee esiosa ilma kasvatamisteta. 1. RIDA: heegelda esimesest nurgast nii: 3 sm nurga ahels-kaarde, * 3 ahels, 1 sm ahels-kaarde*, korda * kuni*, lõpuks 3 ahels ja 3 sm nurka. 2. RIDA: Pööra ja heegelda nii: 1 sm igasse esimesse 3 sm-sse, * 1 sm ahels-kaarde, 3 ahels *, korda * kuni *, lõpuks 1 sm viimasesse ahels-kaarde ja 1 sm igasse 3 sm-sse. 3. RIDA: Pööra ja heegelda nii: 1 sm igasse esimesse 3 sm-sse, * 3 ahels, 1 sm ahels-kaarde*, korda * kuni * ja lõpuks 3 ahels ja 1 sm igasse viimasesse 3 sm-sse. Korda 2. ja 3. rida. Jätka sedasi, kuni edasi-tagasi on heegeldatud 19-20-21-22-23-24 cm, kinnita lõngaots. Korda teisel serval ja nüüd heegelda edasi-tagasi kolmanda ja neljanda nurkade vahele. Lõpuks heegelda ringselt ümber terve ruudu, tee mustrit nagu enne, ainult igasse nurga ahels-kaarde tee 6 sm. Kinnita lõngaots. VARRUKAS Heegelda ringselt, käeaugust alla, alusta varruka siseküljest töö PP. 1. RING: tee 6 ahels (= 1 sm + 3 ahels), *1 sm järgmisesse ahels-kaarde, 3 ahels*, korda *kuni* kokku 16-17-18-19-20-21 korda, lõpus tee 1 aass kolmandasse ahels-sse. 2. RING: tee 5 ahels, * 1 sm järgmisesse ahels-kaarde, 3 ahels*, korda *kuni* kokku 16-17-18-19-20-21 korda, tee 1 ahels, lõpus tee 1 aass kolmandasse ahels-sse ringi algul. Korda 1. ja 2. RINGI, SAMAL AJAL kahanda varruka siseküljel 1 sm + 3 ahels iga 4.-6.-6.-8.-8.-6-nda ringi algul heegeldades 2 sm kokku – loe KAHANDAMISE NIPPI. Korda kahandamist igal 6.-6.-6.-4.-4.-4-ndal ringil = 12-12-13-13-14-14 sm. Korda ringi ilma kahandamisteta, kuni varruka pikkus kõikidel suurustel on umbes 56 cm. Kinnita lõngaots. Heegelda teine varrukas. |
||||||||||||||||||||||
Skeemi seletused |
||||||||||||||||||||||
|
||||||||||||||||||||||
 |
||||||||||||||||||||||
 |
||||||||||||||||||||||
Kas oled teinud seda mustrit?Lisa oma piltidele viide #dropspattern #aroundtheworldcardigan või saada link projektile meie #dropsfan galeriisse. Vajad abi selle mustriga?Garnstudio.com kodulehel on 7 õppevideot, küsimuste/vastuste osa ja muudki. © 1982-2026 DROPS Design A/S. Kõik õigused kaitstud. See dokument, ning selle alajaotused on kaitsud autoriõigustega. Loe rohkem, mida meie mustritega võib teha, iga mustrilehe alt meie kodulehel. |
||||||||||||||||||||||


Tegeledes üle 40 aasta kudumise ja heegeldamise disainidega, pakub DROPS Design ühte suurimat tasuta mustrite kollektsiooni internetis - tõlgituna 17 keelde. Tänaseks on meil 324 kataloogi ja 12290 mustrit - millest 9431 on tõlgitud Eesti keelde.
Me anname endast parima, et tuua teieni kõike mida kudumine ja heegeldamine võib pakkuda - inspiratsiooni, nõuandeid ning ka kvaliteetseid lõngu parima hinnaga! Soovid kasutada mustreid muukski, kui ainult oma tarbeks? Loe infot meie Copyright osas iga lehekülje all. Rõõmsat loomist!
Jäta kommentaar mustrile DROPS 156-42
Ootame kommentaare selle mustri kohta!
Kui soovid midagi küsida, siis kiiremaks vastuse saamiseks veendu, et valid õige kategooria alloleval formil. Vajaliku väljad *.