
Populaarsed kategooriad
Otsid lõnga?


Kommentaarid / Küsimused (52)
Nina kirjutas:
4th symbol in diagram makes 1 st out of 3 (you pass one over two already knitted tog.)
11.08.2014 - 14:10
![]() Cresta kirjutas:
Cresta kirjutas:
Help! I end up with a spare stitch in each block. Can you write out in standard knitting code what the steps over 4 rows should be? My version would be this: over 5 stitches: r1: p, kt (knit twisted), p, k, yo, k (ie 6 stitches now exist in place of 5) r2: k, pt (purl twisted), k, p, p, p, yo (ie 7 stitches now exist in place of 5) r3: p, kt, p, slip, k, k, psso 2 (now 6 stitches) r4: k, pt, k, p, p - ie instructions for 5 stitches, but still have a sixth one.
10.08.2014 - 20:14DROPS Design vastas:
Dear Cresta, diagram is read from the right to the left from RS and from the left to the right from WS, so that row 2 will be P3, YO, K, Ptwisted, P and row 4: K2, K, P twisted, K. NB: the YO created on row 2 should be dropped off needle on row 3. Happy knitting!
12.08.2014 - 11:44
![]() Gerd kirjutas:
Gerd kirjutas:
Hej! Jag har en kund som gör den här modellen i storlek L. Det har gått 3 nystan mer än på garnåtgången. Ändå stickade hon storlek M på ärmarna. Vi ser också på kommentarena att det har hänt fler gånger. Så det vore bra om det ändrades.
28.05.2014 - 08:59Leonor kirjutas:
En la explicacion del punto M1 hay un simbolo q significa "este punto no existe en esta vuelta", como lo tejo entonces?
12.05.2014 - 01:27DROPS Design vastas:
Hola Leonor. El símbolo "no existe" significa que no hay punto en la vta y como no hay punto - no se trabaja. Eso pasa porque tenemos que explicar la labor en un diagrama plano.
17.05.2014 - 20:33
![]() Susan Loudon kirjutas:
Susan Loudon kirjutas:
On your lace pattern, row 1 says: 1 YO between 2 sts, K YO on next row." But below, you say that row 2 is P3, YO. Where do I K the YO?, as described above? It lines up right in the middle of the P3... Also, the stitch count varies row to row, so the patterns don't line up, making the stripe pattern as shown in the photo...what am I doing wrong? Could you please describe the Lace Diagram, stitch by stitch, row by row , including the edge sts etc for one complete block?
11.05.2014 - 06:51DROPS Design vastas:
Dear Mrs Loudon, you are right for row 2. The pattern should be lined up, repeat A.1 until 4 sts remain on row, P 1, K 1 twisted, P 1 and 1 edge st in garter st. Work the twisted st P twisted from WS (as the 3 first sts in A.1). From WS, work these 3 sts then repeat A.1 starting from left towards right. Happy knitting!
12.05.2014 - 09:17
![]() Susan Loudon kirjutas:
Susan Loudon kirjutas:
Thank-you for the description of the lace... but I'm still confused! You note that on R3 to slip 1 st as if to P,K2,psso the 2K sts...etc... but your pattern says" drop YO off the needle on next row (which would be Row 3),. So I'm not sure when to drop that YO because you don't mention it in your instruction.??? thanks! Susan
10.05.2014 - 00:48DROPS Design vastas:
Dear Susan, the YO made on 2nd row is then dropped on 3rd row (you don't work this YO), so that on 3rd row you will: drop the yo from previous row, then slip 1 st as if to P, K 2, psso the 2 K sts (2 sts remain). Happy knitting!
10.05.2014 - 09:43
![]() Susan kirjutas:
Susan kirjutas:
Could you please send me a link to your video instruction for the complete lace pattern for IBIZA 153-12. I notice on your webpage that you have a lot of lace patterns, but you don't have this one! It seems very confusing with different stitch counts on each row. thank-you!
09.05.2014 - 05:42DROPS Design vastas:
Dear Susan, your request have been forwarded. the lace pattern is worked over 3 sts as follows. R1(RS): K1,YO,K1 - R2(WS): P3,YO - R3: slip 1 st as if to P, K 2, psso the 2 K sts (2 sts remain) - R4: P2. Happy knitting!
09.05.2014 - 08:59
![]() Susan kirjutas:
Susan kirjutas:
I've just begun this challenging pattern and am having a problem with the Lace Pattern. Does the A-1 diagram read as normal, from the bottom right to the left, then up one row from left to right? I've asked the Question on other sites and have had different answers! I've completed Row 1, now want to go to Row 2 but don't know where to start .. at the P 3 end or at the K,P twist,K end?
09.05.2014 - 01:32DROPS Design vastas:
Dear Susan, diagrams are read from right towards left from RS and left towards right from WS. The 1st row finished with the first 3 sts in diagram, so that you start row 2 with K, P twisted, K and then A.1 (P3, YO). Happy knitting!
09.05.2014 - 08:54
![]() Anne kirjutas:
Anne kirjutas:
Som mange av dropsoppskriftene, stemmer ikke antall garnnøster, jeg måtte kjøpe 4 ekstra nøster. maskeantallet stemmer i cm.
21.04.2014 - 21:18
![]() M. Mulder kirjutas:
M. Mulder kirjutas:
Trui is af, hij is prachtig, maar twee bollen te weinig. En dan zit je met een ander verfbad.
27.03.2014 - 16:30
|
||||||||||||||||||||||
Ibiza#ibizasweater |
||||||||||||||||||||||
|
|
||||||||||||||||||||||
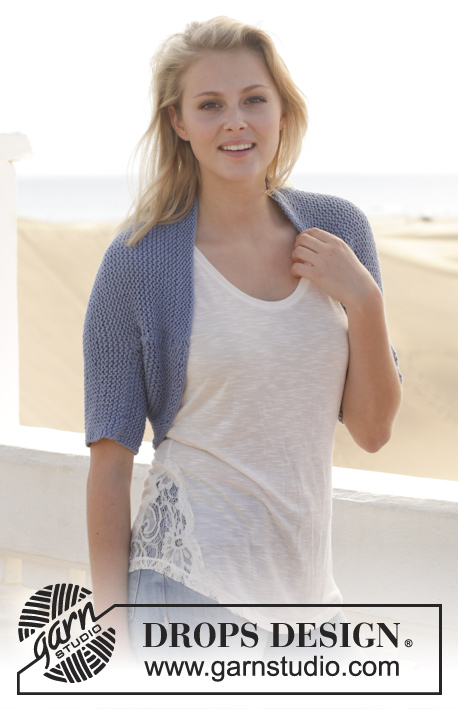
DROPS Paris lõngast kootud pitsmustriga džemper suurustele S kuni XXXL
DROPS 153-12 |
||||||||||||||||||||||
|
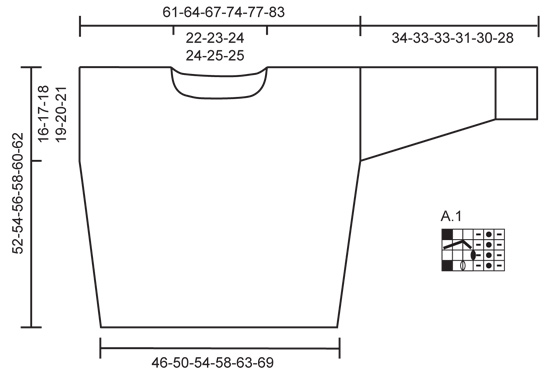
RIPSKUDE (edasi-tagasi kududes): koo kõik read parempidi. MUSTER Vaata skeemi A.1. Skeem on antud vaadatuna töö paremalt poolt (PP) ja näitab iga rida. ---------------------------- DŽEMPER Kootakse edasi-tagasi osadena, pärast õmmeldakse kokku. ESIOSA Loo 5,5 mm varrastele 76-83-88-94-103-113 silmust (sisaldab 1 ääresilmust mõlemal serval). Koo 6 rida ripskoes. Siis koo parempidises koes, mõlema serva 1 ääresilmus ripskoes – vaata ülevalt. Kui töö pikkus on umbes 2 cm, kasvata 1 silmus mõlemal serval, kasvatamiseks tee 1 õs 1 ääresilmuse kõrval. Järgmisel real koo õs keerdsilmusena, et vältida augu teket. Korda kasvatamist umbes iga 3-3,5-3,5-3-3,5-3,5 cm järel veel 11-10-10-12-10-10 korda (= 12-11-11-13-11-11 korda kokku) = 100-105-110-120-125-135 silmust. Koo, kuni töö pikkus on 36-37-38-39-40-41 cm, paigalda 1 silmusemärkija (SM) mõlemasse serva (märgib varrukate ühendamise kohta). Siis koo järgmiselt, töö PP: 1 ääresilmus ripskoes, skeemi A.1, kuni jääb 4 silmust, koo 1 ph, 1 pr keerdsilmusena, 1 ph ja 1 ääresilmus ripskoes. Koo keerdsilmused ph keerdsilmusena töö PH real. Koo sedasi, kuni töö pikkus on 46-48-50-52-54-56 cm, lõpeta pärast tervet vertikaalset skeemi A.1 mustrikordust. Koo esimesed 35-37-39-44-46-51 silmust nagu enne, koo maha järgmised 30-31-32-32-33-33 silmust ja koo rea lõpuni nagu enne. Lõpeta õlad eraldi, SAMAL AJAL koo maha 1 silmus kaelaaugupoolse rea algusest kokku 3 korda = 32-34-36-41-43-48 silmust on õlal. Jätka, kuni töö pikkus on 52-54-56-58-60-62 cm. Koo silmused maha. SELJAOSA Koo nagu esiosa, aga koo, kuni töö pikkus on 50-52-54-56-58-60 cm enne silmuste mahakudumist kaelaaugu jaoks – lõpeta pärast tervet vertikaalset skeemi A.1 mustrikordust. Koo nagu enne esimestel 33-35-37-42-44-49 silmustel, koo maha järgmised 34-35-36-36-37-37 silmust ja koo rea lõpuni nagu enne. Lõpeta õlad eraldi, SAMAL AJAL koo maha 1 silmus järgmise kaelaaugupoolse rea alguses = 32-34-36-41-43-48 silmust on õlal. Koo, kuni töö pikkus on 52-54-56-58-60-62 cm ja siis koo silmused maha. VARRUKAS Loo 5,5 mm varrastele 45-45-50-50-53-53 silmust (sisaldab 1 ääresilmust mõlemal serval). Koo 6 rida ripskoes edasi-tagasi. Siis koo järgmiselt: 1 ääresilmus ripskoes, koo ph 0-0-0-0-2-2 silmust, skeemi A.1, kuni jääb 4-4-4-4-5-5 silmust, 1 ph, 1 pr keerdsilmusena, koo ph 1-1-1-1-2-2 silmust ja 1 ääresilmus ripskoes. Koo keerdsilmused ph keerdsilmusena töö PH. Koo, kuni töö pikkus on 12 cm, lõpeta pärast tervet vertikaalset skeemi A.1 mustrikodust. Siis koo parempidises koes, SAMAL AJAL kasvata 1 silmus 1 ääresilmuse kõrval mõlemal serval. Korda kasvatamist umbes iga 6,5-4,5-4,5-3,5-4-2,5 cm järel veel 3-4-4-5-4-5 korda (= 4-5-5-6-5-6 korda kokku) = 53-55-60-62-63-65 silmust. Koo, kuni töö pikkus on 34-33-33-31-30-28 cm. Koo silmused maha (suurematele suurustele vähem, kuna õlad laiemad). Koo samamoodi teine varrukas. VIIMISTLEMINE ja KAELUS Õmble üks õlaõmblus, jäta teine avatuks. Korja üles 80-100 silmust töö PP kaelaaugu ümber. Koo 6 rida ripskoes edasi-tagasi. Koo silmused maha. Õmble kokku teine õlaõmblus ja kaelaaugu äär. Õmble varrukad silmusemärkijate vahele. Õmble varruka sisekülje ja küljeõmblus ühe õmblusena 1 ääresilmuse kõrvalt. |
||||||||||||||||||||||
Skeemi seletused |
||||||||||||||||||||||
|
||||||||||||||||||||||
 |
||||||||||||||||||||||
Kas oled teinud seda mustrit?Lisa oma piltidele viide #dropspattern #ibizasweater või saada link projektile meie #dropsfan galeriisse. Vajad abi selle mustriga?Garnstudio.com kodulehel on 20 õppevideot, küsimuste/vastuste osa ja muudki. © 1982-2026 DROPS Design A/S. Kõik õigused kaitstud. See dokument, ning selle alajaotused on kaitsud autoriõigustega. Loe rohkem, mida meie mustritega võib teha, iga mustrilehe alt meie kodulehel. |
||||||||||||||||||||||


Tegeledes üle 40 aasta kudumise ja heegeldamise disainidega, pakub DROPS Design ühte suurimat tasuta mustrite kollektsiooni internetis - tõlgituna 17 keelde. Tänaseks on meil 324 kataloogi ja 12290 mustrit - millest 9431 on tõlgitud Eesti keelde.
Me anname endast parima, et tuua teieni kõike mida kudumine ja heegeldamine võib pakkuda - inspiratsiooni, nõuandeid ning ka kvaliteetseid lõngu parima hinnaga! Soovid kasutada mustreid muukski, kui ainult oma tarbeks? Loe infot meie Copyright osas iga lehekülje all. Rõõmsat loomist!
Jäta kommentaar mustrile DROPS 153-12
Ootame kommentaare selle mustri kohta!
Kui soovid midagi küsida, siis kiiremaks vastuse saamiseks veendu, et valid õige kategooria alloleval formil. Vajaliku väljad *.