
Populaarsed kategooriad
Otsid lõnga?


Kommentaarid / Küsimused (59)
![]() Gilardi Claudette kirjutas:
Gilardi Claudette kirjutas:
Je ne comprends pas l'explication des manches.que veut dire "avec les rangs raccourcis comme avant,aux mêmes endroits" Merci
31.01.2022 - 09:02DROPS Design vastas:
Bonjour Mme Gilardi, vous avez auparavant tricoté des rangs raccourcis sur toute la longueur, lorsque vous tricotez les manches, vous allez tourner aux mêmes endroit qu'avant (moins de fois car moins de marqueurs), et continuer ainsi les rangs raccourcis comme avant. Bon tricot!
31.01.2022 - 10:23
![]() Martens kirjutas:
Martens kirjutas:
Ik ben deze Eden vest aan het breien. Ik ben nu de libkermouw aan het breien. Deze moeten in verkorte toeren gebreid worden. De eerste en de tweede toer van de verkorte toeren moeten gewoon volledig heen en terug gebreid worden. Blijft dit ook gelden in de mouw? Want er zijn maar 2 verkorte toeren in de mouw ipv 3. Ik begrijp tevens niet hoe je 35 cm meet (aan de onderkant op het breedste deel) in de uitleg van de linkermouw. Kan u mij daarmee helpen, please?
09.01.2021 - 20:24DROPS Design vastas:
Dag Martens,
De lengte van de mouw meet je aan de onderkant van de mouw op het breedste deel. Als je verkorte toeren maakt op de mouw, keer je het werk op het zelfde punt als bij de panden, dus het aantal steken vanaf de hals tot het keerpunt voor de verkorte toeren moet hetzelfde zijn. Hoe de verkorte toeren herhaald worden is verder precies hetzelfde als op de panden.
10.01.2021 - 12:15
![]() Bobby Garland kirjutas:
Bobby Garland kirjutas:
OK, I think I get it. I need to do 1 more row on the LF (row 1 for me) in order to end at the top. Then, I need to attach a new yarn to stitch #64 on the WS and knit the side piece. Then I will end up with the last row on the RS. Then I will cut that yarn. Then I will go back to the top edge on the LF and pick up yarn and turn to the WS to start the sleeve on those 51 sts. It would have been nice if the instructions had been more specific, instead of saying "work approximately..."
08.01.2021 - 19:57
![]() Bobby Garland kirjutas:
Bobby Garland kirjutas:
I get what you are saying, but I am not asking about the sleeve, as I am not there yet. I need to know if I am to cut the yarn at the lower edge of the left front piece and reattach it to the WS at stitch #64 to start the first row of the side piece so as to end on the RS of the side piece as instructed. There is no other way to end up on the RS unless you start the side piece on the WS in the middle of the work.
08.01.2021 - 17:21DROPS Design vastas:
Dear Mrs Garland, after left front piece measures 23 cm, adjust so that next row will be worked from RS and now work this 1 cm starting from RS = from the bottom edge over the first 64 cm - adjust this 1 cm so that last row is worked from RS, then cut the yarn and join it to work sleeve (starting from RS) over the 51 sts left unworked on needle (starting from RS). Happy knitting!
11.01.2021 - 06:57
![]() Bobby Garland kirjutas:
Bobby Garland kirjutas:
OK, so you also cut the yarn at the end of the left front, which for me is at the lower edge, and reattach to stitch # 64 (for small size) in order to start the side piece on the WS, so as to finish last row of side piece on the RS?
08.01.2021 - 15:15DROPS Design vastas:
Dear Mrs Garland, the last row on left front piece is worked from RS, but when you turn and work sleeve, first row on sleve is worked from WS = this means you don't need to cut the yarn between left front piece and sleeve, then after sleeve, just work the 64 sts on side at the end of a WS row. - no need to cut the yarn neither between sleeve and back piece. Happy knitting!
08.01.2021 - 16:19
![]() Bobby Garland kirjutas:
Bobby Garland kirjutas:
Thank you for your response. Another question....I finished the left front and ended on row 8 of short row sequence, which means the next row would be a right side row. In order to finish the side piece on the RS as instructed and have the side pieces be the same number of rows and have a marker in the middle, I would have to start the side piece on the WS. Do I cut the yarn and start at stitch number 64 at the other end from the WS?
08.01.2021 - 14:08DROPS Design vastas:
Dear Mrs Garland, last row worked for side on front piece is worked from the right side, then cut the yarn and work sleeve. Last row worked on sleeve is from WS, after you have worked this last row on sleeve, work the stitches of the side at the end of this row = from WS, all stitches are now back on needle, turn and start short rows at the beg of next row from RS. Happy knitting!
08.01.2021 - 15:02
![]() Bobby Garland kirjutas:
Bobby Garland kirjutas:
For short rows, when moving from left front to sleeve to back to sleeve to right front, do you continue in the same numerical sequence from the previous section, or do you start again at row 1 or do you reverse the short row sequence, work rows 8-1? You start with row 1 at the left front border and end up with row 8 at the right front....the pieces would not be "mirrored." Even if you have the same number of rows, the short rows would not be in the same place. Does it matter?
04.01.2021 - 14:50DROPS Design vastas:
Dear Mrs Garland, after you have worked the sleeve, work the short rows on back piece starting from row 1 of short rows. Happy knitting!
05.01.2021 - 10:43
![]() LISA RENBARGER kirjutas:
LISA RENBARGER kirjutas:
A friend and I are about to cast on Eden to knit at the same time. My bust measurement is between size M & L. Is there positive ease built in to the pattern?
13.01.2020 - 16:49DROPS Design vastas:
Dear Mrs Renbarger, measure a similar garment you have and like the shape and compare these measurements to the one in the measurement chart (taken flat from side to side, in cm) to find out the matching size. You can then either decide if you want it rather tight or rather loose (with negative or positive ease). Read more here. Happy knitting!
14.01.2020 - 07:17
![]() Kironieke kirjutas:
Kironieke kirjutas:
If i cast on 120 stitches for size M with 23st/cm (tension) how do i get to the total height of 75cm? It only adds up to the 52cm of the body, not the yoke/sleeve part.
21.05.2019 - 20:53DROPS Design vastas:
Dear Kironieke, the 120 stitches will measure 52 cm = whole length of jacket as shown in measurement chart (= 23 cm yoke + 29 cm body). Happy knitting!
22.05.2019 - 09:14
![]() Rosie FRANCIS kirjutas:
Rosie FRANCIS kirjutas:
When knitting the left sleeve, you will have between 51 and 62 stitches, how many do you work before turning on the short rows? The short row instructions work for the whole garment (between 115 and 138 stitches)
06.08.2018 - 22:35DROPS Design vastas:
Dear Mrs Francis, you should work the short rows on the left sleeve on the same places you worked the short rows on the top of front piece before, ithe "turns" should continue and be aligned from the beg of piece. Happy knitting!
07.08.2018 - 09:38
|
||||
Eden#edencardigan |
||||
|
|
||||
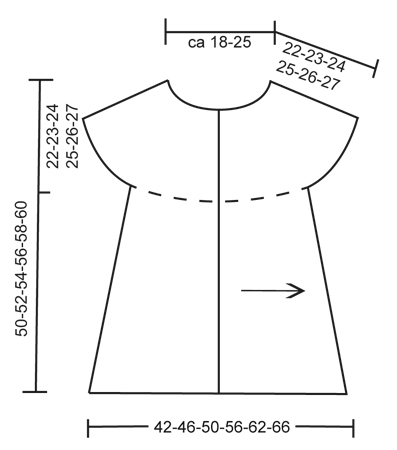
DROPSi põikipidi kootud ripkoes vest lõngast ”Fabel”. Suurused S - XXXL.
DROPS 134-4 |
||||
|
KUDUMISE NIPP Poole töö pealt pöörates, tõsta esimene silmus kudumata, pinguta lõnga ja koo tagasirida. See hoiab ära augu tekke pöördekohal. LÜHENDATUD READ Koo lühendatud ridu, et anda kudumile kerge A-lõige. Alusta alläärest ja koo ülespoole. * Koo rida kõikide silmustega, pööra ja koo tagasirida. Koo 103-108-112-115-119-122 s, pööra ja koo tagasirida. Loe KUDUMISE NIPPI! Koo 89-94-97-99-103-105 s, pööra ja koo tagasirida. Koo 71-75-77-79-81-83 s, pööra ja koo tagasirida *. Korda *-*, st. 1 kordus = 2 rida ülaservas ja 8 rida allääres. MÕÕTMISE NIPP Mõõda tööd siledal pinnal ja ära venita mõõtmise ajal. ------------------------- VEST Kootakse edasi-tagasi. Alusta vasakust esiservast ja lõpeta paremal esiserval. NB! Pilt on peegelpildis. VASAK HÕLM Terve töö on kootud ripskoes, st. kõik read parempidi. Löö üles 3,5 mm varrastele 115-120-125-129-134-138 s sinisekirju lõngaga. 1. rida töö PP (= alläärest üles). Koo 3 cm ripskoes kõikide silmustega (= nööbiliist), lõpeta pärast töö VP rida. JÄLGI KOETIHEDUST! Jätka lühendatud ridadega - vaata ülevalt! Jätka nii, kuni töö pikkus on 23-25-27-30-33-35 cm algusreast (mõõtes alläärest) – loe mõõtmise nippi! Nüüd koo küljeosa järgmiselt: koo 1 cm edasi-tagasi ainult alumise 64-67-70-72-74-76 silmusega. Paigalda silmusemärkija (SM) (= külg). Koo 1 cm edasi-tagasi samadel alumistel silmustel ja tõsta need siis silmusehoidjale (lõpeta pärast töö PP rida, pärast jätkatakse nendega seljaosa). Nüüd koo varrukas. VASAK VARRUKAS = 51-53-55-57-60-62 s. Koo edasi-tagasi lühendatud ridu samades kohtades nagu enne, kuni töö pikkus on 30-31-32-33-34-35 cm (varruka allääres), lõpeta pärast töö VP rida. SELJAOSA Koo 64-67-70-72-74-76 silmust silmusehoidjalt tagasi vardale (töö VP) = kokku on nüüd 115-120-125-129-134-138 silmust. Jätka lühendatud ridadega nagu enne. Kui töö pikkus on 21-23-25-28-31-33 cm SM-st küljel (mõõtes alläärest), paigalda teine SM (= selja keskkoht). Jätka lühendatud ridadega, kuni töö pikkus on u. 20-22-24-27-30-32 cm SM-st seljal (mõõtes alläärest). Nüüd koo küljeosa järgmiselt: koo 1 cm edasi-tagasi ainult alumise 64-67-70-72-74-76 silmusega. Paigalda teine uus SM (= teine külg). Koo 1 cm edasi-tagasi samadel alumistel silmustel ja tõsta need siis silmusehoidjale (lõpeta pärast töö PP rida). Koo parem varrukas. PAREM VARRUKAS Koo nagu vasak varrukas. PAREM HÕLM Koo 64-67-70-72-74-76 silmust silmusehoidjalt tagasi vardale (töö VP) = kokku on nüüd 115-120-125-129-134-138 silmust. Jätka lühendatud ridadega nagu seljaosal. Kui paremal hõlmal on kootud samapalju ridu kui vasakul (miinus nööbiliist = 3 cm), koo nööbiliist järgmiselt: koo 1,5 cm edasi-tagasi kõigil silmustel. Järgmisel töö PP real koo maha nööpaukude jaoks (= alustades alläärest): koo 12 s kõigil suurustel, koo maha järgmised 2 s, * koo 12-13-14-14-15-15 s, koo maha järgmised 2 s *, korda *-* kokku 4 korda, koo ülejäänud rida. Järgmisel real loo 2 uut silmust mahakootud silmuste asemel. Koo kõigil silmustel kuni nööbiliist on 3 cm lai. Koo silmused lõdvalt maha. ÜHENDAMINE Heegelda kahekordse pruuni lõngaga järgmiselt: tee parema hõlma alla nurka 1 kinnissilmus (ks), * 2 ahels, jäta vahele u. 1 cm, 1 ks *, korda *-* üles mööda esiserva, ümber kaelakaare ja tagasi all mööda vasaku hõlma esiserva. Katkesta lõng, kinnita ots. Õmble nööbid ette. |
||||
Skeemi seletused |
||||
|
||||
 |
||||
Kas oled teinud seda mustrit?Lisa oma piltidele viide #dropspattern #edencardigan või saada link projektile meie #dropsfan galeriisse. Vajad abi selle mustriga?Garnstudio.com kodulehel on 6 õppevideot, küsimuste/vastuste osa ja muudki. © 1982-2026 DROPS Design A/S. Kõik õigused kaitstud. See dokument, ning selle alajaotused on kaitsud autoriõigustega. Loe rohkem, mida meie mustritega võib teha, iga mustrilehe alt meie kodulehel. |
||||


Tegeledes üle 40 aasta kudumise ja heegeldamise disainidega, pakub DROPS Design ühte suurimat tasuta mustrite kollektsiooni internetis - tõlgituna 17 keelde. Tänaseks on meil 324 kataloogi ja 12290 mustrit - millest 9431 on tõlgitud Eesti keelde.
Me anname endast parima, et tuua teieni kõike mida kudumine ja heegeldamine võib pakkuda - inspiratsiooni, nõuandeid ning ka kvaliteetseid lõngu parima hinnaga! Soovid kasutada mustreid muukski, kui ainult oma tarbeks? Loe infot meie Copyright osas iga lehekülje all. Rõõmsat loomist!
Jäta kommentaar mustrile DROPS 134-4
Ootame kommentaare selle mustri kohta!
Kui soovid midagi küsida, siis kiiremaks vastuse saamiseks veendu, et valid õige kategooria alloleval formil. Vajaliku väljad *.