
Populaarsed kategooriad
Otsid lõnga?


Kommentaarid / Küsimused (59)
![]() Lara kirjutas:
Lara kirjutas:
Muss ich den Zopf dann auch erst links und danach rechts sricken? Weil bei mir flicht sich das Muster nicht.
19.01.2013 - 20:44DROPS Design vastas:
Hallo Lara, in der Legende zum Diagramm finden Sie beschrieben, wie die Verzopfung entsteht (die M abwechselnd VOR und HINTER die Arbeit legen).
20.01.2013 - 19:08
![]() Saar kirjutas:
Saar kirjutas:
Er ontstaat geen gat in het breiwerk zelf maar onderin de kabel ontstaat er een soort van hol
18.01.2013 - 14:38DROPS Design vastas:
Dat is ook wat ik bedoelde in mijn vorige antwoord ;o) Ik denk dat jij de kabel wat strakker moet breien. Zie video of ga naar de winkel voor persoonlijke ondersteuning.
18.01.2013 - 16:07
![]() Lara kirjutas:
Lara kirjutas:
Hallo! Muss ich während dem Muster auch abwechselnd re. li. stricken oder nur am Ende? LG
17.01.2013 - 18:50DROPS Design vastas:
Hallo Lara, es wird in den Hin-R rechts gestrickt und in den Rück-R links. Viel Erfolg!
18.01.2013 - 07:54
![]() Saar kirjutas:
Saar kirjutas:
Aan het begin van het patroon als ik een naald heb gemaakt, begin ik met de kabel maar er ontstaat na de eerste naald een gat in het breiwerk.
17.01.2013 - 18:32DROPS Design vastas:
Er ontstaat een gat in de kabel zelf? Dan moet je het kabeltje een beetje strakker breien. Zie evt de instructievideo hoe u het kan breien.
18.01.2013 - 13:37
![]() Sofie kirjutas:
Sofie kirjutas:
Je n'arrive pas à faire la torsade :( Pourtant je sais les tricoter mais je crois que je ne comprends pas bien les explications. Faut-il d'abord tricoter 5 mailles endroit et ensuite en passer 5 sur aiguilles auxiliaire ??? Merci par avance !
27.11.2012 - 21:05DROPS Design vastas:
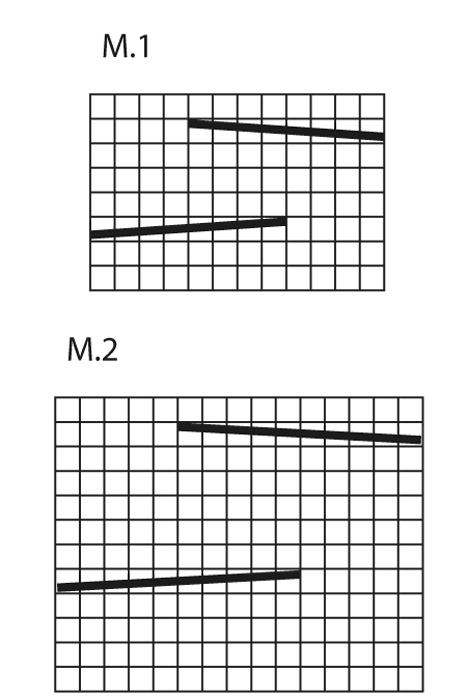
Bonjour Sofie, dans les diagrammes 1 case= 1mx1 rang. Au rang 5 de M.2, vous tricotez : 5 m end, puis la torsade : glissez 5 m sur l'aiguille auxiliaire devant l'ouvrage, tricotez 5 m end, reprenez les 5 m en attente et tricotez les à l'end. Au rang 11, vous commencez par la torsade : glissez 5 m sur l'aiguille auxiliaire derrière l'ouvrage, tricotez 5 m end, reprenez les 5 m en attente et tricotez les à l'end, terminez par 5 m end. Bon tricot !
28.11.2012 - 09:27
![]() Ulla kirjutas:
Ulla kirjutas:
Meget flot og smart
22.10.2012 - 10:59
![]() Steffi kirjutas:
Steffi kirjutas:
Was für eine Randmasche muss ich denn stricken? vielen dank!
21.06.2012 - 18:03DROPS Design vastas:
Am besten sticken Sie die Randmasche immer rechts.
25.06.2012 - 22:11Anastasia kirjutas:
I wanna knit this lovely scarf , but can't understand how to read the diagram: from what side and what corner? Thanks!
08.06.2012 - 13:55DROPS Design vastas:
Dear Anastasia, the diagrams are read begninng in the lower right-hand corner and work towards the left (1st row = RS). On return row, work from the left to the right. Happy Knitting !
06.12.2012 - 11:20
![]() Wallry kirjutas:
Wallry kirjutas:
Il est indique sur les explications qu'il faut 300g de laine pour le tour du cou.
02.02.2012 - 12:19
![]() Drops Design France kirjutas:
Drops Design France kirjutas:
Bonjour Lange et merci. Cliquez en haut sur "détaillants" puis choisissez votre pays pour accéder à la liste des détaillants. La quantité nécessaire est toujours indiquée au poids, cliquez sur "voir le nuancier" pour voir les couleurs et en savoir plus sur la laine, en l’occurrence, Polaris se présente sous forme de pelote de 100 g. Bon tricot !
03.01.2012 - 09:18
|
||||||||||||||||
Braidy#braidyset |
||||||||||||||||
 |
 |
|||||||||||||||
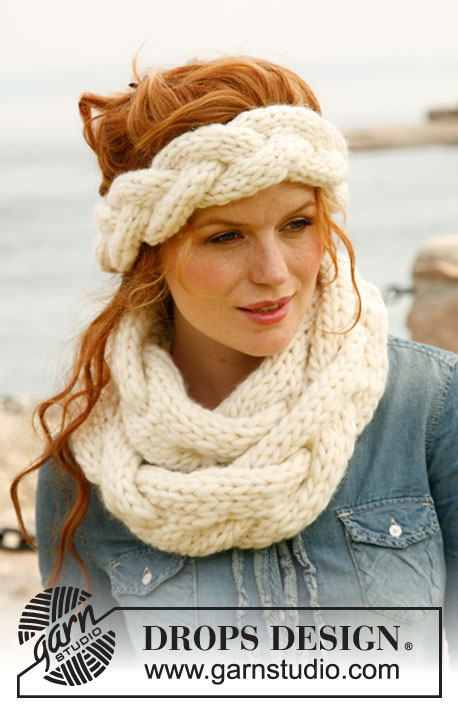
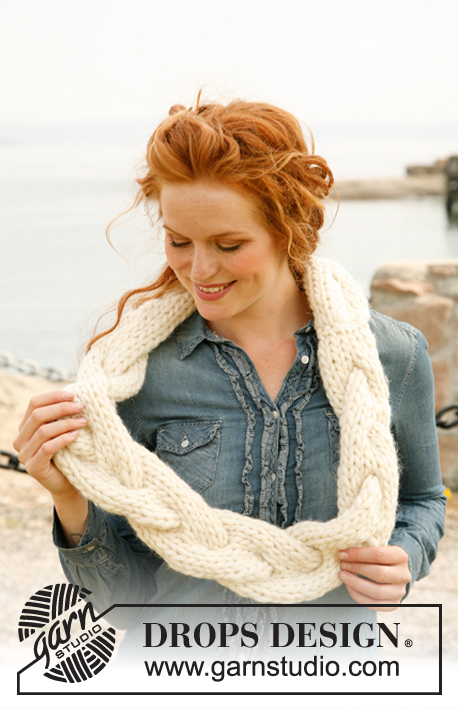
Kootud DROPSi palmikuga peapael ja sall lõngast ”Polaris”.
DROPS 134-7 |
||||||||||||||||
|
MUSTER Vaata skeemi M.1 peapaela jaoks ja skeemi M.2 sallile. Skeem on näidatud töö paremalt poolt (PP). LÕNGAVAHETUSE NIPP Uut palli alustades haruta lõngaots kaheks vähemalt 15 cm ulatuses - lõika 1 pool ära. Tee sama teise toki otsaga. Pane lõnga otsad üksteise peale nii, et need on nüüd normaaljämedusega ja jätka tööd. Nii jääb jätkamine märkamatuks. ------------------------- PEAPAEL Kootakse edasi-tagasi pikk riba ja hiljem õmmeldakse otsast kokku. Loo üles 12 mm varrastele 12 silmust. Koo skeemi M.1 järgi, kuni töö pikkus on u. 50 cm - lõpeta pärast tervet mustrikordust. Enne mahakudumist koo 1 rida parempidises koes. Õmble algusrida mahakudumise rea külge, läbi välimiste silmuste aasasid, et vältida paksu õmblust. ________________________________________________________ KAELUSSALL Kootakse edasi-tagasi pikk riba ja hiljem õmmeldakse kokku. Loo üles 15 mm varrastele 15 silmust. Koo skeemi M.2 järgi, kuni töö pikkus on u. 120 cm - lõpeta pärast tervet mustrikordust. Enne mahakudumist koo 4 rida parempidises koes. Õmble algusrida mahakudumise rea külge, läbi välimiste silmuste aasasid, et vältida paksu õmblust. Kandmiseks keera sall 8 kujuliseks. |
||||||||||||||||
Skeemi seletused |
||||||||||||||||
|
||||||||||||||||
 |
||||||||||||||||
Kas oled teinud seda mustrit?Lisa oma piltidele viide #dropspattern #braidyset või saada link projektile meie #dropsfan galeriisse. Vajad abi selle mustriga?Garnstudio.com kodulehel on 5 õppevideot, küsimuste/vastuste osa ja muudki. © 1982-2026 DROPS Design A/S. Kõik õigused kaitstud. See dokument, ning selle alajaotused on kaitsud autoriõigustega. Loe rohkem, mida meie mustritega võib teha, iga mustrilehe alt meie kodulehel. |
||||||||||||||||


Tegeledes üle 40 aasta kudumise ja heegeldamise disainidega, pakub DROPS Design ühte suurimat tasuta mustrite kollektsiooni internetis - tõlgituna 17 keelde. Tänaseks on meil 324 kataloogi ja 12290 mustrit - millest 9431 on tõlgitud Eesti keelde.
Me anname endast parima, et tuua teieni kõike mida kudumine ja heegeldamine võib pakkuda - inspiratsiooni, nõuandeid ning ka kvaliteetseid lõngu parima hinnaga! Soovid kasutada mustreid muukski, kui ainult oma tarbeks? Loe infot meie Copyright osas iga lehekülje all. Rõõmsat loomist!
Jäta kommentaar mustrile DROPS 134-7
Ootame kommentaare selle mustri kohta!
Kui soovid midagi küsida, siis kiiremaks vastuse saamiseks veendu, et valid õige kategooria alloleval formil. Vajaliku väljad *.